


A Presentation of the STL Vector Container

|
| (52 votes) |

Introduction
This article aims to introduce the std::vector as well as cover some of the most common vector member functions and how to use them properly. The article will also discuss predicates and function pointers as used in common iterator algorithms such as remove_if() and for_each(). After reading this article, the reader should be able to use the vector container effectively and should find no use for dynamic C-style arrays again.
Vector Overview
The vector is part of the C++ Standard Template Library (STL); an amalgamation of general-purpose, templatized classes and functions that implement a plethora of common data structures and algorithms. The vector is considered a container class. Like containers in real-life, these containers are objects that are designed to hold other objects. In short, a vector is a dynamic array designed to hold objects of any type, and capable of growing and shrinking as needed.
In order to use vector, you need to include the following header file:
#include <vector>
The vector is part of the std namespace, so you need to qualify the name. This can be accomplished as shown here:
using std::vector;
vector<int> vInts;
or you can fully qualify the name like this:
std::vector<int> vInts;
I do however suggest that you refrain from declaring global namespaces such as:
using namespace std;
This pollutes the global namespace and may cause problems in later implementations. As for the interface to thevector container, I have listed the member functions and operators of vector in the tables below.
Vector Member Functions 1
| Function | Description |
assign | Erases a vector and copies the specified elements to the empty vector. |
at | Returns a reference to the element at a specified location in the vector. |
back | Returns a reference to the last element of the vector. |
begin | Returns a random-access iterator to the first element in the container. |
capacity | Returns the number of elements that the vector could contain without allocating more storage. |
clear | Erases the elements of the vector. |
empty | Tests if the vector container is empty. |
end | Returns a random-access iterator that points just beyond the end of thevector. |
erase | Removes an element or a range of elements in a vector from specified positions. |
front | Returns a reference to the first element in a vector. |
get_allocator | Returns an object to the allocator class used by a vector. |
insert | Inserts an element or a number of elements into the vector at a specified position. |
max_size | Returns the maximum length of the vector. |
pop_back | Deletes the element at the end of the vector. |
push_back | Adds an element to the end of the vector. |
rbegin | Returns an iterator to the first element in a reversed vector. |
rend | Returns an iterator to the end of a reversed vector. |
resize | Specifies a new size for a vector. |
reserve | Reserves a minimum length of storage for a vector object. |
size | Returns the number of elements in the vector. |
swap | Exchanges the elements of two vectors. |
vector | Constructs a vector of a specific size or with elements of a specific value or with a specific allocator or as a copy of some other vector. |
Vector Operators 1
| Operator | Description |
operator[] | Returns a reference to the vector element at a specified position. |
Constructing a Vector
There are several constructors provided for the vector container. Here are some of the most common.
Construct an empty vector to hold objects of type Widget:
vector<Widget> vWidgets;
//     ------
//      |
//      |- Since vector is a container, its member functions
//         operate on iterators and the container itself so
//         it can hold objects of any type.
Construct a vector to hold 500 Widgets:
vector<Widget> vWidgets(500);
Construct a vector to hold 500 Widgets initialized to 0:
vector<Widget> vWidgets(500, Widget(0));
Construct a vector of Widgets from another vector of Widgets:
vector<Widget> vWidgetsFromAnother(vWidgets);
Adding Elements to a Vector
The default method of adding elements to a vector is by using push_back(). The push_back() member function is responsible for adding elements to the end of a vector and allocating memory as needed. For example, to add 10Widgets to a vector<Widget>, you would use the following code:
for(int i= 0;i<10; i++)
    vWidgets.push_back(Widget(i));
Getting the Number of Elements in a Vector
Many times it is necessary to know how many elements are in your vector (if there are any at all). Remember, thevector is dynamic, and the number of allocations and push_back()s are usually determined by a user file or some other data source. To test if your vector contains anything at all, you call empty(). To get the number of elements, you call size(). For example, if you wanted to initialize a variable to -1 if your vector, v, is empty or to the number of elements in v if it's not, you would use the following code:
int nSize = v.empty() ? -1 : static_cast<int>(v.size());
Accessing Elements in a Vector
There are two ways to access objects stored in a vector.
vector::at()vector::operator[]
The operator[] is supported mainly for compatibility with a legacy C code base. It operates the same way a standard C-style array operator[] works. It is always preferred to use the at() member function, however, as at()is bounds-checked, and will throw an exception if we attempt to access a location beyond the vector limits. However,operator[] could care less and can cause some serious bugs as we will now demonstrate.
Consider the following code:
vector<int> v;
v.reserve(10);


for(int i=0; i<7; i++)
    v.push_back(i);


try
{
 int iVal1 = v[7];  // not bounds checked - will not throw
 int iVal2 = v.at(7); // bounds checked - will throw if out of range
}
catch(const exception& e)
{
 cout << e.what();
}
Now, just because we reserved space for 10 ints doesn't mean they are initialized or even defined. This scenario is best illustrated in the figure below.
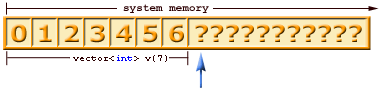
You can try this code on your own and observe the results or see a similar situation in the demo. The bottom line: useat() whenever you can.
Removing Elements from a Vector
Getting things into a vector is fairly easy, but getting them out can be subtly tricky. First of all, the only member functions a vector has, to get rid of elements are erase(), pop_back(), and clear(). Now these are sufficient if you know: which elements you need to remove; if you only need to remove the last element; or if you want to remove all of the elements, respectively. Now before you go off writing some crazy loop to flag which elements you want to erase and brute-force yourself an application-specific implementation, sit back, take a deep breath, and think to yourself: "S...T...L...".
The remove_if() Algorithm
Now, this is where we get into some fun stuff. To use remove_if(), you will need to include the following file:
#include <algorithm>
remove_if() takes 3 parameters:
iterator _First: An iterator pointing to the first element in the range on which to operate.iterator _Last: An iterator pointing to the last element in the range on which to operate.predicate _Pred: A predicate to apply to the iterator being evaluated.
Predicates
Predicates are basically pointers to a function or an actual function object that returns a yes/no answer to a user defined evaluation of that object. The function object is required to supply a function call operator, operator()(). In the case of remove_if(), it is often useful to supply a function object derived from unary_function to allow the user to pass data to the predicate for evaluation.
For example, consider a scenario in which you want to remove elements from a vector<CString> based on certain matching criteria, i.e. if the string contains a value, starts with a value, ends with a value or is a value. First you would set up a data structure that would hold the relevant data, similar to the following code:
#include <functional>
enum findmodes
{
 FM_INVALID = 0,
 FM_IS,
 FM_STARTSWITH,
 FM_ENDSWITH,
 FM_CONTAINS
};
typedef struct tagFindStr
{
 UINT iMode;
 CString szMatchStr;
} FindStr;
typedef FindStr* LPFINDSTR;
You could then proceed to implement the predicate as shown:
class FindMatchingString
    : public std::unary_function<CString, bool>
{

public:
    FindMatchingString(const LPFINDSTR lpFS) : m_lpFS(lpFS) {}

    bool operator()(CString& szStringToCompare) const
    {
        bool retVal = false;

        switch(m_lpFS->iMode)
        {
        case FM_IS:
            {
                retVal = (szStringToCompare == m_lpFDD->szMatchStr);
                break;
            }
        case FM_STARTSWITH:
            {
                retVal = (szStringToCompare.Left(m_lpFDD->szMatchStr.GetLength())
                            == m_lpFDD->szWindowTitle);
                break;
            }
        case FM_ENDSWITH:
            {
                retVal = (szStringToCompare.Right(m_lpFDD->szMatchStr.GetLength())
                            == m_lpFDD->szMatchStr);
                break;
            }
        case FM_CONTAINS:
            {
                retVal = (szStringToCompare.Find(m_lpFDD->szMatchStr) != -1);
                break;
            }
        }

        return retVal;
    }

private:
    LPFINDSTR m_lpFS;
};
With this implementation, you could effectively remove strings from a vector as shown below:
// remove all strings containing the value of
// szRemove from vector<CString> vs.

FindStr fs;
fs.iMode = FM_CONTAINS;
fs.szMatchStr = szRemove;

vs.erase(std::remove_if(vs.begin(), vs.end(), FindMatchingString(&fs)), vs.end());
What remove_if() Really Does
You may be wondering why I have a call to erase() when I am calling remove_if() in the above example. The reason for this is quite subtle and not intuitive for people not familiar with iterators or the STL algorithms. Sinceremove(), remove_if(), and all the remove cousins operate only on a range of iterators, they cannot operate on the container's internals. The call to remove_if() actually shuffles around the elements of the container being operated on. Consider the above example if:
szRemove= "o".vs= the diagram shown below.
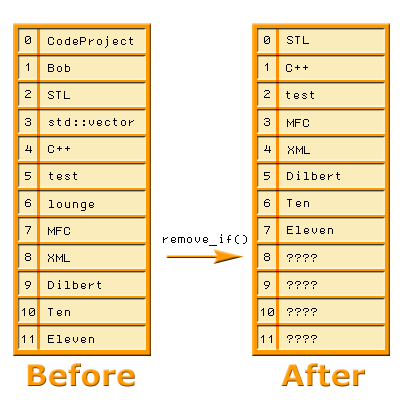
After observing the results, one can see that remove_if() actually returns a forward iterator addressing the new end position of the modified range, one past the final element of the remnant sequence, free of the specified value. The remaining elements may or may not have their original value, to be safe, always assume they are unknown.
The call to erase() then is responsible for actually disposing off the "removed" elements. Notice in the above example that we pass the range from the result of remove_if() through vs.end() to erase().
Shrinking a Bloated Vector
Many times, after lots of data removal or a liberal call to reserve(), you can end up with a vector whose internals are far larger than they need to be. In this case, it is often desirable to "shrink" the vector to fit the size of the data. However, the resize() member function is only capable of increasing the capacity of the vector. The only member capable of changing the size of the internal buffer is clear(), however this has some significant drawbacks like destroying everything in the vector. So how can one solve this problem? Well, let's attempt a first pass.
Remember that we can construct a vector from another vector. Let's see what happens. Consider we have avector, v, with a capacity of 1000. We then make a call to size() and realize we only have 7 elements in thevector. Wow, we're wasting lots of memory! Let's try and make a new vector from our current one.
std::vector<CString> vNew(v);
cout << vNew.capacity();
It turns out vNew.capacity() returns 7. The new vector only allocates enough space for what it gets from v. Now, I don't want to get rid of v, because I may be using it all over the place. What if I try and swap() the internals of v and vNew?
    vNew.swap(v);
    cout << vNew.capacity();
    cout << v.capacity();
Interesting: vNew.capacity() is now 1000, and v.capacity() is 7. Sweet, it worked.
Yes, it may have worked, but that's not an elegant solution, now is it? How can we make this swap trick have some flair? Do we really need to name our temporary variable? Lets try another approach. Consider this code:
std::vector<CString>(v).swap(v);
Can you see what we did there? We have created a temporary unnamed variable instead of a named one and did theswap() all in one step. Much more elegant. Now when the temporary variable goes out of scope, it will take its bloated internal buffer with it, and then we're left with a nice trim v.
Putting it All Together
In the sample applications, you can see how to implement the topics discussed here. The console application is a step-by-step illustration of these examples in action, and the MFC application is mainly a demonstration of using STL, algorithms, and predicates with MFC.
Conclusion
I hope this article serves as a valuable reference and guideline for developers using the STL vector container. I would also hope that those who were skeptical about using the vector before reading this article are now undaunted and ready to throw away their C-style arrays and try it out.
References
- Plauger, P.J. Standard C++ Library Reference. February, 2003. MSDN.
- Schildt, Herbert. C++ from the Ground Up, Second Edition. Berkeley: 1998.
- Sutter, Herb. More Exceptional C++. Indianapolis: 2002.


 1508
1508

 被折叠的 条评论
为什么被折叠?
被折叠的 条评论
为什么被折叠?
 到【灌水乐园】发言


