


Egg是阿里出品的node后端框架,其对koa做了一些封装,使用上更加简单医用。
环境:windows
创建Egg项目
前提是已经安装了node,node的安装这里不重复,默认已经安装了node。
mkdir egg-example
cd egg-example
npm init egg --type=simple
npm install
完成以上步骤便能够创建一个带demo的egg项目

启动项目
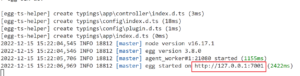
npm run dev从控制台可以看到入口IP和端口
启动项目
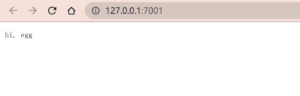
npm run dev在浏览器输入:127.0.0.1:7001
可以看到结果
Egg自带组件的使用
约定俗成的名称:
- app/router.js:路由配置
- app/controller/xx:controller编写位置
- app/service/xx:service编写位置,业务逻辑,与DB交互
- app/middleware/xx:中间件编写位置,共用逻辑,如鉴权
- app/public/xx:静态资源存放位置
- config/config.{env}.js:不同环境的配置文件,默认是config.default.js
- config/plugin.js:配置需要加载的插件,包括官方的和自己编写的
app/router.js
作用:配置路由。如启动项目后IP+端口,便是路由到home.js中
更多配置:路由(Router) - Egg
编写基础的接口:Controller
GET方法获取参数
对应请求:
http://127.0.0.1:7001/?userId=zhangsan获取查询参数param:ctx.query
'use strict';
const { Controller } = require('egg');
class HomeController extends Controller {
  async index() {
    const { ctx } = this;
    const { userId } = ctx.query;
    ctx.body = 'hi, ' + userId;
  }
}
module.exports = HomeController;
获取路径参数parth:ctx.params
// 获取用户信息
  async user() {
    const { ctx } = this;
    const { id } = ctx.params;
    ctx.body = 'hi, 用户:' + id;
  }
POST方法获取参数
获取表单或者JSON:ctx.request.body
获取表单或者JSON:ctx.request.body
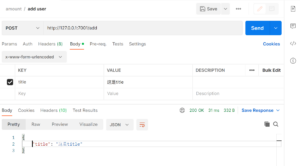
 // 添加一个新用户
  async user_add() {
    const { ctx } = this;
    const { title } = ctx.request.body;
    ctx.body = {
        title
    };
controller调用service方法
这里仅仅在service的模拟数据库的返回,突出controller如何调用service。
controller调用service方法:
const { name, slogan } = await ctx.service.home.user();service方法:
'use strict';
const Service = require('egg').Service;
class HomeService extends Service {
    async user() {
        return {
            name: "张三",
            slogan: "你好,世界"
        }
    };
}
module.exports = HomeService;


 2524
2524


 被折叠的 条评论
为什么被折叠?
被折叠的 条评论
为什么被折叠?
 到【灌水乐园】发言


