


跨域问题是web开发碰到的非常常见的问题之一,解决方法也有很多,这篇文章将会整理一下最简单的两种典型解决方法,nginx的反向代理和angular-cli自带的代理配置方式。
模拟后端
首先我们使用express+node来模拟一个提供数据的后端服务。
安装express
[root@angular proj]# npm install express
npm WARN proj@1.0.0 No repository field.

+ express@4.16.2
added 46 packages in 17.212s
[root@angular proj]#
模拟后端
模拟一个最简单的功能,用户通过api/heroes的URI能够取到heroes的信息,具体代码如下:
[root@angular proj]# cat dist/backsrv.js
const express = require("express");
const app = express();

let heroes = [
      { id: 0,  name: 'Zero' },
      { id: 11, name: 'Mr. Nice' },
      { id: 12, name: 'Narco' },
      { id: 13, name: 'Bombasto' },
      { id: 14, name: 'Celeritas' },
      { id: 15, name: 'Magneta' },
      { id: 16, name: 'RubberMan' },
      { id: 17, name: 'Dynama' },
      { id: 18, name: 'Dr IQ' },
      { id: 19, name: 'Magma' },
      { id: 20, name: 'Tornado' }
];
app.get("/api/heroes",(req,res)=>{
    res.json(heroes);
});

app.listen(8080,"192.168.163.151",()=>console.log("Service has been started at the port 8080..."))
[root@angular proj]#
启动服务
使用node启动模拟后端服务
[root@angular proj]# node dist/backsrv.js
Service has been started at the port 8080...
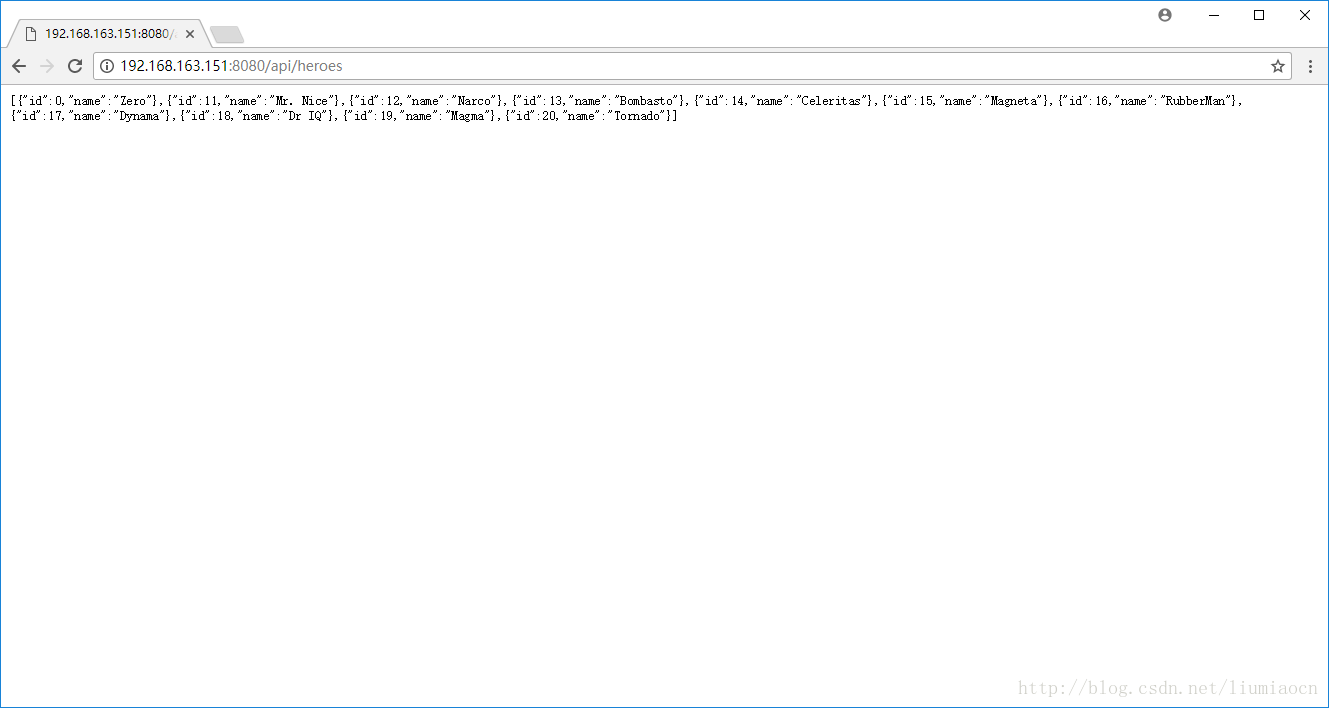
通过页面访问,结果如下:
前端设定
继续使用第8篇文章的HelloAngular的工程,在其根目录创建Angular-cli的代理设定文件,具体内容如下:
/workspace/HelloAngular # cat proxy.conf.json
{
    "/api/": {
        "target": "http://192.168.163.151:8080/",
        "secure": false
    }
}
/workspace/HelloAngular # 你会发现这个跟nginx的反响代理设定非常相似,其实其所做的就是将匹配http://192.168.163.151:8080/api/的内容发到http://192.168.163.151:4200/api/,但是写法略有不同,详细可以参看https://webpack.github.io/docs/webpack-dev-server.html#proxy
启动前端
ng serve -H 0.0.0.0 –proxy-config proxy.conf.json –open
因为此为在容器中启动所以有-H 0.0.0.0,不在容器中根据情况启动时不使用此选项即可
/workspace/HelloAngular # ng serve -H 0.0.0.0 --proxy-config proxy.conf.json --open
** NG Live Development Server is listening on 0.0.0.0:4200, open your browser on http://localhost:4200/ **
...
chunk {vendor} vendor.bundle.js, vendor.bundle.js.map (vendor) 3.07 MB [initial] [rendered]
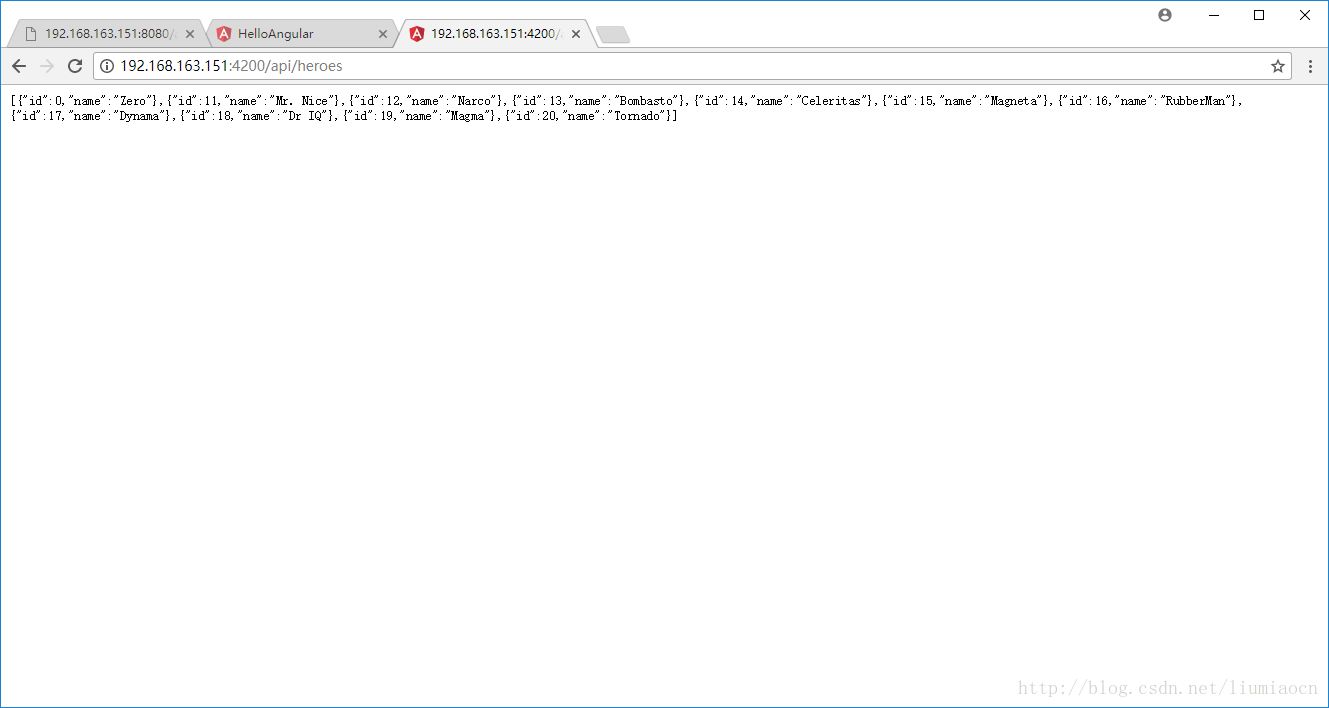
webpack: Compiled successfully.确认结果
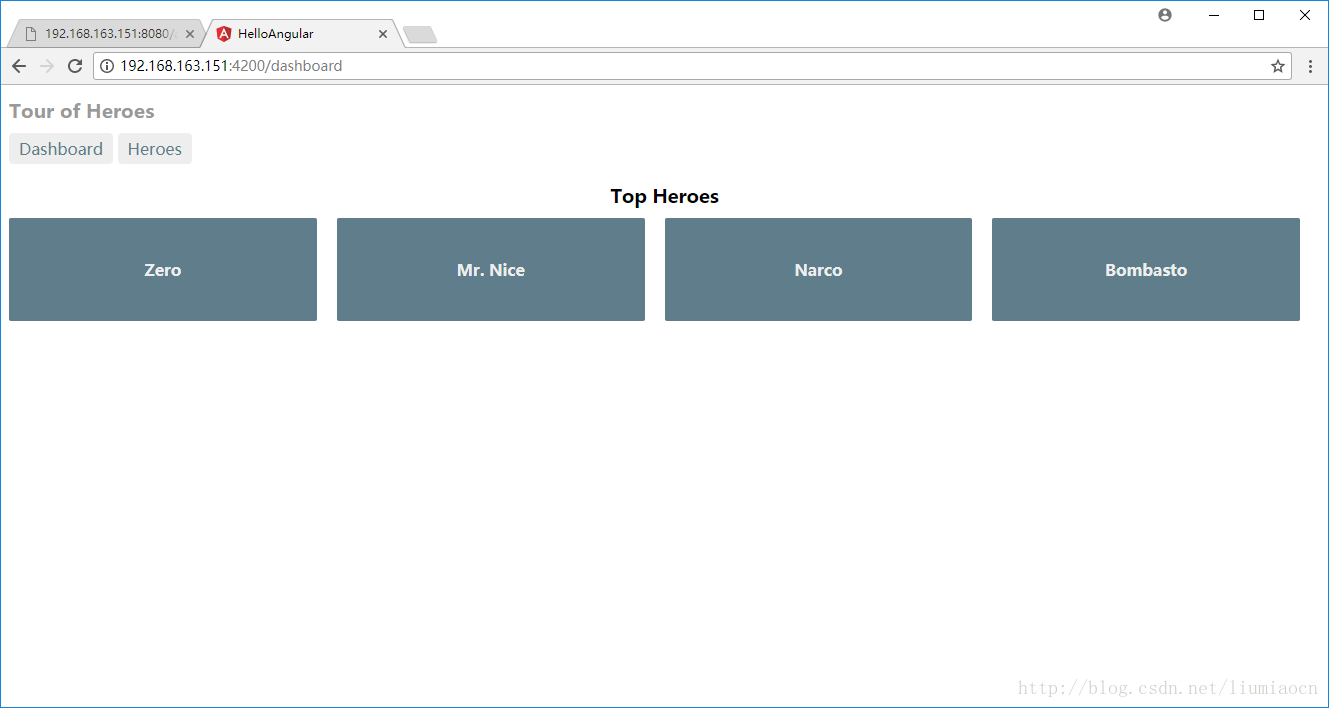
确认proxy.conf.json已经正常起到作用,可以进行跨域访问
这样angular-cli自带的方式就简单验证完毕了,接下来看一下nginx怎样设定。
nginx反向代理
事前准备
依然让express的后端服务继续运行
[root@angular proj]# node dist/backsrv.js
Service has been started at the port 8080...
ng build
使用ng build进行构建,生成dist对象目录
/workspace/HelloAngular # ng build --prod --aot
Date: 2017-11-12T21:03:34.949Z
Hash: 01ac9865708afa91122f
Time: 73829ms
chunk {0} polyfills.14173651b8ae6311a4b5.bundle.js (polyfills) 61.4 kB {4} [initial] [rendered]
chunk {1} main.9b501447634295d191b6.bundle.js (main) 18.1 kB {3} [initial] [rendered]
chunk {2} styles.d41d8cd98f00b204e980.bundle.css (styles) 0 bytes {4} [initial] [rendered]
chunk {3} vendor.d9514c5d6ae413b22be2.bundle.js (vendor) 425 kB [initial] [rendered]
chunk {4} inline.86bf4b1ff0e2bd46ee26.bundle.js (inline) 1.45 kB [entry] [rendered]
/workspace/HelloAngular #
给后面的nginx做个tar包
/workspace/HelloAngular # tar cvpf dist.tar dist
dist/
dist/polyfills.14173651b8ae6311a4b5.bundle.js
dist/main.9b501447634295d191b6.bundle.js
dist/vendor.d9514c5d6ae413b22be2.bundle.js
dist/inline.86bf4b1ff0e2bd46ee26.bundle.js
dist/styles.d41d8cd98f00b204e980.bundle.css
dist/favicon.ico
dist/index.html
dist/3rdpartylicenses.txt
/workspace/HelloAngular #
从镜像中拷贝出tar文件,然后展开
[root@angular tmp]# docker cp festive_johnson:/workspace/HelloAngular/dist.tar .
[root@angular tmp]# tar xvf dist.tar
dist/
dist/polyfills.14173651b8ae6311a4b5.bundle.js
dist/main.9b501447634295d191b6.bundle.js
dist/vendor.d9514c5d6ae413b22be2.bundle.js
dist/inline.86bf4b1ff0e2bd46ee26.bundle.js
dist/styles.d41d8cd98f00b204e980.bundle.css
dist/favicon.ico
dist/index.html
dist/3rdpartylicenses.txt
[root@angular proj]#
下载nginx镜像
只要有nginx即可,不是使用容器方式的可以直接跳过跟容器相关的步骤
[root@angular ~]# docker pull nginx
Using default tag: latest
latest: Pulling from library/nginx
bc95e04b23c0: Pull complete
a21d9ee25fc3: Pull complete
9bda7d5afd39: Pull complete
Digest: sha256:9fca103a62af6db7f188ac3376c60927db41f88b8d2354bf02d2290a672dc425
Status: Downloaded newer image for nginx:latest
[root@angular ~]#
启动nginx
[root@angular proj]# [root@angular proj]# docker run -it -p 4200:80 -v /tmp/dist:/usr/share/nginx/html –name=nginx nginx
结果确认
可以确认目前通过8080和4200都能正常访问

而通过4200/api/heroes则提示404,因为此时还没有设定nginx的反向代理
nginx设定
我们进到容器中,通过设定如下文件便可进行反向代理的设定
[root@angular dist]# docker exec -it nginx sh
# cd /etc/nginx/conf.d
# ls
default.conf
#
我们所需要做的事情就是把这个文件中添加如下一段设定即可,跟angular-cli的proxy.conf.json是不是非常类似,因为proxy都是工作原理都是相近的,至少在外面设定的时候所需要的信息都是一样的。
    location /api/ {
        proxy_pass http://192.168.163.151:8080/api/;
        proxy_redirect default;
    }
发现nginx里面没有vi,可以把设定文件挂出来进行修改,由于只是演示,直接使用cat+EOF吧
修改前
# cat default.conf
server {
    listen       80;
    server_name  localhost;

    #charset koi8-r;
    #access_log  /var/log/nginx/host.access.log  main;

    location / {
        root   /usr/share/nginx/html;
        index  index.html index.htm;
    }

    #error_page  404              /404.html;

    # redirect server error pages to the static page /50x.html
    #
    error_page   500 502 503 504  /50x.html;
    location = /50x.html {
        root   /usr/share/nginx/html;
    }

    # proxy the PHP scripts to Apache listening on 127.0.0.1:80
    #
    #location ~ \.php$ {
    #    proxy_pass   http://127.0.0.1;
    #}

    # pass the PHP scripts to FastCGI server listening on 127.0.0.1:9000
    #
    #location ~ \.php$ {
    #    root           html;
    #    fastcgi_pass   127.0.0.1:9000;
    #    fastcgi_index  index.php;
    #    fastcgi_param  SCRIPT_FILENAME  /scripts$fastcgi_script_name;
    #    include        fastcgi_params;
    #}

    # deny access to .htaccess files, if Apache's document root
    # concurs with nginx's one
    #
    #location ~ /\.ht {
    #    deny  all;
    #}
}

#
修改
使用如下方式进行执行
cat <<EOF >default.conf
server {
    listen       80;
    server_name  localhost;

    #charset koi8-r;
    #access_log  /var/log/nginx/host.access.log  main;

    location / {
        root   /usr/share/nginx/html;
        index  index.html index.htm;
    }

    location /api/ {
        proxy_pass http://192.168.163.151:8080/api/;
        proxy_redirect default;
    }


    #error_page  404              /404.html;

    # redirect server error pages to the static page /50x.html
    #
    error_page   500 502 503 504  /50x.html;
    location = /50x.html {
        root   /usr/share/nginx/html;
    }

    # proxy the PHP scripts to Apache listening on 127.0.0.1:80
    #
    #location ~ \.php$ {
    #    proxy_pass   http://127.0.0.1;
    #}

    # pass the PHP scripts to FastCGI server listening on 127.0.0.1:9000
    #
    #location ~ \.php$ {
    #    root           html;
    #    fastcgi_pass   127.0.0.1:9000;
    #    fastcgi_index  index.php;
    #    fastcgi_param  SCRIPT_FILENAME  /scripts$fastcgi_script_name;
    #    include        fastcgi_params;
    #}

    # deny access to .htaccess files, if Apache's document root
    # concurs with nginx's one
    #
    #location ~ /\.ht {
    #    deny  all;
    #}
}
EOF
修改后
# cat default.conf
server {
    listen       80;
    server_name  localhost;

    #charset koi8-r;
    #access_log  /var/log/nginx/host.access.log  main;

    location / {
        root   /usr/share/nginx/html;
        index  index.html index.htm;
    }

    location /api/ {
        proxy_pass http://192.168.163.151:8080/api/;
        proxy_redirect default;
    }


    #error_page  404              /404.html;

    # redirect server error pages to the static page /50x.html
    #
    error_page   500 502 503 504  /50x.html;
    location = /50x.html {
        root   /usr/share/nginx/html;
    }

    # proxy the PHP scripts to Apache listening on 127.0.0.1:80
    #
    #location ~ \.php$ {
    #    proxy_pass   http://127.0.0.1;
    #}

    # pass the PHP scripts to FastCGI server listening on 127.0.0.1:9000
    #
    #location ~ \.php$ {
    #    root           html;
    #    fastcgi_pass   127.0.0.1:9000;
    #    fastcgi_index  index.php;
    #    fastcgi_param  SCRIPT_FILENAME  /scripts;
    #    include        fastcgi_params;
    #}

    # deny access to .htaccess files, if Apache's document root
    # concurs with nginx's one
    #
    #location ~ /\.ht {
    #    deny  all;
    #}
}
#
重启nginx镜像
ctrl + c中断当前的nginx镜像,然后重新启动即可
[root@angular proj]# docker start nginx
nginx
[root@angular proj]#
结果确认
确认已经能够进行跨域的访问了

总结
这篇文章总结了angular解决跨域的两种常见方式,并结合express和实际的例子进行了验证。


 7467
7467


 被折叠的 条评论
为什么被折叠?
被折叠的 条评论
为什么被折叠?
 到【灌水乐园】发言


