


1、AvtivityManagerService
AvtivityManagerService也是由SystemServer创造的。我们看看ActivityManagerService中的startProcessLocked函数,代码如下所示:
    private final void startProcessLocked(ProcessRecord app,
            String hostingType, String hostingNameStr) {
        // ......
            if ("1".equals(SystemProperties.get("debug.checkjni"))) {
                debugFlags |= Zygote.DEBUG_ENABLE_CHECKJNI;
            }
            if ("1".equals(SystemProperties.get("debug.assert"))) {
                debugFlags |= Zygote.DEBUG_ENABLE_ASSERT;
            }
		// 这个Process类是Android提供的,并非JDK中的Process类
            int pid = Process.start("android.app.ActivityThread",
                    mSimpleProcessManagement ? app.processName : null, uid, uid,
                    gids, debugFlags, null);
        // ......
    }
接下来看看Process的start函数,这个Process类是android.os.Process,它的代码在Process.java中,代码如下所示:
  public static final int start(final String processClass,
                                  final String niceName,
                                  int uid, int gid, int[] gids,
                                  int debugFlags,
                                  String[] zygoteArgs)
    {
        if (supportsProcesses()) {
            try {
                return startViaZygote(processClass, niceName, uid, gid, gids,
                        debugFlags, zygoteArgs);
            } catch (ZygoteStartFailedEx ex) {
                Log.e(LOG_TAG,
                        "Starting VM process through Zygote failed");
                throw new RuntimeException(
                        "Starting VM process through Zygote failed", ex);
            }
        } else {
            // Running in single-process mode

            Runnable runnable = new Runnable() {
                        public void run() {
                            Process.invokeStaticMain(processClass);
                        }
            };

            // Thread constructors must not be called with null names (see spec).
            if (niceName != null) {
                new Thread(runnable, niceName).start();
            } else {
                new Thread(runnable).start();
            }

            return 0;
        }
    }
2、响应请求
响应请求,还是在ZygoteInit中进行的,代码如下:
    /**
     * Runs the zygote process's select loop. Accepts new connections as
     * they happen, and reads commands from connections one spawn-request's
     * worth at a time.
     *
     * @throws MethodAndArgsCaller in a child process when a main() should
     * be executed.
     */
    private static void runSelectLoopMode() throws MethodAndArgsCaller {
        ArrayList<FileDescriptor> fds = new ArrayList();
        ArrayList<ZygoteConnection> peers = new ArrayList();
        FileDescriptor[] fdArray = new FileDescriptor[4];


        fds.add(sServerSocket.getFileDescriptor());
        peers.add(null);


        int loopCount = GC_LOOP_COUNT;
        while (true) {
            int index;


            /*
             * Call gc() before we block in select().
             * It's work that has to be done anyway, and it's better
             * to avoid making every child do it.  It will also
             * madvise() any free memory as a side-effect.
             *
             * Don't call it every time, because walking the entire
             * heap is a lot of overhead to free a few hundred bytes.
             */
            if (loopCount <= 0) {
                gc();
                loopCount = GC_LOOP_COUNT;
            } else {
                loopCount--;
            }


            try {
                fdArray = fds.toArray(fdArray);
                index = selectReadable(fdArray);
            } catch (IOException ex) {
                throw new RuntimeException("Error in select()", ex);
            }


            if (index < 0) {
                throw new RuntimeException("Error in select()");
            } else if (index == 0) {
                ZygoteConnection newPeer = acceptCommandPeer();
                peers.add(newPeer);
                fds.add(newPeer.getFileDesciptor());
            } else {
                boolean done;
// 调用了runOnce
                done = peers.get(index).runOnce();


                if (done) {
                    peers.remove(index);
                    fds.remove(index);
                }
            }
        }
    }
每当有请求数据发送来的时候,zygote就会调用ZygoteConnection的runOnce函数。
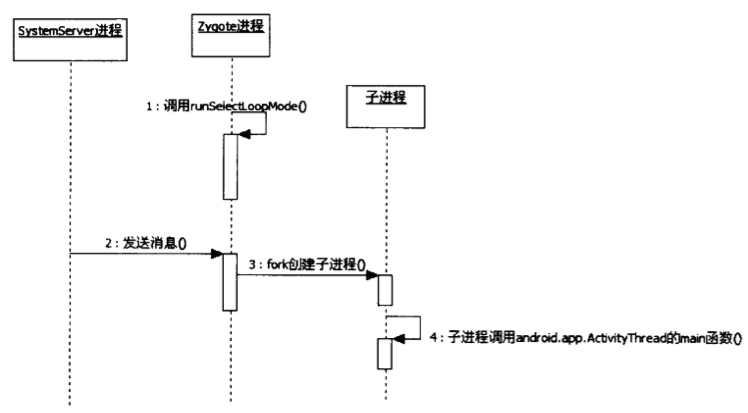
3、zygote分析总结
这里有一副图示,说明一下zygote的原理:


 315
315

 被折叠的 条评论
为什么被折叠?
被折叠的 条评论
为什么被折叠?
 到【灌水乐园】发言


