


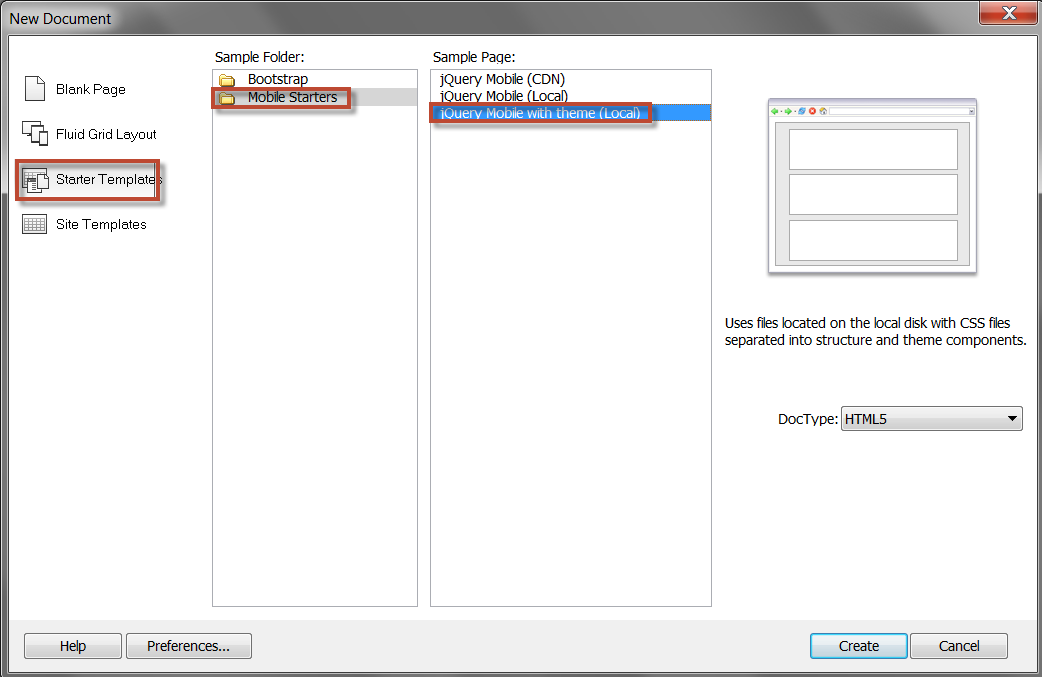
A few years ago, I did a weblog post on PhoneGap. I participated in a Tech Live event in late July where Paul Trani reviewed many of the new features in Dreamweaver CC (and discussed building mobile apps). Paul inspired me to put together these notes for students who may want to build relatively simple mobile apps (in my CMWEB 280 class, for example). I thought it might help to see what has changed in the 3 years since my initial post. Make certain you have a Creative Cloud account and Dreamweaver CC installed on a local computer if you are trying to follow along. Many of these features may not work in prior versions (like DW CS6).Our first step is to create a new document in Dreamweaver. Make certain you select the jQuery mobile starter with theme from the starter templates. You may need to click on these images to enlarge them.
Before proceeding, I create a site (so all my files are properly organized). Site > New Site dialog. I then save the file I just created as index.html in the root of the site I just created. One is then prompted to save dependent files (make certain you do this at the site root).

Once the files are saved, activate live view and you should see you already have a pretty functional example. Obviously we will need to customize this a bit. I think it is pretty impressive we already have this built.
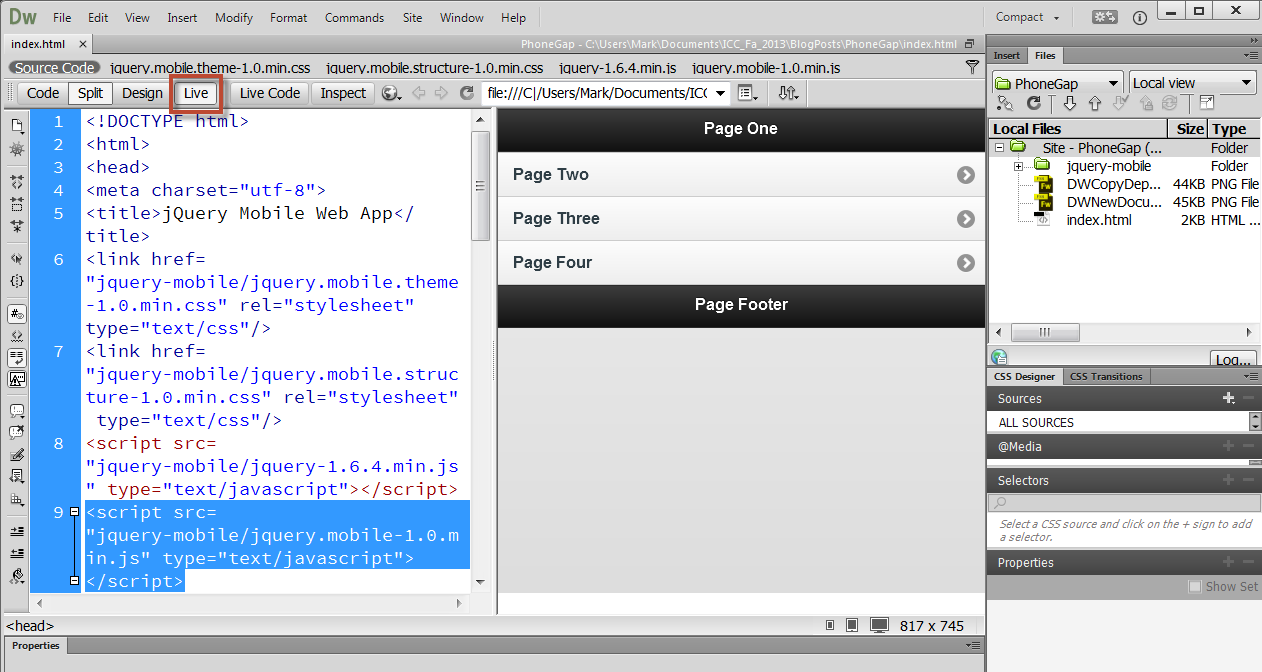
Note that this is a single page (we will turn this in to an app soon as well). If we examine the source code, we will see there are id’s of page, page 2, and so forth. for each of these, we add a data-theme attribute. I set mine to data-theme=”b” for each page. If you don’t like these themes, select Window > jQuery Mobile Swatches and get more themes.

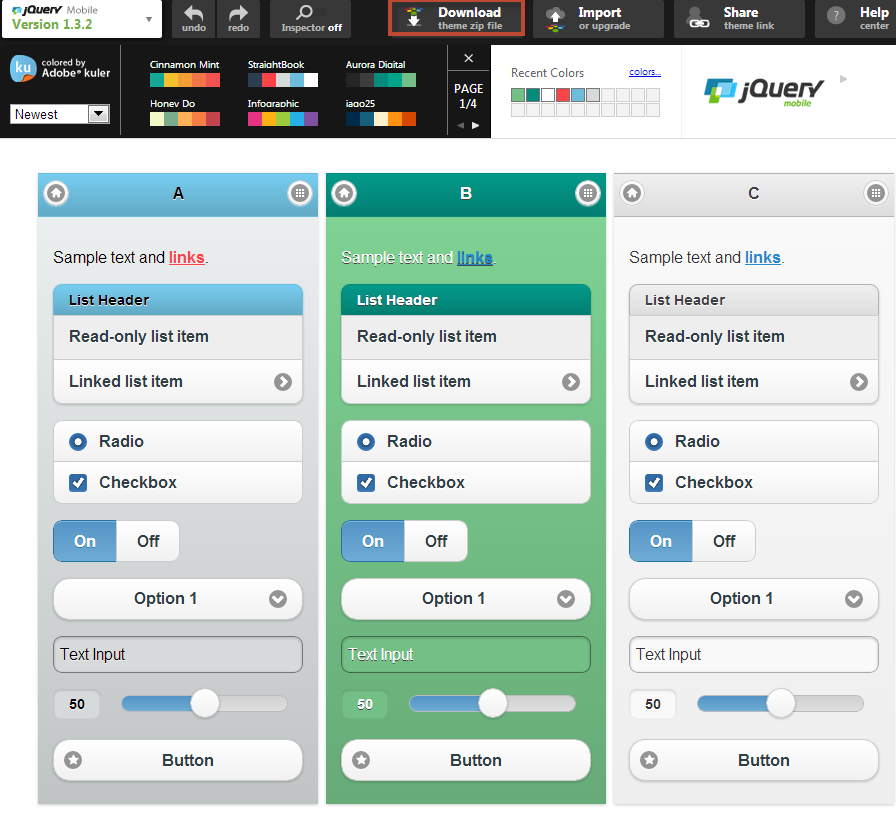
This link will take you to the jQuery Theme Roller site where you can choose any color combinations you want. Once you have made your color choices, you can download them and install and use them for your themes. Since I am graphically challenged, I stuck with the existing theme colors.
I also added a back button on “pages” 2, 3, and 4. I simply added the code data-add-back-btn=”true” to each of these divisions. I then populated each page with appropriate content. Since there are a number of PhoneGap code snippets, I decided to turn this into an example page. Specifically, I added code from the PhoneGap API documentation site for geolocation, network access, and device properties.
Once I have finished configuring the page, I then select Site >PhoneGap Build Service > PhoneGap Build Service. (Yes, I know this menu set seems redundant). I will be prompted to create a new project.

If I were planning to publish this app, I would need signing keys (these cost money). In this case, I simply click continue.

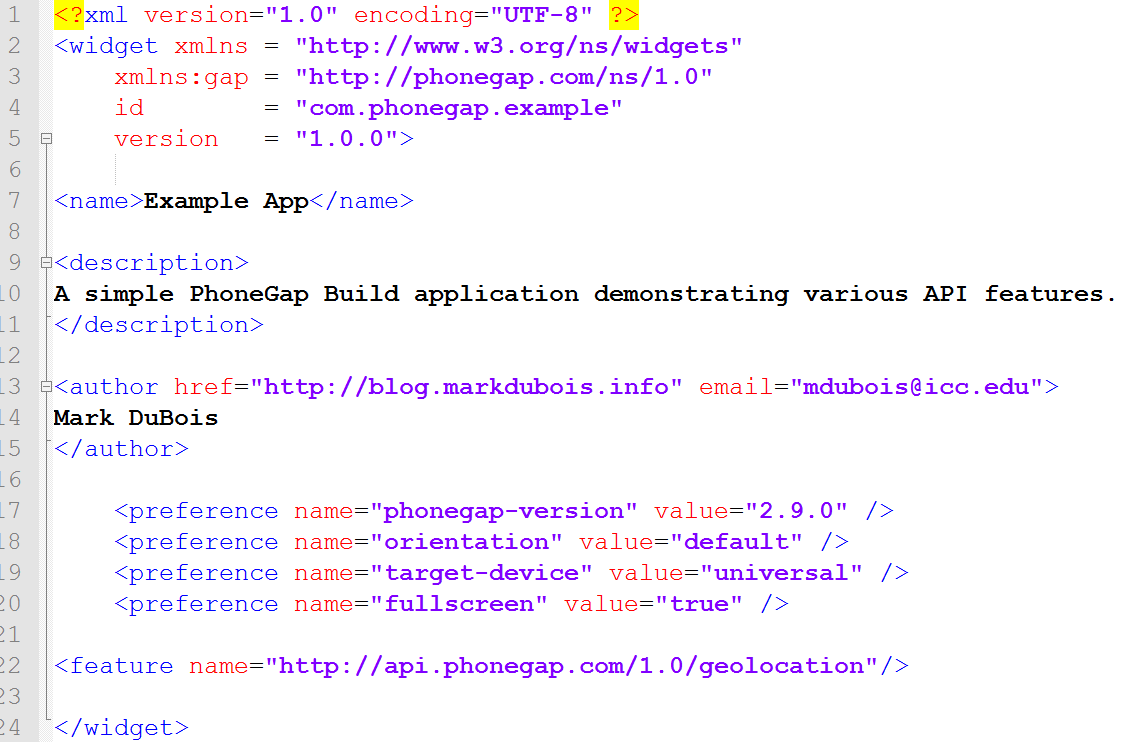
In the event you encounter problems (such as long load times), you can always also visit the PhoneGap build site directly and upload your file. Essentially, you are providing a zip version of your local files (including the jQuery files) and a config.xml file (which Dreamweaver should build for you when you click the above dialog). Note that I have found the current version of PhoneGap works best when you do not include any plugin references in your config.xml file. As long as you point to the proper cordova.js file in your HTML, it seems to pick up the plugin (this may well change with future builds). For those who are curious what the config.xml file looks like, I provide a screen capture below. You can click on the image to enlarge it.
You can build your app and scan the QR code on your appropriate mobile device to obtain the app (it will be downloaded via the browser). For example, on an Android device, you would install the .apk file you downloaded. You can then open the app and run it on your device (assuming you have install from untrusted sources active on your Android device). In the screen captures below, you see the application running on my Samsung Galaxy Tab.
You can also specify images to be used instead of the default. In the interest of time, I did not do this. I highlighted the app below with a brown border.
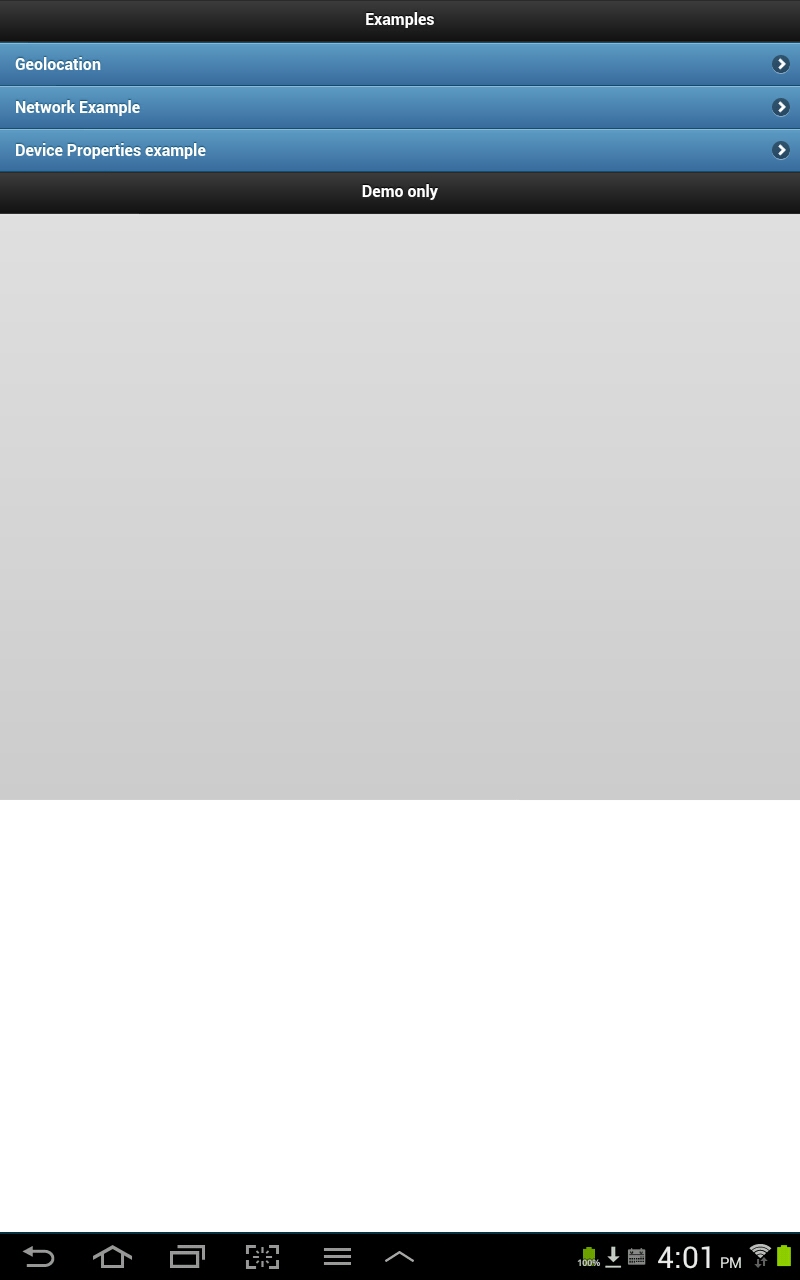
When you tap on the app, you are presented with the following view. In this case, I have the app in portrait view.
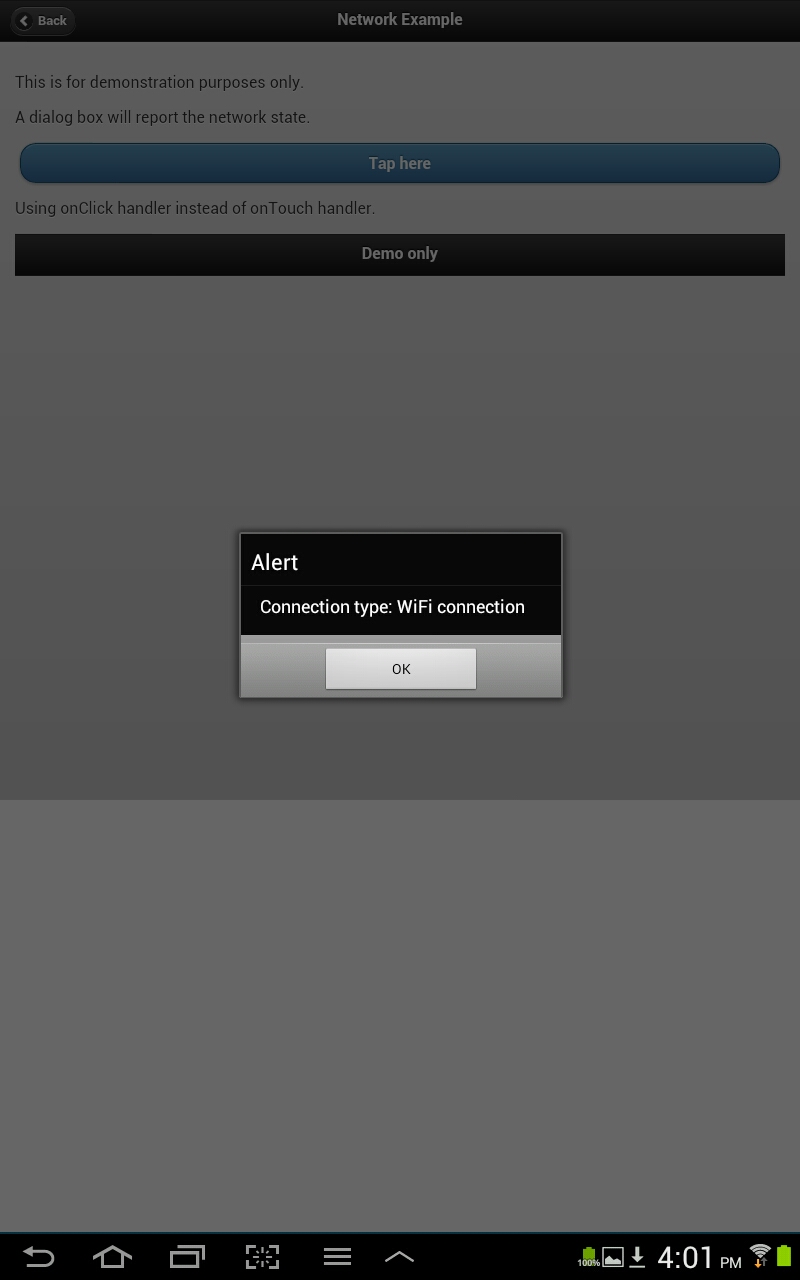
If you choose one of the options, you then interface with the hardware. In this case, you see the type of network presently being used.
You may note that I am not supplying a working example, nor source code (0ther than snippets). This is because I am planning to have students in the CMWEB 280 class develop a similar application as one of their first projects. It just doesn’t seem right to offer a completely working solution.
The biggest changes in the past few years include:
- Not having to keep a copy of the SDK locally. Instead, you can use PhoneGap directly on the PhoneGap Build website.
- Having the ability to use a jQuery mobile starter template in Dreamweaver.
- Having the ability to directly access the jQuery Mobile Theme Roller site from within Dreamweaver (for those who want to create their own color schemes).
- If you have a subscription to Creative Cloud, you can build multiple projects in PhoneGap (if not, you can only build one at a time for free)
- Instead of having to download the .apk file and load it via DropBox or a similar approach on your mobile device, you can now scan the generated QR code. It makes installation so much easier.
- With the addition of the Apache Cordova framework, you can now interface with a significant amount of the device hardware. All this can be done with HTML, CSS, and JavaScript.
I continue to be impressed with how quickly mobile app development options evolve and change. I am curious what your thoughts are on this topic. I welcome our comments.
- See more at: http://www.markdubois.info/weblog/2013/08/dreamweaver-cc-and-phonegap/#sthash.PjVdhx7c.dpufA few years ago, I did a weblog post on PhoneGap. I participated in a Tech Live event in late July where Paul Trani reviewed many of the new features in Dreamweaver CC (and discussed building mobile apps). Paul inspired me to put together these notes for students who may want to build relatively simple mobile apps (in my CMWEB 280 class, for example). I thought it might help to see what has changed in the 3 years since my initial post. Make certain you have a Creative Cloud account and Dreamweaver CC installed on a local computer if you are trying to follow along. Many of these features may not work in prior versions (like DW CS6).Our first step is to create a new document in Dreamweaver. Make certain you select the jQuery mobile starter with theme from the starter templates. You may need to click on these images to enlarge them.
Before proceeding, I create a site (so all my files are properly organized). Site > New Site dialog. I then save the file I just created as index.html in the root of the site I just created. One is then prompted to save dependent files (make certain you do this at the site root).
Once the files are saved, activate live view and you should see you already have a pretty functional example. Obviously we will need to customize this a bit. I think it is pretty impressive we already have this built.
Note that this is a single page (we will turn this in to an app soon as well). If we examine the source code, we will see there are id’s of page, page 2, and so forth. for each of these, we add a data-theme attribute. I set mine to data-theme=”b” for each page. If you don’t like these themes, select Window > jQuery Mobile Swatches and get more themes.
This link will take you to the jQuery Theme Roller site where you can choose any color combinations you want. Once you have made your color choices, you can download them and install and use them for your themes. Since I am graphically challenged, I stuck with the existing theme colors.
I also added a back button on “pages” 2, 3, and 4. I simply added the code data-add-back-btn=”true” to each of these divisions. I then populated each page with appropriate content. Since there are a number of PhoneGap code snippets, I decided to turn this into an example page. Specifically, I added code from the PhoneGap API documentation site for geolocation, network access, and device properties.
Once I have finished configuring the page, I then select Site >PhoneGap Build Service > PhoneGap Build Service. (Yes, I know this menu set seems redundant). I will be prompted to create a new project.
If I were planning to publish this app, I would need signing keys (these cost money). In this case, I simply click continue.
In the event you encounter problems (such as long load times), you can always also visit the PhoneGap build site directly and upload your file. Essentially, you are providing a zip version of your local files (including the jQuery files) and a config.xml file (which Dreamweaver should build for you when you click the above dialog). Note that I have found the current version of PhoneGap works best when you do not include any plugin references in your config.xml file. As long as you point to the proper cordova.js file in your HTML, it seems to pick up the plugin (this may well change with future builds). For those who are curious what the config.xml file looks like, I provide a screen capture below. You can click on the image to enlarge it.
You can build your app and scan the QR code on your appropriate mobile device to obtain the app (it will be downloaded via the browser). For example, on an Android device, you would install the .apk file you downloaded. You can then open the app and run it on your device (assuming you have install from untrusted sources active on your Android device). In the screen captures below, you see the application running on my Samsung Galaxy Tab.
You can also specify images to be used instead of the default. In the interest of time, I did not do this. I highlighted the app below with a brown border.
When you tap on the app, you are presented with the following view. In this case, I have the app in portrait view.
If you choose one of the options, you then interface with the hardware. In this case, you see the type of network presently being used.
You may note that I am not supplying a working example, nor source code (0ther than snippets). This is because I am planning to have students in the CMWEB 280 class develop a similar application as one of their first projects. It just doesn’t seem right to offer a completely working solution.
The biggest changes in the past few years include:
- Not having to keep a copy of the SDK locally. Instead, you can use PhoneGap directly on the PhoneGap Build website.
- Having the ability to use a jQuery mobile starter template in Dreamweaver.
- Having the ability to directly access the jQuery Mobile Theme Roller site from within Dreamweaver (for those who want to create their own color schemes).
- If you have a subscription to Creative Cloud, you can build multiple projects in PhoneGap (if not, you can only build one at a time for free)
- Instead of having to download the .apk file and load it via DropBox or a similar approach on your mobile device, you can now scan the generated QR code. It makes installation so much easier.
- With the addition of the Apache Cordova framework, you can now interface with a significant amount of the device hardware. All this can be done with HTML, CSS, and JavaScript.
I continue to be impressed with how quickly mobile app development options evolve and change. I am curious what your thoughts are on this topic. I welcome our comments.
http://www.markdubois.info/weblog/2013/08/dreamweaver-cc-and-phonegap/
A few years ago, I did a weblog post on PhoneGap. I participated in a Tech Live event in late July where Paul Trani reviewed many of the new features in Dreamweaver CC (and discussed building mobile apps). Paul inspired me to put together these notes for students who may want to build relatively simple mobile apps (in my CMWEB 280 class, for example). I thought it might help to see what has changed in the 3 years since my initial post. Make certain you have a Creative Cloud account and Dreamweaver CC installed on a local computer if you are trying to follow along. Many of these features may not work in prior versions (like DW CS6).Our first step is to create a new document in Dreamweaver. Make certain you select the jQuery mobile starter with theme from the starter templates. You may need to click on these images to enlarge them.
Before proceeding, I create a site (so all my files are properly organized). Site > New Site dialog. I then save the file I just created as index.html in the root of the site I just created. One is then prompted to save dependent files (make certain you do this at the site root).
Once the files are saved, activate live view and you should see you already have a pretty functional example. Obviously we will need to customize this a bit. I think it is pretty impressive we already have this built.
Note that this is a single page (we will turn this in to an app soon as well). If we examine the source code, we will see there are id’s of page, page 2, and so forth. for each of these, we add a data-theme attribute. I set mine to data-theme=”b” for each page. If you don’t like these themes, select Window > jQuery Mobile Swatches and get more themes.
This link will take you to the jQuery Theme Roller site where you can choose any color combinations you want. Once you have made your color choices, you can download them and install and use them for your themes. Since I am graphically challenged, I stuck with the existing theme colors.
I also added a back button on “pages” 2, 3, and 4. I simply added the code data-add-back-btn=”true” to each of these divisions. I then populated each page with appropriate content. Since there are a number of PhoneGap code snippets, I decided to turn this into an example page. Specifically, I added code from the PhoneGap API documentation site for geolocation, network access, and device properties.
Once I have finished configuring the page, I then select Site >PhoneGap Build Service > PhoneGap Build Service. (Yes, I know this menu set seems redundant). I will be prompted to create a new project.
If I were planning to publish this app, I would need signing keys (these cost money). In this case, I simply click continue.
In the event you encounter problems (such as long load times), you can always also visit the PhoneGap build site directly and upload your file. Essentially, you are providing a zip version of your local files (including the jQuery files) and a config.xml file (which Dreamweaver should build for you when you click the above dialog). Note that I have found the current version of PhoneGap works best when you do not include any plugin references in your config.xml file. As long as you point to the proper cordova.js file in your HTML, it seems to pick up the plugin (this may well change with future builds). For those who are curious what the config.xml file looks like, I provide a screen capture below. You can click on the image to enlarge it.
You can build your app and scan the QR code on your appropriate mobile device to obtain the app (it will be downloaded via the browser). For example, on an Android device, you would install the .apk file you downloaded. You can then open the app and run it on your device (assuming you have install from untrusted sources active on your Android device). In the screen captures below, you see the application running on my Samsung Galaxy Tab.
You can also specify images to be used instead of the default. In the interest of time, I did not do this. I highlighted the app below with a brown border.
When you tap on the app, you are presented with the following view. In this case, I have the app in portrait view.
If you choose one of the options, you then interface with the hardware. In this case, you see the type of network presently being used.
You may note that I am not supplying a working example, nor source code (0ther than snippets). This is because I am planning to have students in the CMWEB 280 class develop a similar application as one of their first projects. It just doesn’t seem right to offer a completely working solution.
The biggest changes in the past few years include:
- Not having to keep a copy of the SDK locally. Instead, you can use PhoneGap directly on the PhoneGap Build website.
- Having the ability to use a jQuery mobile starter template in Dreamweaver.
- Having the ability to directly access the jQuery Mobile Theme Roller site from within Dreamweaver (for those who want to create their own color schemes).
- If you have a subscription to Creative Cloud, you can build multiple projects in PhoneGap (if not, you can only build one at a time for free)
- Instead of having to download the .apk file and load it via DropBox or a similar approach on your mobile device, you can now scan the generated QR code. It makes installation so much easier.
- With the addition of the Apache Cordova framework, you can now interface with a significant amount of the device hardware. All this can be done with HTML, CSS, and JavaScript.
I continue to be impressed with how quickly mobile app development options evolve and change. I am curious what your thoughts are on this topic. I welcome our comments.
- See more at: http://www.markdubois.info/weblog/2013/08/dreamweaver-cc-and-phonegap/#sthash.PjVdhx7c.dpuf


 3580
3580

 被折叠的 条评论
为什么被折叠?
被折叠的 条评论
为什么被折叠?
 到【灌水乐园】发言


