


1. 消息中间件概述
1.1. MQ概述
1.2.MQ的优势:
2.RabbitMQ.
RabbitMQ 基础架构:
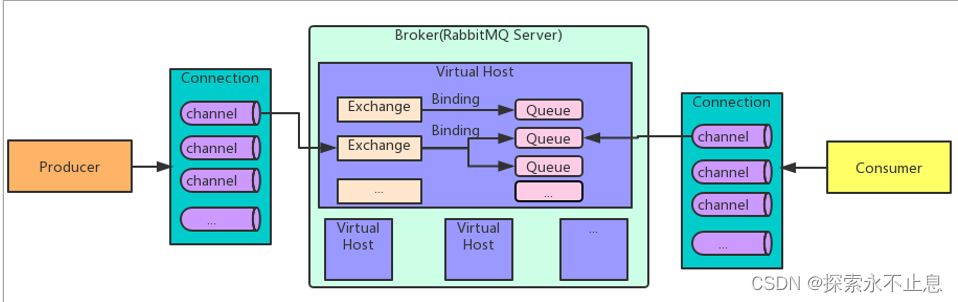
RabbitMQ 中的相关概念:
- Broker:接收和分发消息的应用,RabbitMQ Server就是 Message Broker
- Virtual host:出于多租户和安全因素设计的,把 AMQP 的基本组件划分到一个虚拟的分组中,类似于网络中的 namespace 概念。当多个不同的用户使用同一个 RabbitMQ server 提供的服务时,可以划分出多个vhost,每个用户在自己的 vhost 创建 exchange/queue 等
- Connection:publisher/consumer 和 broker 之间的 TCP 连接
- Channel:如果每一次访问 RabbitMQ 都建立一个 Connection,在消息量大的时候建立 TCP Connection的开销将是巨大的,效率也较低。Channel 是在 connection 内部建立的逻辑连接, 如果应用程序支持多线程,通常每个thread创建单独的 channel 进行通讯,AMQP method 包含 了channel id 帮助客户端和message broker 识别 channel,所以 channel 之间是完全隔离的。 Channel 作为轻量级的 Connection 极大减少了操作系统建立 TCP connection 的开销.
- Exchange:message 到达 broker 的第一站,根据分发规则,匹配查询表中的 routing key,分发 消息到queue 中去。常用的类型有:direct (point-to-point), topic (publish-subscribe) and fanout (multicast)
- Queue:消息最终被送到这里等待 consumer 取走
- Binding:exchange 和 queue 之间的虚拟连接,binding 中可以包含 routing key。Binding 信息 被保存到 exchange 中的查询表中,用于 message 的分发依据
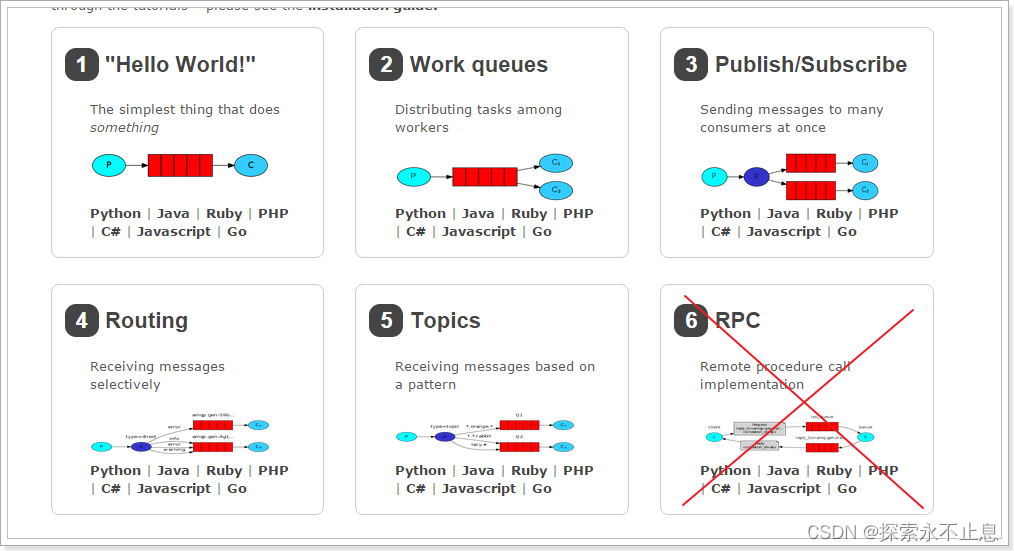
- Fanout:广播,将消息交给所有绑定到交换机的队列
- Direct:定向,把消息交给符合指定routing key 的队列
- Topic:通配符,把消息交给符合routing pattern(路由模式) 的队列
RabbitMQ6种使用模式
- 1.创建连接工厂
- 2.连接工厂创建连接
- 3.连接创建频道
- 4.频道声明交换机名称,类型(简单模式和work模式不需要)
- 5.频道声明队列(简单模式和work路由用队列名替代)
- 6.队列绑定交换机(简单模式和work模式不需要)
- 7.频道给指定路由发送消息(简单模式和work路由用队列名替代,交换机名用"")
- 8.关闭资源
- 创建和生产者相同的连接工厂
- 创建连接
- 创建频道
- 频道声明交换机名称,类型(简单模式和work模式不需要)
- 队列绑定交换机(简单模式和work模式不需要),频道声明要接收的队列,接收队列的路由(简单模式和work路由用队列名替代)
- 定义消费者并设置消息处理的回调方法
- 监听接收消息(不用关闭资源)
简单模式:使用默认的交换机,使用时用" "代替,声明的队列不用声明绑定默认的交换机(队列绑定交换机这一步可省略),路由名称可用队列名替代,一个生产者对应一个队列,一个消费者
work模式:使用默认的交换机,使用时用" "代替,声明的队列不用声明绑定默认的交换机(队列绑定交换机这一步可省略),路由名称可用队列名替代,一个生产者对应一个队列,多个消费者,多个消费者竞争这个队列里的消息
发布订阅模式,交换机名称自定义,交换机类型FanOut,路由用""替代,一个生产者对应一个交换机,多个队列,多个消费者,每个队列都可以得到交换机中的所有消息,每个消费者获得声明的接收队列里的消息.
路由模式:交换机名称自定义,交换机类型Direct,路由名称自定义,可写多个,一个生产者对应一个交换机,多个队列,多个消费者,每个队列都是不同的路由,消息内容不同,,每个消费者获得声明的路由接收队列里的消息.
统配符模式:(同路由模式,用*替代任意一个单词,用#匹配一个或多个单词)交换机名称自定义,交换机类型Topic,路由名称自定义,可写多个,一个生产者对应一个交换机,多个队列,多个消费者,每个队列都是不同的路由,消息内容不同,,每个消费者获得声明的路由接收队列里的消息.
总的来说:流程就是,生产者经不同路由发出的消息都会经交换机转发给匹配不同路由的队列,最后再由消费者接收不同队列路由的消息(可参考示例代码理解,这里演示通配符模式--其中包含路由模式)
创建一个maven项目,引入下面依赖
  <dependencies>
        <dependency>
            <groupId>com.rabbitmq</groupId>
            <artifactId>amqp-client</artifactId>
            <version>5.6.0</version>
        </dependency>
    </dependencies>
消息生产者
为了保证RabbitMQ在退出或者crash等异常情况下数据没有丢失,需要将queue,exchange和Message都持久化。
import com.rabbitmq.client.BuiltinExchangeType;
import com.rabbitmq.client.Channel;
import com.rabbitmq.client.Connection;
import com.rabbitmq.client.ConnectionFactory;

import java.io.IOException;
import java.util.concurrent.TimeoutException;

public class Provider {
    public static final String  TOPIC_EXCHANGE="topic_exchange";
    public static final String  TOPIC_QUEUE_ALL="topic_queue_all";
    public static final String  TOPIC_QUEUE_INSERT_DELETE="topic_queue_insert_delete";
    public static void main(String[] args) throws IOException, TimeoutException {
        //1.创建连接工厂
        ConnectionFactory connectionFactory = new ConnectionFactory();//创建连接工厂
        connectionFactory.setHost("192.168.61.128");//主机地址;默认为 localhost
        connectionFactory.setPort(5672);//连接端口;默认为 5672
        connectionFactory.setVirtualHost("/zwh");//虚拟主机名称;默认为 /  ,需要提前在rabbitmq控制台创建
        connectionFactory.setUsername("root");//连接用户名;默认为guest
        connectionFactory.setPassword("root");//连接密码;默认为guest
        //2.释放连接
        Connection connection = connectionFactory.newConnection();
        //3.创建频道
        Channel channel = connection.createChannel();
        //4.声明交换机(//参数1:交换机名称,参数2:交换机类型)
        channel.exchangeDeclare(TOPIC_EXCHANGE, BuiltinExchangeType.TOPIC);
        //5.声明队列
             /*** 参数1:队列名称
              * 参数2:是否定义持久化队列
              * * 参数3:是否独占本次连接
              * * 参数4:是否在不使用的时候自动删除队列
              * * 参数5:队列其它参数
              * */
        channel.queueDeclare(TOPIC_QUEUE_ALL, true, false, false, null);
        channel.queueDeclare(TOPIC_QUEUE_INSERT_DELETE, true, false, false, null);
        //6.队列绑定交换机
        /*** 参数1:队列名称
         * 参数2:交换机名称
         * 参数3:接收消息的路由
         * */
        channel.queueBind(TOPIC_QUEUE_ALL,TOPIC_EXCHANGE,"item.#");
        channel.queueBind(TOPIC_QUEUE_INSERT_DELETE,TOPIC_EXCHANGE,"item.insert");
        channel.queueBind(TOPIC_QUEUE_INSERT_DELETE,TOPIC_EXCHANGE,"item.delete");
        //7.发送消息
        /*** 参数1:交换机名称,如果没有指定则使用默认Default Exchage
         * * 参数2:路由key,简单模式可以传递队列名称
         * * 参数3:消息其它属性 * 参数4:消息内容 */
        for (int i = 0; i < 3; i++) {
            String message = "你好,梅丽莎-----通配符模式----新增-------"+i;
            channel.basicPublish(TOPIC_EXCHANGE, "item.insert", null, message.getBytes());
            System.out.println(message);

        }
        for (int i = 0; i < 3; i++) {
            String message = "你好,梅丽莎-----通配符模式----修改-------"+i;
            channel.basicPublish(TOPIC_EXCHANGE, "item.update", null, message.getBytes());
            System.out.println(message);
        }
        for (int i = 0; i < 3; i++) {
            String message = "你好,梅丽莎-----通配符模式----删除-------"+i;
            channel.basicPublish(TOPIC_EXCHANGE, "item.delete", null, message.getBytes());
            System.out.println(message);
        }
        //8.关闭资源
        channel.close();
        connection.close();

    }
}
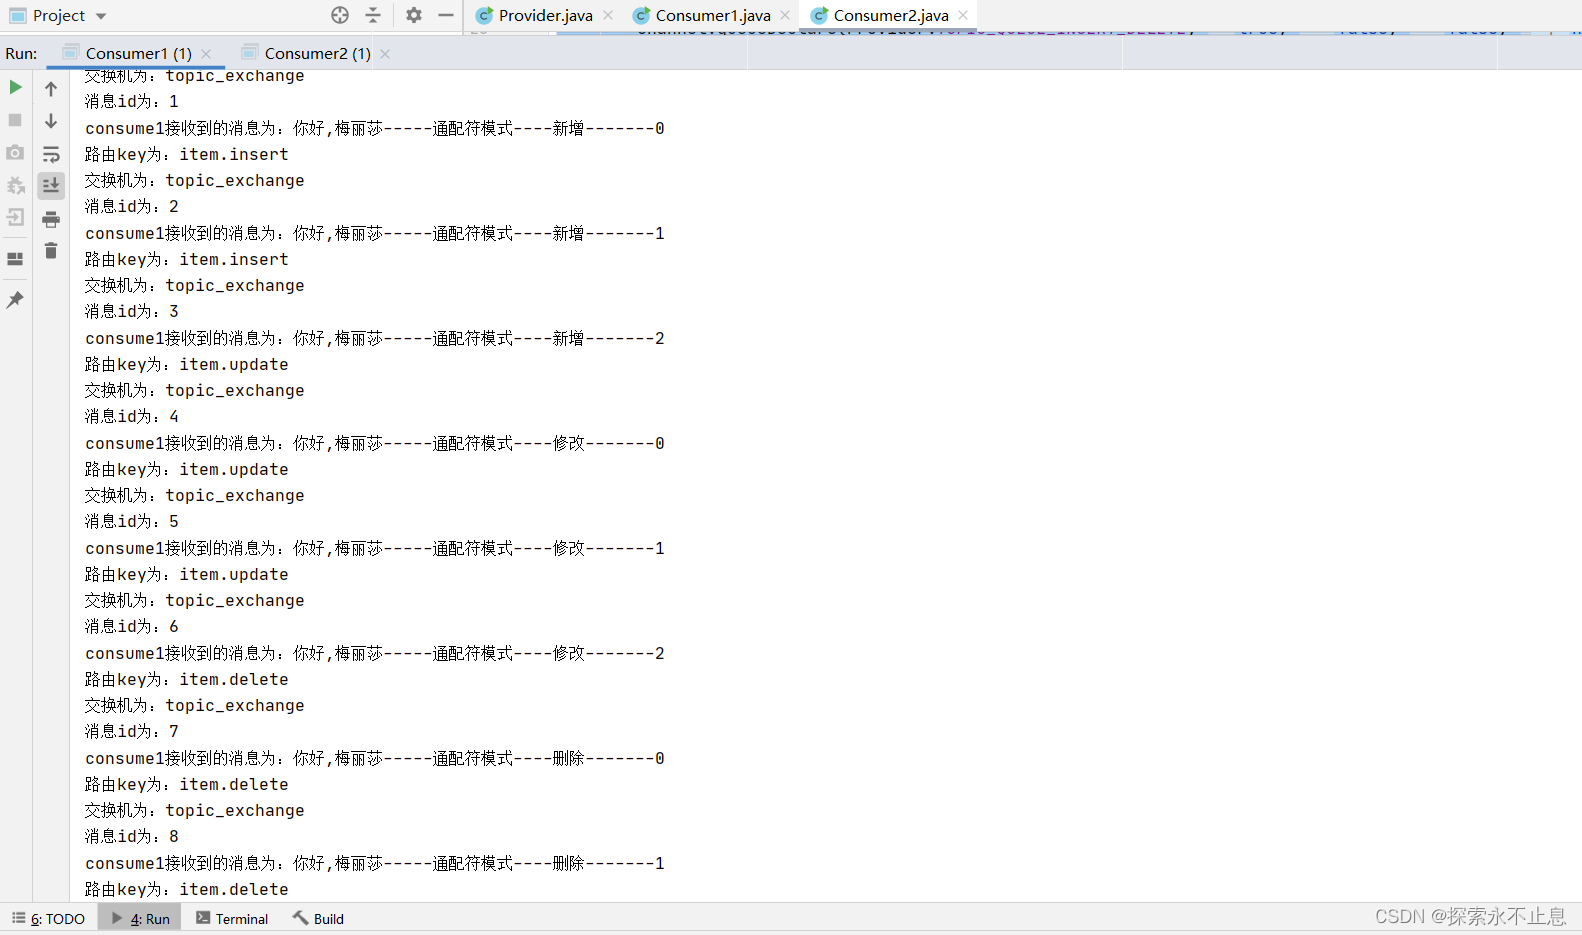
消费者1,接收匹配 item.*(例item.insert,只要item后面跟的是一个单词就可以),用item.#也可以,表示匹配以item.开头的(路由键中可以包含任意多的单词,最多不超过255个字节。)
import com.rabbitmq.client.*;

import java.io.IOException;
import java.util.concurrent.TimeoutException;

public class Consumer1 {


    public static void main(String[] args) throws IOException, TimeoutException {
        //1.创建连接工厂
        ConnectionFactory connectionFactory = new ConnectionFactory();
        connectionFactory.setHost("192.168.61.128");
        connectionFactory.setPort(5672);
        connectionFactory.setVirtualHost("/zwh");
        connectionFactory.setUsername("root");
        connectionFactory.setPassword("root");
        //2.释放连接
        Connection connection = connectionFactory.newConnection();
        //3.创建频道
        Channel channel = connection.createChannel();
        //4.声明交换机
        channel.exchangeDeclare(Provider.TOPIC_EXCHANGE, BuiltinExchangeType.TOPIC);
        //5.声明队列

        channel.queueDeclare(Provider.TOPIC_QUEUE_ALL, true, false, false, null);

        //6.队列绑定交换机
        channel.queueBind(Provider.TOPIC_QUEUE_ALL,Provider.TOPIC_EXCHANGE,"item.#");

        //5.定义接收消息后的回调接口
        DefaultConsumer consumer = new DefaultConsumer(channel) {
            @Override
            /*** consumerTag 消息者标签,在channel.basicConsume时候可以指定
             * * envelope 消息包的内容,可从中获取消息id,消息routingkey,交换机,消息和重 传标志(收到消息失败后是否需要重新发送)
             * * properties 属性信息
             * * body 消息 */
            public void handleDelivery(String consumerTag, Envelope envelope, AMQP.BasicProperties properties, byte[] body) throws IOException {
                System.out.println("路由key为:" + envelope.getRoutingKey()); //
                // 交换机

                System.out.println("交换机为:" + envelope.getExchange());
                // 消息id

                System.out.println("消息id为:" + envelope.getDeliveryTag());
                // 收到的消息

                System.out.println("consume1接收到的消息为:" + new String(body, "utf-8"));
            }
        };
        // 接收消息
        channel.basicConsume(Provider.TOPIC_QUEUE_ALL,true,consumer);

    }
}
消费者2
import com.rabbitmq.client.*;

import java.io.IOException;
import java.util.concurrent.TimeoutException;

public class Consumer2 {


    public static void main(String[] args) throws IOException, TimeoutException {
        //1.创建连接工厂
        ConnectionFactory connectionFactory = new ConnectionFactory();
        connectionFactory.setHost("192.168.61.128");
        connectionFactory.setPort(5672);
        connectionFactory.setVirtualHost("/zwh");
        connectionFactory.setUsername("root");
        connectionFactory.setPassword("root");
        //2.释放连接
        Connection connection = connectionFactory.newConnection();
        //3.创建频道
        Channel channel = connection.createChannel();
        //4.声明交换机
        channel.exchangeDeclare(Provider.TOPIC_EXCHANGE, BuiltinExchangeType.TOPIC);
        //5.声明队列

        channel.queueDeclare(Provider.TOPIC_QUEUE_INSERT_DELETE, true, false, false, null);

        //6.队列绑定交换机
        channel.queueBind(Provider.TOPIC_QUEUE_INSERT_DELETE,Provider.TOPIC_EXCHANGE,"item.insert");
        channel.queueBind(Provider.TOPIC_QUEUE_INSERT_DELETE,Provider.TOPIC_EXCHANGE,"item.delete");

        //5.定义接收消息后的回调接口
        DefaultConsumer consumer = new DefaultConsumer(channel) {
            @Override
            public void handleDelivery(String consumerTag, Envelope envelope, AMQP.BasicProperties properties, byte[] body) throws IOException {
                System.out.println("路由key为:" + envelope.getRoutingKey()); //
                // 交换机

                System.out.println("交换机为:" + envelope.getExchange());
                // 消息id

                System.out.println("消息id为:" + envelope.getDeliveryTag());
                // 收到的消息

                System.out.println("consume2接收到的消息为:" + new String(body, "utf-8"));
            }
        };
        // 接收消息
        channel.basicConsume(Provider.TOPIC_QUEUE_INSERT_DELETE,true,consumer);

    }
}
结果: consume1接收到9条消息,consume2接收到6条消息,

3.springmvc整合rabbitmq
消息生产者端
1.引入pom依赖(整合rabbitmq)
 <dependencies>
        <dependency>
            <groupId>org.springframework</groupId>
            <artifactId>spring-context</artifactId>
            <version>5.1.7.RELEASE</version>
        </dependency>
        <dependency>
            <groupId>org.springframework.amqp</groupId>
            <artifactId>spring-rabbit</artifactId>
            <version>2.1.8.RELEASE</version>
        </dependency>
        <dependency>
            <groupId>junit</groupId>
            <artifactId>junit</artifactId>
            <version>4.12</version>
        </dependency>
        <dependency>
            <groupId>org.springframework</groupId>
            <artifactId>spring-test</artifactId>
            <version>5.1.7.RELEASE</version>
        </dependency>
    </dependencies>
2.定义rabbitmq的连接配置 rabbitmq.properties
rabbitmq.host=192.168.61.128
rabbitmq.port=5672
rabbitmq.username=root
rabbitmq.password=root
rabbitmq.virtual-host=/zwh
3.在spring的配置文件 springcontext.xml文件中定义和管理交换机和队列(这里定义了一个简单模式,两个广播模式,三个路由通配符模式)
<?xml version="1.0" encoding="UTF-8"?>
<beans xmlns="http://www.springframework.org/schema/beans"

xmlns:xsi="http://www.w3.org/2001/XMLSchema-instance"
       xmlns:context="http://www.springframework.org/schema/context"
       xmlns:rabbit="http://www.springframework.org/schema/rabbit"
       xsi:schemaLocation="http://www.springframework.org/schema/beans
       http://www.springframework.org/schema/beans/spring-beans.xsd
       http://www.springframework.org/schema/context
       https://www.springframework.org/schema/context/spring-context.xsd
       http://www.springframework.org/schema/rabbit
       http://www.springframework.org/schema/rabbit/spring-rabbit.xsd">
    <!--加载配置文件-->
    <context:property-placeholder location="classpath:rabbitmq.properties"/>
    <!-- 定义rabbitmq connectionFactory -->
<rabbit:connection-factory id="connectionFactory" host="${rabbitmq.host}"
                           port="${rabbitmq.port}"
                           username="${rabbitmq.username}"
                           virtual-host="${rabbitmq.virtual-host}"
                           password="${rabbitmq.password}"></rabbit:connection-factory>
    <!--定义管理交换机、队列-->
    <rabbit:admin connection-factory="connectionFactory"/>
<!--简单模式,定义持久化队列,不存在则自动创建;不绑定到交换机则绑定到默认交换机 默认交换机类型为direct,名字为:"",路由键为队列的名称 -->
    <rabbit:queue id="simple_queue" name="simple_queue" auto-declare="true"></rabbit:queue>

 <!-- id属性可以没有,name属性必须有,不然进入不了队列-->
    <rabbit:queue id="fanout_queue_01" name="fanout_queue_01" auto-declare="true"></rabbit:queue>
    <rabbit:queue id="fanout_queue_02" name="fanout_queue_02" auto-declare="true"></rabbit:queue>
    <rabbit:fanout-exchange name="fanoutExchange" id="fanoutExchange" auto-declare="true">
    <rabbit:bindings>
        <rabbit:binding queue="fanout_queue_01" ></rabbit:binding>
        <rabbit:binding queue="fanout_queue_02"></rabbit:binding>
    </rabbit:bindings>
    </rabbit:fanout-exchange>

    <rabbit:queue name="topic_queue_01" auto-declare="true"></rabbit:queue>
    <rabbit:queue name="topic_queue_02" auto-declare="true"></rabbit:queue>
    <rabbit:queue name="topic_queue_03" auto-declare="true"></rabbit:queue>
    <rabbit:topic-exchange name="topicExchange" auto-declare="true" id="topicExchange">
        <rabbit:bindings>
            <rabbit:binding pattern="item" queue="topic_queue_01"></rabbit:binding>
            <rabbit:binding pattern="item.*" queue="topic_queue_02"></rabbit:binding>
            <rabbit:binding pattern="item.#" queue="topic_queue_03"></rabbit:binding>
        </rabbit:bindings>
    </rabbit:topic-exchange>

    <!--定义rabbitTemplate对象操作可以在代码中方便发送消息-->
    <rabbit:template id="rabbitTemplate" connection-factory="connectionFactory"/>

</beans>
4.测试(在控制台能够看到消息)
package com.zhao;

import org.junit.Test;
import org.junit.runner.RunWith;
import org.springframework.amqp.rabbit.core.RabbitTemplate;
import org.springframework.beans.factory.annotation.Autowired;
import org.springframework.test.context.ContextConfiguration;
import org.springframework.test.context.junit4.SpringJUnit4ClassRunner;

import java.awt.peer.ScrollbarPeer;

import static org.junit.Assert.*;
@RunWith(SpringJUnit4ClassRunner.class)
@ContextConfiguration(locations = "classpath:springcontext.xml")
public class RabbitMQTest {

@Autowired
    private RabbitTemplate rabbitTemplate;
@Test
    public void send() {

    rabbitTemplate.convertAndSend("simple_queue", "are you ok?");
}
    @Test
    public void send1() {
        /*** 参数1:交换机名称 * 参数2:路由键名(广播设置为空) * 参数3:发送的消息内容 */
        rabbitTemplate.convertAndSend("fanoutExchange", "", "广播队列的消息");
    }
    @Test
    public void send2() {

        /*** 参数1:交换机名称 * 参数2:路由键名(广播设置为空) * 参数3:发送的消息内容 */
        rabbitTemplate.convertAndSend("topicExchange","item","item发送的消息");
        rabbitTemplate.convertAndSend("topicExchange","item.delete","item.delete发送的消息");
        rabbitTemplate.convertAndSend("topicExchange","item.de.up","item.de.up发送的消息");
    }
}
消息消费者端
1.引入依赖
 <dependencies>
        <dependency>
            <groupId>org.springframework</groupId>
            <artifactId>spring-context</artifactId>
            <version>5.1.7.RELEASE</version>
        </dependency>
        <dependency>
            <groupId>org.springframework.amqp</groupId>
            <artifactId>spring-rabbit</artifactId>
            <version>2.1.8.RELEASE</version>
        </dependency>
        <dependency>
            <groupId>junit</groupId>
            <artifactId>junit</artifactId>
            <version>4.12</version>
        </dependency>
        <dependency>
            <groupId>org.springframework</groupId>
            <artifactId>spring-test</artifactId>
            <version>5.1.7.RELEASE</version>
        </dependency>
    </dependencies>
2.定义rabbitmq的连接配置 rabbitmq.properties
rabbitmq.host=192.168.61.128
rabbitmq.port=5672
rabbitmq.username=root
rabbitmq.password=root
rabbitmq.virtual-host=/zwh
3.定义每个队列的监听类,一个队列一个监听类,实现messageListener接口,代码基本相同,改一下类名
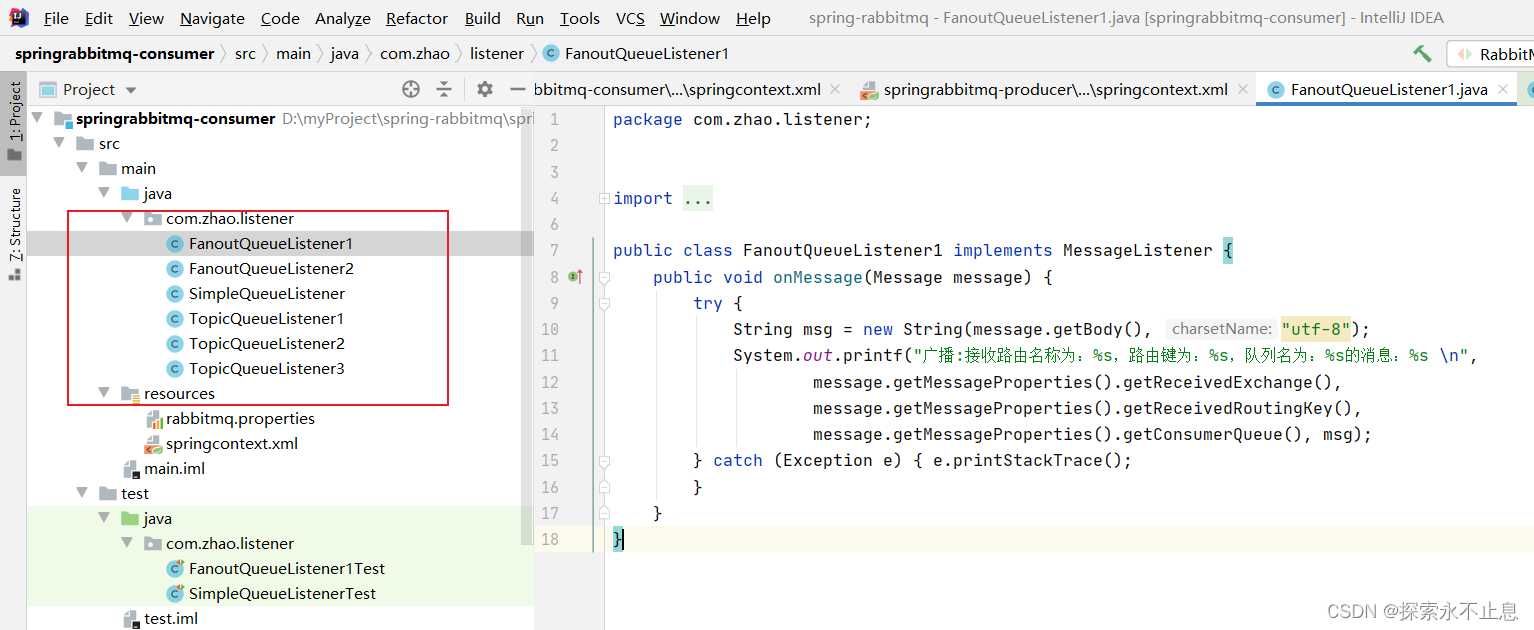
import org.springframework.amqp.core.Message;
import org.springframework.amqp.core.MessageListener;

public class FanoutQueueListener1 implements MessageListener {
    public void onMessage(Message message) {
        try {
            String msg = new String(message.getBody(), "utf-8");
            System.out.printf("广播:接收路由名称为:%s,路由键为:%s,队列名为:%s的消息:%s \n",
                    message.getMessageProperties().getReceivedExchange(),
                    message.getMessageProperties().getReceivedRoutingKey(),
                    message.getMessageProperties().getConsumerQueue(), msg);
        } catch (Exception e) { e.printStackTrace();
        }
    }
}
4.在spring的配置文件 springcontext.xml文件中设置监听各自队列的消息,建立监听关系
<?xml version="1.0" encoding="UTF-8"?>
<beans xmlns="http://www.springframework.org/schema/beans" xmlns:xsi="http://www.w3.org/2001/XMLSchema-instance"
       xmlns:context="http://www.springframework.org/schema/context"
       xmlns:rabbit="http://www.springframework.org/schema/rabbit"
       xsi:schemaLocation="http://www.springframework.org/schema/beans
       http://www.springframework.org/schema/beans/spring-beans.xsd
       http://www.springframework.org/schema/context
       https://www.springframework.org/schema/context/spring-context.xsd
       http://www.springframework.org/schema/rabbit
       http://www.springframework.org/schema/rabbit/spring-rabbit.xsd"> <!--加载配置文件-->
    <context:property-placeholder location="classpath:rabbitmq.properties"/>
<rabbit:connection-factory id="connectionFactory" host="${rabbitmq.host}"
                           port="${rabbitmq.port}"
                           username="${rabbitmq.username}"
                           virtual-host="${rabbitmq.virtual-host}"
                           password="${rabbitmq.password}"></rabbit:connection-factory>

    <bean id="simpleQueueListener" class="com.zhao.listener.SimpleQueueListener"></bean>
    <bean id="fanoutQueueListener1" class="com.zhao.listener.FanoutQueueListener1"></bean>
    <bean id="fanoutQueueListener2" class="com.zhao.listener.FanoutQueueListener2"></bean>
    <bean id="topicQueueListener1" class="com.zhao.listener.TopicQueueListener1"></bean>
    <bean id="topicQueueListener2" class="com.zhao.listener.TopicQueueListener2"></bean>
    <bean id="topicQueueListener3" class="com.zhao.listener.TopicQueueListener3"></bean>

    <rabbit:listener-container connection-factory="connectionFactory" auto-declare="true">
        <rabbit:listener ref="simpleQueueListener" queue-names="simple_queue"></rabbit:listener>
        <rabbit:listener ref="fanoutQueueListener1" queue-names="fanout_queue_01"></rabbit:listener>
        <rabbit:listener ref="fanoutQueueListener2" queue-names="fanout_queue_02"></rabbit:listener>
        <rabbit:listener ref="topicQueueListener1" queue-names="topic_queue_01"></rabbit:listener>
        <rabbit:listener ref="topicQueueListener2" queue-names="topic_queue_02"></rabbit:listener>
        <rabbit:listener ref="topicQueueListener3" queue-names="topic_queue_03"></rabbit:listener>
    </rabbit:listener-container>

</beans>
5.测试:写一个死循环,保持与队列的连接(在bean容器创建的时候监听方法已经在等待执行了,所以只要启动测试类就可以接收到消息)
package com.zhao.listener;

import org.junit.Test;
import org.junit.runner.RunWith;
import org.springframework.test.context.ContextConfiguration;
import org.springframework.test.context.junit4.SpringJUnit4ClassRunner;

import static org.junit.Assert.*;
@RunWith(SpringJUnit4ClassRunner.class)
@ContextConfiguration(locations = "classpath:springcontext.xml")
public class SimpleQueueListenerTest {

    @Test
    public void onMessage() {
        while(true){

        }
    }
}
高级特性
消息生产者消息的可靠传递
- confirm 确认模式
- return 退回模式
1.配置confirm回调,失败后进行业务处理
1.1: 消息发送端xml文件设置
publisher-confirms="true"
1.2:在使用rabbitmq发送消息的时候设置消息发送后的confirm回调函数
@Test
public void send2() {
//2. 定义回调
rabbitTemplate.setConfirmCallback(new RabbitTemplate.ConfirmCallback() {
/**
* @param correlationData 相关配置信息
* @param ack exchange交换机 是否成功收到了消息。true 成功,false代表失败
* @param cause 失败原因
*/
@Override
public void confirm(CorrelationData correlationData, boolean ack, String cause) {
System.out.println("confirm方法被执行了....");
if (ack) {
//接收成功
System.out.println("接收成功消息" + cause);
} else {
//接收失败
System.out.println("接收失败消息" + cause);
//做一些处理,让消息再次发送。
}
}
});
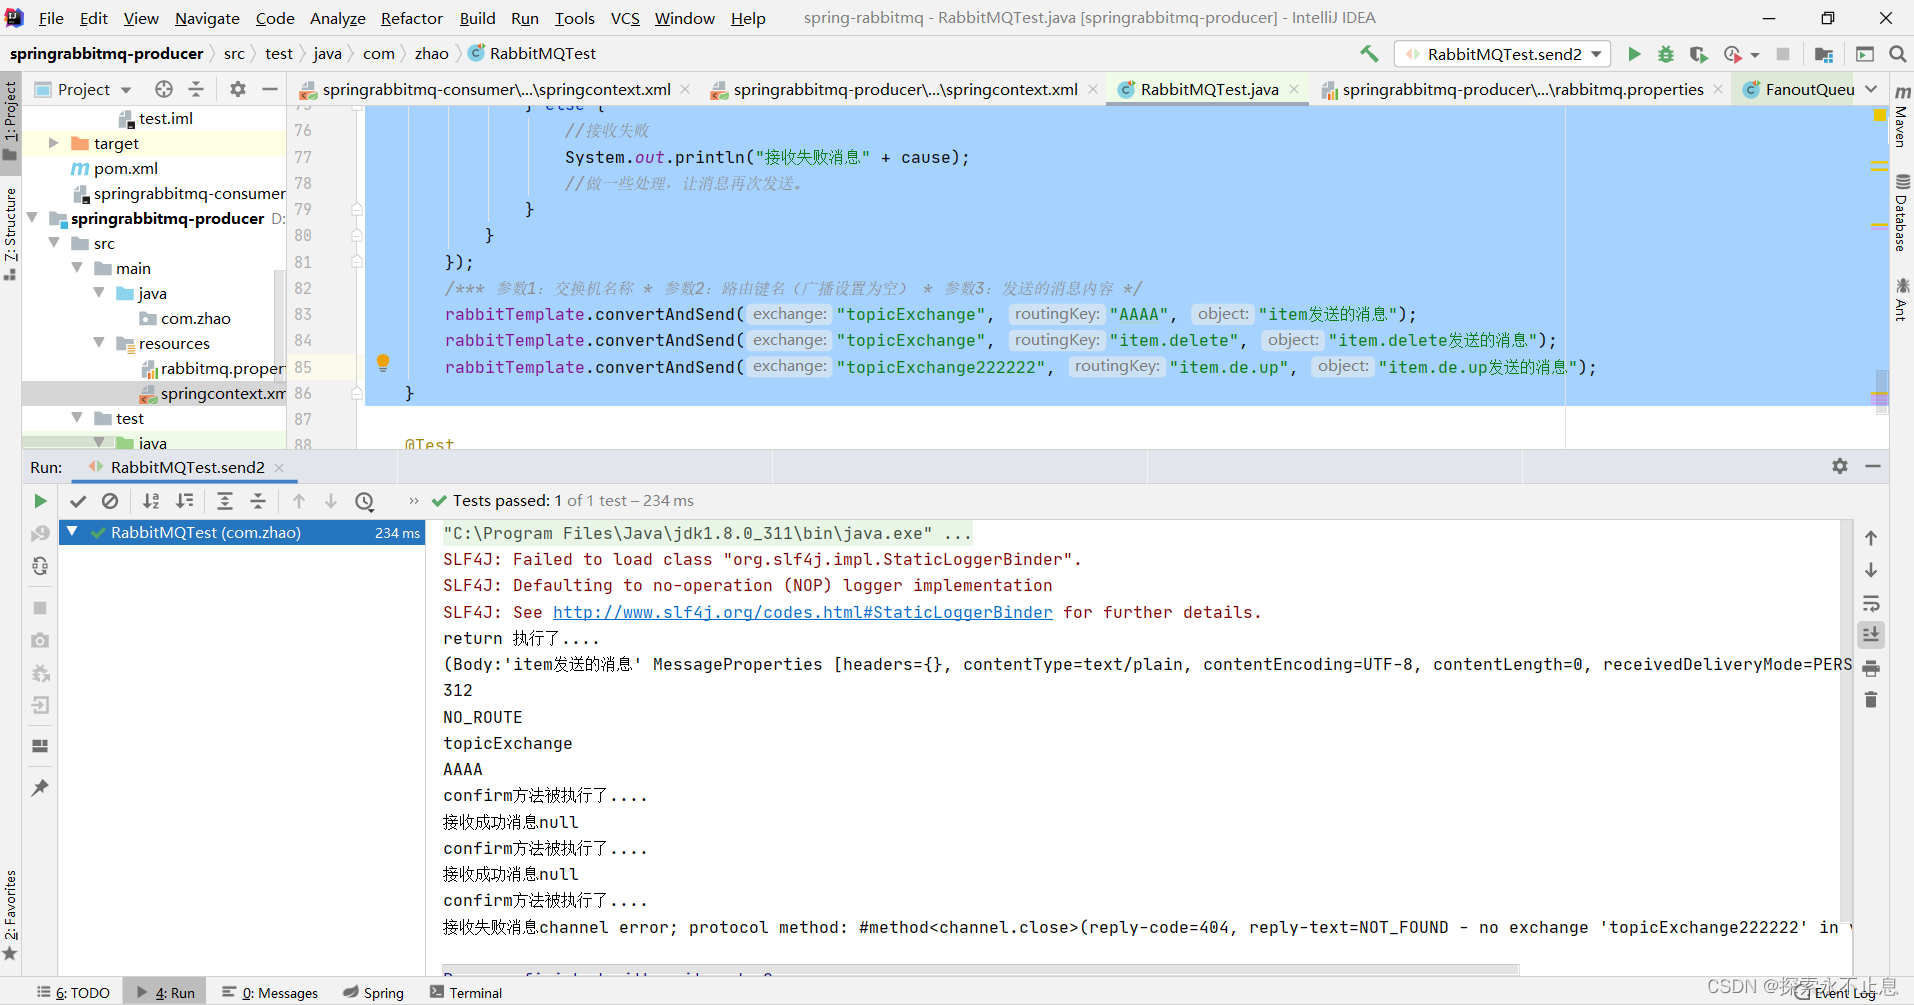
/*** 参数1:交换机名称 * 参数2:路由键名(广播设置为空) * 参数3:发送的消息内容 */
rabbitTemplate.convertAndSend("topicExchange", "item", "item发送的消息");
rabbitTemplate.convertAndSend("topicExchange", "item.delete", "item.delete发送的消息");
rabbitTemplate.convertAndSend("topicExchange222222", "item.de.up", "item.de.up发送的消息");
}
运行测试(这里故意设置第三个消息的交换机名称错误)

2.配置return回调
2.1: 消息发送端xml文件设置
publisher-returns="true"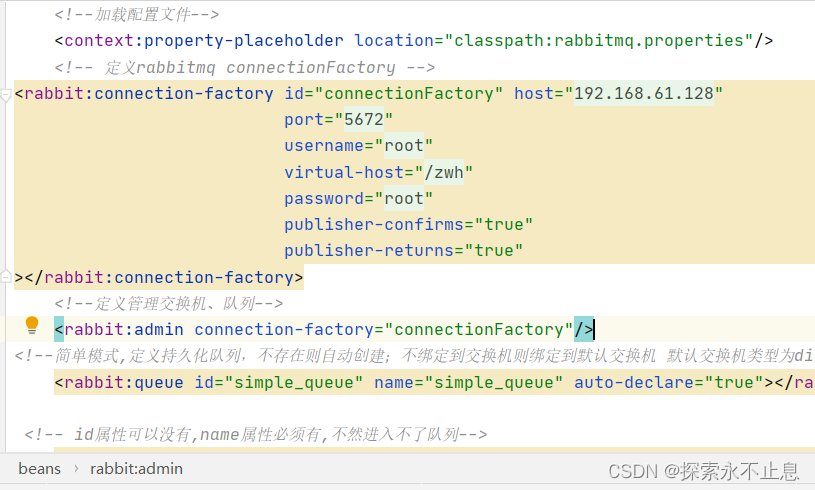
2.2:设置交换机处理失败消息的模式
rabbitTemplate.setMandatory(true);2.3:在使用rabbitmq发送消息的时候设置消息发送后的return回调函数
 @Test
    public void send2() {
        //--------------------------------------return回调--------------------
        //2.设置交换机处理失败消息的模式
        rabbitTemplate.setMandatory(true);
        // 3..设置ReturnCallBack

        rabbitTemplate.setReturnCallback(new RabbitTemplate.ReturnCallback() {
             /**** @param message 消息对象
              *  * @param replyCode 错误码
              *  * @param replyText 错误信息
              *  * @param exchange 交换机
              *  * @param routingKey 路由键
              *  */
             @Override
             public void returnedMessage(Message message, int replyCode, String replyText, String exchange, String routingKey) {
                 System.out.println("return 执行了....");
                 System.out.println(message);
                 System.out.println(replyCode);
                 System.out.println(replyText);
                 System.out.println(exchange);
                 System.out.println(routingKey);
                 //处理逻辑
             }
         });

//------------------------------confirm回调---------------------------------------------
        //2. 定义回调
        rabbitTemplate.setConfirmCallback(new RabbitTemplate.ConfirmCallback() {
            /**
             * @param correlationData 相关配置信息
             * @param ack             exchange交换机 是否成功收到了消息。true 成功,false代表失败
             * @param cause           失败原因
             */
            @Override
            public void confirm(CorrelationData correlationData, boolean ack, String cause) {
                System.out.println("confirm方法被执行了....");
                if (ack) {
                    //接收成功
                    System.out.println("接收成功消息" + cause);
                } else {
                    //接收失败
                    System.out.println("接收失败消息" + cause);
                    //做一些处理,让消息再次发送。
                }
            }
        });
        /*** 参数1:交换机名称 * 参数2:路由键名(广播设置为空) * 参数3:发送的消息内容 */
        rabbitTemplate.convertAndSend("topicExchange", "AAAA", "item发送的消息");
        rabbitTemplate.convertAndSend("topicExchange", "item.delete", "item.delete发送的消息");
        rabbitTemplate.convertAndSend("topicExchange222222", "item.de.up", "item.de.up发送的消息");
    }
2.4:启动测试,(这里故意设置第一个消息的路由错误)
消费者端消息的可靠处理 Consumer Ack
- 自动确认:acknowledge="none"
- 手动确认:acknowledge="manual"
- 根据异常情况确认:acknowledge="auto",(这种方式使用麻烦,不作讲解)
在spring整合rabitmq的基础上重新设计消息监听器,之前是实现MessageListener接口,这个接口只能接收消息不能使用channel处理得到消息后的处理,而往往我们得到消息后是需要进行处理的,所以要把消息监听器改为实现ChannelAwareMessageListener 接口
1.设置手动签收。
acknowledge="manual"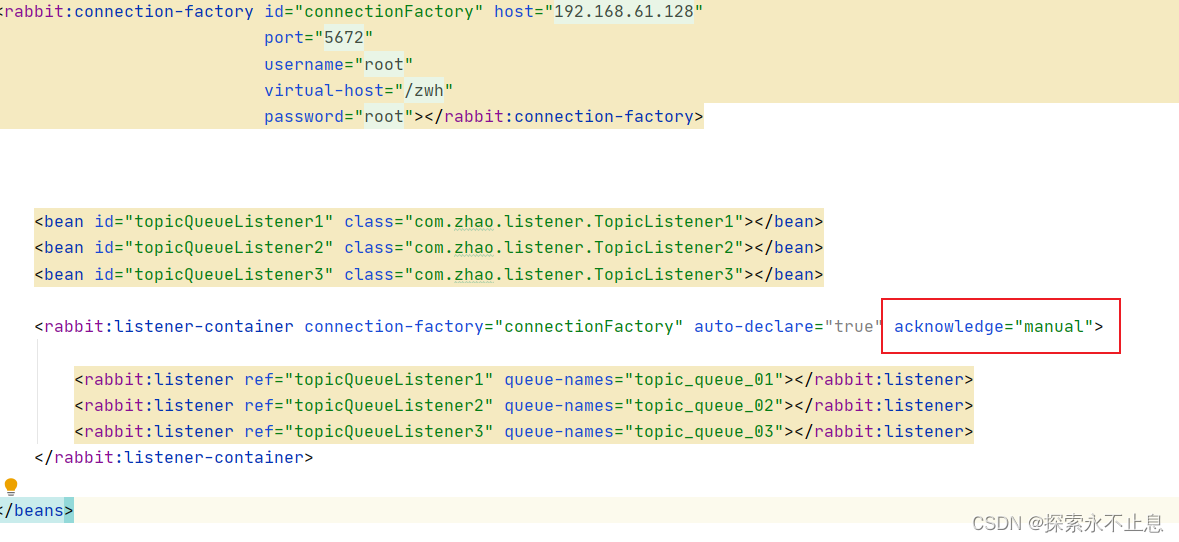
2.重新设计每个路由的监听类,进行消息处理的逻辑以及出现异常的处理:例
package com.zhao.listener;

import com.rabbitmq.client.Channel;
import org.springframework.amqp.core.Message;
import org.springframework.amqp.rabbit.listener.api.ChannelAwareMessageListener;
import org.springframework.stereotype.Component;

@Component
public class TopicListener2 implements ChannelAwareMessageListener {
    @Override
    public void onMessage(Message message, Channel channel) throws Exception {
        /*delivery tag并不是消息的固有属性,是和channel有关的,可以理解为每条消息的id。
        消费者收到消息时,delivery tag已经变成消费者channel的最新值了,不会保持发送方的delivery tag。
        假设3个发送方发了3个消息,tag都是1。那么消费者收到的tag就会是1,2,3。确认时也是按照1 2 3的tag进行确认
        ,rabbit也是知道确认的是哪个消息,因为rabbit内部也是知道每个channel的tag状态。*/
        long deliveryTag = message.getMessageProperties().getDeliveryTag();

    try {
        //1.接收转换消息
        System.out.println(new String(message.getBody()));
        //2. 处理业务逻辑,逻辑处理完了再签收
        System.out.println("处理业务逻辑...");
        //故意出现错误
       // int i = 3/0;
        // 3. 不出现异常手动签收,true表示允许多个消息一起处理
        channel.basicAck(deliveryTag,true);
    } catch (Exception e) {
        e.printStackTrace();
        //4.拒绝签收
        //*第2个参数:true表示允许多个消息一起处理
        // /*第三个参数:requeue:重回队列。如果设置为true,则消息重新回到queue,broker会 重新发送该消息给消费端,直到异常解决后签收 */
        channel.basicNack(deliveryTag,true,true);
        //可替代basicnack(只能一个一个处理,效率不高,不常用)
        //channel.basicReject(deliveryTag,true);
        }
    }

}
3.在spring xml文件中配置监听器和监听队列的对应关系
<?xml version="1.0" encoding="UTF-8"?>
<beans xmlns="http://www.springframework.org/schema/beans" xmlns:xsi="http://www.w3.org/2001/XMLSchema-instance"
       xmlns:context="http://www.springframework.org/schema/context"
       xmlns:rabbit="http://www.springframework.org/schema/rabbit"
       xsi:schemaLocation="http://www.springframework.org/schema/beans
       http://www.springframework.org/schema/beans/spring-beans.xsd
       http://www.springframework.org/schema/context
       https://www.springframework.org/schema/context/spring-context.xsd
       http://www.springframework.org/schema/rabbit
       http://www.springframework.org/schema/rabbit/spring-rabbit.xsd"> <!--加载配置文件-->
    <context:property-placeholder location="classpath:rabbitmq.properties"/>
<rabbit:connection-factory id="connectionFactory" host="${rabbitmq.host}"
                           port="${rabbitmq.port}"
                           username="${rabbitmq.username}"
                           virtual-host="${rabbitmq.virtual-host}"
                           password="${rabbitmq.password}"></rabbit:connection-factory>


    <bean id="topicQueueListener1" class="com.zhao.listener.TopicListener1"></bean>
    <bean id="topicQueueListener2" class="com.zhao.listener.TopicListener2"></bean>
    <bean id="topicQueueListener3" class="com.zhao.listener.TopicListener3"></bean>

    <rabbit:listener-container connection-factory="connectionFactory" auto-declare="true" acknowledge="manual">

        <rabbit:listener ref="topicQueueListener1" queue-names="topic_queue_01"></rabbit:listener>
        <rabbit:listener ref="topicQueueListener2" queue-names="topic_queue_02"></rabbit:listener>
        <rabbit:listener ref="topicQueueListener3" queue-names="topic_queue_03"></rabbit:listener>
    </rabbit:listener-container>

</beans>
4.测试
package com.zhao.listener;
import org.junit.Test;
import org.junit.runner.RunWith;
import org.springframework.test.context.ContextConfiguration;
import org.springframework.test.context.junit4.SpringJUnit4ClassRunner;
import static org.junit.Assert.*;
@RunWith(SpringJUnit4ClassRunner.class)
@ContextConfiguration("classpath:springcontext.xml")
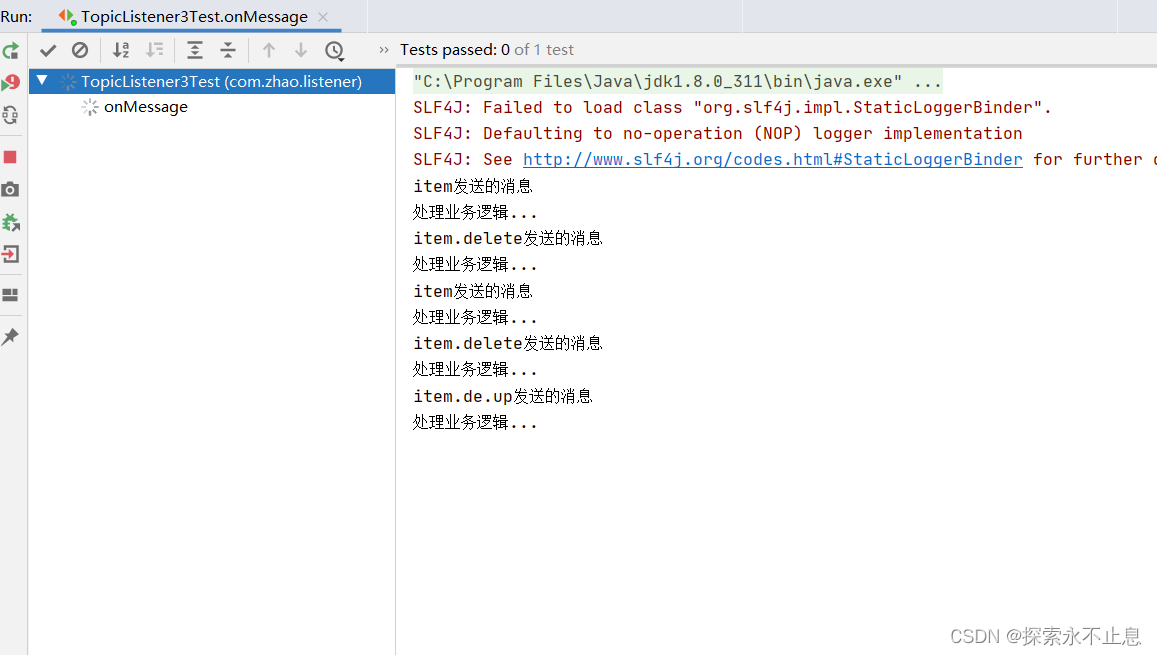
public class TopicListener3Test {
@Test
public void onMessage() {
while (true){}
}
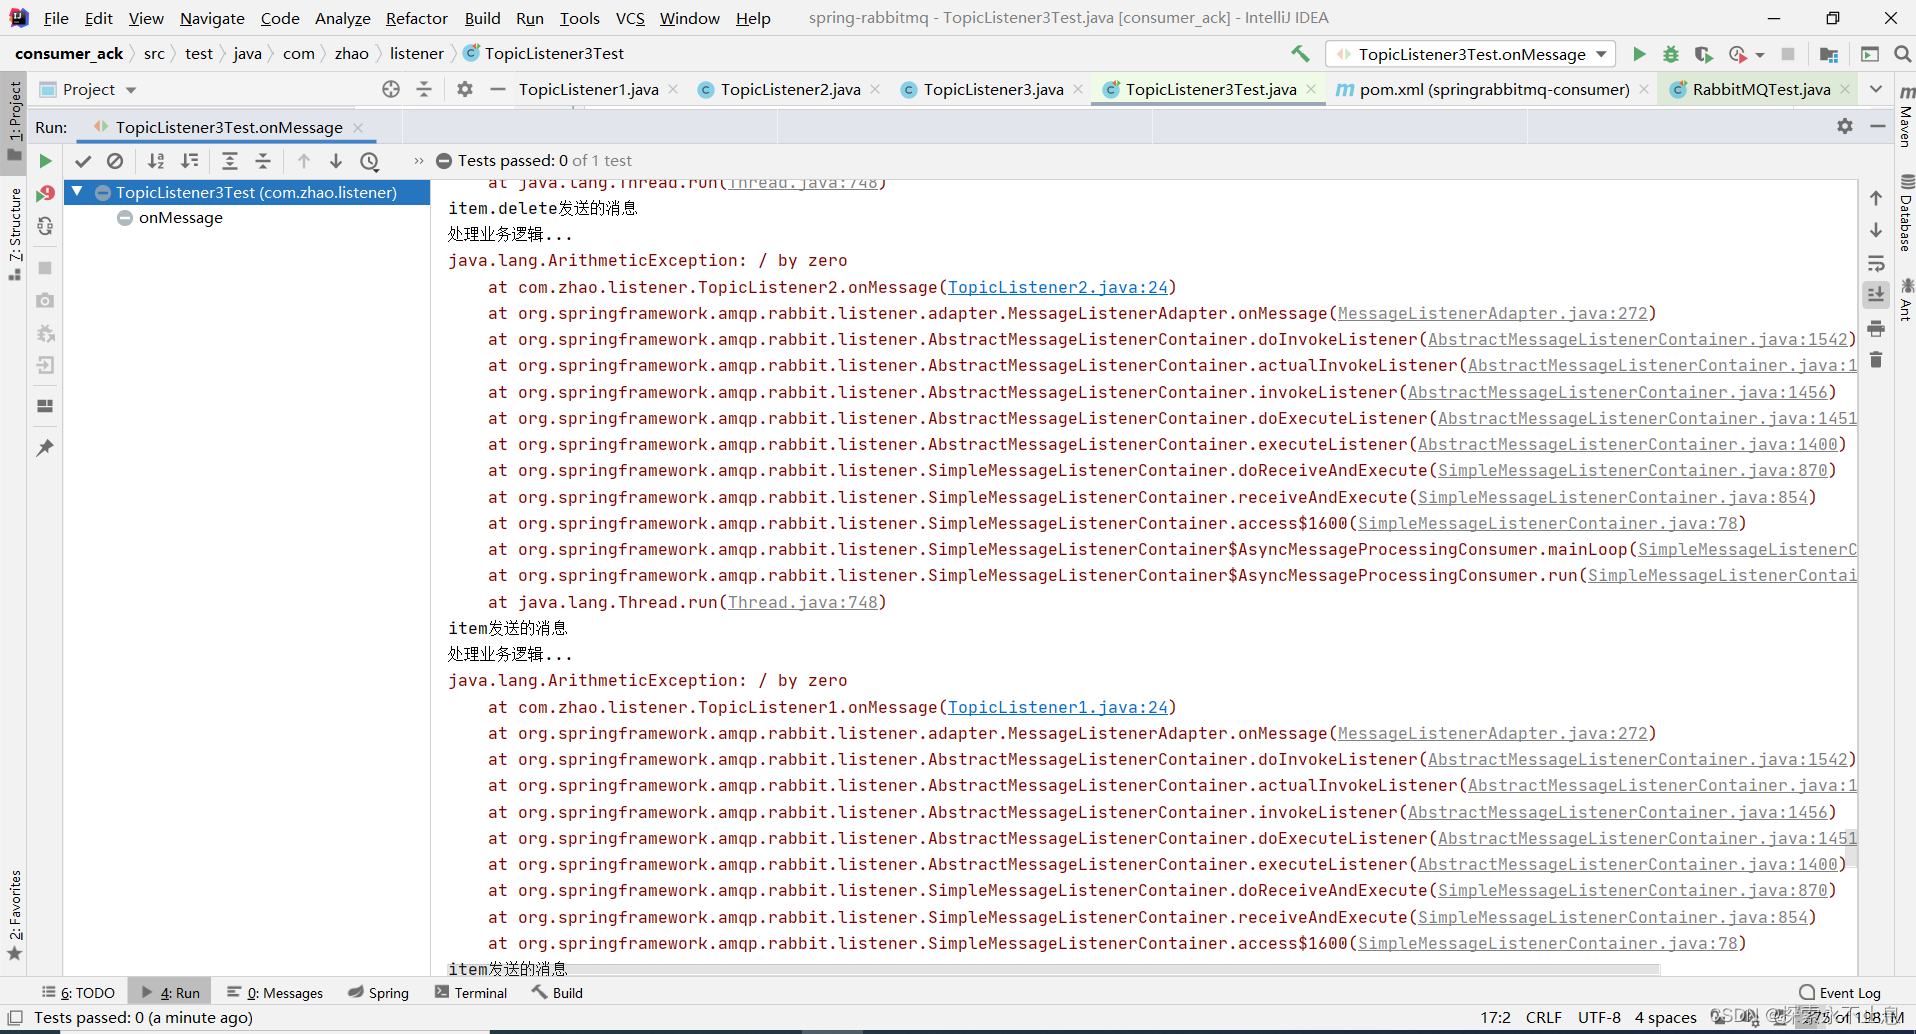
}正常情况:处理完业务后签收
异常情况(3/0) ,消息重回队列,不断尝试发给消费者,直到异常恢复正常
消费端限流实现削峰填谷
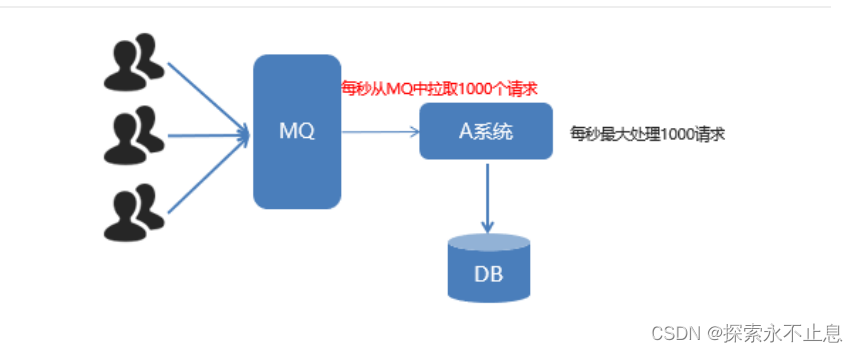

prefetch允许为每个consumer指定最大的unacked messages数目。简单来说就是用来指定一个consumer一次可以从Rabbit中获取多少条message并缓存在client中(RabbitMQ提供的各种语言的client library)。一旦缓冲区满了,Rabbit将会停止投递新的message到该consumer中直到它发出ack。
假设prefetch值设为10,共有两个consumer。意味着每个consumer每次会从queue中预抓取 10 条消息到本地缓存着等待消费。同时该channel的unacked数变为20。而Rabbit投递的顺序是,先为consumer1投递满10个message,再往consumer2投递10个message。如果这时有新message需要投递,先判断channel的unacked数是否等于20,如果是则不会将消息投递到consumer中,message继续呆在queue中。之后其中consumer对一条消息进行ack,unacked此时等于19,Rabbit就判断哪个consumer的unacked少于10,就投递到哪个consumer中。
总的来说,consumer负责不断处理消息,不断ack,然后只要unacked数少于prefetch * consumer数目,broker就不断将消息投递过去。

代码实现TTL设置队列和消息的过期时间

消息过期时间设置(必须是最前面的消息才会生效,如果该消息在中间设置了也没用,很少使用,如果该消息所在队列也设置了过期时间,该消息的过期时间以短的为准)

死信交换机和死信队列(丢弃的队列消息,若不设置死信队列会被丢弃)
以下三种情况会出现死信
- 1. 队列消息长度到达限制;
- 2. 消费者拒接消费消息,basicNack/basicReject,并且不把消息重新放入原目标队列,requeue=false;
- 3. 原队列存在消息过期设置,消息到达超时时间未被消费;
死信交换机和死信队列的工作流程
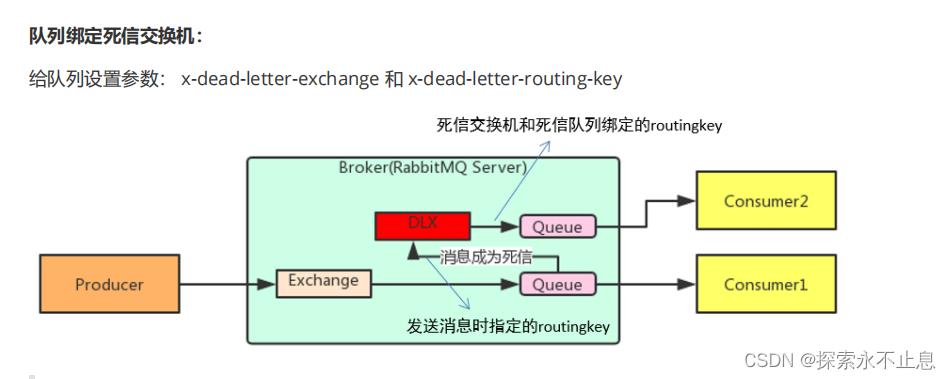
正常队列里的消息一旦成为死信消息后,被队列配置的死信交换机所接受,路由到死信队列,交给死信队列处理,此时正常队列成为消息生产者,正常队列如果要处理死信,需要配置死信交换机,设置发送消息的路由,当然了,需要提前配置好死信交换机和死信队列,以及他们之间的绑定
 <!--  配置死信队列绑定死信交换机-->
    <rabbit:queue name="dlx_queue" id="dlx_queue" auto-declare="true" durable="true"></rabbit:queue>
    <rabbit:topic-exchange name="dlx_exchange" id="dlx_exchange" durable="true" auto-declare="true">
        <rabbit:bindings>
            <rabbit:binding pattern="item.*" queue="dlx_queue"></rabbit:binding>
        </rabbit:bindings>
    </rabbit:topic-exchange>

<!--//设置队列的过期时间-->  <!-- 设置队列的长度限制 max-length,--> <!--正常队列绑定死信交换机,以应对队列出现的死信情况-->
    <rabbit:queue name="topic_queue_01" auto-declare="true">
        <rabbit:queue-arguments>
            <!--x-message-ttl指队列的过期时间,value-type值类型,默认字符串,不指定会报错-->
            <entry key="x-message-ttl" value="10000" value-type="java.lang.Integer"></entry>
            <!--3.1 x-dead-letter-exchange:死信交换机名称-->
            <entry key="x-dead-letter-exchange" value="dlx_exchange" />
            <!--3.2 x-dead-letter-routing-key:死信交换机发送给死信队列的routingkey-->
            <entry key="x-dead-letter-routing-key" value="item.haha" />
            <!--4.2 设置队列的长度限制 max-length,消息超过十条,剩余的消息就会成为死信 -->
            <entry key="x-max-length" value="10" value-type="java.lang.Integer" />
        </rabbit:queue-arguments>
    </rabbit:queue>
rabbitmq实现延迟队列(让消息延迟执行)
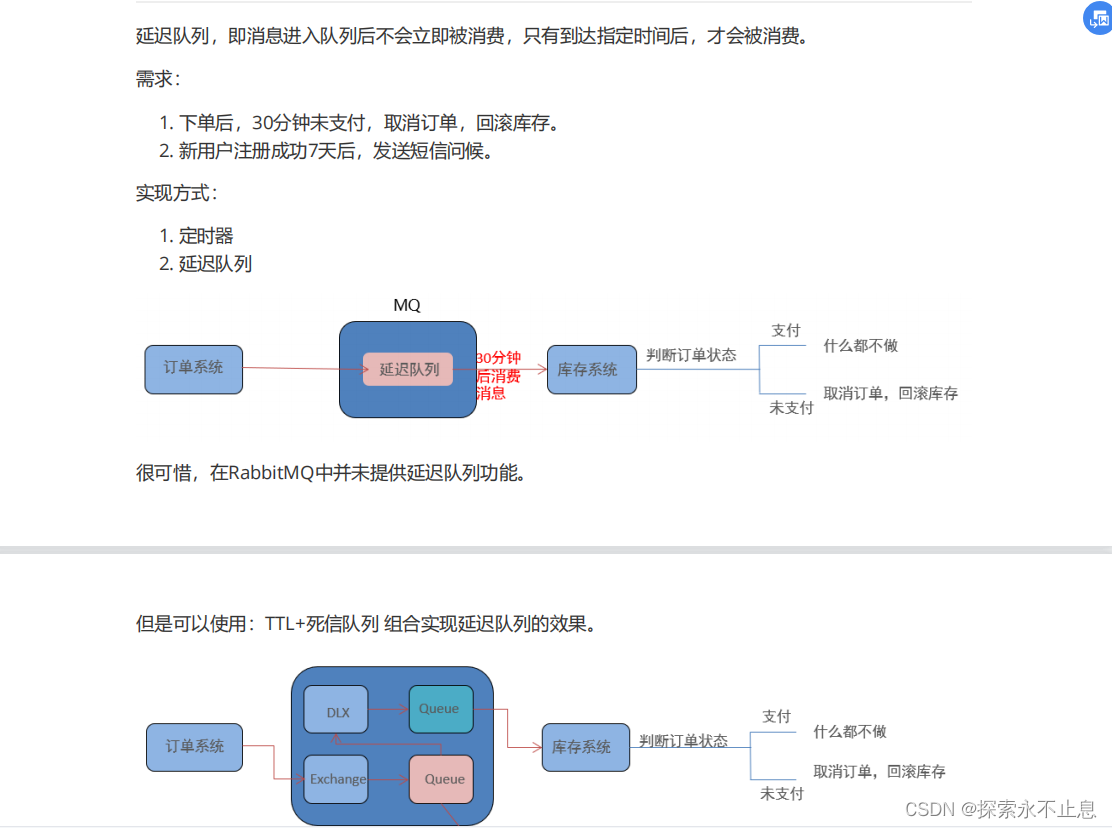
在该例中,库存系统只监听死信队列的消息,正常队列设置消息过期时间30分钟,因为没有消费者,30分钟后自动进入死信队列,然后就被库存系统执行,间接实现延迟执行
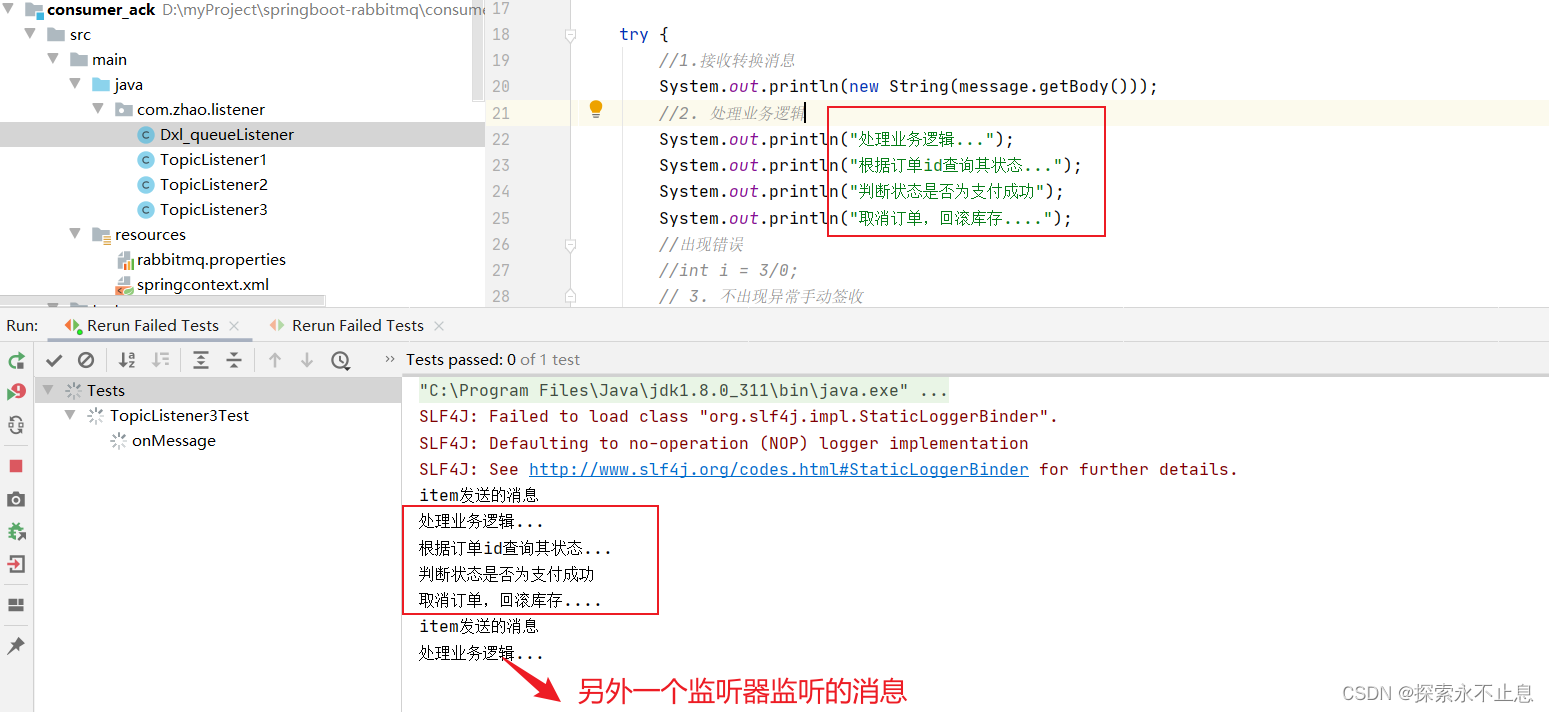
代码实现:在消费者端使用库存系统监听死信队列就好了
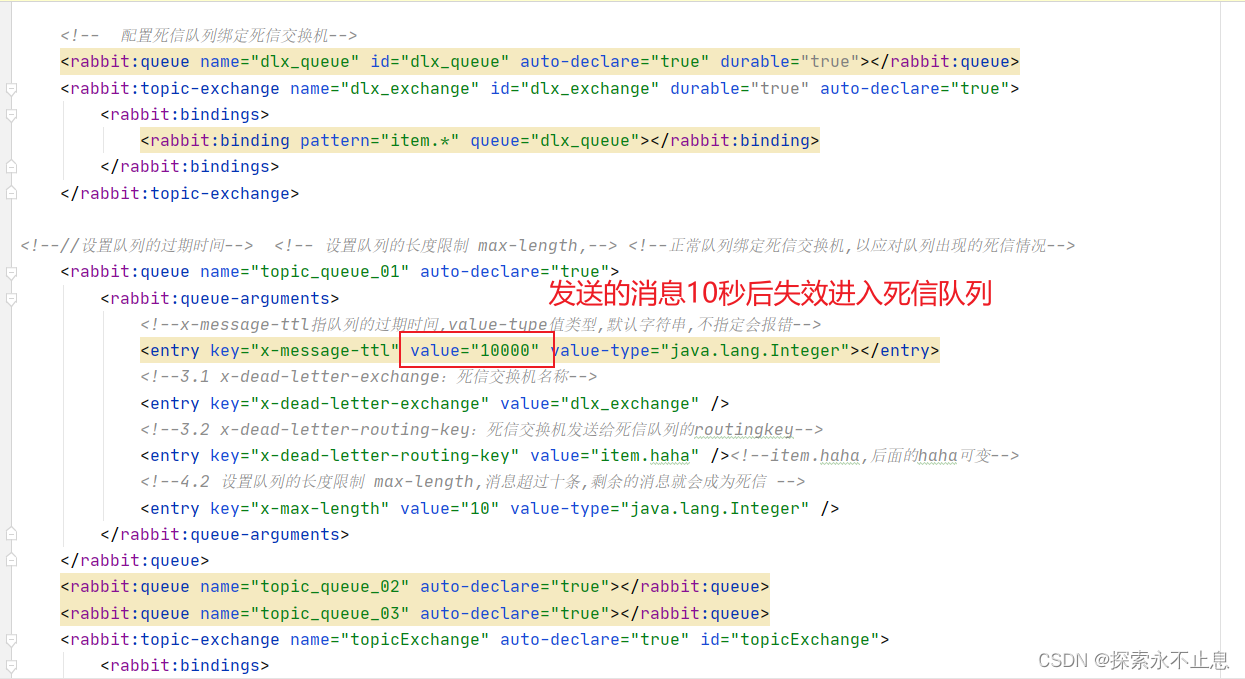
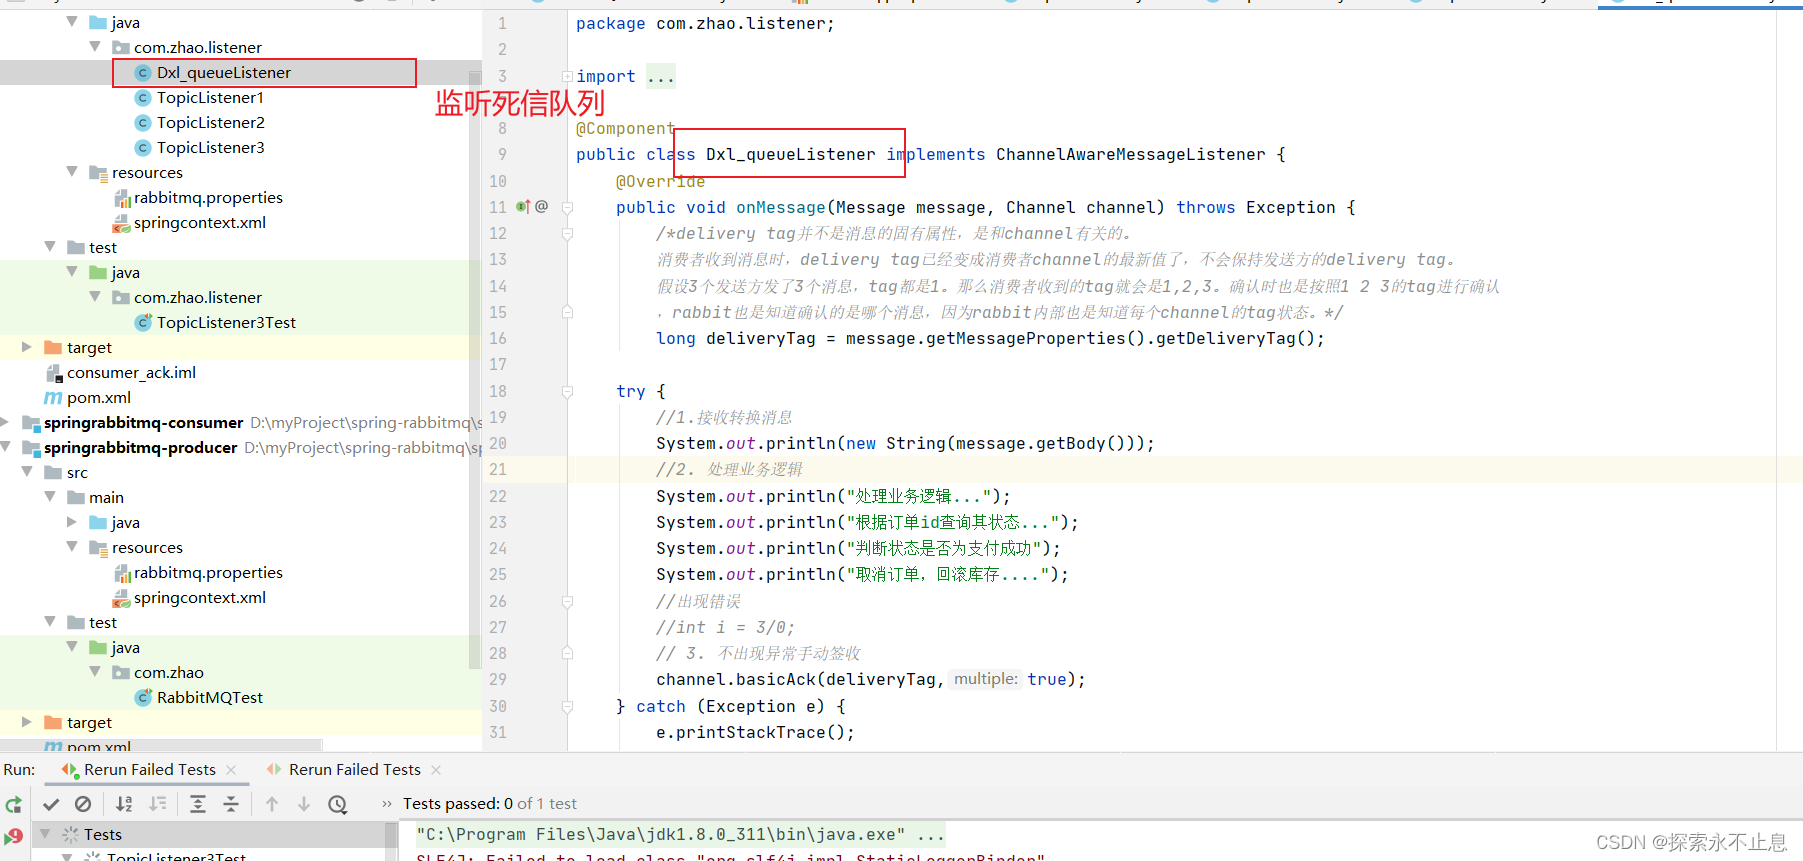

结果:发送的信息10秒后进入死信队列,被死信队列监听器(这里也指库存系统)接收
4.Springboot整合rabbitmq
消息生产者
1.创建项目模块,生成启动类
2.引入pom依赖
    <parent>
        <groupId>org.springframework.boot</groupId>
        <artifactId>spring-boot-starter-parent</artifactId>
        <version>2.1.4.RELEASE</version>
    </parent>
    <dependencies>
        <dependency>
            <groupId>org.springframework.boot</groupId>
            <artifactId>spring-boot-starter-amqp</artifactId>
        </dependency>
        <dependency>
            <groupId>org.springframework.boot</groupId>
            <artifactId>spring-boot-starter-test</artifactId>
        </dependency>
    </dependencies>
3.yml文件中配置rabbitmq
spring:
  rabbitmq:
    host: 192.168.61.128
    virtual-host: /zwh
    port: 5672
    username: root
    password: root
4.配置交换机队列以及绑定关系(这里创建了一个简单模式的和两个topic模式的队列,其他队列同理)
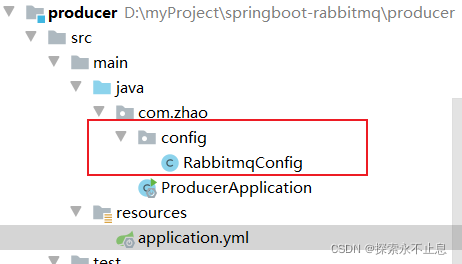
package com.zhao.config;

import com.rabbitmq.client.AMQP;
import org.springframework.amqp.core.*;
import org.springframework.beans.factory.annotation.Qualifier;
import org.springframework.context.annotation.Bean;
import org.springframework.context.annotation.Configuration;

@Configuration
public class RabbitmqConfig {
    //两个topic模式
    public   static final String SPRINGBOOT_TOPIC_EXCHANGE="springboot_topic_exchange";
    public static final String SPRINGBOOT_TOPIC_QUEUE1="springboot_topic_queue1";
    public static final String SPRINGBOOT_TOPIC_QUEUE2="springboot_topic_queue2";
@Bean
//ExchangeBuilder.topicExchange()方法里的参数为交换机名
    public Exchange springbootExchange(){
        return ExchangeBuilder.topicExchange(SPRINGBOOT_TOPIC_EXCHANGE).durable(true).build();
    }
    @Bean
    public Queue springbootTopicQueue1(){
        return QueueBuilder.durable(SPRINGBOOT_TOPIC_QUEUE1).build();
    }
    @Bean
    //QueueBuilder.durable()方法里的参数为队列名
    public Queue springbootTopicQueue2(){
        return QueueBuilder.durable(SPRINGBOOT_TOPIC_QUEUE2).build();
    }
    @Bean
    public Binding topicBind1(@Qualifier("springbootExchange") Exchange exchange,
                             @Qualifier("springbootTopicQueue1")Queue queue1){
        return BindingBuilder.bind(queue1).to(exchange).with("item.#").noargs();
    }
    @Bean
    //@Qualifier注解,qualifier的意思是合格者,通过这个标示,表明了哪个实现类才是我们所需要的,
    public Binding topicBind2(@Qualifier("springbootExchange") Exchange exchange,
                             @Qualifier("springbootTopicQueue2")Queue queue2){
        return BindingBuilder.bind(queue2).to(exchange).with("item.*").noargs();
    }

//一个简单模式,不需要声明交换机,不需要进行绑定,默认
    @Bean
    public Queue simpleQueue(){
     return QueueBuilder.durable("springboot_simpleQueue").build();
    }
}
5.测试
package com.zhao;
import com.zhao.config.RabbitmqConfig;
import org.junit.Test;
import org.junit.runner.RunWith;
import org.springframework.amqp.rabbit.core.RabbitTemplate;
import org.springframework.beans.factory.annotation.Autowired;
import org.springframework.boot.test.context.SpringBootTest;
import org.springframework.test.context.junit4.SpringRunner;
@RunWith(SpringRunner.class)
@SpringBootTest
public class SpringbootRabbitmqTest {
@Autowired
private RabbitTemplate rabbitTemplate;
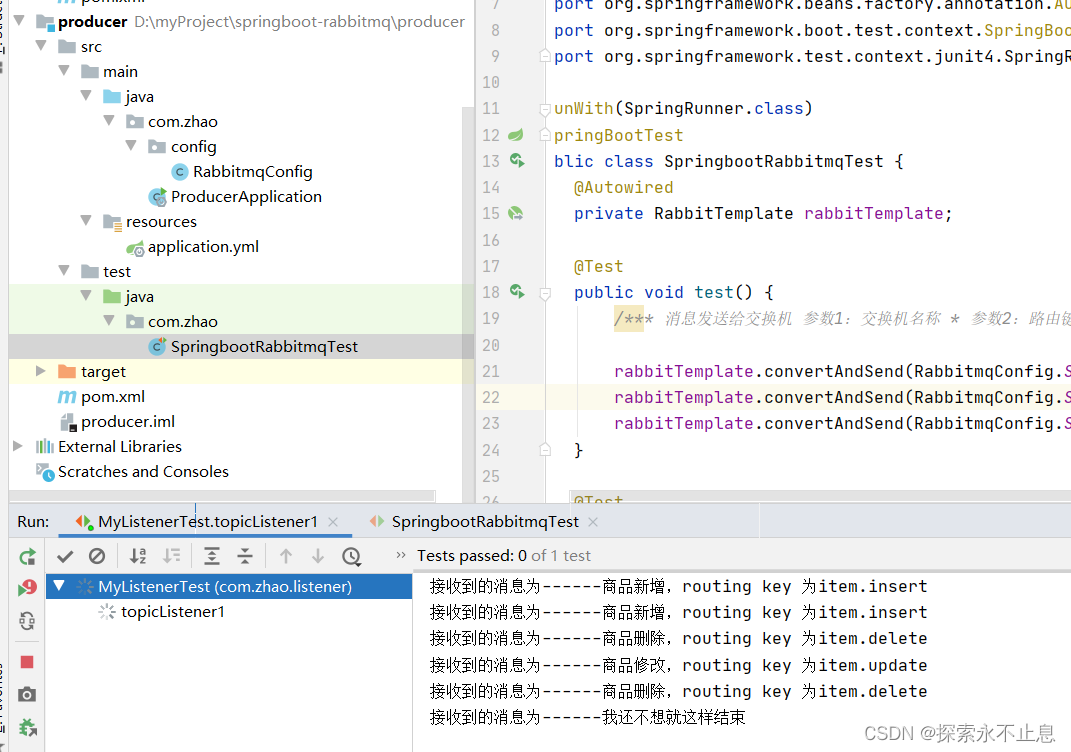
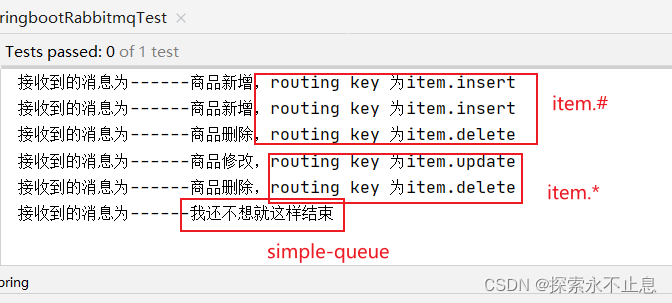
@Test
public void test() {
/*** 消息发送给交换机 参数1:交换机名称 * 参数2:路由键名(广播设置为空) * 参数3:发送的消息内容 */
rabbitTemplate.convertAndSend(RabbitmqConfig.SPRINGBOOT_TOPIC_EXCHANGE, "item.insert", "商品新增,routing key 为item.insert");
rabbitTemplate.convertAndSend(RabbitmqConfig.SPRINGBOOT_TOPIC_EXCHANGE, "item.update.you", "商品修改,routing key 为item.update");
rabbitTemplate.convertAndSend(RabbitmqConfig.SPRINGBOOT_TOPIC_EXCHANGE, "item.delete", "商品删除,routing key 为item.delete");
}
@Test
public void test1() {
/*** 消息发送给交换机 参数1:交换机名称 * 参数2:路由键名(广播设置为空) * 参数3:发送的消息内容 */
rabbitTemplate.convertAndSend("","springboot_simpleQueue","我还不想就这样结束");
}
}
消息消费者
1.前三步同生产者
2.设置监听器,监听特定路由里的消息(springboot不像springmvc那样麻烦,只需要一个监听器类,在方法上使用注解指定路由)
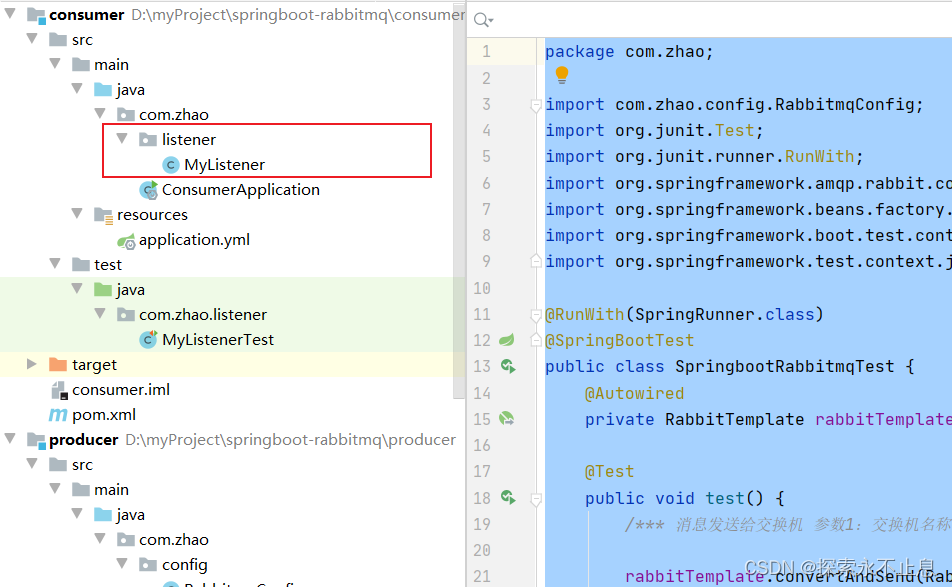
package com.zhao.listener;

import org.springframework.amqp.rabbit.annotation.RabbitListener;
import org.springframework.stereotype.Component;

@Component
public class MyListener {
    @RabbitListener(queues = "springboot_topic_queue1")
    public void topicListener1(String message){
        System.out.println("接收到的消息为------"+message);
    }
    @RabbitListener(queues = "springboot_topic_queue2")
    public void topicListener2(String message){
        System.out.println("接收到的消息为------"+message);
    }
    @RabbitListener(queues = "springboot_simpleQueue")
    public void simpleListener(String message){
        System.out.println("接收到的消息为------"+message);
    }
}
3.创建测试类测试一下(先启动生产者端)
package com.zhao.listener;

import org.junit.Test;
import org.junit.runner.RunWith;
import org.springframework.boot.test.context.SpringBootTest;
import org.springframework.test.context.junit4.SpringRunner;

import static org.junit.Assert.*;
@RunWith(SpringRunner.class)
@SpringBootTest
public class MyListenerTest {

    @Test
    public void topicListener1() {
        while (true){}
    }
}


 5905
5905


 被折叠的 条评论
为什么被折叠?
被折叠的 条评论
为什么被折叠?
 到【灌水乐园】发言


