


转载自:http://www.jeeboot.com/archives/1225.html
本章将探索 Ext JS 的高级组件 grid 。还将使用它帮助读者建立一个功能齐全的公司目录。本章介绍下列几点主题:
- 基本的 grid
- 排序
- 渲染器
- 过滤
- 分页
- 单元格编辑
- 行编辑
- 分组
- 分组 grid(pivot grid)
- 公司目录 —一个示例项目
grid 组件是 Ext JS 中最强大的一个组件。它有很多的选项和配置,能以任何你希望的形式来构建 grid。
Ext JS 的 grid 组件提供完整的支持分页,排序,过滤,搜索,编辑行,编辑单元格,分组,工具栏,滚动缓冲,列的调整和隐藏,列分组,多重排序,行扩展等,强大且实用的功能。
本章的主要目标是为你展示 Ext JS 的 grid 组件的功能以及如何利用这些提供的功能来构建一个简单的应用 公司目录(Company Directory)。最终的设计如下图所示:
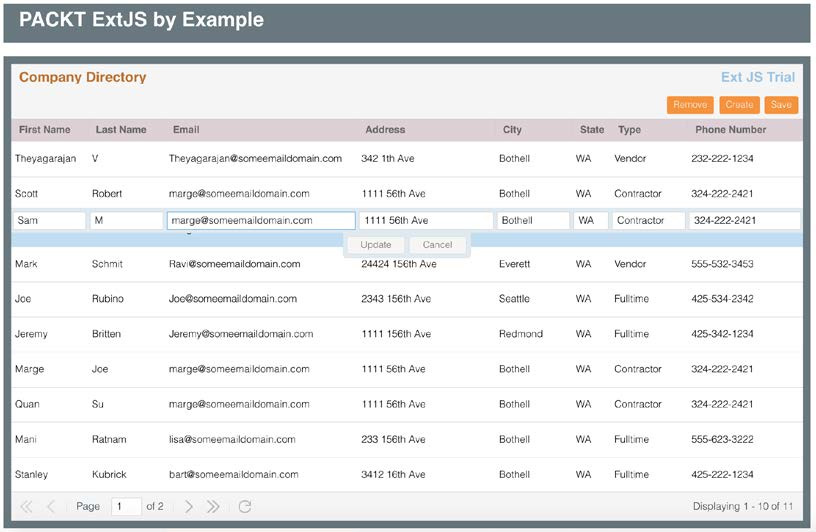
这个示例项目中使用的最重要的组件就是 grid ,分页栏,和行编辑插件。同时这个示例项目中也涉及了其他的前面章节所学过的内容。
基本的 grid
让我们从最基本的 grid 开始,创建一个 grid 组件,使用 Ext.grid.Panel ,你至少需要制定 grid 面板有哪些列和指定 store 来获取数据。这个类名,在现代化工具包(modern toolkit)中是 Ext.grid.Grid,但是在经典工具包(classic toolkit)中是 Ext.grid.Panel 。这两者有一些细微的区别,但是大多数概念是相同的。
我们首先创建一个 store 使用内置硬编码的 model 数据。
下列 model 使用的三个字符串类型的字段,store 使用内置数据并指定了所使用的 model :
Ext.define('Product', {
	extend: 'Ext.data.Model',
	fields: [ 'id', 'productname', 'desc', 'price' ]
});
var productStore = Ext.create('Ext.data.Store', {
model: 'Product',
data: [{
id: 'P1',
productname: 'Ice Pop Maker',
desc: 'Create fun and healthy treats anytime',
price: '$16.33'
}, {
id: 'P2',
productname: 'Stainless Steel Food Jar',
desc: 'Thermos double wall vacuum insulated food jar',
price: '$14.87'
},{
id: 'P3',
productname: 'Shower Caddy',
desc: 'Non-slip grip keeps your caddy in place',
price: '$17.99'
}, {
id: 'P4',
productname: 'VoIP Phone Adapter',
desc: 'Works with Up to Four VoIP Services Across One Phone Port',
price: '$47.50'
}]
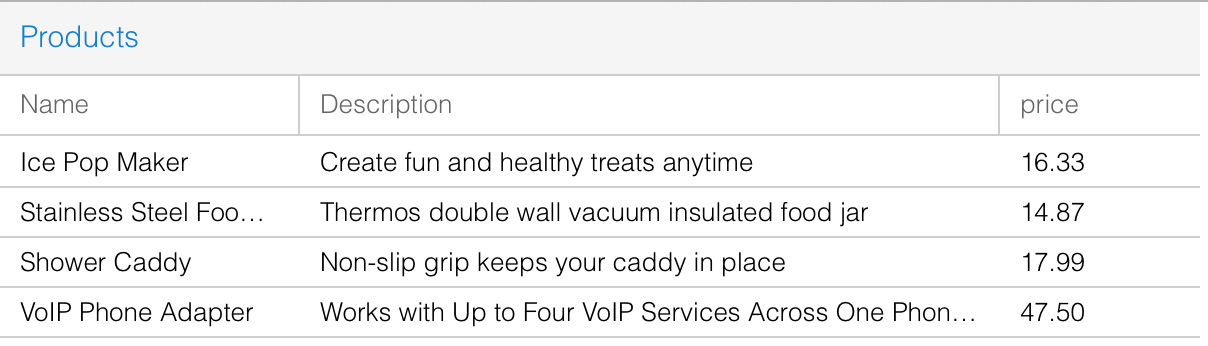
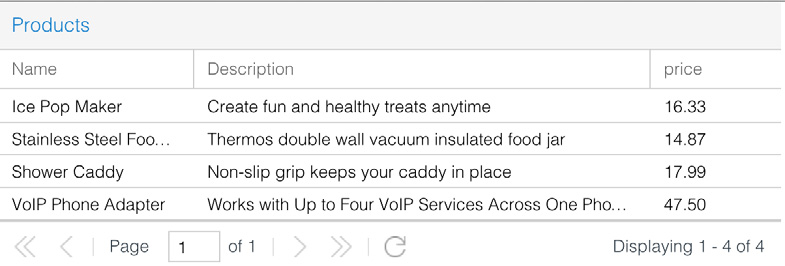
});OK,现在可以使用 Ext.grid.Panel 来创建 grid 了,记得要指定 store 。每一列都可以设置 width 和 flex 。我们将 ‘Description’ 列设置 flex 为 1 ,指定这个属性,这一列会使用其他两列余下的所有宽度。
列的 dataIndex 属性是指定对应 Product 模型中的哪个字段。为 id 列设置 hidden 属性 为 true 使该列保持隐藏,如以下代码所示:
Ext.create('Ext.grid.Panel', {
	renderTo: Ext.getBody(),
	store: productStore,
	width: 600,
	title: 'Products',
	columns: [{
		text: 'Id',
		dataIndex: 'id',
		hidden: true
	},{
		text: 'Name',
		width:150,
		dataIndex: 'productname'
	},{
		text: 'Description',
		dataIndex: 'desc',
		sortable: false,
		flex: 1
	},{
		text: 'price',
		width: 100,
		dataIndex: 'price'
	}]
});
下列截图为以上代码的输入。默认的列宽度是可调整的;如果需要你可以指定一个固定宽度。
排序
这是默认的列菜单,可以用来排序,隐藏或显示列。点击每一列上的细箭头图标,这个列菜单就会显示。排序功能可以从界面或代码上添加:
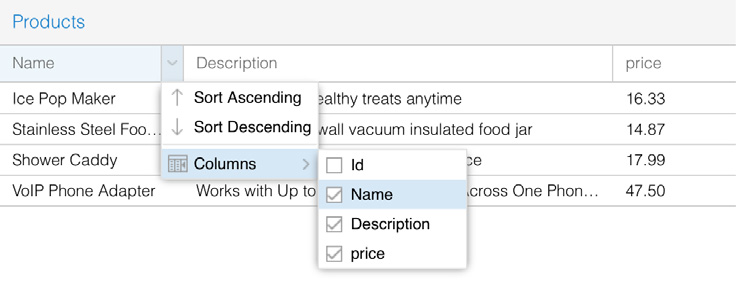
使用代码的写法,为列 Description 设置 sortable 属性为 false ,此选项将为这个列隐藏排序。
默认的排序是客户端排序。如果想开启服务端排序,你需要为 store 设置 remoteSort 属性 为 true 。这时候你界面选择排序后,store 将会把排序信息(字段和排序次序)作为参数发送到服务器。
renderer
列的 renderer 配置可以用来改变列内容的呈现方式。你也许已经注意到 price 列并没有显示货币符号。现在我们使用 renderer 属性为 price 列的值增加 $ 作为前缀:
Ext.create('Ext.grid.Panel', {
	renderTo: Ext.getBody(),
	store: productStore,
	width: 600,
	title: 'Products',
	columns: [{
		text: 'Id',
		dataIndex: 'id',
		hidden: true
	}, {
		text: 'Name',
		width:150,
		dataIndex: 'productname'
	}, {
		text: 'Description',
		dataIndex: 'desc',
		sortable: false,
		flex: 1
	}, {
		text: 'price',
		width: 100,
		dataIndex: 'price',
		renderer: function(value) {
			return Ext.String.format('${0}', value);

		}
	}]
});
输出如下所示:

同样的,你可以使用 renderer 来描绘 HTML 标签到列中。还有 URL 和图片。
过滤
通过添加 Ext.grid.filters.Filters (ptype: gridfilters) 插件到 grid 并对列进行配置可以很容易实现过滤功能:
Ext.create('Ext.grid.Panel', {
	renderTo: Ext.getBody(),
	store: productStore,
	plugins: 'gridfilters',
	width: 600,
	title: 'Products',
	columns: [{
		text: 'Id',
		dataIndex: 'id',
		hidden: true
	},{
		text: 'Name',
		width:150,
		dataIndex: 'productname',
		filter:'string'
	},{
		text: 'Description',
		dataIndex: 'desc',
		sortable: false,
		flex: 1,
		filter: {
			type: 'string',
			itemDefaults: {
				emptyText: 'Search for…'
			}
		}
	},{
		text: 'price',
		width: 100,
		dataIndex: 'price'
	}]
});
对每一列你都可以指定过滤类型,例如 string, bool, 等等,还有检索字段的额外配置(例如 emptyText 就是空文本时的提示内容)。
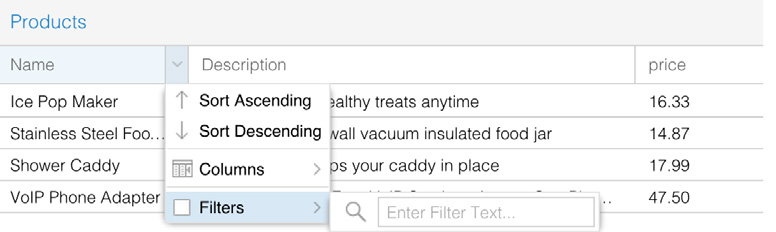
这里是演示的在创建时添加过滤器,但也是可以在 grid 创建后再添加的。
分页
如果你有成千上万的数据,你肯定不想一次加载上万条记录(这句是废话啊),更好的方法是添加分页工具栏,或者使用缓冲滚动条。
现在我们在之前的例子上添加分页工具栏 Ext.toolbar.Paging (xtype: pagingtoolbar)。这里我们将会把分页工具栏添加到 dockedItems ,它是 Ext.panel.Panel 的一个属性, 并且 dockedItems 里配置的项可以设置停驻在 panel 的任意 上,下,左或右边。
Ext.create('Ext.grid.Panel', {
	renderTo: Ext.getBody(),
	store: productStore,
	width: 600,
	title: 'Products',
	columns: [{
		text: 'Id',
		dataIndex: 'id',
		hidden: true
	},{
		text: 'Name',
		width:150,
		dataIndex: 'productname'
	},{
		text: 'Description',
		dataIndex: 'desc',
		sortable: false,
		flex:1
	},{
		text: 'price',
		width: 100,
		dataIndex: 'price'
	}],
	dockedItems: [{
		xtype: 'pagingtoolbar',
		store: productStore,
		dock: 'bottom',
		displayInfo: true
	}]
});
然后,下面这是 store 的代码,store 从 JSON 文件中读取数据:
var productStore = Ext.create('Ext.data.Store', {
	model: 'Product',
	pageSize: 10,
	autoLoad: true,
	proxy: {
		type: 'ajax',
		url: 'data.json',
		reader: {
			type: 'json',
			rootProperty: 'data',
			totalProperty: 'total'
		}
	}
});
rootProperty 属性告诉 store 从 JSON 文件中哪个地方查找记录,同时 totalProperty 属性让 store 知道从哪里读取记录总数。 为了得到正确的结果,当你使用服务器分页时,需要指定 totalProperty 属性,因为这个值将用于分页工具栏。
pageSize 属性的值为 10 它为每页显示的记录数。
- 这个参数用于服务器处理分页,并且返回所请求的数据,而不是整个集合。如果你是从文件中读,那么响应将包含 JSON 文件中的所有记录。
使用了分页工具栏的结果输出:
单元格编辑
grid 中的单元格编辑插件为 Ext.grid.plugin.CellEditing 。可以为 grid 添加单元格编辑的支持。
OK,现在为 grid 添加单元格编辑的功能,简单的添加 cellditing 插件并为必要的列设置编辑器。你可以添加所有列都可以支持单元格编辑,或者为指定列添加编辑器。
单元格编辑器可以是简单的文本框,或者你也可以添加一些复杂的组件,例如 combobox(附带的为 combobox 添加 store 支持)。
下列例子添加了一个文本框编辑器到一个列,和添加了一个 combobox (附带的为 combobox 添加 store 支持)到另一个列:
Ext.create('Ext.grid.Panel', {
	renderTo: Ext.getBody(),
	store: productStore,
	plugins: ['cellediting','gridfilters'],
	width: 600,
	title: 'Products',
	columns: [{
		text: 'Id',
		dataIndex: 'id',
		hidden: true
	},{
		text: 'Name',
		width:150,
		dataIndex: 'productname',
		filter:'string',
		editor: {
			allowBlank: false,
			type: 'string'
		}
	},{
		text: 'Description',
		dataIndex: 'desc',
		sortable: false,
		flex: 1
	},{
		text: 'Price',
		width: 100,
		dataIndex: 'price'
	},{
		text: 'Type',
		width: 100,
		dataIndex: 'type',
		editor: new Ext.form.field.ComboBox({
			typeAhead: true,
			triggerAction: 'all',
			store: [
			    [ 'Bath','Bath'],
			    [ 'Kitchen','Kitchen'],
			    [ 'Electronic','Electronic'],
			    [ 'Food', 'Food'],
			    [ 'Computer', 'Computer' ]
			]

		})
	}]
});
上面的例子中,以下代码是用于设置编辑器的 Type ,不过这里我们使用了硬编码的内置数据,但是它是可以配置从服务器读取数据的:
editor: new Ext.form.field.ComboBox({
    typeAhead: true,
    triggerAction: 'all',
    store: [
        ['Bath','Bath'],
        ['Kitchen','Kitchen'],
        ['Electronic','Electronic'],
        ['Food', 'Food'],
        ['Computer', 'Computer']
    ]
})
Type 可以是任意的受支持的表单组件,例如日期选择器,复选框,单选按钮,数字文本框等等。另外也可以为编辑器添加表单校验功能。

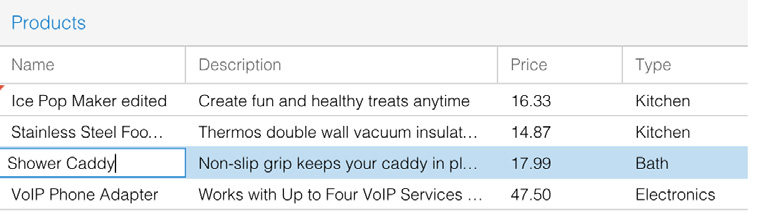
截图为以上代码的输出结果:
一旦编辑了记录,默认不会存到服务器。你可以设置 store 的 autosync 属性为 true ,这将会触发一个 CRUD 的请求到服务器。
如果你不希望同步立即发生,那么你可以在需要时调用 store 的 save 或 sync 方法。例如可以在 grid 的头部添加 Save 按钮 来调用 store 的 save 或 sync 方法。
文本框编辑器,注意有一个小红色标记在第一行第一列的左上角。这个标记是让用户知道这行记录有更新。
行编辑
在单元格编辑的一节中,你每次只能编辑一个单元格,但是在行编辑中,你每次可以编辑一行内容。
使用行编辑插件:Ext.grid.plugin.RowEditing 替换掉单元格编辑插件。你只需要在上面的代码中把 [‘cellediting’,‘gridfilters’] 替换为 [‘rowediting’,‘gridfilters’] 你将得到以下输出:

这个行编辑插件也会应用到本章接下来的示例项目中,你会在那里找到额外的一些内容。
分组
为了对列进行分组,你需要在 store 的 groupField 属性上指定分组字段,并且我们需要在 grid 设置 Ext.grid.feature.Feature ,如以下代码所示:
var productStore = Ext.create('Ext.data.Store', {
model: 'Product',
pageSize: 10,
autoLoad: true,
proxy: {
type: 'ajax',
url: 'data.json',
reader: {
type: 'json',
rootProperty: 'data',
totalProperty: 'total'
}
},
groupField: 'type'
});
Ext.create('Ext.grid.Panel', {
renderTo: Ext.getBody(),
store: productStore,
width: 600,
title: 'Products',
features: [{
id: 'group',
ftype: 'grouping',
groupHeaderTpl : '{name}',
hideGroupedHeader: true,
enableGroupingMenu: false
}],
columns: [{
text: 'Id',
dataIndex: 'id',
hidden: true
},{
text: 'Name',
width:150,
dataIndex: 'productname'
},{
text: 'Description',
dataIndex: 'desc',
sortable: false,
flex: 1,
groupable:false
},{
text: 'Price',
width: 100,
dataIndex: 'price'
},{
text: 'Type',
width: 100,
dataIndex: 'type'
}]
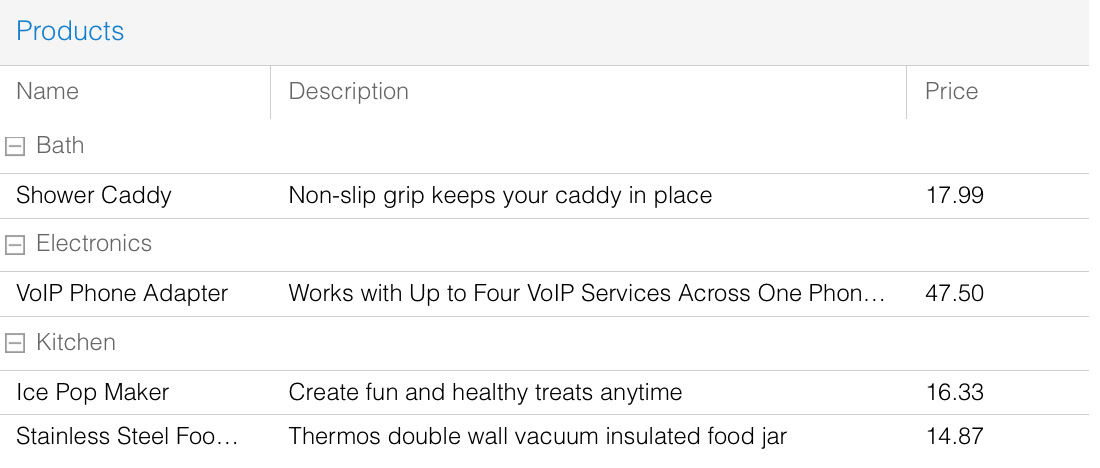
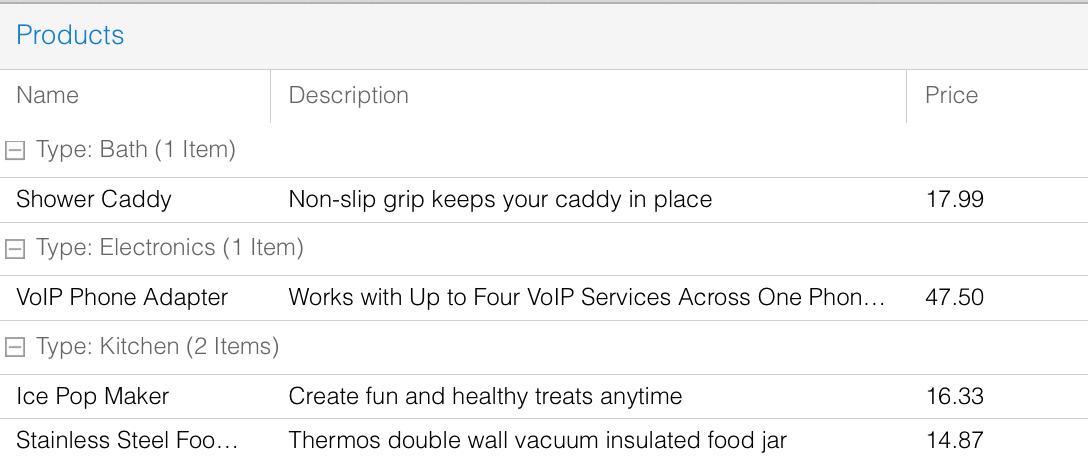
});以上代码所示的输出:
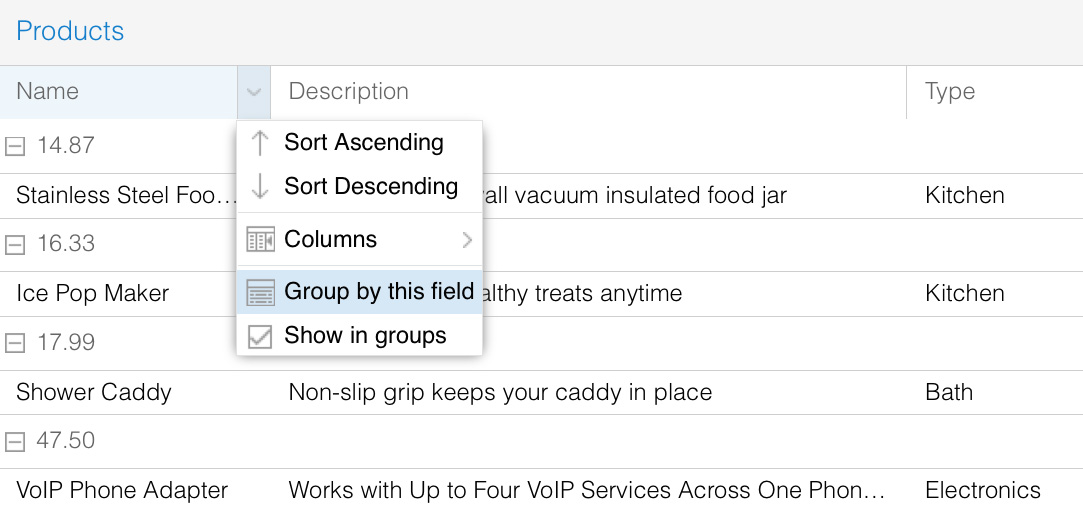
下图显示了分组菜单。使用此菜单,可以在运行时通过 grid 的其他字段分组。这个选项可以设置 enableGroupingMenu 属性为 false 来关闭,上面的代码已经有例子了。
分组的模板可以用来添加一些额外的信息,例如分组后的数量或其他任何你想要的信息,通过 groupHeaderTpl : ‘{name}’,来实现。现在将上面的代码修改为 groupHeaderTpl : ‘{columnName}: {name} ({rows.length} Item{[values. rows.length > 1 ? “s” : “”]})’, 得到下列输出:
pivot grid
这可以让你重新整理和汇总选定的列数据和行数据,以获得所需的报表。
比方说你有一个公司的员工提交的费用数据列表,然后你想看到每个类别,每个员工要求的总费用合计。
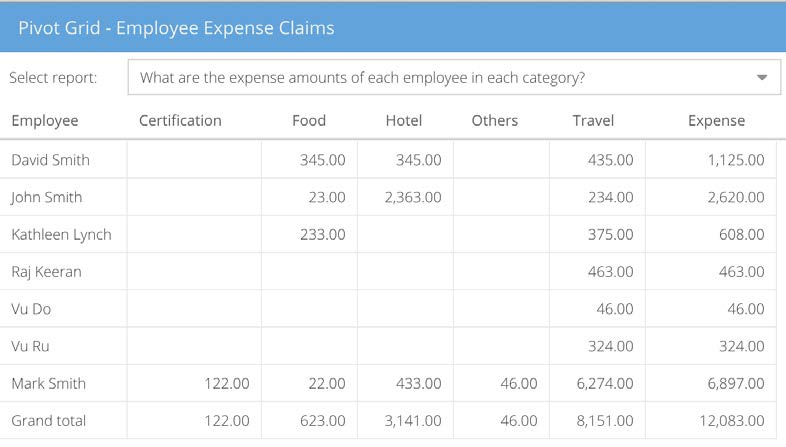
在 grid 里,你需要组织和总结列得到这样的结果,而不是得到费用列表。使用 pivot grid 可以很容易做到。注意除了第一列,其他的列标题的值为这个费用列表中费用类别的值,所以,你看到的数据是已经重新汇总和整理过的。
当你使用 pivot grid ,有两个重要的事需要你准备: axis(轴)和aggregates(聚合) 。 你应该使用 axis 指定行和列的位置以及使用聚合进行分组计算。
这是一个例子:
leftAxis: [{   width: 80,   dataIndex: 'employee',   header: 'Employee'}]

topAxis: [{   dataIndex: 'cat',   header: 'Category',   direction: 'ASC' }]
在轴中你可以指定排序,排序方向,过滤器等等。
aggregate: [{
    measure: 'amount',
    header: 'Expense',
    aggregator: 'sum',
    align: 'right',
    width: 85,
    renderer: Ext.util.Format.numberRenderer('0,000.00')
}
里聚合可以进行 sum ,avg , min , max ,等等and so on.
在 pivot grid 中,你也可以指定 renderer 属性自定义格式化数据:
renderer: function(value, meta, record) {
    return Ext.util.Format.number(value, '0,000.00');
}
现在可以创建 pivot grid 了。 这是用于 pivot grid 的 store 组件:
var store = new Ext.data.JsonStore({
proxy: {
type: 'ajax',
url: 'expense.json',
reader: {
type: 'json',
rootProperty: 'rows'
}
},
autoLoad: true,
fields: [{
name: 'id',
type: 'int'
},{
name: 'employee',
type: 'string'
},{
name: 'amount',
type: 'int'
},{
name: 'date',
type: 'date',
dateFormat: 'd/m/Y'
},{
name: 'cat',
type: 'string'
},{
name: 'year',
convert: function(v, record){
return Ext.Date.format(record.get('date'), "Y");
}
}]
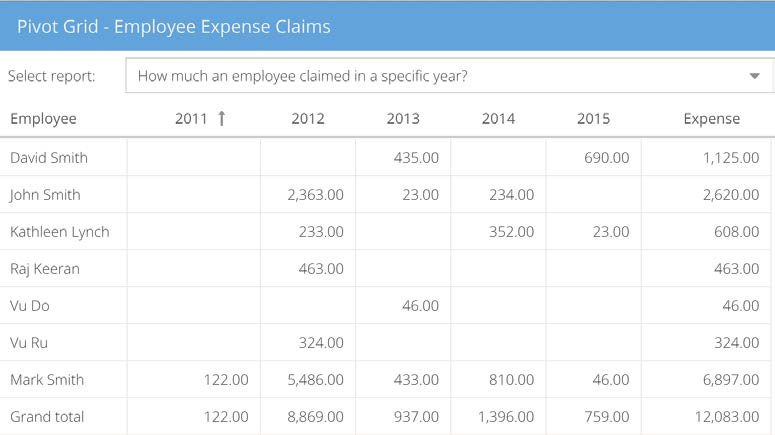
});下面是 pivot grid 的例子代码。这里你可以看到 leftAxis 是固定的,而 topAxis 为动态的,基于一个下拉选择来改变 topAxis 。
var pivotGrid = Ext.create('Ext.pivot.Grid', {
	renderTo: Ext.getBody(),
	title: 'Pivot Grid - Employee Expense Claims',
	height: 600,
	width: 700,
	enableLocking: false,
	viewConfig: {
		trackOver: true,
		stripeRows: false
	},
	tbar: [{
		xtype: 'combo',
		fieldLabel: 'Select report',
		flex: 1,
		editable: false,
		value: '1',
		store: [
		    ['1', 'How much an employee claimed in total?'],
		    ['2', 'What are the expense amounts of each employee in each category?'],
		    ['3', 'How much an employee claimed in a specific year?']
		],
		listeners: {
			select: function(combo, records, eOpts){
				switch(records.get('field1')){
				case '1':
					pivotGrid.reconfigurePivot({
						topAxis: []
					});
					break;
				case '2':
					pivotGrid.reconfigurePivot({
						topAxis: [{
							dataIndex: 'cat',
							header: 'Category',
							direction: 'ASC'
						}]
					});
					break;
				case '3':
					pivotGrid.reconfigurePivot({
						topAxis: [{
							dataIndex: 'year',
							header: 'Year',
							direction: 'ASC'
						}]
					});
					break;
				}
			}
		}
	}],
	store: store,
	aggregate: [{
		measure: 'amount',
		header: 'Expense',
		aggregator: 'sum',
		align: 'right',
		width: 85,
		renderer: Ext.util.Format.numberRenderer('0,000.00')
	}],
	leftAxis: [{
		width: 80,
		dataIndex: 'employee',
		header: 'Employee'
	}],
	topAxis: []
});
下面的截图显示以上代码的输出:

公司目录 – 一个示例项目
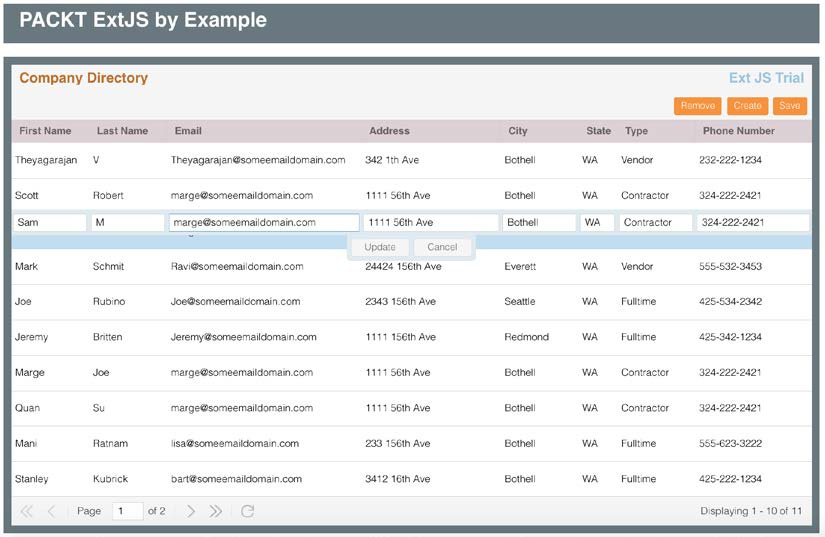
好了,现在我们将使用所学知识创建一个示例项目。以下截屏显示示例项目的最终效果:
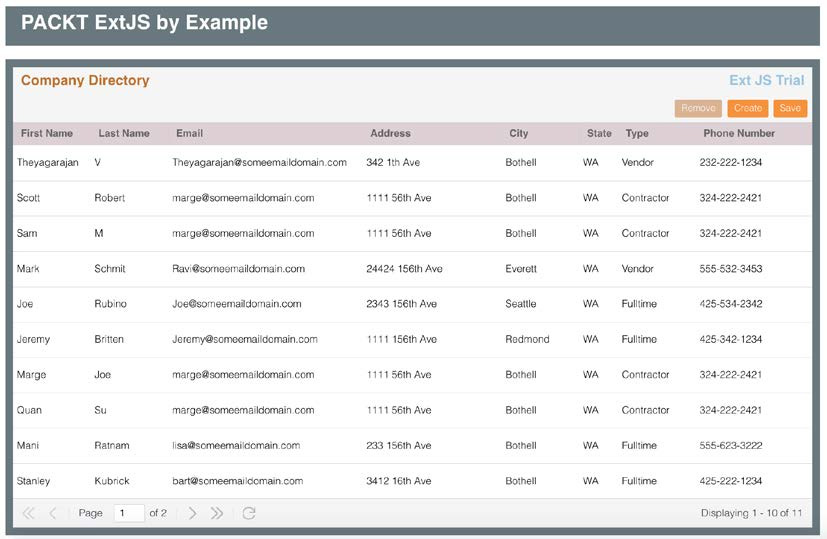
通过查看设计效果,想必你已找到这个项目中最重要的组件就是 grid 了。本示例中所应用的组件和概念有:
- Grid panel
- ViewModel
- Model
- 数据 store 和 rest 代理
- 容器和布局
- 行编辑插件
- 分页
- go 语言实现的 REST API
- 参考资料
下列截图展示了使用了行编辑插件的 修改/新增 操作:
现在让我们看看这个示例项目中的一些重要文件。
- 完整的源码没有在这里提供,但是你可以从此地址去下载。 https://github.com/ ananddayalan/extjs-by-example-companydirectory
截图展示了示例项目的文件结构:

以下视图代码是本例中的重要部分。这个视图显示了这个应用的大部分的可视部分。它使用了 grid panel 和 行编辑插件:
plugins: [{ ptype: ‘rowediting’, clicksToMoveEditor: 1, autoCancel: false }] ,
为 grid 添加行编辑功能,最简单的方法就是使用 RowEditing 。使用 RowEditing 插件并不是必要的,如果你想,你也可以使用表单来做 新增/修改。
为了能够使用编辑功能,我们还需要设置字段的属性或者列的 editor 属性。下面这一行默认为所有的列都提供编辑功能:
editor: { xtype: ‘textfield’, allowBlank: false }
在编辑器中设置校验规则,这样可以只允许满足验证的数据提交。另外 Update 按钮在插件里将是不可用的。
- 这个视图的代码有点长,这段代码中我已经截出来了重要部分的代码,完整的代码在这里。 https://github.com/ ananddayalan/extjs-by-example-company-directory
Ext.define('CD.view.contactList.ContactList', {
	extend: 'Ext.panel.Panel',
	requires: ['CD.view.contactList.ContactListController' ],
	xtype: 'app-contactList',
	controller: 'contactList',
	items: [{
		cls: 'contact-list',
		xtype: 'grid',
		reference: 'contactListGrid',
		scrollable: true,
		autoScroll: true,
		plugins: [{
			ptype: 'rowediting',
			clicksToMoveEditor: 1,
			autoCancel: false
		}],
		listeners: {
			selectionchange: 'onSelectionChange'
		},
		flex:1,
		store: 'contactList',
		pageSize: 10,
		title: 'Company Directory',
		columns: {
			defaults: {
				editor: {
					xtype: 'textfield',
					allowBlank: false
				}
			},
			items: [{
				text: 'First Name',
				width: 100,
				dataIndex: 'fname'
			},{
				text: 'Email',
				width: 250,
				dataIndex: 'email',
				editor: {
					vtype: 'email'
				}
			}]
		},
		dockedItems: [{
			xtype: 'pagingtoolbar',
			store: 'contactList',
			dock: 'bottom',
			displayInfo: true
		},{
			xtype: 'toolbar',
			dock: 'top',
			ui: 'footer',
			defaults: {
				cls: 'btn-orange'
			},
			items: ['->', {
				text: 'Remove',
				disabled: true,
				reference: 'btnRemoveContact',
				listeners: {
					click: 'onRemove'
				},
			}]
		}]
	}]
});
以上代码中,grid 使用了两个工具栏:一个分页工具栏和一个 grid 上方的包含按钮的工具栏。这些工具栏使用 dockedItems 属性配置,以下为示例代码。
在本章的早些时候你学过这个。‘dockedItems’ 是 panel 的属性;它允许你设置一个组件停驻在 panel 上下,左边或右边。尽管通常它用于工具栏,但你可以停驻任意你想要的组件。
- 分页工具栏为了正确设置页码,数据数量等等,需要设置 store 。
dockedItems: [{
	xtype: 'pagingtoolbar',
	store: 'contactList',
	dock: 'bottom',
	displayInfo: true
} , {
	xtype: 'toolbar',
	dock: 'top',
	ui: 'footer',
	//This sets style to the component. The 'ui' is a property of the component. The default value of this property for all the component is 'default'. For details are given in the chapter that focus on theming and styling.
	defaults: { cls: 'btn-orange' },
	items: ['->', {
		text: 'Remove',
		disabled: true,
		//We set disabled by default, and this will be enabled when a row in the grid is selected. Check the onSelectionChange method in the controller.     reference: 'btnRemoveContact',     listeners: { click: 'onRemove' },
	}]
}]
这个 ViewController 的代码非常简单。它只处理了添加,删除,和 ContactList 视图的 selection change 事件。
看一下视图引用是如何访问到控制器的。例如,下列代码返回 grid 的引用:
var grid = this.lookupReference(‘contactListGrid’);
在这儿,contactListGrid 在前面视图中标记为一个引用:
下列代码中,访问 store 使用 grid.getStore() ; 也可以使用 Ext.getStore(contactList) 访问 store :
Ext.define('CD.view.contactList.ContactListController', {
	extend: 'Ext.app.ViewController',
	alias: 'controller.contactList',
	views: ['CD.view.contactList.ContactList'],
	requires: ['CD.store.ContactList'],
	onSave: function() {
		//Note, this will trigger one or more calls to the server based on the number of operations performed in the store.
		Ext.getStore('contactList').save();
	},
	onSelectionChange: function() {
		this.lookupReference('btnRemoveContact').enable();
	},
	onRemove: function() {
		var grid = this.lookupReference('contactListGrid');
		var sm = grid.getSelectionModel();
		//This line cancels the row/cell edit if it is active before we remove the item.
		grid.plugins[0].cancelEdit();
		grid.getStore().remove(sm.getSelection());
		if (grid.getStore().getCount() > 0) {
			sm.select(0);
		}
	},
	onCreate: function() {
		var grid = this.lookupReference('contactListGrid');
		grid.plugins[0].cancelEdit();
		//Create a model instance
		var r = Ext.create('Contact');
		grid.getStore().insert(0, r);
		grid.plugins[0].startEdit(0, 0);
	}
});
模型和视图的代码如下所示。rootProperty 属性让 store 知道在 API 响应的 JSON 数据中从哪里开始读取数据。
Ext.define('Contact', {
	extend: 'Ext.data.Model',
	fields: ['fname', 'lname', 'email', 'address','city','state','phone','type']
});
Ext.define('CD.store.ContactList', {
extend: 'Ext.data.Store',
storeId: 'contactList',
model: 'Contact',
pageSize: 10,
proxy: {
type: 'rest',
url: 'contactlist',
reader: {
type: 'json',
rootProperty: 'data',
totalProperty: 'total'
}
}
});Ext.create('CD.store.ContactList').load();totalProperty 字段让 store 知道服务器可获得的记录总数。grid 的分页工具栏会控制在视图中显示的分页信息例如 “Displaying 1 to 10 of 50” ;这里,50 是 totalProperty 的值。同时基于这个值,grid 知道什么时候该禁用下一页的按钮。
当你不指定模型的字段的类型。默认的类型将是自动的,如果需要你可以指定类型和验证规则。
再来一次,完整的源码在这里啊。 https://github.com/ananddayalan/extjs-by-example-company-directory
总结
在本章中我们详细探讨了 grid 。grid 有许多有用的配置和选项,还有 grid 的过滤,排序,和分组功能。你还学习了如何在 grid 使用不同的插件。还有用来做数据汇总报表的 pivot grid 。以及最后的示例项目。


 1589
1589


 被折叠的 条评论
为什么被折叠?
被折叠的 条评论
为什么被折叠?
 到【灌水乐园】发言


