


前言:接上篇,上篇主要讲理论,下篇讲实战,结合代码演示SpringSecurity,Shiro,Oauth,jwt token以及单点登录等当下主流的登录及权限管理.在技术上我是个喜新厌旧的渣男,全篇以截至2020年2月最新的Springboot及其它包版本为例演示.
完整的项目我已上传至GitHub,如有需要可以下载下来参考,地址:https://github.com/laohanjianshen/login-auth
1.SpringSecurity
新建一个Springboot工程,并引入Springsecurity依赖(为了不浪费篇幅,Sringboot web jpa jdbc等包请自行添加)
        <dependency>
            <groupId>org.springframework.boot</groupId>
            <artifactId>spring-boot-starter-security</artifactId>
        </dependency>
新建一个Controller类,并启动你的Springboot项目,不出意外访问任何URL时你将会看到:

说明SpringSecurity已经生效,下面正式进入研发阶段...
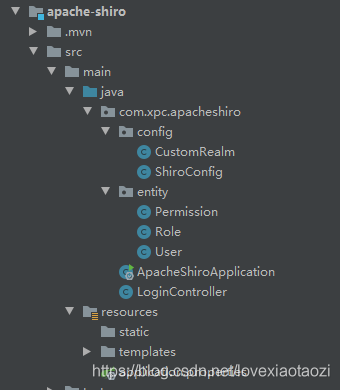
项目整体包及结构如下图所示:
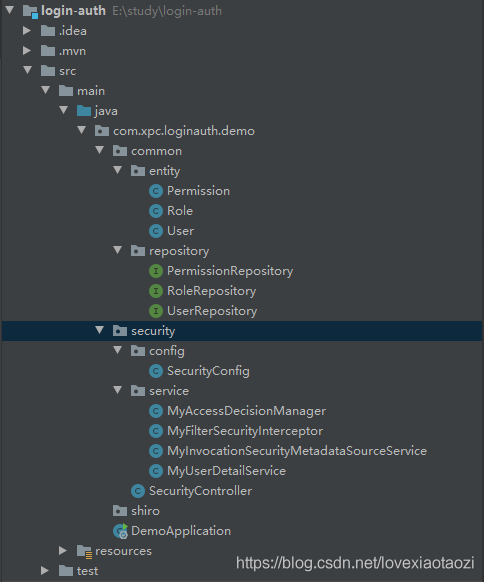
虽然内容乍看上去有点多,而且比网上大多数教程复杂一点,其实并不多,只需要三个步骤即可实现,之所以多是因为我用了更规范的写法,更接近生产环境.
第一步:根据RBAC,我们首先需要创建User,Role,Permission这三个对象及其DAO层:
@Entity
@Data
public class User implements UserDetails, Serializable {
    @Id @GeneratedValue
    private long uid;//主键.

    private String username;//用户名.

    private String password;//密码.

    //省略用户的其它信息,如手机号,邮箱等...

    //用户 - 角色关系. 多对多./
    @ManyToMany(fetch= FetchType.EAGER)//立即从数据库中获取.
    @JoinTable(name="user_role",joinColumns= {@JoinColumn(name="uid")},inverseJoinColumns= {@JoinColumn(name="role_id")})
    private List<Role> roles;

    //当前用户的角色列表
    @Override
    public Collection<? extends GrantedAuthority> getAuthorities() {
        return roles;
    }
    //账号是否未过期
    @Override
    public boolean isAccountNonExpired() {
        return true;
    }
    //账号是否未被锁定
    @Override
    public boolean isAccountNonLocked() {
        return true;
    }
    //证书是否过期
    @Override
    public boolean isCredentialsNonExpired() {
        return true;
    }
    //是否可用
    @Override
    public boolean isEnabled() {
        return true;
    }
}
@Entity
@Data
public class Role implements GrantedAuthority, Serializable {
@Id
@GeneratedValue
private long rid;
private String name;//角色名.
private String descprtion;//角色描述.
@Override
public String getAuthority() {
return name;
}
}@Data
@Entity
public class Permission implements Serializable {
@Id @GeneratedValue
private long id;
private String name;//权限名称.
private String description;//描述.
private String url;//地址.
private long pid;//父id.
//角色和权限的关系 多对多.
@ManyToMany(fetch= FetchType.EAGER)
@JoinTable(name="role_permission",joinColumns= {@JoinColumn(name="permission_id")},
inverseJoinColumns= {@JoinColumn(name="role_id")})
private List<Role> roles;
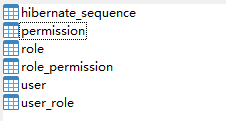
}配置中加入JPA自动生成表策略 :
spring.jpa.generate-ddl=true
spring.jpa.hibernate.ddl-auto=update
然后运行项目,标准的5张表(还有一张是id序列表)就被创建好了,因为是Demo,所以我选择用JPA作为ORM框架,增删改查等都比较方便.
然后添加两个用户,普通用户和管理员并分别初始化权限等信息:
INSERT INTO `permission` VALUES (1, '公共页面访问权限', 'common', 0, '/user/common');
INSERT INTO `permission` VALUES (2, '管理员页面访问权限', 'admin', 0, '/user/admin');

INSERT INTO `role` VALUES (1, '普通用户', 'ordinary');
INSERT INTO `role` VALUES (2, '老板', 'boss');

INSERT INTO `role_permission` VALUES (1, 1);
INSERT INTO `role_permission` VALUES (1, 2);
INSERT INTO `role_permission` VALUES (2, 2);

INSERT INTO `user` VALUES (1, 'e10adc3949ba59abbe56e057f20f883e', 'user');
INSERT INTO `user` VALUES (2, 'e10adc3949ba59abbe56e057f20f883e', 'admin');

INSERT INTO `user_role` VALUES (1, 1);
INSERT INTO `user_role` VALUES (2, 1);
INSERT INTO `user_role` VALUES (2, 2);
相关SQL我已放入项目中,可以直接用Navicat等工具导入也行.
DAO层请自行创建,比较简单,就三个接口,这里省略了,至此第一步就已完成.
第二步:创建登录及鉴权的Service层(划重点,这块是整个Spring-security的核心)
①在上篇中我有提到,SpringSecurity用到的跟用户相关的信息来源于UserDetailService,所以我们需要实现此接口
@Service
public class MyUserDetailService implements UserDetailsService {
    @Resource
    UserRepository userRepository;

    @Override
    public UserDetails loadUserByUsername(String s) throws UsernameNotFoundException {
        return userRepository.findByUsername(s);
    }
}
②自定义过滤器的元数据 ,这步的核心是getAttributes(Object o)方法,该方法需要返回当前请求所需要的用户身份列表(roleNames).
@Service
public class MyInvocationSecurityMetadataSourceService implements FilterInvocationSecurityMetadataSource {
    @Resource
    private PermissionRepository permissionRepository;
    /**
     * 每一个资源所需要的角色 ,Collection<ConfigAttribute>决策器会用到,用Map作缓存,避免每次请求都去查库
     */
    private static HashMap<String, Collection<ConfigAttribute>> map = null;

    /**
     * 获取决策器DecisionManager所需要的当前请求对应的role
     * @param o
     * @return
     * @throws IllegalArgumentException
     */
    @Override
    public Collection<ConfigAttribute> getAttributes(Object o) throws IllegalArgumentException {
        if (null == map) {
            loadResourceDefine();
        }
        HttpServletRequest request = ((FilterInvocation) o).getHttpRequest();

        for (Iterator<String> it = map.keySet().iterator(); it.hasNext(); ) {
            String url = it.next();
            if (new AntPathRequestMatcher(url).matches(request)) {
                //这里返回的就是当前请求的url所需要的roleNameList
                return map.get(url);
            }
        }
        return null;
    }

    @Override
    public Collection<ConfigAttribute> getAllConfigAttributes() {
        return null;
    }

    @Override
    public boolean supports(Class<?> aClass) {
        return true;
    }

    /**
     * 将permission表中的url对应的权限通过role_permission表与role关联并存入map
     */
    private void loadResourceDefine() {
        map = new HashMap<>(16);
        List<Permission> permissions = permissionRepository.findAll();
        for (Permission permission : permissions) {
            String url = permission.getUrl();
            StringBuilder sb = new StringBuilder();
            permission.getRoles().forEach(r->{
                sb.append(r.getName());
            });
            String name = sb.toString();
            ConfigAttribute configAttribute = new SecurityConfig(name);
            if (map.containsKey(url)) {
                map.get(url).add(configAttribute);
            } else {
                List<ConfigAttribute> list = new ArrayList<>();
                list.add(configAttribute);
                map.put(url, list);
            }
        }
    }
}
③覆盖SpringSecurity的拦截器,用上面自定义的元数据:
@Component
public class MyFilterSecurityInterceptor extends FilterSecurityInterceptor {
    @Autowired
    private FilterInvocationSecurityMetadataSource securityMetadataSource;

    @Autowired
    public void setMyAccessDecisionManager(MyAccessDecisionManager myAccessDecisionManager) {
        super.setAccessDecisionManager(myAccessDecisionManager);
    }

    @Override
    public void doFilter(ServletRequest request, ServletResponse response, FilterChain chain) throws IOException, ServletException {
        FilterInvocation fi = new FilterInvocation(request, response, chain);
        invoke(fi);
    }

    public void invoke(FilterInvocation fi) {
        InterceptorStatusToken token = super.beforeInvocation(fi);
        try {
            fi.getChain().doFilter(fi.getRequest(), fi.getResponse());
        } catch (IOException e) {
            e.printStackTrace();
        } catch (ServletException e) {
            e.printStackTrace();
        } finally {
            super.afterInvocation(token, null);
        }
    }

    @Override
    public SecurityMetadataSource obtainSecurityMetadataSource() {
        return this.securityMetadataSource;
    }
}
④ 自定义决策器,核心方法是decide(...),此方法用来判断当前登录用户是否有权限访问该资源.
@Component
public class MyAccessDecisionManager implements AccessDecisionManager {
    @Override
    public void decide(Authentication authentication, Object o, Collection<ConfigAttribute> collection) throws AccessDeniedException, InsufficientAuthenticationException {
        if (CollectionUtils.isEmpty(collection)) {
            return;
        } else {
            String needRole;
            for (Iterator<ConfigAttribute> iter = collection.iterator(); iter.hasNext(); ) {
                needRole = iter.next().getAttribute();
                for (GrantedAuthority ga : authentication.getAuthorities()) {
                    if (needRole.contains(ga.getAuthority())) {
                        //当前请求所需角色列表包含当前登陆人的角色,允许访问
                        return;
                    }
                }
            }
            throw new AccessDeniedException("当前访问没有权限");
        }
    }
    /**
     * 表示此AccessDecisionManager是否能够处理传递的ConfigAttribute呈现的授权请求
     */
    @Override
    public boolean supports(ConfigAttribute configAttribute) {
        return true;
    }
    /**
     * 表示当前AccessDecisionManager实现是否能够为指定的安全对象(方法调用或Web请求)提供访问控制决策
     */
    @Override
    public boolean supports(Class<?> aClass) {
        return true;
    }
}
此方法中的:
authentication包含了当前用户的相关信息
Object o其实就是FilterInvocation对象,可以通过它来获取HttpServletRequest等...所以如果要简写的话可以把②③中的内容挪到此处,但不推荐,不规范,虽然可以减少代码.
collection其实就是②中的请求url对应的roleNameList.
至此,步骤二完成.
第三步:全局配置
@Configuration
@EnableWebSecurity
public class SecurityConfig extends WebSecurityConfigurerAdapter {
    @Autowired
    private MyUserDetailService userDetailService;

    @Autowired
    public void configureGlobal(AuthenticationManagerBuilder auth) throws Exception {

        //校验用户
        auth.userDetailsService(userDetailService).passwordEncoder(new PasswordEncoder() {
            //对密码进行加密
            @Override
            public String encode(CharSequence charSequence) {
                return DigestUtils.md5DigestAsHex(charSequence.toString().getBytes());
            }

            //对密码进行判断匹配
            @Override
            public boolean matches(CharSequence charSequence, String s) {
                String encode = DigestUtils.md5DigestAsHex(charSequence.toString().getBytes());
                boolean res = s.equals(encode);
                return res;
            }
        });
    }

    @Override
    protected void configure(HttpSecurity http) throws Exception {
        http.authorizeRequests()
                .antMatchers("/", "index", "/login", "/login-error", "/401", "/css/**", "/js/**").permitAll()//默认放行这些资源
                .anyRequest().authenticated()//其余请求统统要走spring-security的拦截
                .and()
                .formLogin().loginPage("/login").failureUrl("/login-error")//登录失败
                .and()
                .exceptionHandling().accessDeniedPage("/401");//权限异常时的跳转页面
        http.logout().logoutSuccessUrl("/");
    }
}
configureGlobal中主要配置我们自定义的UserDetailService,以及对密码的加密解密,可以看到,Spring-security对加密解密的支持非常友好,不需要你再去花大量笔墨去写工具类.
configure方法主要配置一些拦截和跳转信息
几个静态页面我就不贴了,太浪费篇幅,有需要可以去Git拉取

现在我们可以测试一下:
@Controller
public class SecurityController {
@RequestMapping("/")
public String root() {
return "redirect:/index";
}
@RequestMapping("/index")
public String index() {
return "index";
}
@RequestMapping("/login")
public String login() {
return "login";
}
@RequestMapping("/login-error")
public String loginError(Model model) {
model.addAttribute("loginError", true);
return "login";
}
@GetMapping("/401")
public String accessDenied() {
return "401";
}
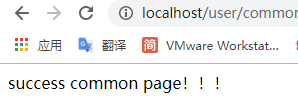
@GetMapping("/user/common")
public String common() {
return "user/common";
}
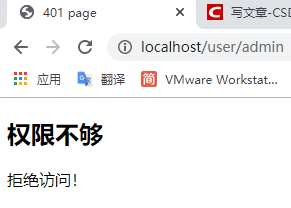
@GetMapping("/user/admin")
public String admin() {
return "user/admin";
}
}
启动项目后测试符合预期:登录user普通用户账号,访问公共页面被允许,受保护页面被拒绝.登录admin用户则可不受限制.
至此,Spring-security的部分先告一段落.
2.Apache Shiro
shiro的配置和使用都比较简单,为了演示更简单,我这里省略从数据库查询的操作,用Map来模拟.
新建一个Springboot的子工程,先来看一下整体的结构:
第一步,引入shiro依赖,其它web,jpa等相关依赖请自行引入,完整代码可以从本篇开头那里的Git仓拉取.
        <dependency>
            <groupId>org.apache.shiro</groupId>
            <artifactId>shiro-spring</artifactId>
            <version>1.4.2</version>
        </dependency>
第二步,创建User等类对象,因为shiro也是RBAC的,比较简单,我就不贴了.
第三步,创建自定义Reaml继承自AuthorizingRealm,并覆写doGetAuthorizationInfo方法和doGetAuthorticationInfo方法
public class CustomRealm extends AuthorizingRealm {
    /**
     * 处理授权
     *
     * @param principalCollection
     * @return
     */
    @Override
    protected AuthorizationInfo doGetAuthorizationInfo(PrincipalCollection principalCollection) {
        String name = principalCollection.getPrimaryPrincipal().toString();
        User user = getUserByName(name);
        SimpleAuthorizationInfo authorizationInfo = new SimpleAuthorizationInfo();
        user.getRoles().forEach(role -> {
            //添加角色
            authorizationInfo.addRole(role.getRoleName());
            //添加权限
            role.getPermission().forEach(permission -> {
                authorizationInfo.addStringPermission(permission.getPermissionName());
            });
        });
        return authorizationInfo;
    }

    /**
     * 处理认证
     *
     * @param authenticationToken
     * @return
     * @throws AuthenticationException
     */
    @Override
    protected AuthenticationInfo doGetAuthenticationInfo(AuthenticationToken authenticationToken) throws AuthenticationException {
        String name = authenticationToken.getPrincipal().toString();
        User user = getUserByName(name);
        return new SimpleAuthenticationInfo(name, user.getPassword(), getName());
    }

    private User getUserByName(String name) {
        //模拟数据库查询
        Permission permission1 = new Permission(1L, "common");
        Permission permission2 = new Permission(2L, "private");
        Set<Permission> permissionSet1 = new HashSet<>();
        permissionSet1.add(permission1);
        Set<Permission> permissionSet2 = new HashSet<>();
        permissionSet2.add(permission1);
        permissionSet2.add(permission2);
        Role role1 = new Role(1L, "ordinary", permissionSet1);
        Role role2 = new Role(2L, "admin", permissionSet2);
        Set<Role> roleSet1 = new HashSet<>();
        roleSet1.add(role1);
        Set<Role> roleSet2 = new HashSet<>();
        roleSet2.add(role1);
        roleSet2.add(role2);
        User user1 = new User(1L, "user", "123456", "abc", roleSet1);
        User user2 = new User(2L, "admin", "123456", "def", roleSet2);
        Map<String, User> map = new HashMap<>(3);
        map.put(user1.getUsername(), user1);
        map.put(user2.getUsername(), user2);
        return map.get(name);
    }
}
其中doGetAuthorizationInfo方法负责封装权限信息,doGetAuthorticationInfo负责封装认证(账户名,密码等)信息
第四步,全局配置
@Configuration
public class ShiroConfig {

    @Bean
    public ShiroFilterFactoryBean shiroFilterFactoryBean(SecurityManager securityManager) {
        ShiroFilterFactoryBean shiroFilterFactoryBean = new ShiroFilterFactoryBean();
        shiroFilterFactoryBean.setSecurityManager(securityManager);
        Map<String, String> map = new HashMap<>();
        //登出
        map.put("/logout", "logout");
        //对所有用户认证
        map.put("/**", "authc");
        //登录
        shiroFilterFactoryBean.setLoginUrl("/login");
        //首页
        shiroFilterFactoryBean.setSuccessUrl("/index");
        //错误页面,认证不通过跳转
        shiroFilterFactoryBean.setUnauthorizedUrl("/error");
        shiroFilterFactoryBean.setFilterChainDefinitionMap(map);
        return shiroFilterFactoryBean;
    }

    //配置自定义的Realm
    @Bean
    public CustomRealm customRealm(){
        return new CustomRealm();
    }
    @Bean
    public SecurityManager securityManager(){
        DefaultWebSecurityManager securityManager = new DefaultWebSecurityManager();
        securityManager.setRealm(customRealm());
        return securityManager;
    }
    @Bean
    public AuthorizationAttributeSourceAdvisor authorizationAttributeSourceAdvisor(SecurityManager securityManager) {
        AuthorizationAttributeSourceAdvisor authorizationAttributeSourceAdvisor = new AuthorizationAttributeSourceAdvisor();
        authorizationAttributeSourceAdvisor.setSecurityManager(securityManager);
        return authorizationAttributeSourceAdvisor;
    }

    //解决spring aop的二次代理问题
    @Bean
    @ConditionalOnMissingBean
    public DefaultAdvisorAutoProxyCreator defaultAdvisorAutoProxyCreator() {
        DefaultAdvisorAutoProxyCreator defaultAAP = new DefaultAdvisorAutoProxyCreator();
        defaultAAP.setProxyTargetClass(true);
        return defaultAAP;
    }

}
配置类主要配置ShiroFilterFactoryBean,和自定义的Realm.
ShiroFilterFactoryBean负责配置默认的登录登出以及首页,错误页面等信息.
自定义的Realm一定要设置给SecurityManager来处理,否则不生效.
编写测试类
@Controller
public class LoginController {
@RequestMapping("/login")
@ResponseBody
public String login(User user) {
//添加用户认证信息
Subject subject = SecurityUtils.getSubject();
UsernamePasswordToken usernamePasswordToken = new UsernamePasswordToken(
user.getUsername(),
user.getPassword()
);
try {
//进行验证,这里可以捕获异常,然后返回对应信息
subject.login(usernamePasswordToken);
} catch (AuthenticationException e) {
e.printStackTrace();
return "账号或密码错误!";
} catch (AuthorizationException e) {
e.printStackTrace();
return "没有权限";
}
return "login success";
}
//注解验角色和权限
@RequiresRoles("ordinary")
@RequiresPermissions("common")
@RequestMapping("/index")
@ResponseBody
public String index() {
return "index!";
}
@RequiresRoles("admin")
@RequiresPermissions("private")
@RequestMapping("/limit")
@ResponseBody
public String limit() {
return "limit!";
}
}
可以启动项目后在浏览器输入:
http://localhost:8080/login?username=user&password=123456
登录普通用户然后分别访问index和limit接口,然后再登录admin账号,重复此流程并观察,我已经测过了,结果符合预期.
至此就完成了整个shiro的演示,可以看出shiro在配置上要比springsecurity简单很多,在springboot诞生前,相比之下的简单程度更是不言而喻,但基础功能上两者不相上下,所以在早期项目中喜欢用shrio的开发者更多一些,现在这种局势已经被逆转,现在的主角是spring-security,所以我不想再浪费篇幅在shiro上.
在更多的场景里,单点登录和oauth才是我们想要的.
关于Oauth如果想学习的极力推荐阮一峰老师的教程,真的太赞了:http://www.ruanyifeng.com/blog/2014/05/oauth_2_0.html
在上篇中我已经介绍了单点登录和oauth的好处,这里不再赘述,在微服务架构流行的今天,大部分上点规模的企业都会有自己的认证中心,也就是把传统的登录鉴权模块单独抽取出来,做成一个独立的认证服务,该企业下的子应用可以直接去请求该服务,完成登录和鉴权,具体的流程可以参照下图(引自李卫民老师https://www.funtl.com/zh/spring-security-oauth2):
其中,客户端就是我们具体的某个应用,甚至是浏览器,认证服务器就是本篇重点要讲的负责登录和鉴权的服务,资源服务器则是一些受保护的资源,也就是登录后且具备某些权限才可以访问的资源.
先来看一下认证服务器的项目结构:
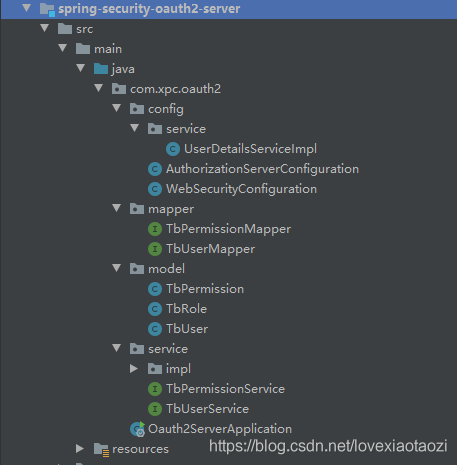
项目下载地址:https://github.com/laohanjianshen/spring-security-oauth2
大部分都是RBAC相关的内容,与前面讲的无异,核心配置其实只有AuthorizationServerConfiguration和WebSecurityConfiguration.
AuthorizationServerConfiguration继承并覆盖AuthorizationServerConfigurerAdapter类中的configure方法,以此来告诉SpringSecurity,当前认证服务器要使用tokenstore来存放token,客户端采用Jdbc方式.
@Configuration
@EnableAuthorizationServer
public class AuthorizationServerConfiguration extends AuthorizationServerConfigurerAdapter {

    @Bean
    @Primary
    @ConfigurationProperties(prefix = "spring.datasource")
    public DataSource dataSource() {
        return DataSourceBuilder.create().build();
    }

    @Bean
    public TokenStore tokenStore() {
        return new JdbcTokenStore(dataSource());
    }

    @Bean
    public ClientDetailsService jdbcClientDetailsService() {
        return new JdbcClientDetailsService(dataSource());
    }

    @Override
    public void configure(AuthorizationServerEndpointsConfigurer endpoints) throws Exception {
        endpoints.tokenStore(tokenStore());
    }

    @Override
    public void configure(ClientDetailsServiceConfigurer clients) throws Exception {
        // 配置客户端
        clients.withClientDetails(jdbcClientDetailsService());
    }

}
WebSecurityConfiguration继承并覆写WebSecurityConfigurerAdapter类中的configure方法,以此来告诉SpringSecurity默认的登录及鉴权Servierce是UserDetailService,至于UserDetailService,是我们自己来实现的.
@Configuration
@EnableWebSecurity
@EnableGlobalMethodSecurity(prePostEnabled = true, securedEnabled = true, jsr250Enabled = true)
public class WebSecurityConfiguration extends WebSecurityConfigurerAdapter {
    @Autowired
    private UserDetailsServiceImpl userDetailsService;

    @Bean
    public PasswordEncoder passwordEncoder() {
        return new BCryptPasswordEncoder();
    }

    @Override
    protected void configure(AuthenticationManagerBuilder auth) throws Exception {
        auth.userDetailsService(userDetailsService);
    }

    @Override
    public void configure(WebSecurity web) throws Exception {
        web.ignoring()
                .antMatchers("/oauth/check_token");
    }
}
UserDetailServiceImpl类实现SpringSecurity定义的UserDetailsService接口,覆写loadUserByUsername方法,通过用户名从数据库中查询并封装该用户的账号,密码,权限等信息.
@Service
public class UserDetailsServiceImpl implements UserDetailsService {
    @Autowired
    private TbUserService tbUserService;
    @Autowired
    private TbPermissionService tbPermissionService;

    @Override
    public UserDetails loadUserByUsername(String s) throws UsernameNotFoundException {
        TbUser tbUser = tbUserService.getUserByName(s);
        List<GrantedAuthority> grantedAuthorities = Lists.newArrayList();
        if (Objects.nonNull(tbUser)) {
            List<TbPermission> permissions = tbPermissionService.getPermissionListByUserId(tbUser.getId());
            permissions.forEach(tbPermission -> {
                GrantedAuthority grantedAuthority = new SimpleGrantedAuthority(tbPermission.getEnname());
                grantedAuthorities.add(grantedAuthority);
            });
        }
        return new User(tbUser.getUsername(), tbUser.getPassword(), grantedAuthorities);
    }
}
封装好这些之后,具体的登录和权限判定,SpringSecurity框架会帮我们去实现具体的过程,我们无需再操心后面的实现过程.
然后在资源服务器的配置文件中指定对应的认证服务器地址,就可以将认证服务器和资源服务器的联系建立起来.
security:
oauth2:
client:
client-id: client
client-secret: secret
access-token-uri: http://localhost:8080/oauth/token
user-authorization-uri: http://localhost:8080/oauth/authorize
resource:
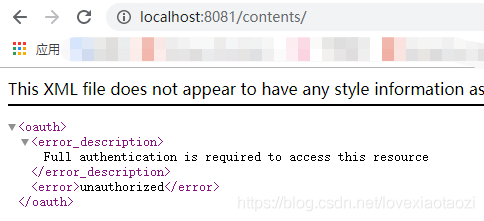
token-info-uri: http://localhost:8080/oauth/check_token然后分别启动客户端和服务端,然后进行测试:
首先直接访问资源服务器,这时候系统提示我没有登录或没有权限
然后访问认证服务器进行授权:
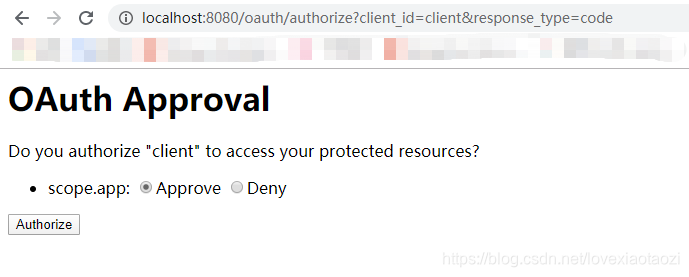
授权完成后,会跳转到一个backUrl,并携带一个code,通过此code我们可以申请到访问资源服务器的token令牌
![]()
通过此code+clientId+client secret即可获取到token
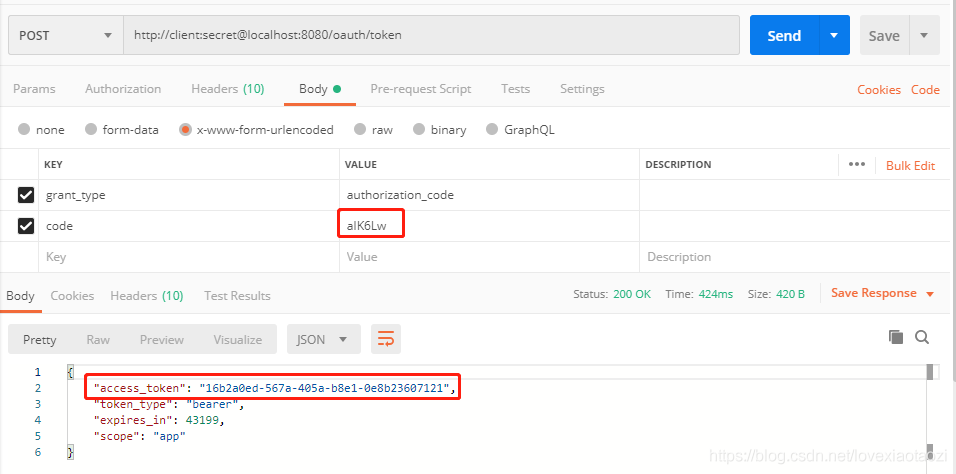
然后我们在访问资源服务器时,携带该token就可以正确访问资源了:

上面为了演示和帮助理解,把部分步骤拆分开来了,在实际业务中,过程更为简化,完整的过程是:
①用户请求资源服务器->②如果用户未登录或未授权->③跳转至授权页面->④授权成功后颁发令牌并携带该令牌跳转至资源服务器->⑤资源服务器请求认证服务器判定该令牌是否有效->⑥有效即放行让用户访问资源.
①~⑥中用户可见的步骤只有①③④⑥,其它步骤都由后台自动完成.
登录和鉴权几乎是每个系统必备的,但在实际开发中接触的却比较少,因为大部分公司都有现成的轮子,所以关于登录鉴权这块平时开发的极少,所以特意拎出来再复习一遍.
最后特别感谢阮一峰老师和李卫民老师,能给予一些学习和参考的资料,收获颇多.


 5166
5166


 被折叠的 条评论
为什么被折叠?
被折叠的 条评论
为什么被折叠?
 到【灌水乐园】发言


