


前面已经分析完了Tomcat的启动和关闭过程,本篇就来接着分析一下Tomcat中请求的处理过程。
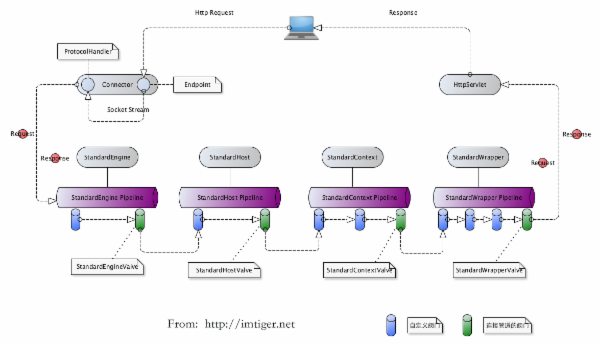
在开始本文之前,咋们首先来看看一个Http请求处理的过程,一般情况下是 浏览器发送http请求->建立Socket连接->通过Socket读取数据->根据http协议解析数据->调用后台服务完成响应 ,详细的流程图如上图所示,等读者读完本篇,应该就清楚了上图所表达的意思。Tomcat既是一个HttpServer也是一个Servlet 容器,那么这里必然也涉及到如上过程,首先根据HTTP协议规范解析请求数据,然后将请求转发给Servlet进行处理,因此顺应这样的思路,本文也将从 Http协议请求解析 , 请求如何转发给Servlet 两个方面来进行分析。首先来看Http协议请求解析。
Http协议请求解析
在 Tomcat启动过程(Tomcat源代码阅读系列之三) 一文中,我们已经知道Tomcat启动以后,默认情况下会通过 org.apache.tomcat.util.net.JIoEndpoint.Acceptor 监听Socket连接,当监听到有Socket连接的时候,就会调用 org.apache.tomcat.util.net.JIoEndpoint#processSocket 方法进行处理,下面我们就来看看此方法的代码,为了节省版面,只保留与本文相关的代码。
org.apache.tomcat.util.net.JIoEndpoint#processSocket
protected boolean processSocket(Socket socket) {
        // Process the request from this socket
        try {
            SocketWrapper<Socket> wrapper = new SocketWrapper<Socket>(socket);
            wrapper.setKeepAliveLeft(getMaxKeepAliveRequests());
            // During shutdown, executor may be null - avoid NPE
            if (!running) {
                return false;
            }
            getExecutor().execute(new SocketProcessor(wrapper));
        } catch (RejectedExecutionException x) {
         //exception handler ...
         return false;
        }
        return true;
}
通过上面的代码,我们可以看出首先将Socket封装为SocketWrapper,然后通过SocketProcessor来进行处理,因为Tomcat必然面对用户并发请求,因此这里Socket的处理通过新的线程池来处理。接下来我们再来看看SocketProcess的代码,同样省略了一些非核心的代码,代码如下:
org.apache.tomcat.util.net.JIoEndpoint.SocketProcessor#run
public void run() {
        boolean launch = false;
        synchronized (socket) {
            try {
                SocketState state = SocketState.OPEN;

                try {
                    // SSL handshake
                    serverSocketFactory.handshake(socket.getSocket());
                } catch (Throwable t) {
                    ExceptionUtils.handleThrowable(t);
                    if (log.isDebugEnabled()) {
                        log.debug(sm.getString("endpoint.err.handshake"), t);
                    }
                    // Tell to close the socket
                    state = SocketState.CLOSED;
                }

                if ((state != SocketState.CLOSED)) {
                    if (status == null) {
                        // 1
                        state = handler.process(socket, SocketStatus.OPEN);
                    } else {
                        state = handler.process(socket,status);
                    }
                }
                if (state == SocketState.CLOSED) {
                    // Close socket
                    if (log.isTraceEnabled()) {
                        log.trace("Closing socket:"+socket);
                    }
                    countDownConnection();
                    try {
                        socket.getSocket().close();
                    } catch (IOException e) {
                        // Ignore
                    }
                } else if (state == SocketState.OPEN ||
                        state == SocketState.UPGRADING  ||
                        state == SocketState.UPGRADED){
                    socket.setKeptAlive(true);
                    socket.access();
                    launch = true;
                } else if (state == SocketState.LONG) {
                    socket.access();
                    waitingRequests.add(socket);
                }
            } finally {
               //other code
            }
        }
        socket = null;
        // Finish up this request
    }

}
默认情况下,代码会运行到标注1的地方,标注1的地方又通过 org.apache.tomcat.util.net.JIoEndpoint.Handler#process 的方法进行处理,而通过前面Tomcat启动的文章,我们已经知道handler属性是在 org.apache.coyote.http11.Http11Protocol 的构造方法中初始化的,构造方法如下:
org.apache.coyote.http11.Http11Protocol#Http11Protocol
public Http11Protocol() {
    endpoint = new JIoEndpoint();
    cHandler = new Http11ConnectionHandler(this);
    ((JIoEndpoint) endpoint).setHandler(cHandler);
    setSoLinger(Constants.DEFAULT_CONNECTION_LINGER);
    setSoTimeout(Constants.DEFAULT_CONNECTION_TIMEOUT);
    setTcpNoDelay(Constants.DEFAULT_TCP_NO_DELAY);
}
从构造方法中,我们可以清楚的看到,其实初始化了 org.apache.coyote.http11.Http11Protocol.Http11ConnectionHandler 的实例,那么接下来我们就来看看它的process方法,因为Http11ConnectionHandler继承了 org.apache.coyote.AbstractProtocol.AbstractConnectionHandler ,而自己没有实现process方法,因此会调用到父类的process方法,那么接下来我们就来看看AbstractConnectionHandler的process方法,代码如下:
org.apache.coyote.AbstractProtocol.AbstractConnectionHandler#process
public SocketState process(SocketWrapper<S> socket,
        SocketStatus status) {
    Processor<S> processor = connections.remove(socket.getSocket());

    if (status == SocketStatus.DISCONNECT && processor == null) {
        //nothing more to be done endpoint requested a close
        //and there are no object associated with this connection
        return SocketState.CLOSED;
    }

    socket.setAsync(false);

    try {
        if (processor == null) {
            processor = recycledProcessors.poll();
        }
        if (processor == null) {
            processor = createProcessor();
        }

        initSsl(socket, processor);

        SocketState state = SocketState.CLOSED;
        do {
            if (status == SocketStatus.DISCONNECT &&
                    !processor.isComet()) {
                // Do nothing here, just wait for it to get recycled
                // Don't do this for Comet we need to generate an end
                // event (see BZ 54022)
            } else if (processor.isAsync() ||
                    state == SocketState.ASYNC_END) {
                state = processor.asyncDispatch(status);
            } else if (processor.isComet()) {
                state = processor.event(status);
            } else if (processor.isUpgrade()) {
                state = processor.upgradeDispatch();
            } else {
                state = processor.process(socket);
            }

            if (state != SocketState.CLOSED && processor.isAsync()) {
                state = processor.asyncPostProcess();
            }

            if (state == SocketState.UPGRADING) {
                // Get the UpgradeInbound handler
                UpgradeInbound inbound = processor.getUpgradeInbound();
                // Release the Http11 processor to be re-used
                release(socket, processor, false, false);
                // Create the light-weight upgrade processor
                processor = createUpgradeProcessor(socket, inbound);
                inbound.onUpgradeComplete();
            }
        } while (state == SocketState.ASYNC_END ||
                state == SocketState.UPGRADING);

        return state;
    } catch(java.net.SocketException e) {
              // exception handler
    }

    return SocketState.CLOSED;
}
通过查看上面的代码,默认一个新连接的情况下,会调用 org.apache.coyote.Processor#process 方法,而Processor的实例实在 org.apache.coyote.AbstractProtocol.AbstractConnectionHandler#createProcessor 中创建的,通过查看createProcessor代码,我们发现是创建了一个org.apache.coyote.http11.Http11Processor的实例,那么接下来,我们就来看看它的process方法,因为Http11Processor继承了AbstractHttp11Processor,最终其实调用的是AbstractHttp11Processor的process方法,代码如下:
org.apache.coyote.http11.AbstractHttp11Processor#process
public SocketState process(SocketWrapper<S> socketWrapper)
    throws IOException {
    RequestInfo rp = request.getRequestProcessor();
    rp.setStage(org.apache.coyote.Constants.STAGE_PARSE);

    // Setting up the I/O
    // 1
    setSocketWrapper(socketWrapper);
    getInputBuffer().init(socketWrapper, endpoint);
    getOutputBuffer().init(socketWrapper, endpoint);

    // Flags
    error = false;
    keepAlive = true;
    comet = false;
    openSocket = false;
    sendfileInProgress = false;
    readComplete = true;
    if (endpoint.getUsePolling()) {
        keptAlive = false;
    } else {
        keptAlive = socketWrapper.isKeptAlive();
    }

    if (disableKeepAlive()) {
        socketWrapper.setKeepAliveLeft(0);
    }

    while (!error && keepAlive && !comet && !isAsync() &&
            upgradeInbound == null && !endpoint.isPaused()) {

        // Parsing the request header
        try {
            setRequestLineReadTimeout();
            //2
            if (!getInputBuffer().parseRequestLine(keptAlive)) {
                if (handleIncompleteRequestLineRead()) {
                    break;
                }
            }

            if (endpoint.isPaused()) {
                // 503 - Service unavailable
                response.setStatus(503);
                error = true;
            } else {
                // Make sure that connectors that are non-blocking during
                // header processing (NIO) only set the start time the first
                // time a request is processed.
                if (request.getStartTime() < 0) {
                    request.setStartTime(System.currentTimeMillis());
                }
                keptAlive = true;
                // Set this every time in case limit has been changed via JMX
                request.getMimeHeaders().setLimit(endpoint.getMaxHeaderCount());
                // Currently only NIO will ever return false here
                // 3
                if (!getInputBuffer().parseHeaders()) {
                    // We've read part of the request, don't recycle it
                    // instead associate it with the socket
                    openSocket = true;
                    readComplete = false;
                    break;
                }
                if (!disableUploadTimeout) {
                    setSocketTimeout(connectionUploadTimeout);
                }
            }
        } catch (IOException e) {
            if (getLog().isDebugEnabled()) {
                getLog().debug(
                        sm.getString("http11processor.header.parse"), e);
            }
            error = true;
            break;
        } catch (Throwable t) {
            ExceptionUtils.handleThrowable(t);
            UserDataHelper.Mode logMode = userDataHelper.getNextMode();
            if (logMode != null) {
                String message = sm.getString(
                        "http11processor.header.parse");
                switch (logMode) {
                    case INFO_THEN_DEBUG:
                        message += sm.getString(
                                "http11processor.fallToDebug");
                        //$FALL-THROUGH$
                    case INFO:
                        getLog().info(message);
                        break;
                    case DEBUG:
                        getLog().debug(message);
                }
            }
            // 400 - Bad Request
            response.setStatus(400);
            adapter.log(request, response, 0);
            error = true;
        }

        if (!error) {
            // Setting up filters, and parse some request headers
            rp.setStage(org.apache.coyote.Constants.STAGE_PREPARE);
            try {
                prepareRequest();
            } catch (Throwable t) {
                ExceptionUtils.handleThrowable(t);
                if (getLog().isDebugEnabled()) {
                    getLog().debug(sm.getString(
                            "http11processor.request.prepare"), t);
                }
                // 400 - Internal Server Error
                response.setStatus(400);
                adapter.log(request, response, 0);
                error = true;
            }
        }

        if (maxKeepAliveRequests == 1) {
            keepAlive = false;
        } else if (maxKeepAliveRequests > 0 &&
                socketWrapper.decrementKeepAlive() <= 0) {
            keepAlive = false;
        }

        // Process the request in the adapter
        if (!error) {
            try {
                // 4
                rp.setStage(org.apache.coyote.Constants.STAGE_SERVICE);
                adapter.service(request, response);
                // Handle when the response was committed before a serious
                // error occurred.  Throwing a ServletException should both
                // set the status to 500 and set the errorException.
                // If we fail here, then the response is likely already
                // committed, so we can't try and set headers.
                if(keepAlive && !error) { // Avoid checking twice.
                    error = response.getErrorException() != null ||
                            (!isAsync() &&
                            statusDropsConnection(response.getStatus()));
                }
                setCometTimeouts(socketWrapper);
            } catch (InterruptedIOException e) {
                error = true;
            } catch (HeadersTooLargeException e) {
                error = true;
                // The response should not have been committed but check it
                // anyway to be safe
                if (!response.isCommitted()) {
                    response.reset();
                    response.setStatus(500);
                    response.setHeader("Connection", "close");
                }
            } catch (Throwable t) {
                ExceptionUtils.handleThrowable(t);
                getLog().error(sm.getString(
                        "http11processor.request.process"), t);
                // 500 - Internal Server Error
                response.setStatus(500);
                adapter.log(request, response, 0);
                error = true;
            }
        }

        // Finish the handling of the request
        rp.setStage(org.apache.coyote.Constants.STAGE_ENDINPUT);

        if (!isAsync() && !comet) {
            if (error) {
                // If we know we are closing the connection, don't drain
                // input. This way uploading a 100GB file doesn't tie up the
                // thread if the servlet has rejected it.
                getInputBuffer().setSwallowInput(false);
            }
            endRequest();
        }

        rp.setStage(org.apache.coyote.Constants.STAGE_ENDOUTPUT);

        // If there was an error, make sure the request is counted as
        // and error, and update the statistics counter
        if (error) {
            response.setStatus(500);
        }
        request.updateCounters();

        if (!isAsync() && !comet || error) {
            getInputBuffer().nextRequest();
            getOutputBuffer().nextRequest();
        }

        if (!disableUploadTimeout) {
            if(endpoint.getSoTimeout() > 0) {
                setSocketTimeout(endpoint.getSoTimeout());
            } else {
                setSocketTimeout(0);
            }
        }

        rp.setStage(org.apache.coyote.Constants.STAGE_KEEPALIVE);

        if (breakKeepAliveLoop(socketWrapper)) {
            break;
        }
    }

    rp.setStage(org.apache.coyote.Constants.STAGE_ENDED);

    if (error || endpoint.isPaused()) {
        return SocketState.CLOSED;
    } else if (isAsync() || comet) {
        return SocketState.LONG;
    } else if (isUpgrade()) {
        return SocketState.UPGRADING;
    } else {
        if (sendfileInProgress) {
            return SocketState.SENDFILE;
        } else {
            if (openSocket) {
                if (readComplete) {
                    return SocketState.OPEN;
                } else {
                    return SocketState.LONG;
                }
            } else {
                return SocketState.CLOSED;
            }
        }
    }
}
上面的代码有点长,但是经过分析,我们还是可以看清楚主干,我已经在代码中将主流程通过数字标注了,我们就来一一看看标注了数字的地方:
标注1的地方(第7行)将Socket的输入流和输出流通过InternalInputBuffer进行了包装,InternalInputBuffer是在Http11Processor的构造函数中初始化的。
标注2的地方(第35行)调用了InternalInputBuffer的parseRequesLine方法解析http请求的请求行。(关于http请求行和请求头请看下文解释)
标注3的地方(第57行)调用了InternalInputBuffer的prarseHeaders方法解析http请求的请求头。解析完了以后,会将http header保存在 org.apache.tomcat.util.http.MimeHeaders
标注4的地方(第128行)调用了org.apache.coyote.Adapter#service方法,次方法就会最终调用到具体的Servlet.
对于Http请求行和请求头,大家可以看下面的例子:
Http get request
GET /contextpath/querystring HTTP/1.1

Host: 127.0.0.1:8080

User-Agent: Mozilla/5.0 (Macintosh; Intel Mac OS X 10.9; rv:23.0) Gecko/20100101 Firefox/23.0

Accept: text/html,application/xhtml+xml,application/xml;q=0.9,*/*;q=0.8

Accept-Language: en-US,en;q=0.5

Accept-Encoding: gzip, deflate Cookie: JSESSIONID=9F5897FEF3CDBCB234C050C132DCAE52; __atuvc=384%7C39; __utma=96992031.358732763.1380383869.1381468490.1381554710.38; __utmz=96992031.1380383869.1.1.utmcsr=(direct)|utmccn=(direct)|utmcmd=(none); Hm_lvt_21e144d0df165d6556d664e2836dadfe=1381330561,1381368826,1381395666,1381554711 Connection: keep-alive Cache-Control: max-age=0
在上面的Http协议get请求中,其中请求行就是第一行, GET /contextpath/querystring HTTP/1.1 ,余下的都是请求头。这里面需要注意根据Http协议的要求,请求行末尾必须是CRLF,而请求行与请求头,以及请求头之间必须用空行隔开,而空行也必须只包含CRLF。对于Http协议请求头的规范可以参考 这里 。
通过上面的描述,我们可以整理出如下的一个请求解析流程:
Request http header parse
org.apache.tomcat.util.net.JIoEndpoint.Acceptor#run
->org.apache.tomcat.util.net.JIoEndpoint.SocketProcessor#run(请求处理线程池中运行)
-->org.apache.coyote.AbstractProtocol.AbstractConnectionHandler#process
--->org.apache.coyote.http11.AbstractHttp11Processor#process
---->org.apache.coyote.http11.InternalInputBuffer#parseRequestLine
---->org.apache.coyote.http11.InternalInputBuffer#parseHeaders
---->org.apache.catalina.connector.CoyoteAdapter#service
如何转发到Servlet
上面我们说了一个请求过来是如何根据http协议解析Socket的数据,最终将生成 org.apache.coyote.Request 和 org.apache.coyote.Response ,接下来我们就来看看request,reponse是如何一步步的进入最终的Servlet进行处理的。这一步的入口就是CoyoteAdapter的service方法。 接下来我们就来看看它的代码:
org.apache.catalina.connector.CoyoteAdapter#service
public void service(org.apache.coyote.Request req,
                    org.apache.coyote.Response res)
    throws Exception {


    Request request = (Request) req.getNote(ADAPTER_NOTES);
    Response response = (Response) res.getNote(ADAPTER_NOTES);

    //1
    if (request == null) {

        // Create objects
        request = connector.createRequest();
        request.setCoyoteRequest(req);
        response = connector.createResponse();
        response.setCoyoteResponse(res);

        // Link objects
        request.setResponse(response);
        response.setRequest(request);

        // Set as notes
        req.setNote(ADAPTER_NOTES, request);
        res.setNote(ADAPTER_NOTES, response);

        // Set query string encoding
        req.getParameters().setQueryStringEncoding
            (connector.getURIEncoding());

    }

    if (connector.getXpoweredBy()) {
        response.addHeader("X-Powered-By", POWERED_BY);
    }

    boolean comet = false;
    boolean async = false;

    try {

        // Parse and set Catalina and configuration specific
        // request parameters
        req.getRequestProcessor().setWorkerThreadName(Thread.currentThread().getName());
        //2
        boolean postParseSuccess = postParseRequest(req, request, res, response);
        if (postParseSuccess) {
            //check valves if we support async
            request.setAsyncSupported(connector.getService().getContainer().getPipeline().isAsyncSupported());
            // Calling the container
            //3
            connector.getService().getContainer().getPipeline().getFirst().invoke(request, response);

            // other code

        }
        // other code

    } catch (IOException e) {
        // Ignore
    } finally {
        req.getRequestProcessor().setWorkerThreadName(null);
        // Recycle the wrapper request and response
        if (!comet && !async) {
            request.recycle();
            response.recycle();
        } else {
            // Clear converters so that the minimum amount of memory
            // is used by this processor
            request.clearEncoders();
            response.clearEncoders();
        }
    }

}
为了可以清楚的看到主流程,上面删除了一部分非主流程的代码,接下来我们逐一分析一下标注了数字的地方:
标注1的代码(第9行)将 org.apache.coyote.Request 和 org.apache.coyote.Response 对象转变为 org.apache.catalina.connector.Request , org.apache.catalina.connector.Response 类型的对象。其中coyote包中的Request仅仅只是包含了解析出来的http协议的数据,而connector包中的Request才是真正Servlet容器中的HttpServletRequest,它里面包含了完成请求需要的host,context和wrapper信息,在这里每一个wrapper其实都对应web.xml配置的一个Servlet。
标注2(第44行)的代码调用了postParseRequest方法,这个方法里面做的事情非常多,但是最终都是为了根据Request对象找到对应的Host,Conext和Wrapper对象,也就是说最终要清楚这个请求应该由哪个Servlet来处理。
标注3(第50)的代码将已经设置好了Host,Context,Wrapper对象的Request通过Pipeline机制链式传递给最终的Servlet。
上面只是从整体上告诉了读者 org.apache.catalina.connector.CoyoteAdapter#service 方法做的事情,接下来我们进一步分解每一个步骤都具体做了哪些工作。第一步比较简单,大家可以自己阅读,我们关键来看2,3步。首先我们来看看postParseRequest方法。 通过分析org.apache.catalina.connector.CoyoteAdapter#postParseRequest的代码,我们会发现它最终是通过 org.apache.tomcat.util.http.mapper.Mapper#map 方法来达到匹配请求到对应的Context和Wrapper(Servlet包装类)目的。具体代码如下:
org.apache.catalina.connector.CoyoteAdapter#postParseRequest
connector.getMapper().map(serverName, decodedURI, version,
                                      request.getMappingData());
            request.setContext((Context) request.getMappingData().context);
            request.setWrapper((Wrapper) request.getMappingData().wrapper);
那我们再来看看此方法。通过分析它的代码,我们发现最终其实是调用了几个 internalMap** 方法将找到的Context,Wrapper设置到org.apache.catalina.connector.Request对象的org.apache.tomcat.util.http.mapper.MappingData类型的属性中,map方法执行完以后,然后接下来就从MappingData中获取已经找到的Context和Wrapper,再设置到Request的context和wrapper中。
接下来我们再来分析第3步,第3步通过pipeline链式调用机制最终调用了Servlet对象,而对于pipeline其实是运用了责任链模式,它将各个阀门链接起来,然后一步步的调用,而至于有多少个阀门(Valve)对象,主要来源于两个地方,一个是conf/server.xml中配置的valve,我们知道所有的容器都是支持pipeline机制的,另外一个就是每一个容器的构造其中自己初始化的阀门对象。接下来一一看一下。对于StandardEngine来说有一个与之对应的StandardEngineValve,对于StandardHost有一个StandardHostValve与之对应,StandardContext有一个StandardContextValve与之对应,StandardWrapper与StandardWrapperValve对应,通过分析代码,我们可以得到如下的一个调用链。
->org.apache.catalina.core.StandardEngineValve#invoke
-->org.apache.catalina.valves.AccessLogValve#invoke
--->org.apache.catalina.valves.ErrorReportValve#invoke
---->org.apache.catalina.core.StandardHostValve#invoke
----->org.apache.catalina.authenticator.AuthenticatorBase#invoke
------>org.apache.catalina.core.StandardContextValve#invoke
------->org.apache.catalina.core.StandardWrapperValve#invoke
上述的调用栈中,最后会调用到StandardWrapperValve,它其实也是最终调用Servlet的地方,接下来我们就来看看它的代码:
public final void invoke(Request request, Response response)
    throws IOException, ServletException {

    // Initialize local variables we may need
    boolean unavailable = false;
    Throwable throwable = null;
    // This should be a Request attribute...
    long t1=System.currentTimeMillis();
    requestCount++;
    StandardWrapper wrapper = (StandardWrapper) getContainer();
    Servlet servlet = null;
    Context context = (Context) wrapper.getParent();


    // Allocate a servlet instance to process this request
    try {
        //1
        if (!unavailable) {
            servlet = wrapper.allocate();
        }
    } catch (UnavailableException e) {
        container.getLogger().error(
                sm.getString("standardWrapper.allocateException",
                        wrapper.getName()), e);
        long available = wrapper.getAvailable();
        if ((available > 0L) && (available < Long.MAX_VALUE)) {
            response.setDateHeader("Retry-After", available);
            response.sendError(HttpServletResponse.SC_SERVICE_UNAVAILABLE,
                       sm.getString("standardWrapper.isUnavailable",
                                    wrapper.getName()));
        } else if (available == Long.MAX_VALUE) {
            response.sendError(HttpServletResponse.SC_NOT_FOUND,
                       sm.getString("standardWrapper.notFound",
                                    wrapper.getName()));
        }
    } // other code

    MessageBytes requestPathMB = request.getRequestPathMB();
    DispatcherType dispatcherType = DispatcherType.REQUEST;
    if (request.getDispatcherType()==DispatcherType.ASYNC) dispatcherType = DispatcherType.ASYNC;
    request.setAttribute(Globals.DISPATCHER_TYPE_ATTR,dispatcherType);
    request.setAttribute(Globals.DISPATCHER_REQUEST_PATH_ATTR,
            requestPathMB);
    // Create the filter chain for this request
    ApplicationFilterFactory factory =
        ApplicationFilterFactory.getInstance();
    ApplicationFilterChain filterChain =
        factory.createFilterChain(request, wrapper, servlet);

    // Reset comet flag value after creating the filter chain
    request.setComet(false);

    // Call the filter chain for this request
    // NOTE: This also calls the servlet's service() method
    // 2
    try {
        if ((servlet != null) && (filterChain != null)) {
            // Swallow output if needed
            if (context.getSwallowOutput()) {
                try {
                    SystemLogHandler.startCapture();
                    if (request.isAsyncDispatching()) {
                        //TODO SERVLET3 - async
                        ((AsyncContextImpl)request.getAsyncContext()).doInternalDispatch();
                    } else if (comet) {
                        filterChain.doFilterEvent(request.getEvent());
                        request.setComet(true);
                    } else {
                        filterChain.doFilter(request.getRequest(),
                                response.getResponse());
                    }
                } finally {
                    String log = SystemLogHandler.stopCapture();
                    if (log != null && log.length() > 0) {
                        context.getLogger().info(log);
                    }
                }
            } else {
                if (request.isAsyncDispatching()) {
                    //TODO SERVLET3 - async
                    ((AsyncContextImpl)request.getAsyncContext()).doInternalDispatch();
                } else if (comet) {
                    request.setComet(true);
                    filterChain.doFilterEvent(request.getEvent());
                } else {
                    filterChain.doFilter
                        (request.getRequest(), response.getResponse());
                }
            }

        }
    } catch(Exception e){
    // other code
    }


}
为了节省版面,上面的代码已经删除非主流程的代码。接下来我们逐一分析一下标注了数字的地方:
标注1(第17行)的代码实例化了Servlet对象,在实例化的过程中使用了Java双检查锁的机制来实例化Servlet,有兴趣的童鞋可以去看看org.apache.catalina.core.StandardWrapper#allocate的代码。这里需要注意的是在Servlet2.4规范之前,有一个singleThreadMode模型,这个机制类似与之前EJB的无状态会话Bean机制,每个线程过来会通过实例池中取出一个实例来完成响应。在Servlet规范2.4之后,单线程模型已经被废除了。具体细节可以参考 这里 .
标注2(第55行)的代码其实调用了大家熟悉的Servlet的过滤器链,过滤器链最终就会调用到Servlet.
最后,咋们再来看看过滤器滤链的处理,来看看 org.apache.catalina.core.ApplicationFilterChain#doFilter ,doFilter方法中会根据filterConfig中取的web.xml配置的过滤器,然后一个个调用,等每个过滤器执行完了以后,最终就会调用到Servlet的Service方法。
通过上面的分析,其实我们已经清楚了一个请求过来以后,Tomcat是如何一步步处理的。我们再来做一个总体的总结:
用户浏览器发送请求,请求会发送到对应的Connector监听的Socket端口。
Connector从Socket流中获取数据,然后根据Http协议将其解析为Request和Reponse对象
找到Request对象对应的Host,Context,Wrapper
调用最终的Servelt的service进行处理。


 4691
4691

 被折叠的 条评论
为什么被折叠?
被折叠的 条评论
为什么被折叠?
 到【灌水乐园】发言


