Find error messages with a Correlation ID token in SharePoint 2010

Using PowerShell to lookup a log message based on Correlation ID token

One of the quick-n-awesome ways to do this is to simply hook up a PowerShell console (SharePoint 2010 Management Shell) and then just write the following command (replace the <GUID> with the Correlation Id):

get-splogevent | ?{$_Correlation -eq "<GUID>" }

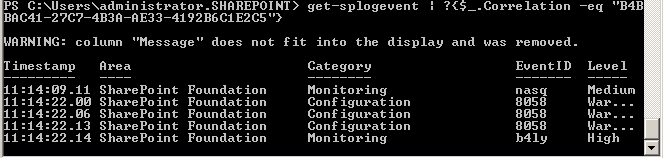
This will give you the details about your specific error like this in the console:

image

You might want to be more precise and get more specific details out of your query, then you can try something like this:

get-splogevent | ?{$_.Correlation -eq "<GUID>"} | select Area, Category, Level, EventID, Message | Format-List

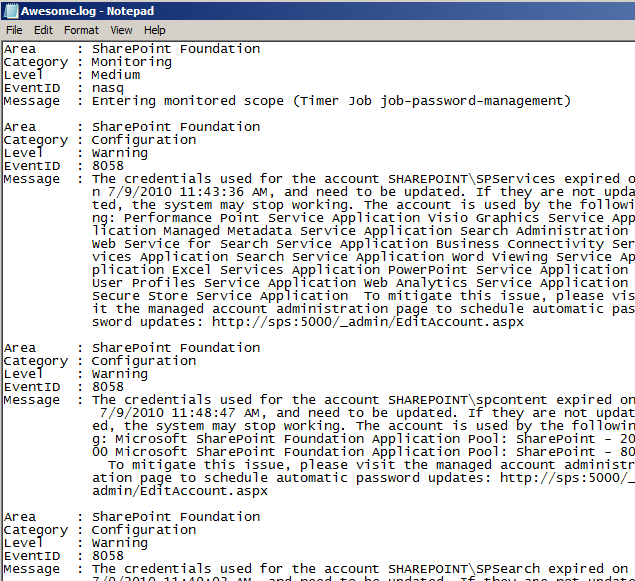
This will give you the details about your specific error like this with some juicy details:

image

Finally if you would want these messages to be put into a text or log file instead, you could just add the classic “> C:Awesome.log” after the command like this:

get-splogevent | ?{$_.Correlation -eq "<GUID>"} | select Area, Category, Level, EventID, Message | Format-List > C:Awesome.log

image

On MSDN they have an overvoew of using SP-GetLogEvent which I would recommend!

Using SQL queries to find log message based on Correlation ID token

You can utilize the SQL logs database to fetch the specific error message based on Correlation id as well. In your logging DB (usually called WSS_Logging, but can be called something else if you’ve changed it) there is a view called ULSTraceLogwhich you can query with a simple SQL query and fetch the results.

I’ve created a query to fetch the items from the logging database like this:

 select 	[RowCreatedTime],  [ProcessName],  [Area], 
 		[Category],  EventID,  [Message] 
 from  [WSS_UsageApplication].[dbo].[ULSTraceLog] 
 where  CorrelationId=< pre>'B4BBAC41-27C7-4B3A-AE33-4192B6C1E2C5'

This will render your results in the SQL Query window like this:

image

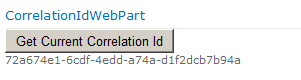
This can of course be implemented in a Web Part for your convenience as well (I’ve created a bunch of diag. and logging web parts that I’ve got deployed to Central Admin) that could look like this (this way you don’t need physical access to the ULS logs all the time, but can do a quick lookup from the web part):

image

Get the current Correlation ID by using code

I got this piece of code from my good friend Wictor’s blog post. Thanks Wictor – this made my Logging-project more satisfying!

With the following code you can fetch the current Correlation Id of a request.

Create a method (in my case called GetCurrentCorrelationToken()) to wrap up the functionality of returning the current token like this:

 public  class  CorrelationId 
 {
     [DllImport ("advapi32.dll")]
     public  static  extern  uint  EventActivityIdControl(uint  controlCode,ref Guid activityId);
     public  const  uint  EVENT_ACTIVITY_CTRL_GET_ID = 1;

     public  static  Guid  GetCurrentCorrelationToken()
     {
         Guid  g = Guid .Empty;
         EventActivityIdControl(EVENT_ACTIVITY_CTRL_GET_ID, ref  g);
         return  g;
     }
 }

Then from wherever in your code you can simply call it by using this approach:

 protected  void  Button1_Click(object  sender, EventArgs  e)
 {
     Label1.Text = CorrelationId .GetCurrentCorrelationToken().ToString();
 }

(Normally you might want this in a try/catch statement or something like that)

image


在使用Python来安装geopandas包时,由于geopandas依赖于几个其他的Python库(如GDAL, Fiona, Pyproj, Shapely等),因此安装过程可能需要一些额外的步骤。以下是一个基本的安装指南,适用于大多数用户: 使用pip安装 确保Python和pip已安装: 首先,确保你的计算机上已安装了Python和pip。pip是Python的包管理工具,用于安装和管理Python包。 安装依赖库: 由于geopandas依赖于GDAL, Fiona, Pyproj, Shapely等库,你可能需要先安装这些库。通常,你可以通过pip直接安装这些库,但有时候可能需要从其他源下载预编译的二进制包(wheel文件),特别是GDAL和Fiona,因为它们可能包含一些系统级的依赖。 bash pip install GDAL Fiona Pyproj Shapely 注意:在某些系统上,直接使用pip安装GDAL和Fiona可能会遇到问题,因为它们需要编译一些C/C++代码。如果遇到问题,你可以考虑使用conda(一个Python包、依赖和环境管理器)来安装这些库,或者从Unofficial Windows Binaries for Python Extension Packages这样的网站下载预编译的wheel文件。 安装geopandas: 在安装了所有依赖库之后,你可以使用pip来安装geopandas。 bash pip install geopandas 使用conda安装 如果你正在使用conda作为你的Python包管理器,那么安装geopandas和它的依赖可能会更简单一些。 创建一个新的conda环境(可选,但推荐): bash conda create -n geoenv python=3.x anaconda conda activate geoenv 其中3.x是你希望使用的Python版本。 安装geopandas: 使用conda-forge频道来安装geopandas,因为它提供了许多地理空间相关的包。 bash conda install -c conda-forge geopandas 这条命令会自动安装geopandas及其所有依赖。 注意事项 如果你在安装过程中遇到任何问题,比如编译错误或依赖问题,请检查你的Python版本和pip/conda的版本是否是最新的,或者尝试在不同的环境中安装。 某些库(如GDAL)可能需要额外的系统级依赖,如地理空间库(如PROJ和GEOS)。这些依赖可能需要单独安装,具体取决于你的操作系统。 如果你在Windows上遇到问题,并且pip安装失败,尝试从Unofficial Windows Binaries for Python Extension Packages网站下载相应的wheel文件,并使用pip进行安装。 脚本示例 虽然你的问题主要是关于如何安装geopandas,但如果你想要一个Python脚本来重命名文件夹下的文件,在原始名字前面加上字符串"geopandas",以下是一个简单的示例: python import os # 指定文件夹路径 folder_path = 'path/to/your/folder' # 遍历文件夹中的文件 for filename in os.listdir(folder_path): # 构造原始文件路径 old_file_path = os.path.join(folder_path, filename) # 构造新文件名 new_filename = 'geopandas_' + filename # 构造新文件路径 new_file_path = os.path.join(folder_path, new_filename) # 重命名文件 os.rename(old_file_path, new_file_path) print(f'Renamed "{filename}" to "{new_filename}"') 请确保将'path/to/your/folder'替换为你想要重命名文件的实际文件夹路径。
评论
添加红包

请填写红包祝福语或标题

红包个数最小为10个

红包金额最低5元

当前余额3.43前往充值 >
需支付:10.00
成就一亿技术人!
领取后你会自动成为博主和红包主的粉丝 规则
hope_wisdom
发出的红包
实付
使用余额支付
点击重新获取
扫码支付
钱包余额 0

抵扣说明:

1.余额是钱包充值的虚拟货币,按照1:1的比例进行支付金额的抵扣。
2.余额无法直接购买下载,可以购买VIP、付费专栏及课程。

余额充值