


本文描述了ElasticSearch5.1.1集群部署过程,包括3个节点集群搭建过程,中文插件的安装,中途遇到问题的解决等等。
1.准备
-
* 三台机器:*
序号 主机名称 IP地址 操作系统
1 c1 192.168.xxx.157 centos7
2 c2 192.168.xxx.158 centos7
3 c3 192.168.xxx.159 centos7 -
* 关闭防火墙*
- 1
- 1
- 查看磁盘情况
- 1
- 1
为了避免磁盘使用不均而导致系统问题,因而先查看磁盘的分布情况。
/dev目录共83G,只使用了8%不到,因此可以将后续的所有文件和程序存放在此目录下。当然,这要根据你的实际情况而定。
-
安装包5.1.1
https://www.elastic.co/downloads/elasticsearch elasticsearch-5.1.1.tar.gz
-
查看配置hosts
- 1
- 1
2.创建目录
具体目录创建如下:
- 1
- 1
3.解压
3.1 复制
先将elasticsearch文件复制到/usr/local/elasticsearch文件夹下.
3.2 解压
- 1
- 1
4.配置文件
4.1 创建数据和日志目录
- 1
- 2
- 1
- 2
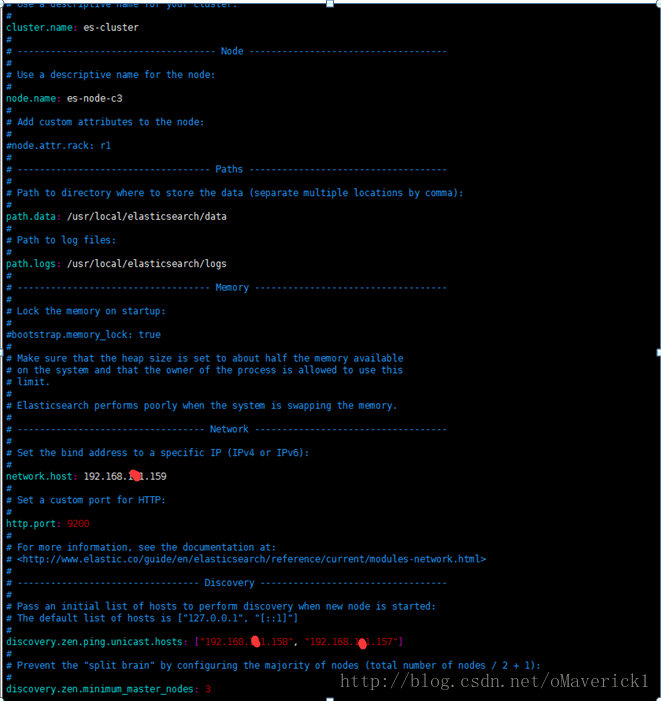
4.2 修改配置elasticsearch.yml文件
在/usr/local/elasticsearch/elasticsearch-5.1.1/config文件夹下,复制配置文件:
- 1
- 1
5.创建管理用户
5.1 用户创建
创建用户组
- 1
- 1
创建用户,用户elsearch 密码 cfca1234
- 1
- 1
5.2 用户赋予权限
进入目录:/usr/local
- 1
- 1
5.3 elsearch用户启动测试
- 1
- 2
- 1
- 2
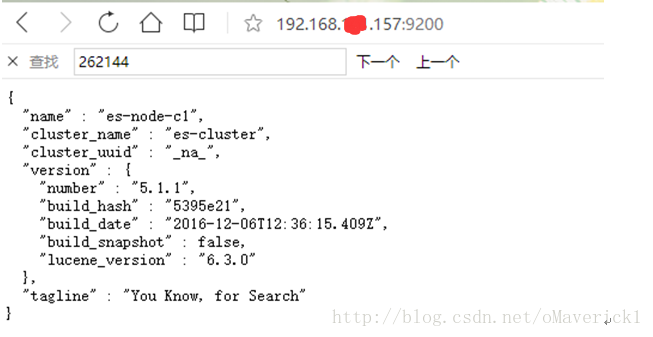
5.3 浏览器访问
登录地址 http://192.168.121.157:9200/
获得结果如下,说明单节点安装成功
6.配置其他节点
从c3节点复制文件到另外两个节点
6.1 复制elasticsearch文件
语句如下:
- 1
- 2
- 1
- 2
6.1 修改elasticsearch配置
分别登录c1,c2,参考4.2修改elasticsearch.yml文件
6.2 创建管理用户
分别在c1,c2执行章节5创建管理用户命令,
详见下图箭头所指之处。
6.3安装中文插件
Install IK
源码地址:https://github.com/medcl/elasticsearch-analysis-ik,Git clone下来。
mvn package 打包生成 elasticsearch-analysis-ik-5.1.1.jar
拷贝安装目录 /usr/local/elasticsearch/elasticsearch-5.1.1/plugins

7.Q&A
7.1警告提示
报了一大串错误,其实只是一个警告。
解决:使用新Linux版本,就不会出现此类问题了。
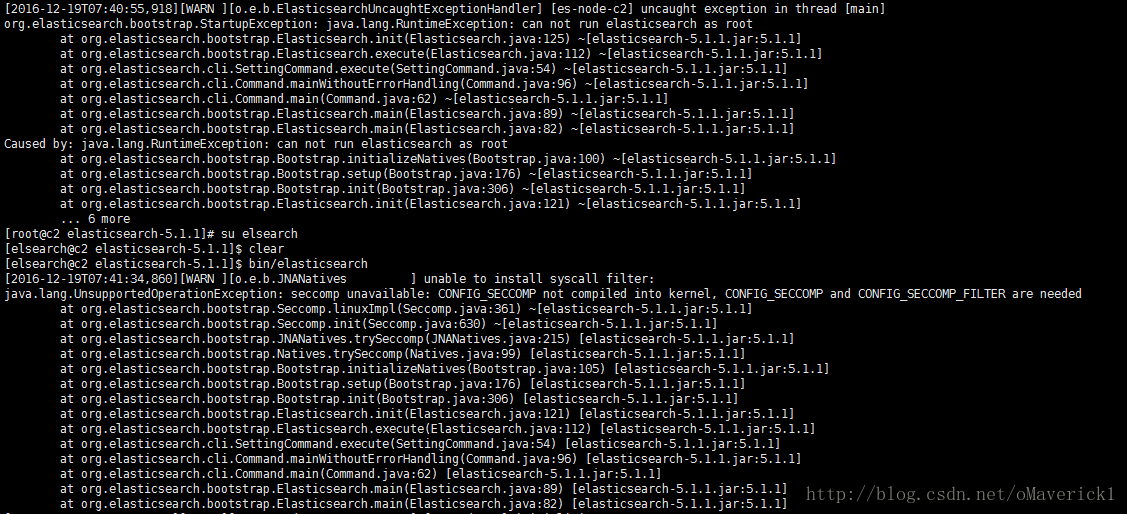
7.2 ERROR: bootstrap checks failed
max number of threads [1024] for user [lishang] likely too low, increase to at least [2048]
解决:切换到root用户,编辑limits.conf 添加类似如下内容
[elsearch@c2 elasticsearch-5.1.1]$ su root
[root@c2 elasticsearch-5.1.1]# vim /etc/security/limits.conf
添加如下内容:
* soft nofile 65536
* hard nofile 131072
* soft nproc 2048
* hard nproc 4096
7.3 max number of threads [1024] for user [lish] likely too low, increase to at least [2048]
解决:切换到root用户,进入limits.d目录下修改配置文件。
[root@c2 ~]# vim /etc/security/limits.d/90-nproc.conf
修改如下内容:
* soft nproc 1024
修改为
- soft nproc 2048
7.4 max virtual memory areas vm.max_map_count [65530] likely too low, increase to at least [262144]
解决:切换到root用户修改配置sysctl.conf
[root@c2 elasticsearch-5.1.1]# vim /etc/sysctl.conf
添加下面配置:
[root@c2 elasticsearch-5.1.1]#vm.max_map_count=262144
并执行命令:
[root@c2 elasticsearch-5.1.1]#sysctl -p
然后,重新启动elasticsearch,即可启动成功。
7.5 找不到主机或路由
一般情况下是你的
discovery.zen.ping.unicast.hosts:[“192.168.. “,”192.168.. “] 这里写错了.
7.6、启动异常:ERROR: bootstrap checks failed
system call filters failed to install; check the logs and fix your configuration or disable system call filters at your own risk
问题原因:因为Centos6不支持SecComp,而ES5.2.1默认bootstrap.system_call_filter为true进行检测,所以导致检测失败,失败后直接导致ES不能启动。详见 :https://github.com/elastic/elasticsearch/issues/22899
解决方法:在elasticsearch.yml中配置bootstrap.system_call_filter为false,注意要在Memory下面:
bootstrap.memory_lock: false
bootstrap.system_call_filter: false
7.7、启动后,如果只有本地可以访问,尝试修改配置文件 elasticsearch.yml
中network.host(注意配置文件格式不是以 # 开头的要空一格, : 后要空一格)为 network.host: 0.0.0.0
默认端口是 9200
注意:关闭防火墙 或者开放9200端口、启动后,如果只有本地可以访问,尝试修改配置文件 elasticsearch.yml
中network.host(注意配置文件格式不是以 # 开头的要空一格, : 后要空一格)
为 network.host: 0.0.0.0
默认端口是 9200
注意:关闭防火墙 或者开放9200端口
8、安装中文分词插件 smartcn
仍然使用elsearch登录,然后切换目录到elsearchsearch 所在的文件夹
$ cd elasticsearch-5.3.2执行安装命令
$ sudo ./bin/elasticsearch-plugin install analysis-smartcn卸载命名
$ sudo ./bin/elasticsearch-plugin remove analysis-smartcn测试分词,使用"人人编程,世界和平"为例子,进行测试,使用站长工具 将例子中的字断转换成unicode编码的字断 在的终端中,调用下面方法,验证smartcn分词插件是否已经成功运行
$ curl -XGET 'localhost:9200/_analyze?pretty' -d '{"analyzer":"smartcn", "text": "\u4eba\u4eba\u7f16\u7a0b\uff0c\u4e16\u754c\u548c\u5e73"}' 出现如下结果证明分词成功。若没有添加"analyzer":"smartcn"指定分词,将使用默认分词。对于中文来讲,将会把所有的字单独分出来。
{
  "tokens" : [
    {
      "token" : "人人",
      "start_offset" : 0,
      "end_offset" : 2,
      "type" : "word",
      "position" : 0
    },
    {
      "token" : "编程",
      "start_offset" : 2,
      "end_offset" : 4,
      "type" : "word",
      "position" : 1
    },
    {
      "token" : "世界",
      "start_offset" : 5,
      "end_offset" : 7,
      "type" : "word",
      "position" : 3
    },
    {
      "token" : "和平",
      "start_offset" : 7,
      "end_offset" : 9,
      "type" : "word",
      "position" : 4
    }
  ]
}
9、配置elasticsearch.yml
$ cd elasticsearch-5.3.2
$ vim ./config/elasticsearch.yml
根据需求修改一下节点:
cluster.name: es-5.3-test   #换个集群的名字,免得跟别人的集群混在一起

node.name: node-es-101     #换个节点名字

network.host: 0.0.0.0       #修改一下ES的监听地址,这样别的机器也可以访问
http.port: 9200             #端口号,默认就好


# 增加新的参数,这样head插件可以访问es
http.cors.enabled: true
http.cors.allow-origin: "*"


#增加新的参数,这样ES可以通过外网进行访问,只设置network.host: 0.0.0.0 公网仍旧无法访问
transport.host: localhost
transport.tcp.port: 9300

@注意,设置参数的时候:后面要有空格!
10、Sense安装使用
对于不熟悉Linux的人来讲,使用curl是个硬伤,所以 Chrome有个插件Sense可以帮我们很方便的操作Elasticsearch。国内需要FQ。

先来测试下分词

三、安装 Kibaba
1配置
编辑config/kibana.yml
vim config/kibana.yml
按照要求修改为
elasticsearch.url: "http://10.1.5.66:9200"
...其他部分没有改动,不需要修改
如果要只允许本机可以访问,kibana.yml 中加入:
host: "127.0.0.1"
3.启动
kibana 5.2.1 可以单独启动
命令
bin/kibana
后台运行
nohup bin/kibana &
访问
http://localhost:5601
---------------------------------------------------------------------------
1、下载安装
切换到root账户,按顺序依次执行以下命令
$ wget -c https://artifacts.elastic.co/downloads/kibana/kibana-5.3.2-x86_64.rpm
$ sha1sum kibana-5.3.2-x86_64.rpm
$ sudo rpm --install kibana-5.3.2-x86_64.rpm
2、配置Kibana的host
$ whereis kibana
kibana: /etc/kibana /usr/share/kibana
如果显示以上结果表明kibana已经正确安装完成,两个目录
/etc/kibana 为kibana config文件所在的目录
/usr/share/kibana 为程序所在的目录
修改Kibana的配置文件,允许公网访问
$ vim /etc/kibana/kibana.yml 将server.host修改为
server.host: "0.0.0.0"3、启动Kibana
配置kibana能够自动启动
$ sudo chkconfig --add kibana启动和停止
$ sudo -i service kibana start
$ sudo -i service kibana stop 接下来即可使用公网访问http://IP:5601打开Kibana了。


 132
132


 被折叠的 条评论
为什么被折叠?
被折叠的 条评论
为什么被折叠?
 到【灌水乐园】发言


