


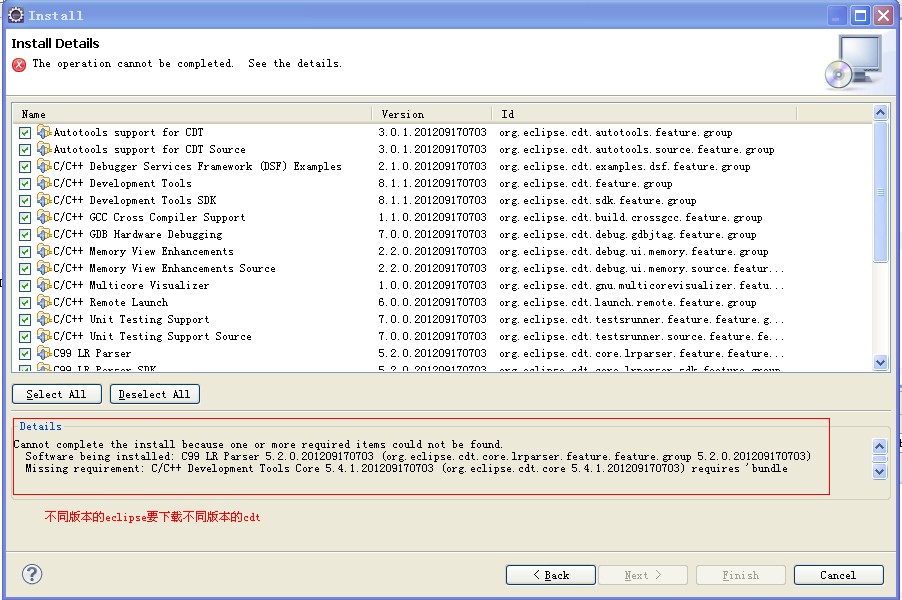
画了一个思维导图让大家一目了然配置过程


注:第一次安装会弹出个警告框,不要管他,点击确认就可以了。


Location:点击Archive,定位到下载的“cdt-master-7.0.2.zip”文件。
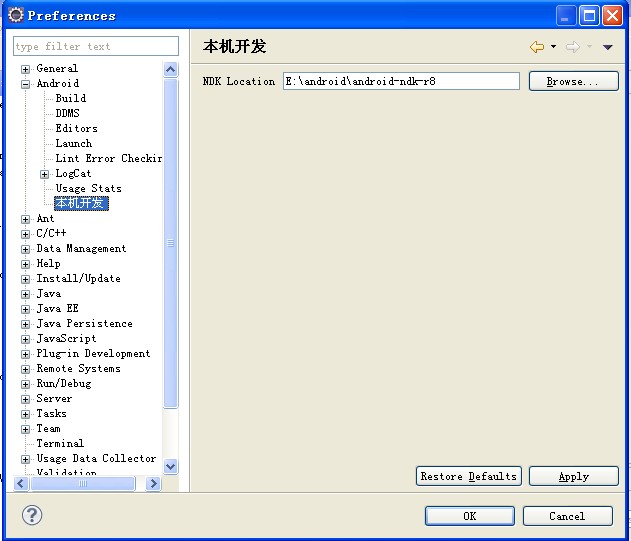


设置Build command为“bash E:\android\android-ndk-r8\ndk-build”。


6.运行后在模拟器上输出的字符串为“Hello JNI from ZDZ!”即说明配置成功。

附上官方文档
Getting Started with the NDK
Once you've installed the NDK successfully, take a few minutes to read the documentation included in the NDK. You can find the documentation in the <ndk>/docs/ directory. In particular, please read the OVERVIEW.HTML document completely, so that you understand the intent of the NDK and how to use it.
If you used a previous version of the NDK, take a moment to review the list of NDK changes in the CHANGES.HTML document.
Here's the general outline of how you work with the NDK tools:
- Place your native sources under
<project>/jni/... - Create
<project>/jni/Android.mkto describe your native sources to the NDK build system - Optional: Create
<project>/jni/Application.mk. - Build your native code by running the 'ndk-build' script from your project's directory. It is located in the top-level NDK directory:
cd <project>
<ndk>/ndk-build
The build tools copy the stripped, shared libraries needed by your application to the proper location in the application's project directory.
- Finally, compile your application using the SDK tools in the usual way. The SDK build tools will package the shared libraries in the application's deployable
.apkfile.
For complete information on all of the steps listed above, please see the documentation included with the NDK package.
Using the NDK
The Android framework provides two ways to use native code:
- Write your application using the Android framework and use JNI to access the APIs provided by the Android NDK. This technique allows you to take advantage of the convenience of the Android framework, but still allows you to write native code when necessary. If you use this approach, your application must target specific, minimum Android platform levels, see Android platform compatibility for more information.
-
Write a native activity, which allows you to implement the lifecycle callbacks in native code. The Android SDK provides the
NativeActivityclass, which is a convenience class that notifies your native code of any activity lifecycle callbacks (onCreate(),onPause(),onResume(), etc). You can implement the callbacks in your native code to handle these events when they occur. Applications that use native activities must be run on Android 2.3 (API Level 9) or later.You cannot access features such as Services and Content Providers natively, so if you want to use them or any other framework API, you can still write JNI code to do so.
Contents of the NDK
The NDK contains the APIs, documentation, and sample applications that help you write your native code. Specifically:
- A set of tools and build files used to generate native code libraries from C and C++ sources
- A way to embed the corresponding native libraries into an application package file (
.apk) that can be deployed on Android devices - A set of native system headers and libraries that will be supported in all future versions of the Android platform, starting from Android 1.5. Applications that use native activities must be run on Android 2.3 or later.
- Documentation, samples, and tutorials
The latest release of the NDK supports the following instruction sets:
- ARMv5TE, including Thumb-1 instructions (see
docs/CPU-ARCH-ABIS.htmlfor more information) - ARMv7-A, including Thumb-2 and VFPv3-D16 instructions, with optional support for NEON/VFPv3-D32 instructions (see
docs/CPU-ARM-NEON.htmlfor more information) - x86 instructions (see
docs/CPU-X86.htmlfor more information) - MIPS instructions (see
docs/CPU-MIPS.htmlfor more information)
ARMv5TE machine code will run on all ARM-based Android devices. ARMv7-A will run only on devices such as the Verizon Droid or Google Nexus One that have a compatible CPU. The main difference between the two instruction sets is that ARMv7-A supports hardware FPU, Thumb-2, and NEON instructions. You can target either or both of the instruction sets — ARMv5TE is the default, but switching to ARMv7-A is as easy as adding a single line to the application's Application.mkfile, without needing to change anything else in the file. You can also build for both architectures at the same time and have everything stored in the final .apk. Complete information is provided in the CPU-ARCH-ABIS.HTML in the NDK package.
The NDK provides stable headers for libc (the C library), libm (the Math library), OpenGL ES (3D graphics library), the JNI interface, and other libraries, as listed in the Development tools section.
Development tools
The NDK includes a set of cross-toolchains (compilers, linkers, etc..) that can generate native ARM binaries on Linux, OS X, and Windows (with Cygwin) platforms.
It provides a set of system headers for stable native APIs that are guaranteed to be supported in all later releases of the platform:
- libc (C library) headers
- libm (math library) headers
- JNI interface headers
- libz (Zlib compression) headers
- liblog (Android logging) header
- OpenGL ES 1.1 and OpenGL ES 2.0 (3D graphics libraries) headers
- libjnigraphics (Pixel buffer access) header (for Android 2.2 and above).
- A Minimal set of headers for C++ support
- OpenSL ES native audio libraries
- Android native application APIS
The NDK also provides a build system that lets you work efficiently with your sources, without having to handle the toolchain/platform/CPU/ABI details. You create very short build files to describe which sources to compile and which Android application will use them — the build system compiles the sources and places the shared libraries directly in your application project.
Important: With the exception of the libraries listed above, native system libraries in the Android platform are not stable and may change in future platform versions. Your applications should only make use of the stable native system libraries provided in this NDK.
Documentation
The NDK package includes a set of documentation that describes the capabilities of the NDK and how to use it to create shared libraries for your Android applications. In this release, the documentation is provided only in the downloadable NDK package. You can find the documentation in the <ndk>/docs/ directory. Included are these files (partial listing):
- INSTALL.HTML — describes how to install the NDK and configure it for your host system
- OVERVIEW.HTML — provides an overview of the NDK capabilities and usage
- ANDROID-MK.HTML — describes the use of the Android.mk file, which defines the native sources you want to compile
- APPLICATION-MK.HTML — describes the use of the Application.mk file, which describes the native sources required by your Android application
- CPLUSPLUS-SUPPORT.HTML — describes the C++ support provided in the Android NDK
- CPU-ARCH-ABIS.HTML — a description of supported CPU architectures and how to target them.
- CPU-FEATURES.HTML — a description of the
cpufeaturesstatic library that lets your application code detect the target device's CPU family and the optional features at runtime. - CHANGES.HTML — a complete list of changes to the NDK across all releases.
- DEVELOPMENT.HTML — describes how to modify the NDK and generate release packages for it
- HOWTO.HTML — information about common tasks associated with NDK development
- IMPORT-MODULE.HTML — describes how to share and reuse modules
- LICENSES.HTML — information about the various open source licenses that govern the Android NDK
- NATIVE-ACTIVITY.HTML — describes how to implement native activities
- NDK-BUILD.HTML — describes the usage of the ndk-build script
- NDK-GDB.HTML — describes how to use the native code debugger
- PREBUILTS.HTML — information about how shared and static prebuilt libraries work
- STANDALONE-TOOLCHAIN.HTML — describes how to use Android NDK toolchain as a standalone compiler (still in beta).
- SYSTEM-ISSUES.HTML — known issues in the Android system images that you should be aware of, if you are developing using the NDK.
- STABLE-APIS.HTML — a complete list of the stable APIs exposed by headers in the NDK.
Additionally, the package includes detailed information about the "bionic" C library provided with the Android platform that you should be aware of, if you are developing using the NDK. You can find the documentation in the<ndk>/docs/system/libc/ directory:
- OVERVIEW.HTML — provides an overview of the "bionic" C library and the features it offers.
Sample apps
The NDK includes sample applications that illustrate how to use native code in your Android applications:
hello-jni— a simple application that loads a string from a native method implemented in a shared library and then displays it in the application UI.two-libs— a simple application that loads a shared library dynamically and calls a native method provided by the library. In this case, the method is implemented in a static library imported by the shared library.san-angeles— a simple application that renders 3D graphics through the native OpenGL ES APIs, while managing activity lifecycle with aGLSurfaceViewobject.hello-gl2— a simple application that renders a triangle using OpenGL ES 2.0 vertex and fragment shaders.hello-neon— a simple application that shows how to use thecpufeatureslibrary to check CPU capabilities at runtime, then use NEON intrinsics if supported by the CPU. Specifically, the application implements two versions of a tiny benchmark for a FIR filter loop, a C version and a NEON-optimized version for devices that support it.bitmap-plasma— a simple application that demonstrates how to access the pixel buffers of AndroidBitmapobjects from native code, and uses this to generate an old-school "plasma" effect.native-activity— a simple application that demonstrates how to use the native-app-glue static library to create a native activitynative-plasma— a version of bitmap-plasma implemented with a native activity.
For each sample, the NDK includes the corresponding C source code and the necessary Android.mk and Application.mk files. There are located under <ndk>/samples/<name>/ and their source code can be found under<ndk>/samples/<name>/jni/.
You can build the shared libraries for the sample apps by going into <ndk>/samples/<name>/ then calling the ndk-buildcommand. The generated shared libraries will be located under <ndk>/samples/<name>/libs/armeabi/ for (ARMv5TE machine code) and/or <ndk>/samples/<name>/libs/armeabi-v7a/ for (ARMv7 machine code).
Next, build the sample Android applications that use the shared libraries:
- If you are developing in Eclipse with ADT, use the New Project Wizard to create a new Android project for each sample, using the "Import from Existing Source" option and importing the source from
<ndk>/samples/<name>/. Then, set up an AVD, if necessary, and build/run the application in the emulator. - If you are developing with Ant, use the
androidtool to create the build file for each of the sample projects at<ndk>/samples/<name>/. Then set up an AVD, if necessary, build your project in the usual way, and run it in the emulator.
For more information about developing with the Android SDK tools and what you need to do to create, build, and run your applications, see the Overview section for developing on Android.
Exploring the hello-jni Sample
The hello-jni sample is a simple demonstration on how to use JNI from an Android application. The HelloJni activity receives a string from a simple C function and displays it in a TextView.
The main components of the sample include:
- The familiar basic structure of an Android application (an
AndroidManifest.xmlfile, asrc/andresdirectories, and a main activity) - A
jni/directory that includes the implemented source file for the native code as well as the Android.mk file - A
tests/directory that contains unit test code.
- Create a new project in Eclipse from the existing sample source or use the
androidtool to update the project so it generates a build.xml file that you can use to build the sample.- In Eclipse:
- Click File > New Android Project...
- Select the Create project from existing source radio button.
- Select any API level above Android 1.5.
- In the Location field, click Browse... and select the
<ndk-root>/samples/hello-jnidirectory. - Click Finish.
- On the command line:
- Change to the
<ndk-root>/samples/hello-jnidirectory. - Run the following command to generate a build.xml file:
android update project -p . -s
- Change to the
- In Eclipse:
- Compile the native code using the
ndk-buildcommand.cd <ndk-root>/samples/hello-jni <ndk_root>/ndk-build
- Build and install the application as you would a normal Android application. If you are using Eclipse, run the application to build and install it on a device. If you are using Ant, run the following commands from the project directory:
ant debug
adb install bin/HelloJni-debug.apk
When you run the application on the device, the string Hello JNI should appear on your device. You can explore the rest of the samples that are located in the <ndk-root>/samples directory for more examples on how to use the JNI.
Exploring the native-activity Sample Application
The native-activity sample provided with the Android NDK demonstrates how to use the android_native_app_glue static library. This static library makes creating a native activity easier by providing you with an implementation that handles your callbacks in another thread, so you do not have to worry about them blocking your main UI thread. The main parts of the sample are described below:
- The familiar basic structure of an Android application (an
AndroidManifest.xmlfile, asrc/andresdirectories). The AndroidManifest.xml declares that the application is native and specifies the .so file of the native activity. SeeNativeActivityfor the source or see the<ndk_root>/platforms/samples/native-activity/AndroidManifest.xmlfile. - A
jni/directory contains the native activity, main.c, which uses theandroid_native_app_glue.hinterface to implement the activity. The Android.mk that describes the native module to the build system also exists here.
To build this sample application:
- Create a new project in Eclipse from the existing sample source or use the
androidtool to update the project so it generates a build.xml file that you can use to build the sample.- In Eclipse:
- Click File > New Android Project...
- Select the Create project from existing source radio button.
- Select any API level above Android 2.3.
- In the Location field, click Browse... and select the
<ndk-root>/samples/native-activitydirectory. - Click Finish.
- On the command line:
- Change to the
<ndk-root>/samples/native-activitydirectory. - Run the following command to generate a build.xml file:
android update project -p . -s
- Change to the
- In Eclipse:
- Compile the native code using the
ndk-buildcommand.cd <ndk-root>/platforms/samples/android-9/samples/native-activity <ndk_root>/ndk-build
- Build and install the application as you would a normal Android application. If you are using Eclipse, run the application to build and install it on a device. If you are using Ant, run the following commands in the project directory, then run the application on the device:
ant debug
adb install bin/NativeActivity-debug.apk


 324
324

 被折叠的 条评论
为什么被折叠?
被折叠的 条评论
为什么被折叠?
 到【灌水乐园】发言


