


Ajax: A Brief Introduction
-
AJAX stands for Asynchronous JavaScript And Xml.
-
Ajax is a technique to use HTTPXMLObject of JavaScript to send data to server and receive data from server asynchronously.
-
So using Ajax technique, javascript code exchanges data with server, updates parts of web page without reloading the whole page.
JSF provides execellent support for making ajax call. It provides f:ajax tag to handle ajax calls.
JSF Tag
<f:ajax execute="input-component-name" render="output-component-name" />Tag Attributes
| S.N. | Attribute & Description |
|---|---|
| 1 | disabled If true, the Ajax behavior will be applied to any parent or child components. If false, the Ajax behavior will be disabled. |
| 2 | event The event that will invoke Ajax requests, for example "click", "change", "blur", "keypress", etc. |
| 3 | execute A space-separated List of IDs for components that should be included in the Ajax request. |
| 4 | immediate If "true" behavior events generated from this behavior are broadcast during Apply Request Values phase. Otherwise, the events will be broadcast during Invoke Applications phase |
| 5 | listener An EL expression for a method in a backing bean to be called during the Ajax request. |
| 6 | onerror The name of a JavaScript callback function that will be invoked if there is an error during the Ajax request |
| 7 | onevent The name of a JavaScript callback function that will be invoked to handle UI events. |
| 8 | render A space-separated list of IDs for components that will be updated after an Ajax request. |
Example Application
Let us create a test JSF application to test the custom component in JSF.
| Step | Description |
|---|---|
| 1 | Create a project with a name helloworld under a package com.tutorialspoint.test as explained in the JSF - First Application chapter. |
| 2 | Modify UserData.java file as explained below. |
| 3 | Modify home.xhtml as explained below. Keep rest of the files unchanged. |
| 4 | Compile and run the application to make sure business logic is working as per the requirements. |
| 5 | Finally, build the application in the form of war file and deploy it in Apache Tomcat Webserver. |
| 6 | Launch your web application using appropriate URL as explained below in the last step. |
UserData.java
package com.tutorialspoint.test;

import java.io.Serializable;

import javax.faces.bean.ManagedBean;
import javax.faces.bean.SessionScoped;

@ManagedBean(name = "userData", eager = true)
@SessionScoped
public class UserData implements Serializable {

   private static final long serialVersionUID = 1L;

   private String name;
   public String getName() {
      return name;
   }
   public void setName(String name) {
      this.name = name;
   }

   public String getWelcomeMessage(){
      return "Hello " + name;
   }
}
home.xhtml
<?xml version="1.0" encoding="UTF-8"?>
<!DOCTYPE html PUBLIC "-//W3C//DTD XHTML 1.0 Transitional//EN"
"http://www.w3.org/TR/xhtml1/DTD/xhtml1-transitional.dtd">
<html xmlns="http://www.w3.org/1999/xhtml"
xmlns:h="http://java.sun.com/jsf/html"
xmlns:f="http://java.sun.com/jsf/core"
xmlns:tp="http://java.sun.com/jsf/composite/tutorialspoint">
<h:head>
<title>JSF tutorial</title>
</h:head>
<h:body>
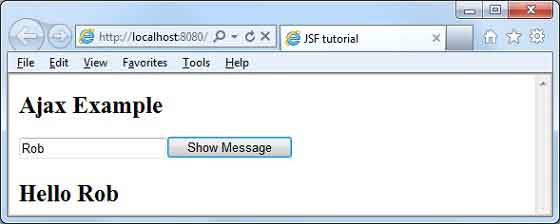
<h2>Ajax Example</h2>
<h:form>
<h:inputText id="inputName" value="#{userData.name}"></h:inputText>
<h:commandButton value="Show Message">
<f:ajax execute="inputName" render="outputMessage" />
</h:commandButton>
<h2><h:outputText id="outputMessage"
value="#{userData.welcomeMessage !=null ?
userData.welcomeMessage : ''}"
/></h2>
</h:form>
</h:body>
</html>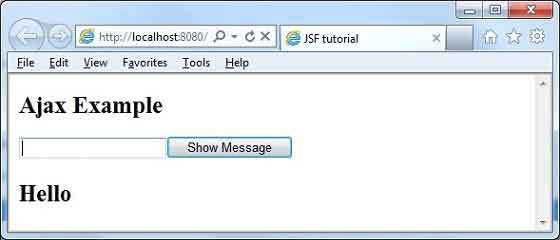
Enter name and press Show Message button. You will see the following result without page refresh/form submit.


 6482
6482


 被折叠的 条评论
为什么被折叠?
被折叠的 条评论
为什么被折叠?
 到【灌水乐园】发言


