


最近重构项目,想把之前的一些控件替换成BottomSheetDialog。最后选用的是更加方便的BottomSheetDialogFragment。也遇到了很多坑,写出来分享一下。
1.BottomSheetDialogFragment背景圆角设置
<?xml version="1.0" encoding="utf-8"?>
<shape xmlns:android="http://schemas.android.com/apk/res/android"
    android:shape="rectangle">

    <solid android:color="@color/white" />

    <corners
        android:topLeftRadius="20dp"
        android:topRightRadius="20dp" />
</shape>
按这个代码给根布局设置完成后,却没有显示对应的圆角。所以我想这是不是BottomSheetDialog的背景是白色的,所以挡住了。把白色换成其他颜色后果然看出来:

Screenshot_2018-05-24-11-20-50
解决方法:
BottomSheetDialog dialog = (BottomSheetDialog) super.onCreateDialog(savedInstanceState);

View view = View.inflate(getContext(), R.layout.layout_room_more_setting, null);
 dialog.setContentView(view);

 ((View) view.getParent()).setBackgroundColor(getResources().getColor(android.R.color.transparent));
设置BottomSheetDialog的背景为透明色。
2.弹出BottomSheetDialog背景变暗
默认情况下直接弹出BottomSheetDialogFragment背景会变暗,需求是不能变暗。可以通过设置style解决问题。
    @Override
    public void onCreate(@Nullable Bundle savedInstanceState) {
        super.onCreate(savedInstanceState);
        setStyle(BottomSheetDialogFragment.STYLE_NORMAL, R.style.TransBottomSheetDialogStyle);
    }

    <style name="TransBottomSheetDialogStyle" parent="Theme.Design.Light.BottomSheetDialog">
        <item name="android:windowFrame">@null</item>
        <item name="android:windowIsFloating">true</item>
        <item name="android:windowIsTranslucent">true</item>
        <item name="android:background">@android:color/transparent</item>
        <item name="android:backgroundDimEnabled">false</item>
    </style>
这样弹出Dialog时背景就不会变暗。
3.弹出的BottomSheetDialog占满屏幕
如果BottomSheetDialog中内容很多的话弹出的Dialog首先会到达一个peekHeight,然后如果滑动内容,整个Dialog就会向上滑动,直到铺满屏幕。很多时候我们是不希望整个Dialog向上滑动到整个屏幕的,比如在需要实时预览设置效果的画面:
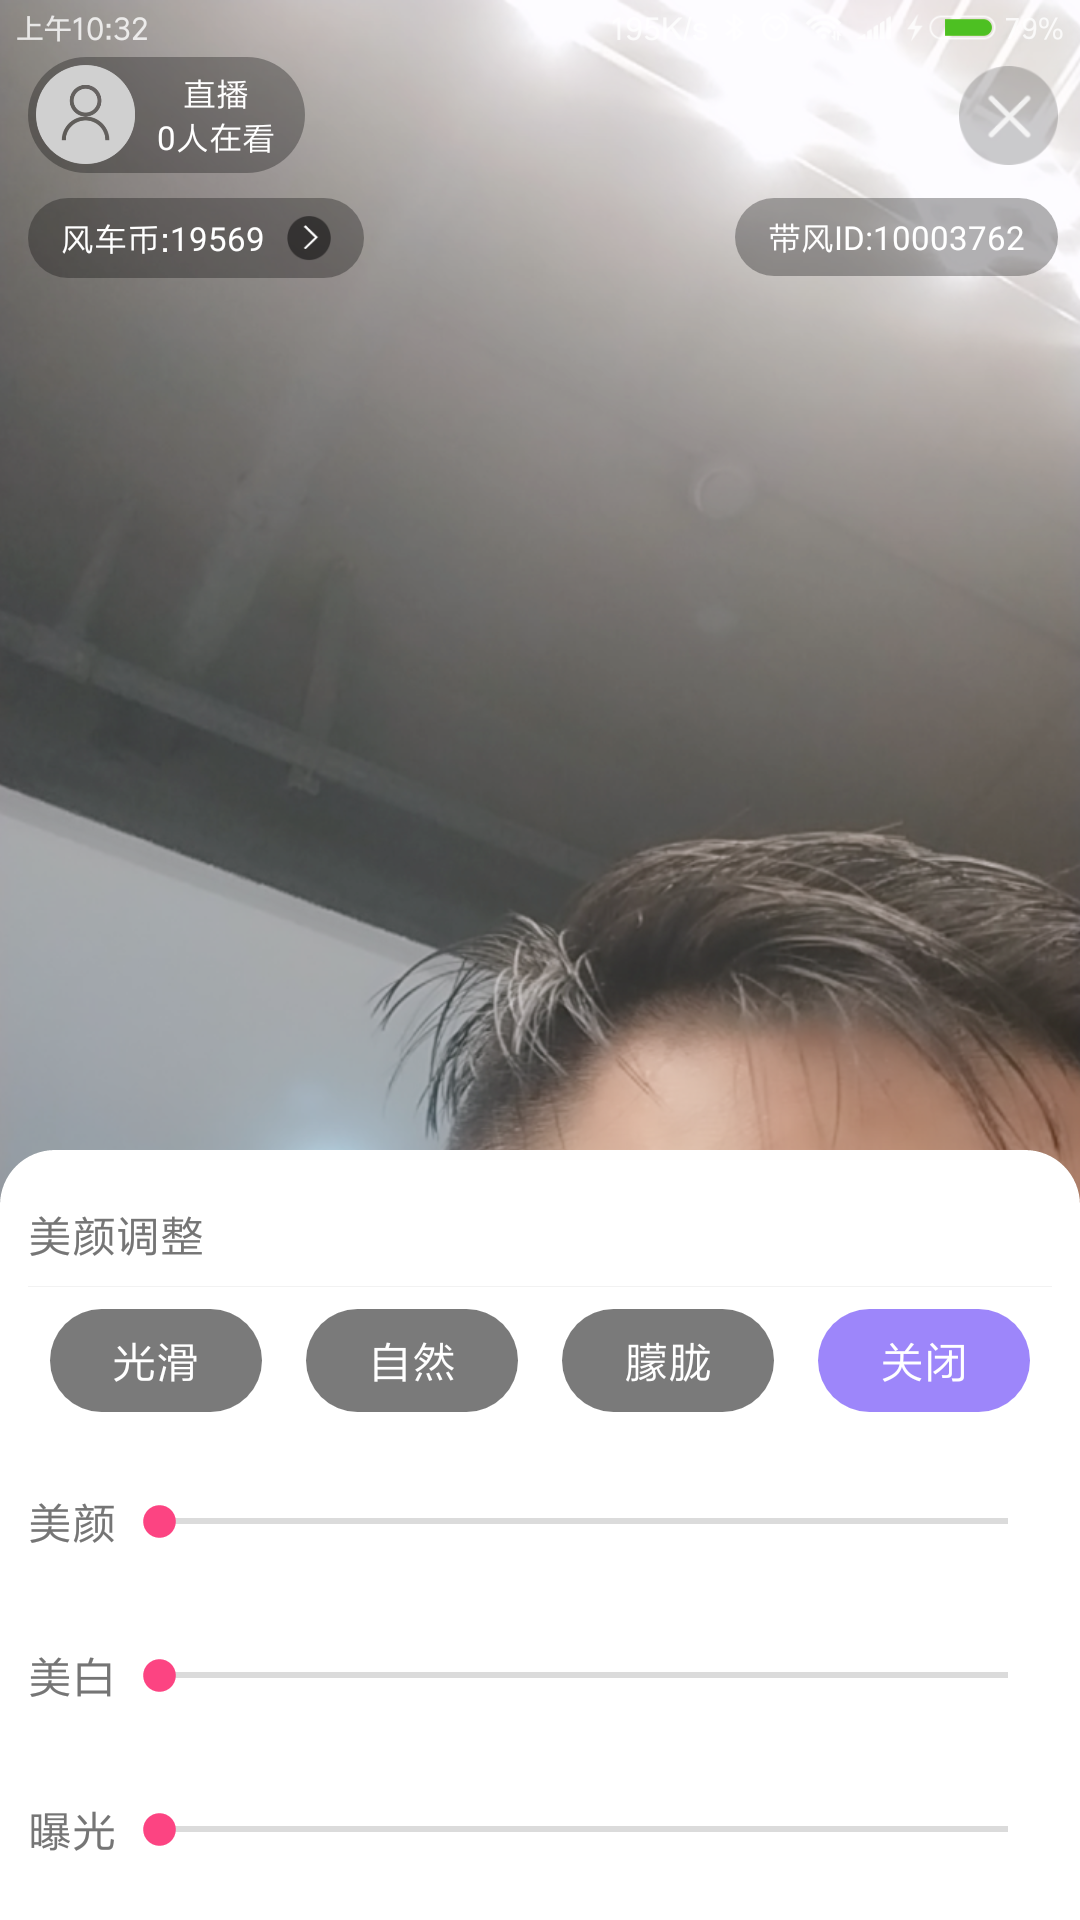
image.png
如果再向上滑动就会一直占满整个屏幕,无法实时看到预览的画面。这时我们就需要控制BottomSheetDialog的peekHeight和最大高度。
在BottomSheetBehavior中有一个setPeekHeight()方法可以控制首次弹出的高度,BottomSheetDialog没有将这个方法开放给我们。查看setContentView()源码:
    @Override
    public void setContentView(@LayoutRes int layoutResId) {
        super.setContentView(wrapInBottomSheet(layoutResId, null, null));
    }
再打开wrapInBottomSheet(layoutResId, null, null):
    private View wrapInBottomSheet(int layoutResId, View view, ViewGroup.LayoutParams params) {
        final FrameLayout container = (FrameLayout) View.inflate(getContext(),
                R.layout.design_bottom_sheet_dialog, null);
        final CoordinatorLayout coordinator =
                (CoordinatorLayout) container.findViewById(R.id.coordinator);
        if (layoutResId != 0 && view == null) {
            view = getLayoutInflater().inflate(layoutResId, coordinator, false);
        }
        FrameLayout bottomSheet = (FrameLayout) coordinator.findViewById(R.id.design_bottom_sheet);
        mBehavior = BottomSheetBehavior.from(bottomSheet);
        mBehavior.setBottomSheetCallback(mBottomSheetCallback);
        mBehavior.setHideable(mCancelable);
        if (params == null) {
            bottomSheet.addView(view);
        } else {
            bottomSheet.addView(view, params);
        }
        // We treat the CoordinatorLayout as outside the dialog though it is technically inside
        coordinator.findViewById(R.id.touch_outside).setOnClickListener(new View.OnClickListener() {
            @Override
            public void onClick(View view) {
                if (mCancelable && isShowing() && shouldWindowCloseOnTouchOutside()) {
                    cancel();
                }
            }
        });
        // Handle accessibility events
        ViewCompat.setAccessibilityDelegate(bottomSheet, new AccessibilityDelegateCompat() {
            @Override
            public void onInitializeAccessibilityNodeInfo(View host,
                    AccessibilityNodeInfoCompat info) {
                super.onInitializeAccessibilityNodeInfo(host, info);
                if (mCancelable) {
                    info.addAction(AccessibilityNodeInfoCompat.ACTION_DISMISS);
                    info.setDismissable(true);
                } else {
                    info.setDismissable(false);
                }
            }

            @Override
            public boolean performAccessibilityAction(View host, int action, Bundle args) {
                if (action == AccessibilityNodeInfoCompat.ACTION_DISMISS && mCancelable) {
                    cancel();
                    return true;
                }
                return super.performAccessibilityAction(host, action, args);
            }
        });
        bottomSheet.setOnTouchListener(new View.OnTouchListener() {
            @Override
            public boolean onTouch(View view, MotionEvent event) {
                // Consume the event and prevent it from falling through
                return true;
            }
        });
        return container;
    }
在第十行可以看到BottomSheetBehavior,这个BottomSheetBehavior是从R.id.design_bottom_sheet这个View获取的。那么我们同样可以通过这个方法获取BottomSheetBehavior,然后设置peekHeight。
View view = bottomSheetDialog.getWindow().findViewById(android.support.design.R.id.design_bottom_sheet);
BottomSheetBehavior.from(view).setPeekHeight(1600);
由于我们的代码没有在Support包下面,所以不能直接写R.id.design_bottom_sheet,而是要写成android.support.design.R.id.design_bottom_sheet。
这时我们已经完成了设置首次弹出高度。接下来我们需要设置Dialog的最大高度。
查看BottomSheetDialog的源码可以再onCreate()方法中发现如下代码:
    @Override
    protected void onCreate(Bundle savedInstanceState) {
        super.onCreate(savedInstanceState);
        Window window = getWindow();
        if (window != null) {
            if (Build.VERSION.SDK_INT >= 21) {
                window.clearFlags(WindowManager.LayoutParams.FLAG_TRANSLUCENT_STATUS);
                window.addFlags(WindowManager.LayoutParams.FLAG_DRAWS_SYSTEM_BAR_BACKGROUNDS);
            }
            window.setLayout(ViewGroup.LayoutParams.MATCH_PARENT,
                    ViewGroup.LayoutParams.MATCH_PARENT);
        }
    }
这里面window.setLayout()方法就是设置整个Dialog占满屏幕,这样如果内容过长就会一直向上滑动,直到占满屏幕。那么我们只需要改变这个属性即可。
mWindow.setLayout(ViewGroup.LayoutParams.MATCH_PARENT, mMaxHeight);
现在我们发现Dialog的高度是我们想要的高度了,但是Dialog没有像预期一样固定在屏幕底部。这时需要简单设置下dialog的gravity即可:
bottomSheetDialog.getWindow().setGravity(Gravity.BOTTOM);
需要注意的是需要在onCreate() 中对宽高进行设置,或者 show() 之后进行设置,否则高度设置不生效。
综合上述的过程,可以对这个可以自定peekHeight和maxHeight的BottomSheetDialog做一个简单的封装,方便使用:
package com.zouludaifeng.daifeng.widget;

import android.content.Context;
import android.os.Bundle;
import android.support.annotation.NonNull;
import android.support.design.widget.BottomSheetBehavior;
import android.support.design.widget.BottomSheetDialog;
import android.view.Gravity;
import android.view.View;
import android.view.ViewGroup;
import android.view.Window;

/**
 * @author sun on 2018/5/25.
 */
public class CustomHeightBottomSheetDialog extends BottomSheetDialog {

    private int mPeekHeight;
    private int mMaxHeight;
    private boolean mCreated;
    private Window mWindow;
    private BottomSheetBehavior mBottomSheetBehavior;

    public CustomHeightBottomSheetDialog(@NonNull Context context,int peekHeight,int maxHeight) {
        super(context);
        init(peekHeight, maxHeight);
    }

    public CustomHeightBottomSheetDialog(@NonNull Context context, int theme,int peekHeight,int maxHeight) {
        super(context, theme);
        init(peekHeight, maxHeight);
    }

    public CustomHeightBottomSheetDialog(@NonNull Context context, boolean cancelable, OnCancelListener cancelListener,int peekHeight,int maxHeight) {
        super(context, cancelable, cancelListener);
        init(peekHeight, maxHeight);
    }

    private void init(int peekHeight, int maxHeight) {
        mWindow = getWindow();
        mPeekHeight = peekHeight;
        mMaxHeight = maxHeight;
    }

    @Override
    protected void onCreate(Bundle savedInstanceState) {
        super.onCreate(savedInstanceState);

        mCreated = true;

        setPeekHeight();
        setMaxHeight();
        setBottomSheetCallback();
    }

    public void setPeekHeight(int peekHeight) {
        mPeekHeight = peekHeight;

        if (mCreated) {
            setPeekHeight();
        }
    }

    public void setMaxHeight(int height) {
        mMaxHeight = height;

        if (mCreated) {
            setMaxHeight();
        }
    }

    public void setBatterSwipeDismiss(boolean enabled) {
        if (enabled) {

        }
    }

    private void setPeekHeight() {
        if (mPeekHeight <= 0) {
            return;
        }

        if (getBottomSheetBehavior() != null) {
            mBottomSheetBehavior.setPeekHeight(mPeekHeight);
        }
    }

    private void setMaxHeight() {
        if (mMaxHeight <= 0) {
            return;
        }

        mWindow.setLayout(ViewGroup.LayoutParams.MATCH_PARENT, mMaxHeight);
        mWindow.setGravity(Gravity.BOTTOM);
    }

    private BottomSheetBehavior getBottomSheetBehavior() {
        if (mBottomSheetBehavior != null) {
            return mBottomSheetBehavior;
        }

        View view = mWindow.findViewById(android.support.design.R.id.design_bottom_sheet);
        // setContentView() 没有调用
        if (view == null) {
            return null;
        }
        mBottomSheetBehavior = BottomSheetBehavior.from(view);
        return mBottomSheetBehavior;
    }

    private void setBottomSheetCallback() {
        if (getBottomSheetBehavior() != null) {
            mBottomSheetBehavior.setBottomSheetCallback(mBottomSheetCallback);
        }
    }

    private final BottomSheetBehavior.BottomSheetCallback mBottomSheetCallback
            = new BottomSheetBehavior.BottomSheetCallback() {
        @Override
        public void onStateChanged(@NonNull View bottomSheet,
                                   @BottomSheetBehavior.State int newState) {
            if (newState == BottomSheetBehavior.STATE_HIDDEN) {
                dismiss();
                BottomSheetBehavior.from(bottomSheet).setState(
                        BottomSheetBehavior.STATE_COLLAPSED);
            }
        }

        @Override
        public void onSlide(@NonNull View bottomSheet, float slideOffset) {
        }
    };
}
4.java.lang.IllegalStateException: Fragment does not have a view
在BottomSheetDialog中使用ViewPager会报这个错误。错误的原因没有深究,提供一个简单的解决方案就是不要再onCreateDialog()中创建Dialog,转到onCreateView中创建View,就不会报这个异常。
但是这么干又会带来第一个问题里面提到的,背景变成了白色。如果直接在onCreateView()或者onViewCreated()里面调用
((View) view.getParent()).setBackgroundColor(getResources().getColor(android.R.color.transparent));
会报空指针异常,这时需要在onActivityCreated()中调用这个方法,就可以避免这个问题。汗,一趟走过来,问题还真是不少。
参考:http://www.voidcn.com/article/p-vtgwgqnn-nq.html
作者:Butane
链接:https://www.jianshu.com/p/7fcec871ea36
来源:简书
著作权归作者所有。商业转载请联系作者获得授权,非商业转载请注明出处。


 1913
1913

 被折叠的 条评论
为什么被折叠?
被折叠的 条评论
为什么被折叠?
 到【灌水乐园】发言


