


本文接上篇博客:Flume介绍、安装、使用案例、自定义Source/Sink、监控
Flume 版本:1.9.0
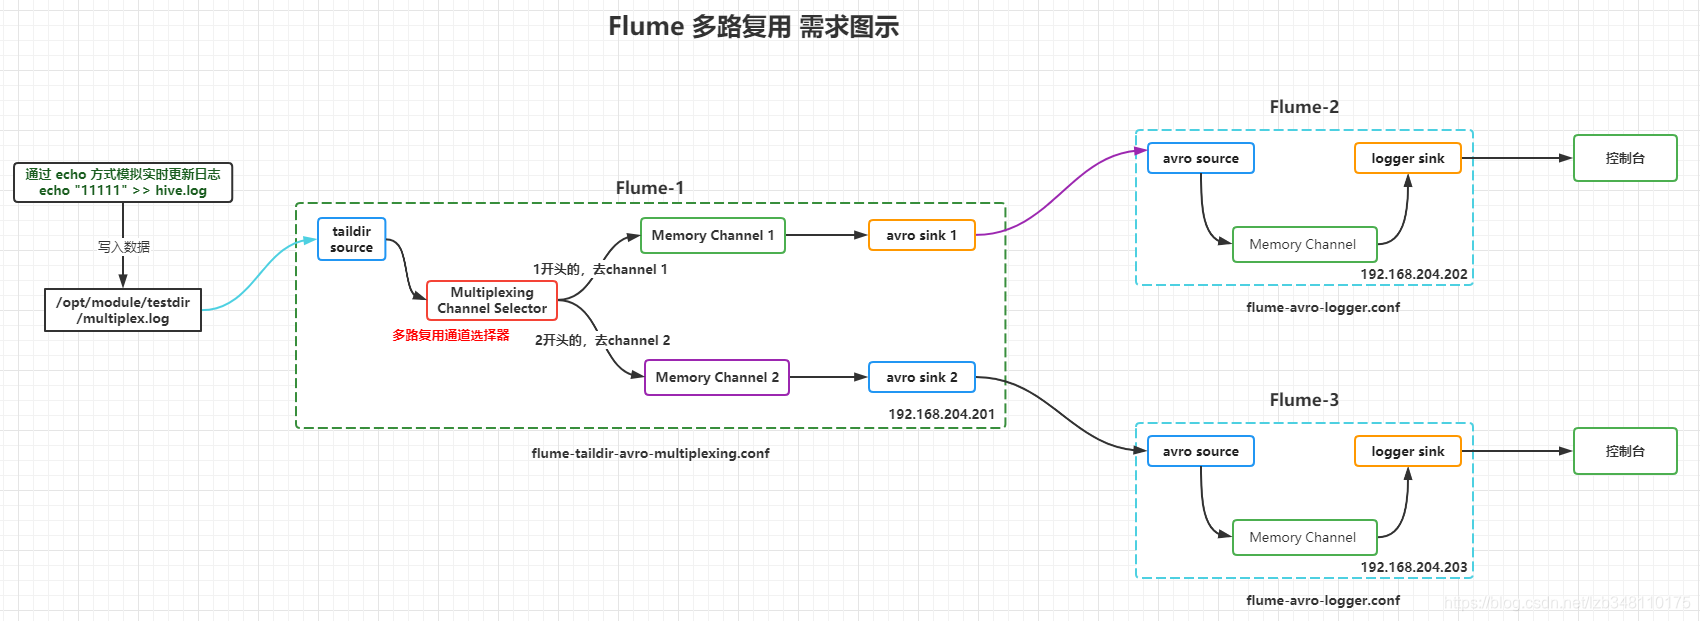
1.多路复用通道选择器(Multiplexing Channel Selector)
Flume多路复用:
同一时刻,source只能传输给一个channel,source是通过 event header 来决定传输到哪一个 channel。
即:Flume 多路复用,需配合自定义Interceptor来使用。比如:一个日志文件(多个系统的日志都在该文件中),根据日志中某个字段值,比如type=1,是系统A日志,sink to hdfs;type=2,是系统B日志,sink to kafka,此时就可以使用Flume多路复用,通过event header 来决定传输到哪个Channel)
案例:
Flume-1 监听 multiplex.log 日志文件;
根据日志输入内容,配合Flume 自定义 Interceptor,
以1开头的,交给 Flume-2 处理;2开头的数据,交给 Flume-3 处理
选型:
Flume-1:taildir source+memory channel+avro sink+Multiplexing Channel Selector(多路复用渠道选择器)
Flume-2:avro source+memory channel+logger sink
Flume-3:avro source+memory channel+logger sink
文档参考:
taildir source:http://flume.apache.org/releases/content/1.9.0/FlumeUserGuide.html#taildir-source
memory channel:http://flume.apache.org/releases/content/1.9.0/FlumeUserGuide.html#memory-channel
avro sink:http://flume.apache.org/releases/content/1.9.0/FlumeUserGuide.html#avro-sink
logger sink:http://flume.apache.org/releases/content/1.9.0/FlumeUserGuide.html#logger-sink
Multiplexing Channel Selector:http://flume.apache.org/releases/content/1.9.0/FlumeUserGuide.html#multiplexing-channel-selector
2.需求图示
3.自定义Interceptor
创建 Maven 工程,添加 Maven 依赖,自定义 Interceptor 即可
<dependency>
    <groupId>org.apache.flume</groupId>
    <artifactId>flume-ng-core</artifactId>
    <version>1.9.0</version>
</dependency>
package com.flume.interceptor;

import org.apache.flume.Context;
import org.apache.flume.Event;
import org.apache.flume.interceptor.Interceptor;

import java.util.List;
import java.util.Map;

/**
 * 自定义Flume Interceptor拦截器
 * @author : lzb
 * @date: 2021-06-22 11:15
 */
public class MyInterceptor implements Interceptor {

    @Override
    public void initialize() {

    }

    @Override
    public Event intercept(Event event) {
        // 获取Event事件中的header信息
        Map<String, String> headers = event.getHeaders();
        // 获取Event事件中的body信息
        String body = new String(event.getBody());
        System.out.println("数据:" + body);
        // 根据body中的内容【如果1开头,则是系统A的日志;如果2开头,则是系统B的日志】这样来决定添加怎么样的头信息
        if ("1".equals(body.substring(0,1))) {
            headers.put("type", "systemA");
            System.out.println("数据为1开头,进入header1-systemA");
        } else if ("2".equals(body.substring(0,1))) {
            headers.put("type", "systemB");
            System.out.println("数据为2开头,进入header2-systemB");
        }
        return event;
    }

    @Override
    public List<Event> intercept(List<Event> events) {
        // list参数,循环执行intercept()方法
        events.forEach(this::intercept);
        return events;
    }

    @Override
    public void close() {

    }

    // 创建一个静态类
    public static class Builder implements Interceptor.Builder {

        @Override
        public Interceptor build() {
            return new MyInterceptor();
        }

        @Override
        public void configure(Context context) {

        }
    }
}
自定义Interceptor代码,来这里拿 https://pan.baidu.com/s/1p4uToEcfLbJ0Nr-7ac1Y3Q (提取码:5fpy )
4.flume配置
Ⅰ.Flume-1
flume-taildir-avro-multiplexing.conf
# Name the components on this agent
a1.sources = r1
a1.sinks = k1 k2
a1.channels = c1 c2

# Flume Interceptors configure
a1.sources.r1.interceptors = i1
a1.sources.r1.interceptors.i1.type = com.flume.interceptor.MyInterceptor$Builder

# Multiplexing Channel Selector configure(多路复用通道选择器配置)
a1.sources.r1.selector.type = multiplexing
a1.sources.r1.selector.header = type
a1.sources.r1.selector.mapping.systemA = c1
a1.sources.r1.selector.mapping.systemB = c2

# Describe/configure the source
a1.sources.r1.type = TAILDIR
a1.sources.r1.positionFile = /opt/module/flume/position/taildir_multiplexing_position.json1
a1.sources.r1.filegroups = f1
a1.sources.r1.filegroups.f1 = /opt/module/testdir/multiplex.log

# Describe the sink
a1.sinks.k1.type = avro
a1.sinks.k1.hostname = 192.168.204.202
a1.sinks.k1.port = 41414

a1.sinks.k2.type = avro
a1.sinks.k2.hostname = 192.168.204.203
a1.sinks.k2.port = 41414

# Use a channel which buffers events in memory
a1.channels.c1.type = memory
a1.channels.c1.capacity = 1000
a1.channels.c1.transactionCapacity = 100

a1.channels.c2.type = memory
a1.channels.c2.capacity = 1000
a1.channels.c2.transactionCapacity = 100

# Bind the source and sink to the channel
a1.sources.r1.channels = c1 c2
a1.sinks.k1.channel = c1
a1.sinks.k2.channel = c2
Ⅱ.Flume-2
flume-avro-logger.conf
# Name the components on this agent
a1.sources = r1
a1.sinks = k1
a1.channels = c1

# Describe/configure the source
a1.sources.r1.type = avro
a1.sources.r1.bind = 192.168.204.202
a1.sources.r1.port = 41414

# Describe the sink
a1.sinks.k1.type = logger

# Use a channel which buffers events in memory
a1.channels.c1.type = memory
a1.channels.c1.capacity = 1000
a1.channels.c1.transactionCapacity = 100

# Bind the source and sink to the channel
a1.sources.r1.channels = c1
a1.sinks.k1.channel = c1
Ⅲ.Flume-3
flume-avro-logger.conf
# Name the components on this agent
a1.sources = r1
a1.sinks = k1
a1.channels = c1

# Describe/configure the source
a1.sources.r1.type = avro
a1.sources.r1.bind = 192.168.204.203
a1.sources.r1.port = 41414

# Describe the sink
a1.sinks.k1.type = logger

# Use a channel which buffers events in memory
a1.channels.c1.type = memory
a1.channels.c1.capacity = 1000
a1.channels.c1.transactionCapacity = 100

# Bind the source and sink to the channel
a1.sources.r1.channels = c1
a1.sinks.k1.channel = c1
5.启动命令
注意:
1.启动前,需要将自定义的 Interceptor 打包,并将jar包放到flume所在目录下的 lib 文件夹下;
2.必须先启动 Flume-2 和 Flume-3,再启动 Flume-1。
# Flume-2 启动命令
bin/flume-ng agent -c conf -n a1 -f job/multiplexing/flume-avro-logger.conf -Dflume.root.logger=INFO,console
# Flume-3 启动命令
bin/flume-ng agent -c conf -n a1 -f job/multiplexing/flume-avro-logger.conf -Dflume.root.logger=INFO,console
# Flume-1 启动命令
bin/flume-ng agent -c conf -n a1 -f job/multiplexing/flume-taildir-avro-multiplexing.conf
6.测试图示
Taildir Source 实时监听
testdir/test.log和testdir/hive.log
- echo 方式追加数据至
hive.log文件,模拟实时日志;会将数据写入hdfs 的/flume/aggregate目录下文件中- echo 方式追加数据至
test.log文件,模拟实时日志;也会将数据写入hdfs 的/flume/aggregate目录下文件中
测试结果,如图所示:
博主写作不易,加个关注呗
求关注、求点赞,加个关注不迷路 ヾ(◍°∇°◍)ノ゙
我不能保证所写的内容都正确,但是可以保证不复制、不粘贴。保证每一句话、每一行代码都是亲手敲过的,错误也请指出,望轻喷 Thanks♪(・ω・)ノ


 1万+
1万+


 被折叠的 条评论
为什么被折叠?
被折叠的 条评论
为什么被折叠?
 到【灌水乐园】发言


