


Fragment与Fragment之间可以进行信息传递,同样,Fragment与Activity也可以进行信息的传递。
下面是一个演示在Activity中获取来自Fragment的信息,使用接口回调的方法在Activity中接收信息
MainActivity.java:
public class MainActivity extends FragmentActivity {

	private FragmentManager manager;
	private FragmentTransaction transaction;
	private Button button;

	@Override
	protected void onCreate(Bundle savedInstanceState) {
		super.onCreate(savedInstanceState);
		setContentView(R.layout.activity_main);

		/* 获取对应的控件 */
		button = (Button) this.findViewById(R.id.button);
		/* 获取manager */
		manager = this.getSupportFragmentManager();
		/* 创建事物 */
		transaction = manager.beginTransaction();

		/* 创建LeftFragment(在内部类中使用到了,所以要用final) */
		final LeftFragment leftFragment = new LeftFragment();
		/* 把Fragment添加到对应的位置 */
		transaction.add(R.id.left, leftFragment, "left");
		/* 提交事物 */
		transaction.commit();

		/* 设置按钮的监听事件 */
		button.setOnClickListener(new OnClickListener() {

			@Override
			public void onClick(View v) {

				/* 使用接口回调的方法获取数据 */
				leftFragment.getEditText(new CallBack() {

					@Override
					public void getResult(String result) {
						/*打印信息*/
						Toast.makeText(MainActivity.this, "-->>" + result, 1).show();
					}
				});

			}
		});

	}

}
LeftFragment.java代码:
public class LeftFragment extends Fragment {

	private Button button;
	private EditText editText;

	public LeftFragment() {
		// TODO Auto-generated constructor stub
	}

	@Override
	public void onCreate(Bundle savedInstanceState) {
		// TODO Auto-generated method stub
		super.onCreate(savedInstanceState);
	}

	@Override
	public View onCreateView(LayoutInflater inflater, ViewGroup container, Bundle savedInstanceState) {

		/*动态加载布局*/
		View view = inflater.inflate(R.layout.left, null);
		/*从动态布局中获取对应的控件*/
		editText = (EditText) view.findViewById(R.id.editText1);
		return view;
	}

	@Override
	public void onPause() {
		// TODO Auto-generated method stub
		super.onPause();
	}

	/*接口回调*/
	public void getEditText(CallBack callBack){
		/*获取文本框的信息*/
		String msg = editText.getText().toString();
		callBack.getResult(msg);
	}

	/*接口*/
	public interface CallBack{
		/*定义一个获取信息的方法*/
		public void getResult(String result);
	}
}
activity_main.xml:
<LinearLayout xmlns:android="http://schemas.android.com/apk/res/android"
    xmlns:tools="http://schemas.android.com/tools"
    android:layout_width="match_parent"
    android:layout_height="match_parent"
    android:orientation="horizontal"
    tools:context=".MainActivity" >

    <LinearLayout
        android:id="@+id/left"
        android:layout_width="224dp"
        android:layout_height="match_parent"
        android:background="#CCCCCC"
        android:orientation="vertical" >
    </LinearLayout>

    <LinearLayout
        android:layout_width="wrap_content"
        android:layout_height="match_parent"
        android:orientation="vertical" >

        <Button
            android:id="@+id/button"
            android:layout_width="wrap_content"
            android:layout_height="wrap_content"
            android:text="获得Fragment的值" />
    </LinearLayout>

</LinearLayout>
left.xml:
<?xml version="1.0" encoding="utf-8"?>
<LinearLayout xmlns:android="http://schemas.android.com/apk/res/android"
android:layout_width="match_parent"
android:layout_height="match_parent"
android:orientation="vertical" >
<EditText
android:id="@+id/editText1"
android:layout_width="match_parent"
android:layout_height="wrap_content"
android:ems="10" >
<requestFocus />
</EditText>
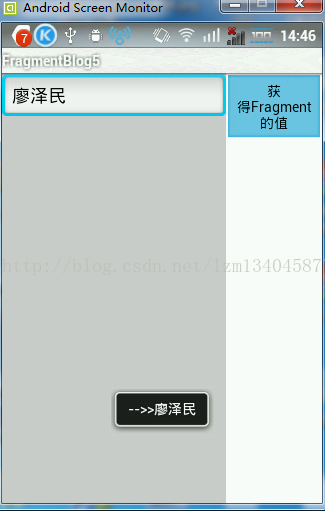
</LinearLayout>demo演示效果:


 419
419


 被折叠的 条评论
为什么被折叠?
被折叠的 条评论
为什么被折叠?
 到【灌水乐园】发言


