 Vue中实现过渡动画的多种方法解析


合理使用动画可以极大提高用户的使用体验。vue中提供了一些和过渡和动画相关的抽象概念,可以帮助我们方便快速的定义和使用动画,本节从css动画开始学习,逐步深入vue中动画apl的应用
使用CSS3创建动画
c3本身支持丰富的动画效果,例如组件的过渡、渐变、移动、翻转等都是可以添加带个话效果。c3动画的核心是定义keyframes或transition。keyframes定义了动画的行为,比如对于颜色渐变的动画,需要定义起始的颜色和终止的颜色,浏览器会自动帮助我们计算期间的所有中间态来执行动画,transtition的使用更加简单,当组件的css属性变化,使用transition来定义其过渡动画属性
transition过渡动画
<!DOCTYPE html>
<html lang="en">
<head>
  <meta charset="UTF-8">
  <meta name="viewport" content="width=device-width, initial-scale=1.0">
  <title>Document</title>
  <script src="https://unpkg.com/vue@next"></script>
  <style>
    .demo{
      width: 100px;
      height: 100px;
      background-color: red;
    }
    .demo-ani{
      width: 200px;
      height: 200px;
      background-color: blue;
      transition: width 2s,height 2s,background-clor 2s;
    }
  </style>
</head>
<body>
  <div id="Application">
    <div :class="cls" @click="run"></div>
  </div>
  <script>
    const App=Vue.createApp({
      data() {
        return {
          cls:"demo"
        }
      },
      methods: {
        run(){
          if(this.cls=="demo"){
            this.cls="demo-ani"
          }else{
            this.cls="demo"
          }
        }
      },
    })
    App.mount("#Application")
  </script>
</body>
</html>
上面的代码里,css中定义的demo-ani类中指定了transition属性,这个属性可以设置要过渡的属性和动画事件。运行代码,点击色块,可以看到色块变大的过程中,会有动画效果,上面的代码简写了,我们也可以逐条属性进行设置
 .demo{
      width: 100px;
      height: 100px;
      background-color: red;
      transition-property: width,height,background-color;
      transition-duration: 1s;
      transition-timing-function: linear;
      transition-delay: 2s
    }
p的设置了动画的属性,du的由来设置动画的执行时长,tim-fun的是用来设置执行方式,liner表示线性执行,del表示延时多久执行动画
keyframes动画
transition动画适合用来创建简单的过渡效果,c3里面支持使用animation属性来配置更加复杂的动画效果。animation属性根据keyframes配置来执行关键帧的动画效果
<!DOCTYPE html>
<html lang="en">
<head>
  <meta charset="UTF-8">
  <meta name="viewport" content="width=device-width, initial-scale=1.0">
  <title>Document</title>
  <script src="https://unpkg.com/vue@next"></script>
  <style>
    @keyframes animation1{
      0%{
        background-color: red;
        width: 100px;
        height: 100px;
      }
      25%{
        background-color: orchid;
        width: 200px;
        height: 200px;
      }
      75%{
        background-color: green;
        width: 150px;
        height: 150px;
      }
      100%{
        background-color: blue;
        width: 200px;
        height: 200px;
      }
    }
    .demo{
      width: 100px;
      height: 100px;
      background-color: red;
    }
    .demo-ani{
      animation: animation1 4s linear;
      width: 200px;
      height: 200px;
      background-color: blue;
    }
  </style>
</head>
<body>
  <div id="Application">
    <div :class="cls" @click="run"></div>
  </div>
  <script>
    const App=Vue.createApp({
      data() {
        return {
          cls:"demo"
        }
      },
      methods: {
        run(){
          if(this.cls=="demo"){
            this.cls="demo-ani"
          }else{
            this.cls="demo"
          }
        }
      },
    })
    App.mount("#Application")
  </script>
</body>
</html>
带百分号的也就是一个关键帧,在其中可以定义元荤素的各种渲染属性,比如宽高、位置、颜色等,在定义keyframes的时候,如果只关心起始和终止状态,也没有不使用百分号,使用from和to
js实现动画效果
动画的本质是将元素的变化以渐变的方式来完成,把大的状态变化拆成非常多小的状态变化,通过不断执行这些变化来达成动画效果。使用js的定时器按照一定频率进行组件状态变化也可以实现动画效果
<!DOCTYPE html>
<html lang="en">
<head>
  <meta charset="UTF-8">
  <meta name="viewport" content="width=device-width, initial-scale=1.0">
  <title>Document</title>
  <script src="https://unpkg.com/vue@next"></script>
</head>
<body>
  <div id="Application">
    <div :style="{backgroundColor:'blue',width:width+'px',height:height+'px'}" @click="run"></div>
  </div>
  <script>
    const App=Vue.createApp({
      data() {
        return {
          width:100,
          height:100,
          timer:null
        }
      },
      methods: {
        run(){
          this.timer=setInterval(this.animation,10)
        },
        animation(){
          if(this.width==200){
            clearInterval(this.timer)
          }else{
            this.width++
            this.height++
          }
        }
      },
    })
    App.mount("#Application")
  </script>
</body>
</html>
setinterval方法是用来开启一个定时器的,代码设置了每十毫秒就执行一次回调函数,在回调函数里,逐步将色块的尺寸放大,就有了动画效果,使用JavaScript可以更加灵活的控制动画的效果,在实际开发,结合canvas的使用,js会有强大的自定义动画效果。动画结束后,需要将定时器停止
vue过渡动画
vue过度动画的核心原理是通过css类来实现的,vue帮助我们在组件的不同生命周期自动切换不同的css类
vue里默认提供了一个名为transition的内置组件,可以用来包装要展示过渡动画的组件。transition组件的name属性用来设置要执行的动画名称,vue约定一系列css类名规则来定义各个过渡过程里的组件状态
<!DOCTYPE html>
<html lang="en">
<head>
  <meta charset="UTF-8">
  <meta name="viewport" content="width=device-width, initial-scale=1.0">
  <title>Document</title>
  <script src="https://unpkg.com/vue@next"></script>
  <style>
    .ani-enter-from{
      width: 0px;
      height: 0px;
      background-color: red;
    }
    .ani-enter-active{
      transition: width 2s,height 2s,background-color 2s;
    }
    .ani-enter-to{
      width: 100px;
      height: 100px;
      background-color: blue;
    }
    .ani-leave-from{
      width: 100px;
      height: 100px;
      background-color: blue;
    }
    .ani-leave-active{
      transition: width 2s,height 2s,background-color 3s;
    }
    .ani-leave-to{
      width: 0px;
      height: 0px;
      background-color: red;
    }
  </style>
</head>
<body>
  <div id="Application">
    <button @click="click">显示/隐藏</button>
    <transition name="ani">
      <div v-if="show">

      </div>
    </transition>
  </div>
  <script>
    const App=Vue.createApp({
      data() {
        return {
          show:false
        }
      },
      methods: {
        click(){
          this.show=!this.show
        }
      },
    })
    App.mount("#Application")
  </script>
</body>
</html>
点击功能按键,组件在显示和隐藏的时候会要特殊的过渡动画效果。代码的核心是定义的六个特殊的css类,这六个css类没有显示使用,但是在组件执行动画里起到了不可替代的作用。当我们为transition组件的name属性设置动画名称后,当组件被插入页面被移除的时候,会自动寻找动画名称开头的css类,也就是上面定义的六个css类
也就是x-enter/leave-from/active/to
x指的是定义的过渡动画的名称。六种css类,前三种用来定义组件被插入页面的动画效果,后面三种用来定义组件被移除页面的动画效果
x-e-f类在组件即将被插入页面的时候被添加在组件和是哪个,可以理解为组件的初始状态,元素被插入页面后此类会马上被移除
x-e-t类在组件被插入页面后立即被添加,此时x-e-f类会被移除,可以理解为组件过渡的最终状态
x-e-a类在组件的整个插入过渡动画都被会添加,直到组件的过渡动画结束后才会被移除。可以在这个类里面定义组件过渡动画的时长、方式、延迟
x-e-f和第一个相反,在组件即将被移除的时候此类会被添加,用来定义移除组件时过渡动画的起始状态
x-l-t则是对于移除组件动画的终止状态
x-l-a类在组件移除过渡的整个过程都会被添加,直到组件过渡动画结束后才会被移除。
上面六种css类虽然被添加的时机不同,但是最终都会被移除,因此当动画执行完成后,组件的样式并不会保留,跟常见的是在组件本身绑定一个最终状态的样式类
<transition name="ani">
      <div v-if="show" class="demo">

      </div>
    </transition>
css代码
 .demo{
      width: 100px;
      height: 100px;
      background-color: blue;
    }
设置动画过程中的监听回调
对于组件的加载或卸载过程,有一系列的生命周期函数会被调用,对于vue中的转场动画,也可以注册一系列的动画函数来对其过程进行监听
例如
 <div id="Application">
    <button @click="click">显示/隐藏</button>
    <transition name="ani"
    @before-enter="beforeEnter"
    @enter="enter"
    @after-enter="afterEnter"
    @enter-cancelled="enterCancelled"
    @before-leave="beforeLeave"
    @leave="leave"
    @after-leave="afterLeave"
    @leave-cancelled="leaveCancelled"
    >
      <div v-if="show" class="demo">

      </div>
    </transition>
注册的回调方法需要在组件的methods选项里实现
 methods: {
        click(){
          this.show=!this.show
        },
        beforeEnter(el){
          console.log("beforeEnter");
        },
        enter(el,done){
          console.log("enter");
        },
        afterEnter(el){
          console.log("afterEnter");
        },
        enterCancelled(el){
          console.log("enterCancelled");
        },
        beforeLeave(el){
          console.log("beforeLeave");
        },
        leave(el,done){
          console.log("leave");
        },
        afterLeave(el){
          console.log("afterleave");
        },
        leaveCancelled(el){
          console.log("leaveCancelled");
        }
      },
借助回调函数,我们在组件过渡动画过程里实现复杂的业务逻辑可以通过js来自定义过度动画,当需要自定义过渡动画的时候,需要将transition组件的css属性关掉
上面的回调函数里的enter和leave除了会将当前元素与作为参数,还有一个函数类型的done参数,如果将css属性关闭,决定用js来实现自定义的过度动画,那么done函数就需要被手动调用,要不然动画会立即完成
多个组件的过渡动画
vue的transition组件支持同时包赚更多个互斥的子组件元素,从而实现多组件的过渡效果,在实际开发,有很多类似情况,例如a消失的同时b展示,例子:
<!DOCTYPE html>
<html lang="en">
<head>
  <meta charset="UTF-8">
  <meta name="viewport" content="width=device-width, initial-scale=1.0">
  <title>Document</title>
  <script src="https://unpkg.com/vue@next"></script>
  <style>
    .demo{
      width: 100px;
      height: 100px;
      background-color: blue;
    }
    .demo2{
      width: 100px;
      height: 100px;
      background-color: blue;
    }
    .ani-enter-from{
      width: 0px;
      height: 0px;
      background-color: red;
    }
    .ani-enter-active{
      transition: width 3s,height 3s background-color 3s;
    }
    .ani-enter-to{
      width: 100px;
      height: 100px;
      background-color: blue;
    }
    .ani-leave-from{
      width: 100px;
      height: 100px;
      background-color: blue;
    }
    .ani-leave-active{
      transition: width 3s,height 3s,background-color 3s;
    }
    .ani-leave-to{
      width: 0px;
      height: 0px;
      background-color: red;
    }
  </style>
</head>
<body>
  <div id="Application">
    <button @click="click">显示/隐藏</button>
    <transition name="ani">
    <div v-if="show" class="demo"></div>
    <div v-else class="demo2"></div>
    </transition>
  </div>
  <script>
    const App=Vue.createApp({
      data() {
        return {
          show:false
        }
      },
      methods: {
        click(){
          this.show=!this.show
        }
      },
    })
    App.mount("#Application")
  </script>
</body>
</html>
运行代码,点击按钮,可以看到两个色块以过渡动画的形式交替出现。默认情况两个元素的插入和移除动画会同步进行,大多数需要移除动画执行完成后,再执行插入动画。要实现此功能有对transition组件的mode属性进行设置,当我们设置为out-in,就会先执行移除动画,再执行插入动画,设置为in-out就先执行插入动画,再执行移除,如下
<transition name="ani" mode="in-out">
    <div v-if="show" class="demo"></div>
    <div v-else class="demo2"></div>
    </transition>
列表过渡动画
实际开发里,列表是一种非常流行的页面设计的方式。vue里,通常使用v-for指令来动态构建列表视图,在动态构建列表视图的过程中,其中的元素经常有增删、重拍等操作,在vue里使用transition-group组件可以非常方便的实现列表元素变动的动画效果
<!DOCTYPE html>
<html lang="en">
<head>
  <meta charset="UTF-8">
  <meta name="viewport" content="width=device-width, initial-scale=1.0">
  <title>Document</title>
  <script src="https://unpkg.com/vue@next"></script>
  <style>
    .list-enter-active,
    .list-leave-active{
      transition: all 1s ease;
    }
    .list-enter-from,
    .list-leave-to{
      opacity: 0;
    }
  </style>
</head>
<body>
  <div id="Application">
    <button @click="click">添加元素</button>
    <transition-group name="list">
    <div v-for="item in items" :key="item">
      元素:{{item}}
    </div>

    </transition-group>
  </div>
  <script>
    const App=Vue.createApp({
      data() {
        return {
          items:[1,2,3,4,5]
        }
      },
      methods: {
        click(){
          this.items.push(this.items[this.items.length-1]+1)
        }
      },
    })
    App.mount("#Application")
  </script>
</body>
</html>
单击添加元素,可以实现渐进式插入
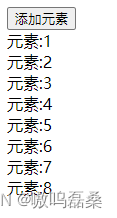
在使用transition-group组件实现列表动画时,和transition类似,首先需要定义动画所需的css类。如果使用列表动画,列表的每一个元素都需要有一个唯一的key值。
除了对列表元素进行增删,排序过程也可以采用动画进行过渡,只需要额外定义一个v-move;类的特殊动画类就行
优化用户列表页面
对于前端网页开发,功能实现仅仅是开发产品的第一步,如何给用户以最优的使用体验才是工程师的核心关注点,尝试给第七章的用户列表实例加入一些动画效果
  template:`
      <div class="container">
      <div class="content">
        <input type="radio" :value="-1" v-model="sexFilter">全部
        <input type="radio" :value="0" v-model="sexFilter">男
        <input type="radio" :value="-1" v-model="sexFilter">女
      </div>
      <div class="content">搜索:<input type="text" v-model="searchKey"></div>
      <div class="content">

        <div class="tab" width="300px">
          <div>
            <div class="item">姓名</div>
            <div class="item">性别</div>
          </div>
          <transition-group name="list">
            <div v-for="(data,index) in showDatas" :key="data.name">
            <div class="item">{{data.name}}</div>
            <div class="item">{{data.sex=='0' ? '男':'女'}}</div>
            </div>
          </transition-group>
        </div>
      </div>
    </div>
      `
css样式和动画效果
<style>
    .container{
      margin: 50px;
    }
    .content{
      margin: 20px;
    }
    .tab{
      width: 300px;
      position: absolute;
    }
    .item{
      border: gray 1px solid;
      width: 148px;
      text-align: center;
      transition: all 0.8s ease;
      display: inline-block;
    }
    .list-enter-active{
      transition: all 1s ease;
    }
    .list-enter-from,
    .list-leave-to{
      opacity: 0;
    }
    .list-move{
      transition: transform 1s ease;
    }
    .list-leave-active{
      position: absolute;
      transition: all 1s ease;
    }
  </style>
过渡效果灰常不错


 被折叠的 条评论
为什么被折叠?
被折叠的 条评论
为什么被折叠?
 到【灌水乐园】发言


