


 本文深入分析SpringBoot使用外置Tomcat启动的流程,涵盖SpringApplication.run方法的各个阶段,包括环境准备、创建容器、容器刷新前的准备及刷新容器的详细步骤,解析配置文件、初始化监听器等核心操作。
前言
SpringBoot应用默认以Jar包方式并且使用内置Servlet容器(默认Tomcat),该种方式虽然简单但是默认不支持JSP并且优化容器比较复杂。故而我们可以使用习惯的外置Tomcat方式并将项目打War包。一键获取SpringBoot笔记
【6】SpringApplication.run方法详细分析-准备环境
③ prepareEnvironment–环境构建
ConfigurableEnvironment environment = prepareEnvironment(listeners,
					applicationArguments);
跟进去该方法:
 private ConfigurableEnvironment prepareEnvironment(
            SpringApplicationRunListeners listeners,
            ApplicationArguments applicationArguments) {


        // Create and configure the environment
        //获取对应的ConfigurableEnvironment
        ConfigurableEnvironment environment = getOrCreateEnvironment();
        //配置
        configureEnvironment(environment, applicationArguments.getSourceArgs());
        //发布环境已准备事件,这是第二次发布事件
        listeners.environmentPrepared(environment);
        bindToSpringApplication(environment);
        if (this.webApplicationType == WebApplicationType.NONE) {


            environment = new EnvironmentConverter(getClassLoader())
                    .convertToStandardEnvironmentIfNecessary(environment);
        }
        ConfigurationPropertySources.attach(environment);
        return environment;
    }
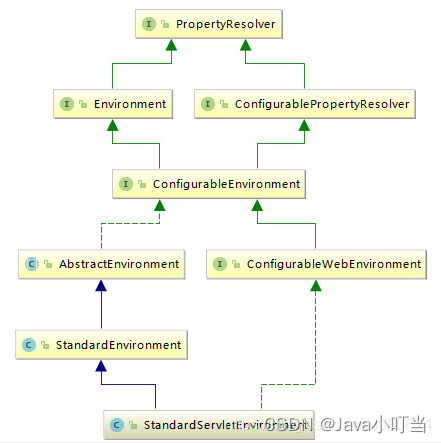
来看一下getOrCreateEnvironment()方法,前面已经提到,environment已经被设置了servlet类型,所以这里创建的是环境对象是StandardServletEnvironment。
 private ConfigurableEnvironment getOrCreateEnvironment() {


        if (this.environment != null) {


            return this.environment;
        }
        if (this.webApplicationType == WebApplicationType.SERVLET) {


            return new StandardServletEnvironment();
        }
        return new StandardEnvironment();
    }
枚举类WebApplicationType是SpringBoot2新增的特性,主要针对spring5引入的reactive特性。
枚举类型如下:
public enum WebApplicationType {


    //不需要再web容器的环境下运行,普通项目
    NONE,
    //基于servlet的web项目
    SERVLET,
    //这个是spring5版本开始的新特性
    REACTIVE
}
Environment接口提供了4种实现方式,StandardEnvironment、StandardServletEnvironment和MockEnvironment、StandardReactiveWebEnvironment,分别代表普通程序、Web程序、测试程序的环境、响应式web环境,
配置环境代码如下:
protected void configureEnvironment(ConfigurableEnvironment environment,
			String[] args) {


		configurePropertySources(environment, args);
		configureProfiles(environment, args);
	}
在返回return new StandardServletEnvironment();对象的时候,会完成一系列初始化动作,主要就是将运行机器的系统变量和环境变量,加入到其父类AbstractEnvironment定义的对象MutablePropertySources中,MutablePropertySources对象中定义了一个属性集合:
 private final List<PropertySource<?>> propertySourceList;

    public MutablePropertySources() {


        this.propertySourceList = new CopyOnWriteArrayList();
        this.logger = LogFactory.getLog(this.getClass());
    }
执行到这里,系统变量和环境变量已经被载入到配置文件的集合中,接下来就行解析项目中的配置文件。
关于CopyOnWriteArrayList可以参考博文浅谈从fail-fast机制到CopyOnWriteArrayList使用
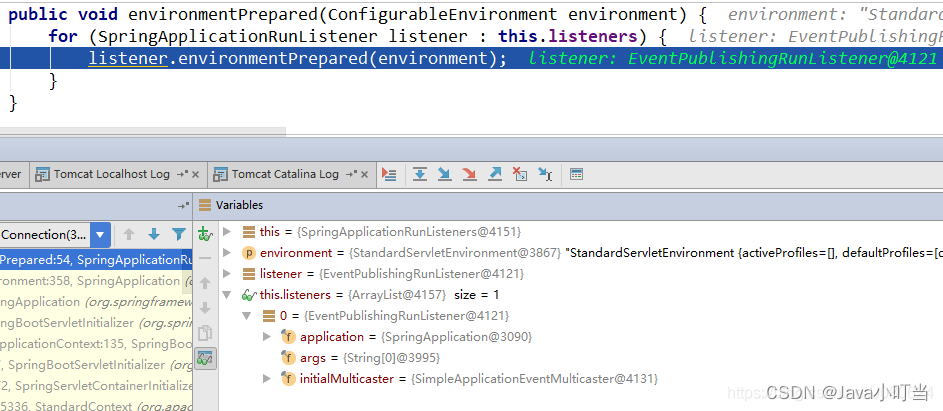
④ listeners.environmentPrepared(environment);–第二次发布事件
来看一下listeners.environmentPrepared(environment);,上面已经提到了,这里是第二次发布事件。什么事件呢?顾名思义,系统环境初始化完成的事件。
跟进方法:
继续跟:
@Override
public void environmentPrepared(ConfigurableEnvironment environment) {


	this.initialMulticaster.multicastEvent(new ApplicationEnvironmentPreparedEvent(
			this.application, this.args, environment));
}
这里将要广播ApplicationEnvironmentPreparedEvent事件了
@Override
	public void multicastEvent(final ApplicationEvent event, @Nullable ResolvableType eventType) {


		ResolvableType type = (eventType != null ? eventType : resolveDefaultEventType(event));
		for (final ApplicationListener<?> listener : getApplicationListeners(event, type)) {


			Executor executor = getTaskExecutor();
			if (executor != null) {


				executor.execute(() -> invokeListener(listener, event));
			}
			else {


				invokeListener(listener, event);
			}
		}
	}
发布事件的流程上面已经讲过了,这里不在赘述。来看一下根据事件类型获取到的监听器:
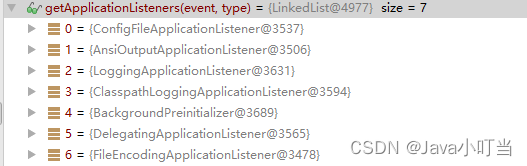
遍历监听器,调用不同监听器对该事件的处理。
可以看到获取到的监听器和第一次发布启动事件获取的监听器有几个是重复的,这也验证了监听器是可以多次获取,根据事件类型来区分具体处理逻辑。上面介绍日志监听器的时候已经提到。
主要来看一下ConfigFileApplicationListener,该监听器非常核心,主要用来处理项目配置。项目中的 properties 和yml文件都是其内部类所加载。
首先方法执行入口:
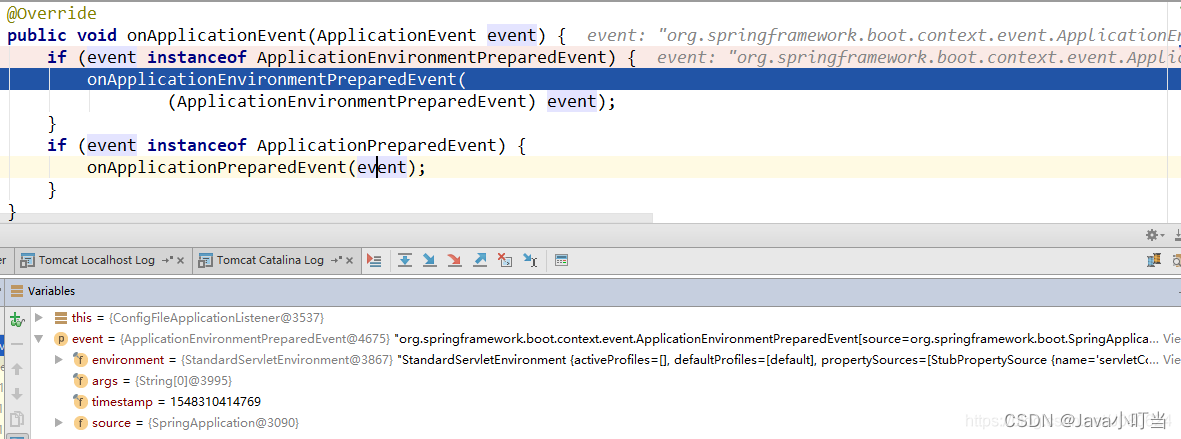
调用onApplicationEnvironmentPreparedEvent方法:
private void onApplicationEnvironmentPreparedEvent(
			ApplicationEnvironmentPreparedEvent event) {


		List<EnvironmentPostProcessor> postProcessors = loadPostProcessors();
		postProcessors.add(this);
		AnnotationAwareOrderComparator.sort(postProcessors);
		for (EnvironmentPostProcessor postProcessor : postProcessors) {


			postProcessor.postProcessEnvironment(event.getEnvironment(),
					event.getSpringApplication());
		}
首先还是会去读spring.factories 文件,List postProcessors = loadPostProcessors();获取的处理类有以下四种:
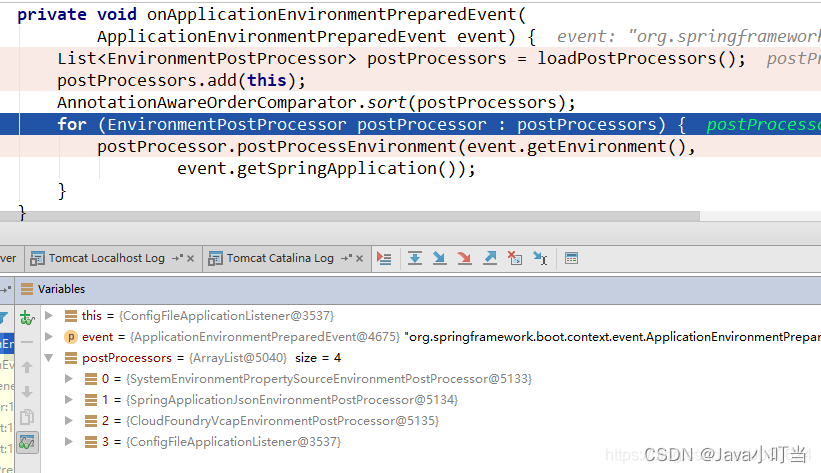

SystemEnvironmentPropertySourceEnvironmentPostProcessor(加载系统环境变量):

SpringApplicationJsonEnvironmentPostProcessor:

@Override
	public void postProcessEnvironment(ConfigurableEnvironment environment,
			SpringApplication application) {


		MutablePropertySources propertySources = environment.getPropertySources();
		StreamSupport.stream(propertySources.spliterator(), false)
				.map(JsonPropertyValue::get).filter(Objects::nonNull).findFirst()
				.ifPresent((v) -> processJson(environment, v));
	}
在执行完上述三个监听器流程后,ConfigFileApplicationListener会执行该类本身的逻辑。由其内部类Loader加载项目制定路径下的配置文件:
// Note the order is from least to most specific (last one wins)
private static final String DEFAULT_SEARCH_LOCATIONS =
"classpath:/,classpath:/config/,file:./,file:./config/";
ConfigFileApplicationListener

@Override
	public void postProcessEnvironment(ConfigurableEnvironment environment,
			SpringApplication application) {


		addPropertySources(environment, application.getResourceLoader());
	}

内部类Loader构造函数:
Loader(ConfigurableEnvironment environment, ResourceLoader resourceLoader) {


			this.environment = environment;
			this.resourceLoader = (resourceLoader != null ? resourceLoader
					: new DefaultResourceLoader());
			this.propertySourceLoaders = SpringFactoriesLoader.loadFactories(
					PropertySourceLoader.class, getClass().getClassLoader());
		}
其获取的propertySourceLoaders 如下:
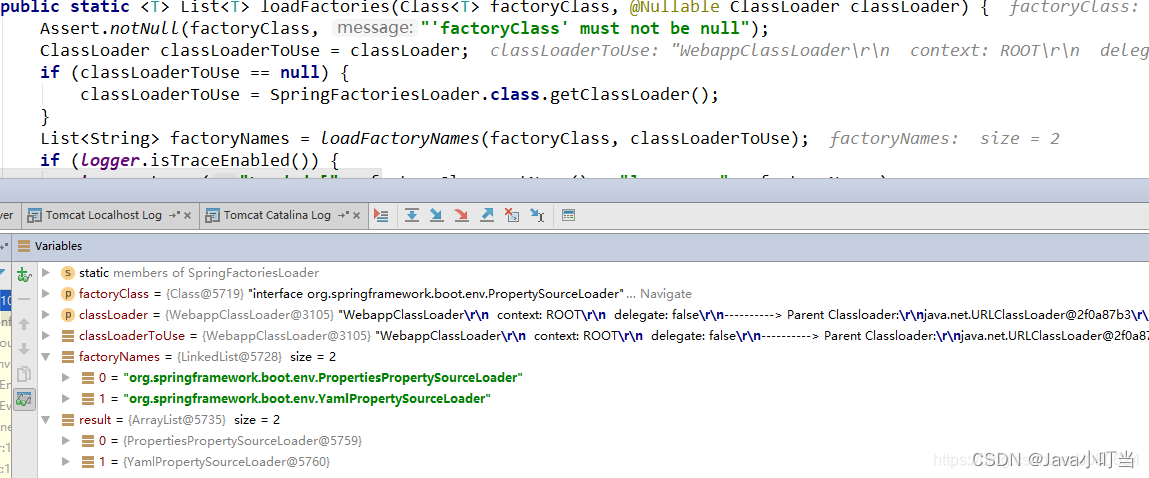
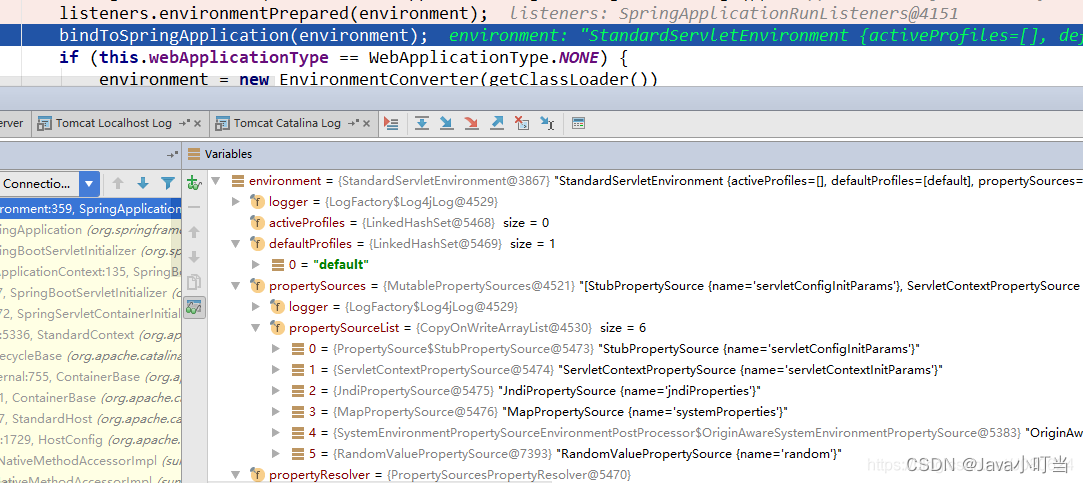
至此使用ConfigFileApplicationListener将应用配置文件加载进来,接下来该其它六个监听器依次处理。
监听器处理完毕返回到ConfigurableEnvironment prepareEnvironment(SpringApplicationRunListeners listeners, ApplicationArguments applicationArguments)处,此时environment对象如下:
接下来将environment绑定到SpringApplication上。

返回到SpringApplication类中ConfigurableApplicationContext run(String… args)方法处:
【7】SpringApplication.run方法详细分析-创建容器
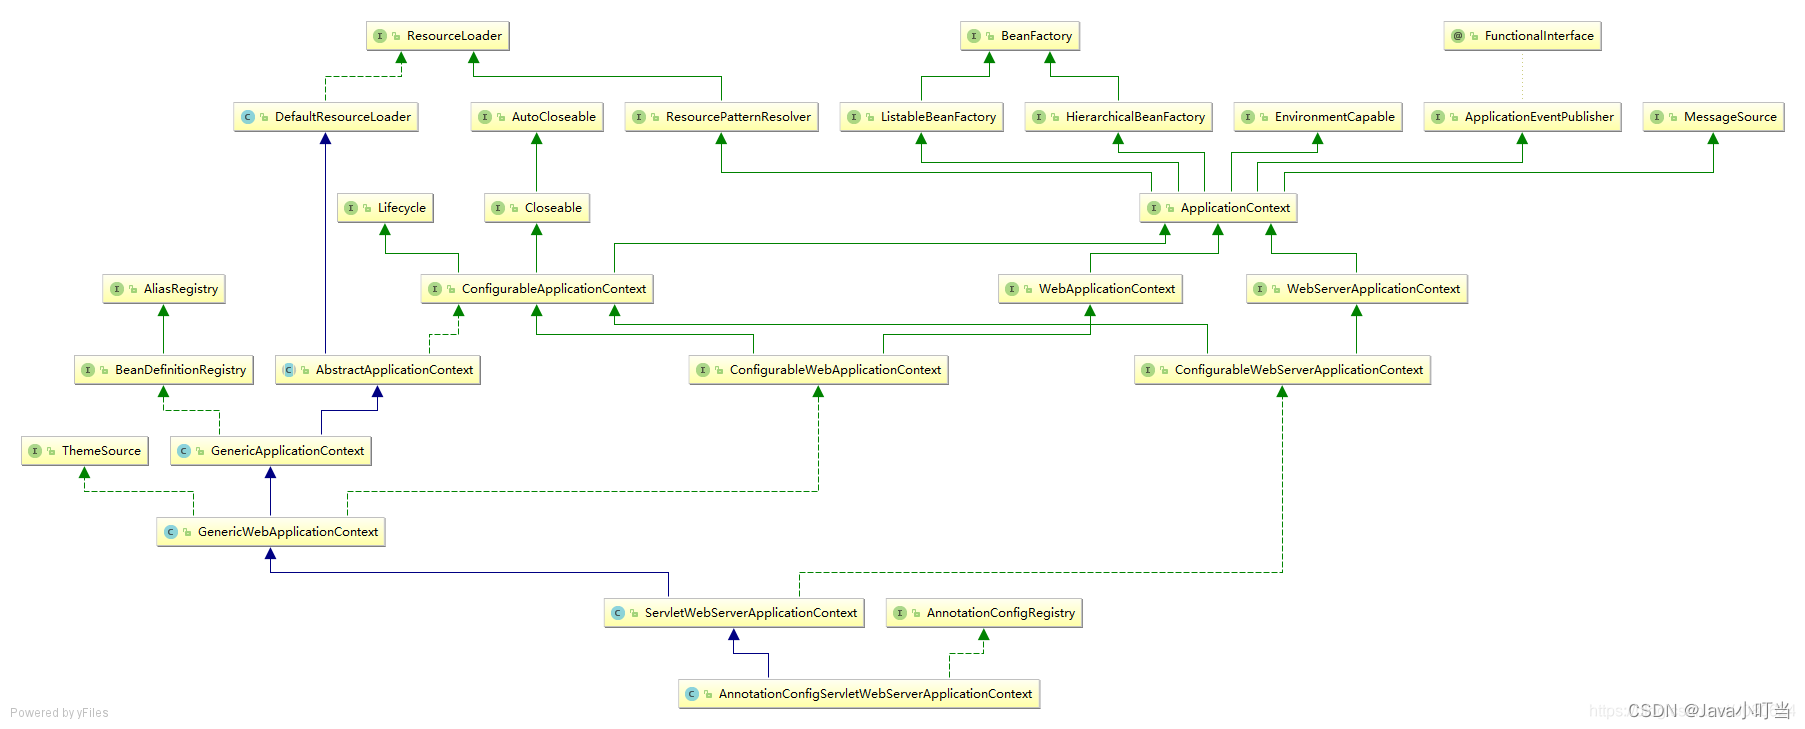
⑤ createApplicationContext();创建容器
在SpringBootServletInitializer.createRootApplicationContext(ServletContext servletContext)中设置过contextClass:
builder.contextClass(AnnotationConfigServletWebServerApplicationContext.class);
看创建容器的代码:
protected ConfigurableApplicationContext createApplicationContext() {
Class<?> contextClass = this.applicationContextClass;
//如果contextClass 为null,就根据webApplicationType加载对应class;
//这里不为null,是AnnotationConfigServletWebServerApplicationContext
if (contextClass == null) {
try {
switch (this.webApplicationType) {
case SERVLET:
contextClass = Class.forName(DEFAULT_WEB_CONTEXT_CLASS);
break;
case REACTIVE:
contextClass = Class.forName(DEFAULT_REACTIVE_WEB_CONTEXT_CLASS);
break;
default:
contextClass = Class.forName(DEFAULT_CONTEXT_CLASS);
}
}
catch (ClassNotFoundException ex) {
throw new IllegalStateException(
"Unable create a default ApplicationContext, "
+ "please specify an ApplicationContextClass",
ex);
}
}
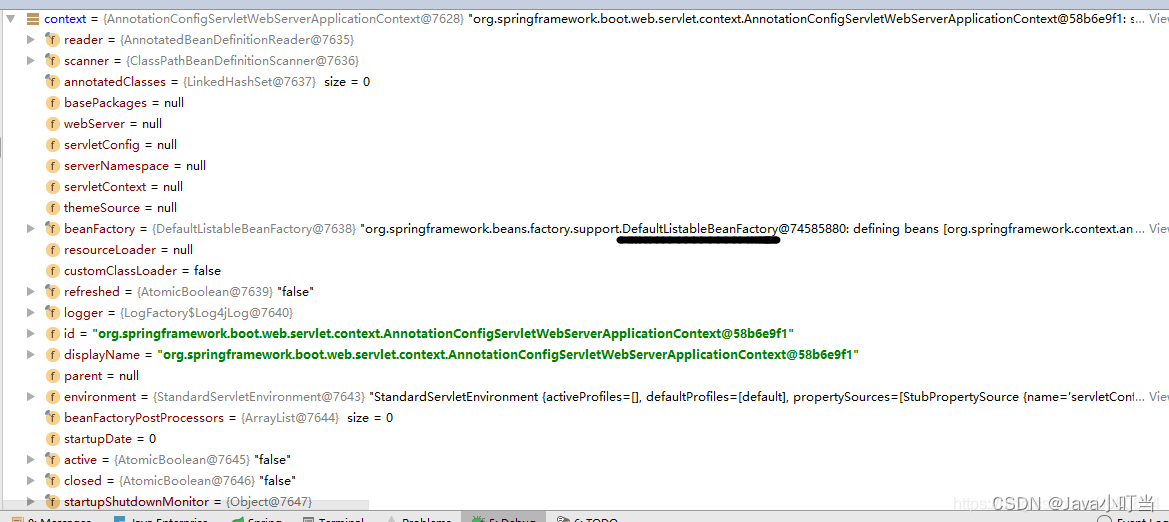
//这里根据反射实例化容器
return (ConfigurableApplicationContext) BeanUtils.instantiateClass(contextClass);
}
创建的context如下:
⑥ 报告错误信息
这里还是以同样的方式获取 spring.factories文件中的指定类:
private <T> Collection<T> getSpringFactoriesInstances(Class<T> type,
			Class<?>[] parameterTypes, Object... args) {


		ClassLoader classLoader = Thread.currentThread().getContextClassLoader();
		// Use names and ensure unique to protect against duplicates
		Set<String> names = new LinkedHashSet<>(
				SpringFactoriesLoader.loadFactoryNames(type, classLoader));
		List<T> instances = createSpringFactoriesInstances(type, parameterTypes,
				classLoader, args, names);
		AnnotationAwareOrderComparator.sort(instances);
		return instances;
	}

如果应用启动失败,则会打印失败信息:
@Override
	public void report(FailureAnalysis failureAnalysis) {


		if
最低0.47元/天 解锁文章


 1697
1697

 被折叠的 条评论
为什么被折叠?
被折叠的 条评论
为什么被折叠?
 到【灌水乐园】发言


