


模型说明
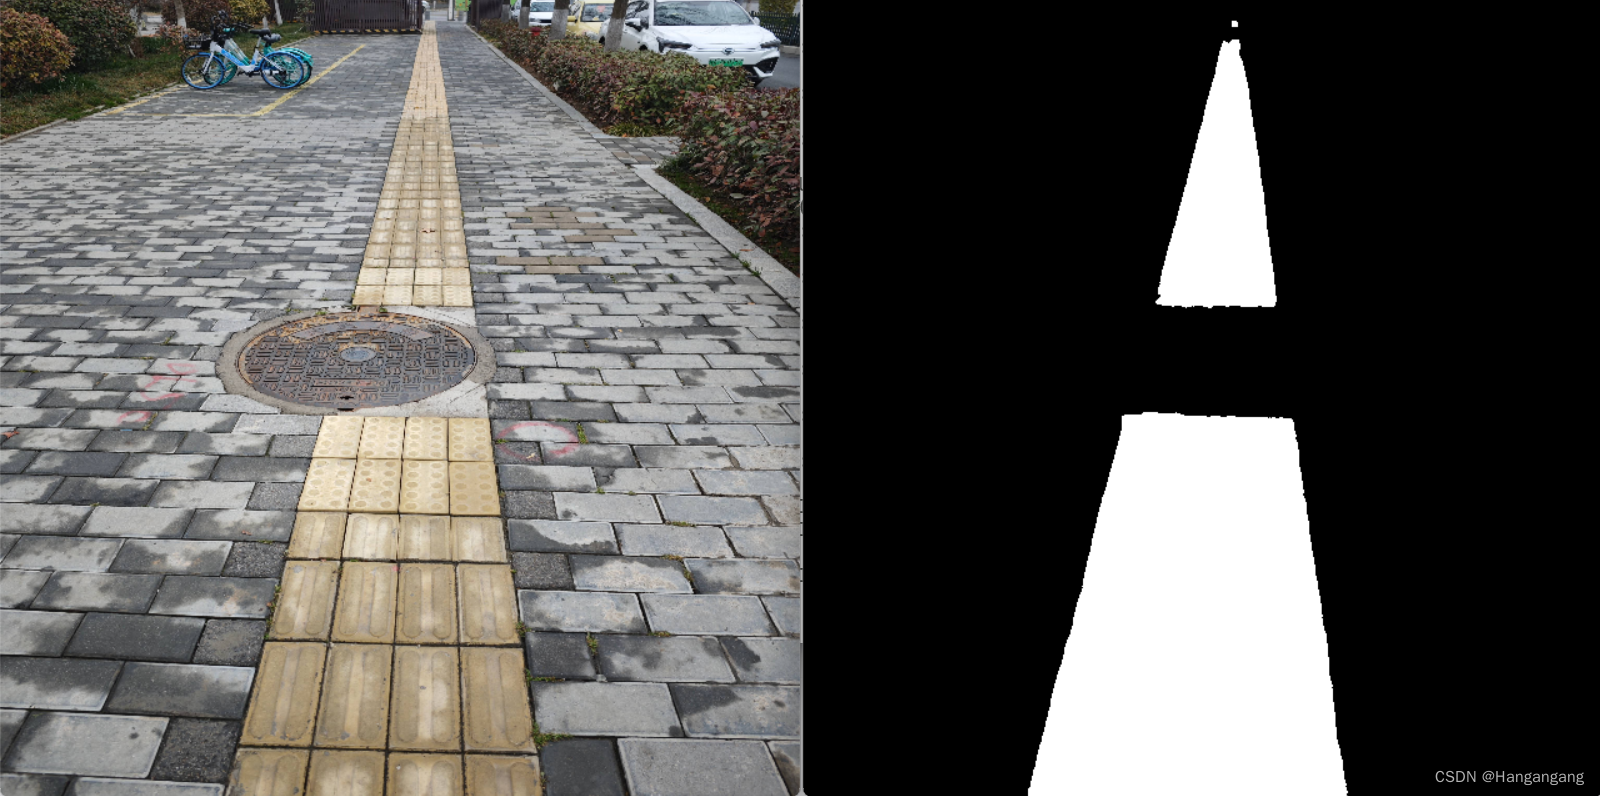
GRFB-unet模型用于分割图片中的盲道,该模型来自论文,本人按照其代码训练。论文与代码见Github仓库。模型识别效果如下:
模型的输入维度为:(1,3,640,640) 即 <批量数><通道数><高度><宽度>
模型输出:(1,2,640,640) 即 <批量数><通道数><高度><宽度>
两通道代表二分类,即正类与负类.
论文与完整代码
完整代码在Github中,连接如下:完整代码
代码中有原论文地址和文件说明。
安装onnxruntime
C++环境下安装,在官网选择合适版本。我使用的是microsoft.ml.onnxruntime.1.17.3.nupkg。
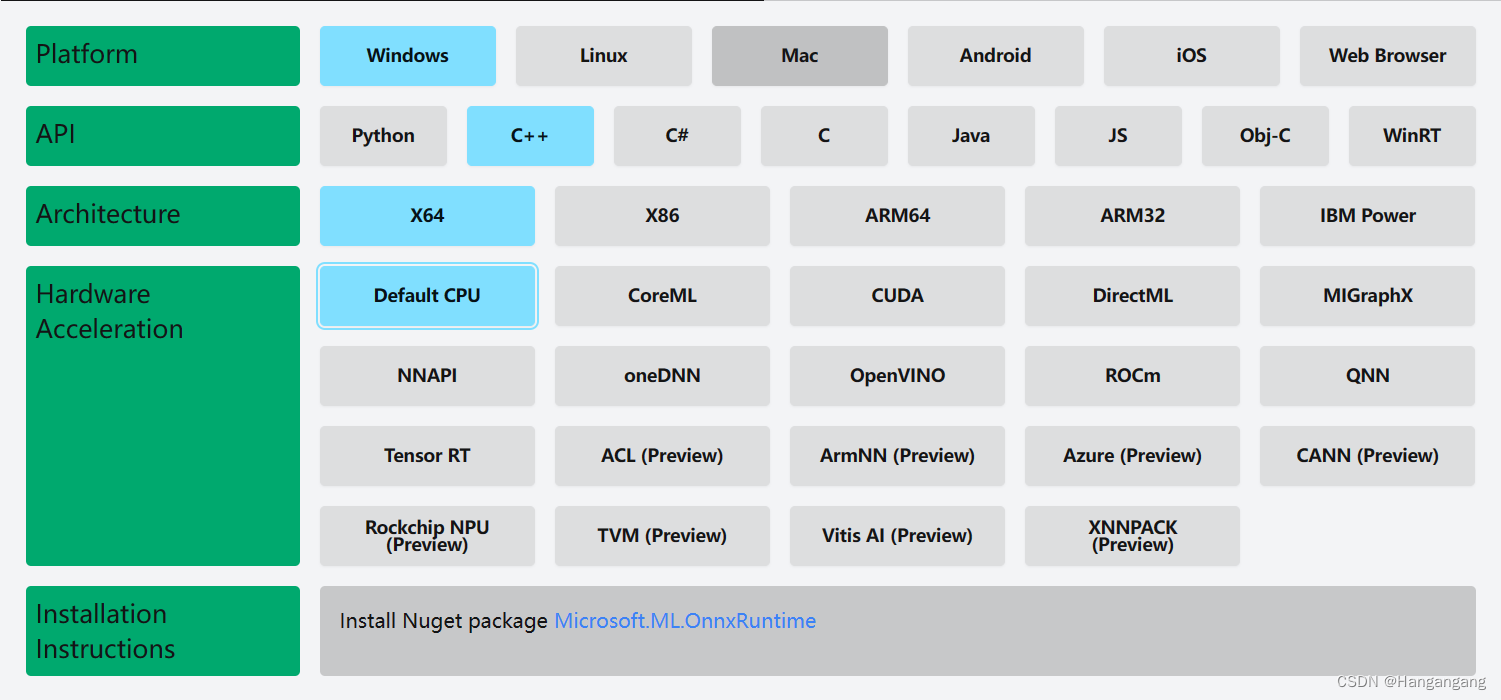
在VS中安装nupkg格式文件
按照下图选择:
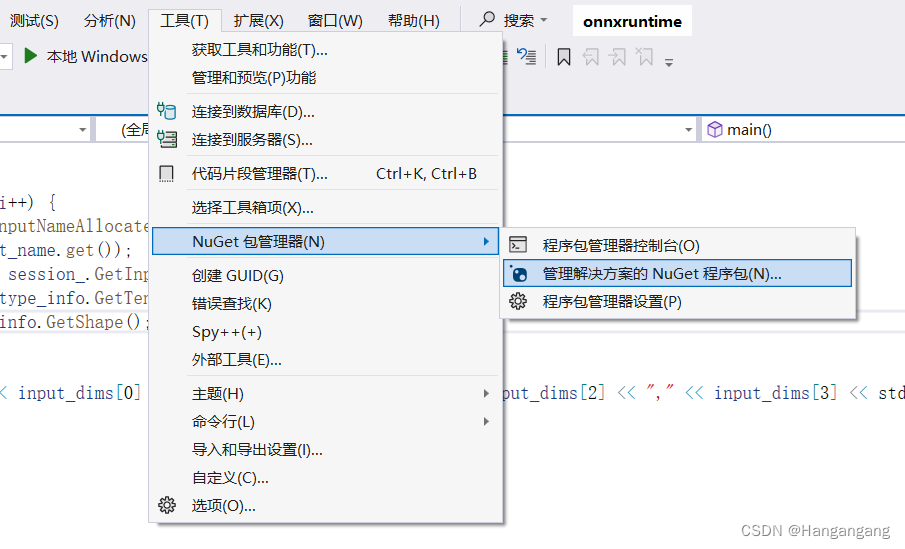
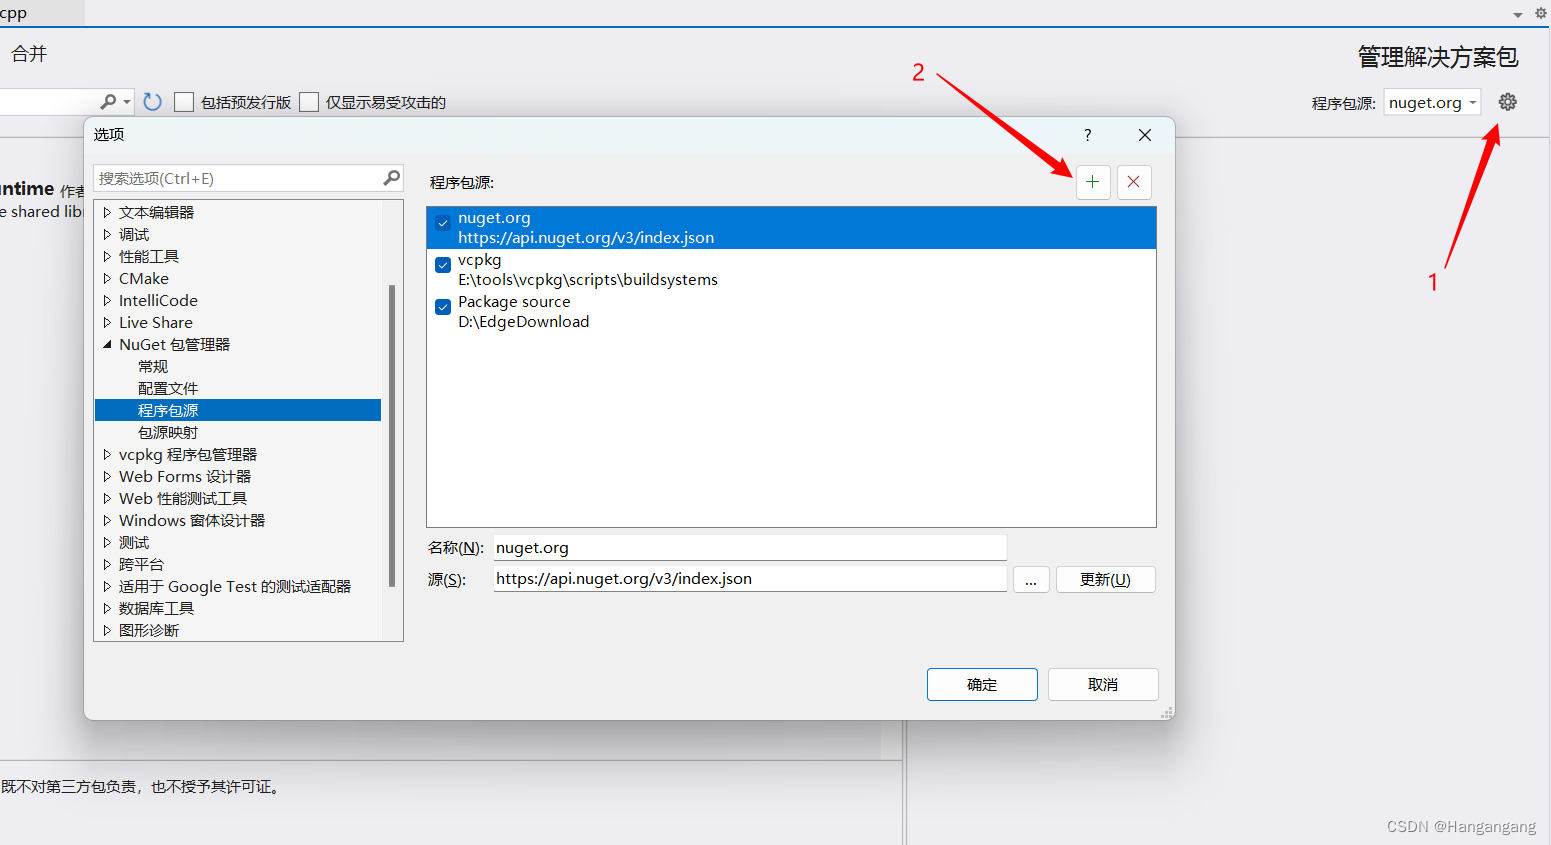
详细步骤参看:
如何安装nupkg文件
安装opencv
参照下面这篇:
安装opencv
onnxruntime推理步骤
我找到的关于在C++上运行onnxruntime的资料有限,参考了一些代码最终完成了预期推理结果。
需要注意的点是输入数据的问题,深度学习模型的输入一般为float类型,而opencv读取图像的数据Mat一般采用int8_t类型,对图形进行均一化很容易出现类型不匹配计算结果容易错误。因此在转换为输入张量之前对每一个三通道的像素用float类型接收并进行数据处理后存储在输入张量中。这样可以对数据进行预期的处理,代码如下:
cv::Mat original_image = cv::imread("images/003.jpg", cv::IMREAD_COLOR);
cv::Mat resized_image;
cv::resize(original_image, resized_image, cv::Size(640, 640));

// 确定输入数据维度
std::vector<int64_t> input_node_dims = { 1,3,640,640 };
size_t input_tensor_size = 1 * 3 * 640 * 640;

// 填充数据输入
std::vector<float> input_tensor_values(input_tensor_size);
for (int h = 0; h < 640; ++h) {
    for (int w = 0; w < 640; ++w) {
        for (int c = 0; c < 3; ++c) {
            // 均一化像素值
            float pix = resized_image.at<cv::Vec3b>(h, w)[c];
            pix = pix / 255.0f;
            pix = (pix - __mean[c]) / __std[c];
            input_tensor_values[640 * 640 * c + h * 640 + w] = pix;
        }
    }
}
整个代码的思路流程如下
- 环境设置与模型加载
- 创建环境:使用
Ort::Env创建一个运行环境,可以设定日志级别和环境名称。 - 会话选项与模型加载:通过
Ort::SessionOptions初始化会话配置,并使用指定路径加载.onnx模型文件创建Ort::Session对象。
- 输入输出信息获取
- 节点计数:调用
session.GetInputCount()和session.GetOutputCount()获取输入和输出节点的数量。 - 节点名称:定义输入输出节点名称,这里模型的输入节点名为"input",输出节点名为"output"。
- 图像预处理
- 读取与调整大小:使用OpenCV读取图像并调整至模型所需的尺寸。
- 归一化:对图像像素值进行归一化处理,并应用均值与标准差进行进一步的标准化,以适应模型的输入要求。
- 准备输入张量
- 定义张量维度:根据模型要求定义输入张量的维度。
- 填充数据:将处理后的图像数据按张量维度顺序填充至
input_tensor_values中。 - 创建 Ort::Value:使用
Ort::Value::CreateTensor创建输入张量,并指定内存分配方式、数据指针、维度等。
- 模型执行
- Session::Run:通过
session.Run方法执行模型推理,传入输入节点名、输入张量、输出节点名等参数。
- 输出处理
- 获取与解析输出张量:访问并解析模型的输出张量,此处输出为一个用于分类或分割的结果。
- 后处理:根据模型输出进行后处理,本例中是对二分类结果进行简单处理,生成二值图像。
- 显示与保存结果:使用OpenCV显示和保存最终处理的图像。
C++代码验证
代码1:
实现加载onnx并完成对测试图片的推理:
#include <onnxruntime_cxx_api.h>
#include <iostream>
#include <assert.h>
#include <opencv2/highgui.hpp>
#include <opencv2/imgproc.hpp>

float __mean[] = { 0.709, 0.381, 0.224 };
float __std[] = { 0.127, 0.079, 0.043 };

int main()
{
    try {
        // 加载模型并创建环境空间
        const wchar_t* model_path = L"./grfb_unet.onnx";
        Ort::Env env(ORT_LOGGING_LEVEL_WARNING, "grfb_unet");
        Ort::SessionOptions session_options;
        Ort::Session session(env, model_path, session_options);
        Ort::AllocatorWithDefaultOptions allocator;

        // 获取输入输出
        std::vector<const char*> input_node_names = { "input" };
        std::vector<const char*> output_node_names = { "output" };

        // 加载测试图像
        cv::Mat original_image = cv::imread("images/003.jpg", cv::IMREAD_COLOR);
        cv::Mat resized_image;
        cv::resize(original_image, resized_image, cv::Size(640, 640));
        cv::imshow("Resized Image", resized_image);

        // 确定输入数据维度
        std::vector<int64_t> input_node_dims = { 1,3,640,640 };
        size_t input_tensor_size = 1 * 3 * 640 * 640;

        // 填充数据输入
        std::vector<float> input_tensor_values(input_tensor_size);
        for (int h = 0; h < 640; ++h) {
            for (int w = 0; w < 640; ++w) {
                for (int c = 0; c < 3; ++c) {
                    // 均一化像素值
                    float pix = resized_image.at<cv::Vec3b>(h, w)[c];
                    pix = pix / 255.0f;
                    pix = (pix - __mean[c]) / __std[c];
                    input_tensor_values[640 * 640 * c + h * 640 + w] = pix;
                }
            }
        }

        auto memory_info = Ort::MemoryInfo::CreateCpu(OrtArenaAllocator, OrtMemTypeDefault);

        Ort::Value input_tensor = Ort::Value::CreateTensor<float>(
            memory_info,
            input_tensor_values.data(),
            input_tensor_size,
            input_node_dims.data(),
            input_node_dims.size()
        );

        assert(input_tensor.IsTensor());

        std::vector<Ort::Value> ort_inputs;
        ort_inputs.push_back(std::move(input_tensor));


        // 启动模型预测并获取输出张量
        auto output_tensors = session.Run(
            Ort::RunOptions{ nullptr },
            input_node_names.data(),
            ort_inputs.data(),
            ort_inputs.size(),
            output_node_names.data(),
            1
        );

        // 输出张量
        Ort::Value& output_tensor = output_tensors[0];
        const float* output_data = output_tensor.GetTensorData<float>();

        // 存储输出图像
        cv::Mat result_image(640, 640, CV_8UC1);

        // 对输出的2通道图像进行二分类预测
        for (int h = 0; h < 640; ++h) {
            for (int w = 0; w < 640; ++w) {
                int index_max = output_data[w + h * 640] > output_data[w + h * 640 + 640 * 640] ? 0 : 1;
                result_image.at<uchar>(h, w) = 255 * index_max;
            }
        }

        // 显示结果
        cv::imshow("Result Image", result_image);
        cv::waitKey(0);
        cv::imwrite("result_image.png", result_image);

    }
    catch (const Ort::Exception& e) {
        // 打印异常
        std::cerr << "Caught Ort::Exception: " << std::string(e.what()) << std::endl;
        size_t pos = std::string(e.what()).find("ErrorCode: ");
        if (pos != std::string::npos) {
            std::string error_code_str = std::string(e.what()).substr(pos + 12);
            int error_code = std::stoi(error_code_str);
            std::cerr << "Error Code: " << error_code << std::endl;
        }
        return -1;
    }

    return 0;
}
代码2:
实现对onnx模型的输入输出分析:
#include <onnxruntime_cxx_api.h>
#include <iostream>
#include <assert.h>

int main() {
	std::string onnxpath = "./grfb_unet.onnx";
	std::wstring modelPath = std::wstring(onnxpath.begin(), onnxpath.end());
	Ort::SessionOptions session_options;
	Ort::Env env = Ort::Env(ORT_LOGGING_LEVEL_ERROR, "grfb_unet-onnx");
	session_options.SetGraphOptimizationLevel(ORT_ENABLE_BASIC);

	// 加载会话
	Ort::Session session_(env, modelPath.c_str(), session_options);
	std::cout << "model has been loaded" << std::endl;

	std::vector<std::string> input_node_names;
	std::vector<std::string> output_node_names;

	size_t numInputNodes = session_.GetInputCount();
	size_t numOutputNodes = session_.GetOutputCount();
	Ort::AllocatorWithDefaultOptions allocator;
	input_node_names.reserve(numInputNodes);

	// 获取输入信息
	int input_w = 0;
	int input_h = 0;
	for (int i = 0; i < numInputNodes; i++) {
		auto input_name = session_.GetInputNameAllocated(i, allocator);
		input_node_names.push_back(input_name.get());
		Ort::TypeInfo input_type_info = session_.GetInputTypeInfo(i);
		auto input_tensor_info = input_type_info.GetTensorTypeAndShapeInfo();
		auto input_dims = input_tensor_info.GetShape();
		input_w = input_dims[3];
		input_h = input_dims[2];
		std::cout << "input format: " << input_dims[0] << "," << input_dims[1] << "," << input_dims[2] << "," << input_dims[3] << std::endl;
	}

	// 获取输出信息
	int output_h = 0;
	int output_w = 0;

	Ort::TypeInfo output_type_info = session_.GetOutputTypeInfo(0);
	auto output_tensor_info = output_type_info.GetTensorTypeAndShapeInfo();
	auto output_dims = output_tensor_info.GetShape();
	output_h = output_dims[3];
	output_w = output_dims[2];
	std::cout << "output format: " << output_dims[0] << "," << output_dims[1] << "," << output_dims[2] << "," << output_dims[3] << std::endl;
	for (int i = 0; i < numOutputNodes; i++) {
		auto out_name = session_.GetOutputNameAllocated(i, allocator);
		output_node_names.push_back(out_name.get());
	}

	std::cout << "input name: " << input_node_names[0] << " output name: " << output_node_names[0] << std::endl;
	return 0;
}
代码标准化
上面的代码不方便移植使用,将onnxruntime封装在类中可以在main函数中大大简化流程,也可以作为其他模型的参考。
类说明:
这个代码定义了一个结构体DCSP_INIT_PARAM和一个类DCSP_CORE,它们主要用于处理深度学习模型推理的相关任务,看起来是基于ONNX Runtime库进行设计的。
DCSP_INIT_PARAM 结构体:
ModelPath:这是一个std::string类型成员,用于存储模型文件的路径。imgSize:这是一个std::vector<int>类型成员,初始化为{640, 640},表示输入图片的尺寸,宽和高均为640像素。LogSeverityLevel:这是一个整型变量,代表日志的严重级别,数值越高表示日志级别越低(例如错误、警告等)。IntraOpNumThreads:也是一个整型变量,表示在运行会话期间用于执行模型运算的线程数量,默认设置为1。
DCSP_CORE 类:
-
DCSP_CORE():构造函数,用于初始化类的对象。 -
~DCSP_CORE():析构函数,当对象生命周期结束时,用于释放资源。 -
CreateSession(DCSP_INIT_PARAM& iParams):此方法接收一个DCSP_INIT_PARAM类型的引用作为参数,用于根据传入的参数初始化并创建一个新的ONNX运行时会话。 -
RunSession(cv::Mat& iImg, std::vector<std::vector<float>>& oResult):该方法接收一个OpenCV Mat类型的图像以及一个二维浮点数向量引用作为参数,它会在已创建的会话中运行模型,并将推理结果存入提供的二维浮点数向量中。 -
WarmUpSession():预热方法,这个函数我暂未实现。 -
TensorProcess(clock_t& starttime_1, cv::Mat& iImg, float* blob, std::vector<int64_t>& inputNodeDims, std::vector<std::vector<float>>& oResult):这个方法是用于处理输入图像到张量格式(通过blob指针)、设置输入节点维度、执行推理并获取输出的详细过程。
类的私有成员:
Ort::Env env:ONNX运行时环境对象,用于管理ONNX运行时的全局状态。Ort::Session* session:指向ONNX会话的指针,用于存储模型并执行模型推理。Ort::RunOptions options:ONNX运行选项,可以设置一些执行模型推理时的额外参数。std::vector<const char*> inputNodeNames和outputNodeNames:分别存储模型的输入节点名称和输出节点名称列表。std::vector<int> imgSize:存储输入图片的尺寸信息,这里再次声明是因为类内部也需要用到该信息。
代码1:RunOnnx.cpp
#include "RunOnnx.h"
#include <regex>

float _mean_[] = { 0.709, 0.381, 0.224 };
float _std_[] = { 0.127, 0.079, 0.043 };

// 转换图像
void PostProcess(cv::Mat& iImg, std::vector<int> iImgSize, cv::Mat& oImg) {
    cv::resize(iImg, oImg, cv::Size(iImgSize.at(0), iImgSize.at(1)));
    if (iImg.channels() == 1) {
        cv::cvtColor(oImg, oImg, cv::COLOR_GRAY2BGR);
    }
    cv::cvtColor(oImg, oImg, cv::COLOR_BGR2RGB);
}

// 向一维向量中注入图像均一化数据
void BlobFromImage(cv::Mat& iImg, float* iBlob) {
    int channels = iImg.channels();
    int imgHeight = iImg.rows;
    int imgWidth = iImg.cols;

    for (int h = 0; h < imgHeight; ++h) {
        for (int w = 0; w < imgWidth; ++w) {
            for (int c = 0; c < channels; ++c) {
                // 均一化图像像素
                float pix = iImg.at<cv::Vec3b>(h, w)[c];
                pix = pix / 255.0f;
                pix = (pix - _mean_[c]) / _std_[c];
                iBlob[imgWidth * imgHeight * c + h * imgWidth + w] = pix;
            }
        }
    }
}

// 创建 检测核心服务提供者 DCSP
DCSP_CORE::DCSP_CORE()
{
}

// 析构函数 释放申请的onnxruntime会话
DCSP_CORE::~DCSP_CORE() {
    delete session;
    for (auto it = inputNodeNames.begin(); it != inputNodeNames.end(); ++it) {
        delete[] * it;
    }
    inputNodeNames.clear(); // 清空vector,以防重复析构或意外使用

    for (auto it = outputNodeNames.begin(); it != outputNodeNames.end(); ++it) {
        delete[] * it;
    }
    outputNodeNames.clear(); // 同样清空vector
}

// 创建一个会话,成功则返回1,否则返回0
int DCSP_CORE::CreateSession(DCSP_INIT_PARAM& iParams)
{
    std::regex pattern("[\u4e00-\u9fa5]"); // 检测是否包含汉字
    bool result = std::regex_search(iParams.ModelPath, pattern);
    if (result) {
        perror("[DCSP_ONNX]:Model path error.Change your model path without chinese characters.\n");
        return 0;
    }
    try {
        // 初始化私有变量
        imgSize = iParams.imgSize;

        // 创建环境与会话
        env = Ort::Env(ORT_LOGGING_LEVEL_WARNING, "Unet");
        Ort::SessionOptions sessionOption;
        sessionOption.SetGraphOptimizationLevel(GraphOptimizationLevel::ORT_ENABLE_ALL);
        sessionOption.SetIntraOpNumThreads(iParams.IntraOpNumThreads);
        sessionOption.SetLogSeverityLevel(iParams.LogSeverityLevel);

        int ModelPathSize = MultiByteToWideChar(CP_UTF8, 0, iParams.ModelPath.c_str(), static_cast<int>(iParams.ModelPath.length()), nullptr, 0);
        wchar_t* wide_cstr = new wchar_t[ModelPathSize + 1];
        MultiByteToWideChar(CP_UTF8, 0, iParams.ModelPath.c_str(), static_cast<int>(iParams.ModelPath.length()), wide_cstr, ModelPathSize);
        wide_cstr[ModelPathSize] = L'\0';
        const wchar_t* modelPath = wide_cstr;

        // 启动会话
        session = new Ort::Session(env, modelPath, sessionOption);
        Ort::AllocatorWithDefaultOptions allocator;

        // 自动获取输入输出名称
        size_t inputNodesNum = session->GetInputCount();
        for (size_t i = 0; i < inputNodesNum; i++) {
            Ort::AllocatedStringPtr input_node_name = session->GetInputNameAllocated(i, allocator);
            int len=strlen(input_node_name.get())+1;
            char* temp_buf = new char[len];
            strcpy_s(temp_buf,len,input_node_name.get());
            inputNodeNames.push_back(temp_buf);
        }
        size_t OutputNodesNum = session->GetOutputCount();
        for (size_t i = 0; i < OutputNodesNum; i++) {
            Ort::AllocatedStringPtr output_node_name = session->GetOutputNameAllocated(i, allocator);
            int len = strlen(output_node_name.get())+1;
            char* temp_buf = new char[len];
            strcpy_s(temp_buf, len, output_node_name.get());
            outputNodeNames.push_back(temp_buf);
        }
        options = Ort::RunOptions{ nullptr };
        WarmUpSession();
        return 1;
    }
    catch (const std::exception& e) {
        // 展示错误信息
        const char* str1 = "[DCSP_ONNX]:";
        const char* str2 = e.what();
        std::string result = std::string(str1) + std::string(str2);
        std::cout << result << std::endl;
        perror("[DCSP_ONNX]:Create session failed.\n");
        return 0;
    }
}

// 运行推理,输入图片,将结果存放在给定的地址中
int DCSP_CORE::RunSession(cv::Mat& iImg, std::vector<std::vector<float>>& oResult)
{
    clock_t starttime_1 = clock();
    cv::Mat processedImg;
    // 转换大小并重设色彩空间
    PostProcess(iImg, imgSize, processedImg);
    float* blob = new float[processedImg.total() * 3];
    // 数据注入至blob中
    BlobFromImage(processedImg, blob);
    // 设置输入数据维度
    std::vector<int64_t> inputNodeDims = { 1, 3, imgSize.at(0), imgSize.at(1) };
    // 转换为张量并完成推理
    TensorProcess(starttime_1, iImg, blob, inputNodeDims, oResult);
    return 1;
}


int DCSP_CORE::TensorProcess(clock_t& starttime_1, cv::Mat& iImg, float* blob, std::vector<int64_t>& inputNodeDims, std::vector<std::vector<float>>& oResult)
{
    // 创建输入张量
    Ort::Value inputTensor = Ort::Value::CreateTensor<float>(
        Ort::MemoryInfo::CreateCpu(OrtDeviceAllocator, OrtMemTypeCPU),
        blob,
        3 * imgSize.at(0) * imgSize.at(1),
        inputNodeDims.data(),
        inputNodeDims.size()
    );
    std::vector<Ort::Value> ort_inputs;
    ort_inputs.push_back(std::move(inputTensor));
    // 执行推导
    auto outputTensor = session->Run(
        options,
        inputNodeNames.data(),
        ort_inputs.data(),
        ort_inputs.size(),
        outputNodeNames.data(),
        outputNodeNames.size()
    );
    Ort::Value& output_tensor = outputTensor[0];
    const float* output_data = output_tensor.GetTensorData<float>();
    delete[]blob;
    for (int h = 0; h < imgSize.at(0); ++h) {
        for (int w = 0; w < imgSize.at(1); ++w) {
            int index_max = output_data[w + h * imgSize.at(1)] > output_data[w + h * imgSize.at(1) + imgSize.at(0) * imgSize.at(1)] ? 0 : 1;
            oResult[h][w]=index_max;
        }
    }
    return 1;
}

int DCSP_CORE::WarmUpSession()
{
    // TODO
    return 1;
}
代码2:RunOnnx.h
#pragma once
#include <string>
#include <vector>
#include <cstdio>
#include <opencv2/opencv.hpp>
#include <onnxruntime_cxx_api.h>
#include <Windows.h>
#include <direct.h>
#include <io.h>


typedef struct _DCSP_INIT_PARAM {
    std::string ModelPath;
    std::vector<int> imgSize = { 640, 640 };
    int LogSeverityLevel = 3;
    int IntraOpNumThreads = 1;
} DCSP_INIT_PARAM;


class DCSP_CORE {
public:
    DCSP_CORE();

    ~DCSP_CORE();

public:
    int CreateSession(DCSP_INIT_PARAM& iParams);
    int RunSession(cv::Mat& iImg, std::vector<std::vector<float>>& oResult);
    int WarmUpSession();
    int TensorProcess(clock_t& starttime_1, cv::Mat& iImg, float* blob, std::vector<int64_t>& inputNodeDims,
        std::vector<std::vector<float>>& oResult);

private:
    Ort::Env env;
    Ort::Session* session;
    Ort::RunOptions options;
    std::vector<const char*> inputNodeNames;
    std::vector<const char*> outputNodeNames;
    std::vector<int> imgSize;
};
代码3:main.cpp
这里修改为从视频中读取,更加方便展示。
#include "RunOnnx.h"
#include <iostream>

int main()
{
    cv::VideoCapture cap;
    cap.open("images/001.mp4");
    if (!cap.isOpened()) {
        std::cout << "the vedio not exist or has been broken.\n";
        return 0;
    }

    // 创建模型
    struct _DCSP_INIT_PARAM para;
    para.ModelPath = "./grfb_unet.onnx";
    DCSP_CORE* detect=new DCSP_CORE;
    detect->CreateSession(para);
    std::vector<std::vector<float>> result(640, std::vector<float>(640, 0.0f));

    while (1) {
        cv::Mat original_image;
        cap >> original_image;
        if (original_image.empty()) {
            std::cout << "over \n";
            break;
        }
        detect->RunSession(original_image,result);

        // 将二维vector转换为cv::Mat
        cv::Mat matResult(result.size(), result[0].size(), CV_32FC1);
        for (size_t i = 0; i < result.size(); ++i) {
            for (size_t j = 0; j < result[i].size(); ++j) {
                matResult.at<float>(i, j) = result[i][j];
            }
        }
        matResult.convertTo(matResult, CV_8UC1, 255.0);
        cv::imshow("Single Channel Image", matResult);
        cv::waitKey(1);
    }
    return 0;
}
参考文章
VS c++ onnxruntime 环境配置、onnx教程、部署推理模型、sklearn pkl模型转onnx、问题汇总
上面这篇文章在读取模型输入时使用了char*,似乎存在内存泄漏导致函数调用完成后获取不到输入的情况。
参考代码
类的代码参考:up主 柯学家Lv0


 1605
1605

 被折叠的 条评论
为什么被折叠?
被折叠的 条评论
为什么被折叠?
 到【灌水乐园】发言


