


WebRTC 架构
通常来说,WebRTC的架构如下图所示:
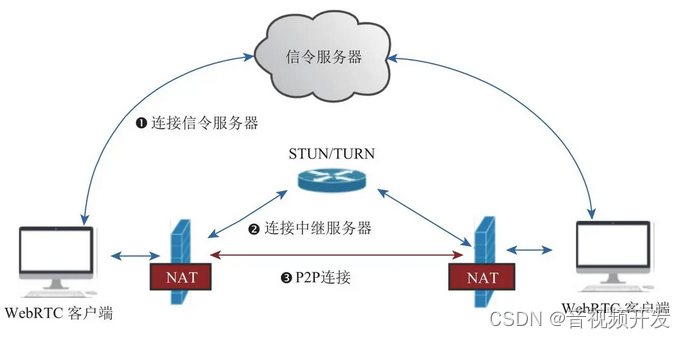
我们可以看到,一个简单的点对点通讯系统主要由四部分组成:
-
WebRTC客户端:负责生产/消费音视频数据,位于NAT之内,属于内网
-
NAT:Network Address Translation (NAT),网络地址转换协议, 能够将设备的内网地址映射到一个公网的地址。
-
信令服务器:用于传输SDP、candidate等信令数据。
-
STUN/TURN服务器(中继服务器):
- STUN:用于为位于NAT内的设备找到自己的公网地址。WebRTC客户端通过给处于公网的STUN服务器发送请求来获得自己的公网地址信息,以及是否能够被(穿过路由器)访问。
- TURN:对于无法通过STUN服务器进行内网穿越的“对称型NAT”,我们可以借助TURN服务器作为中继服务器,通过TURN服务器对数据进行转发。
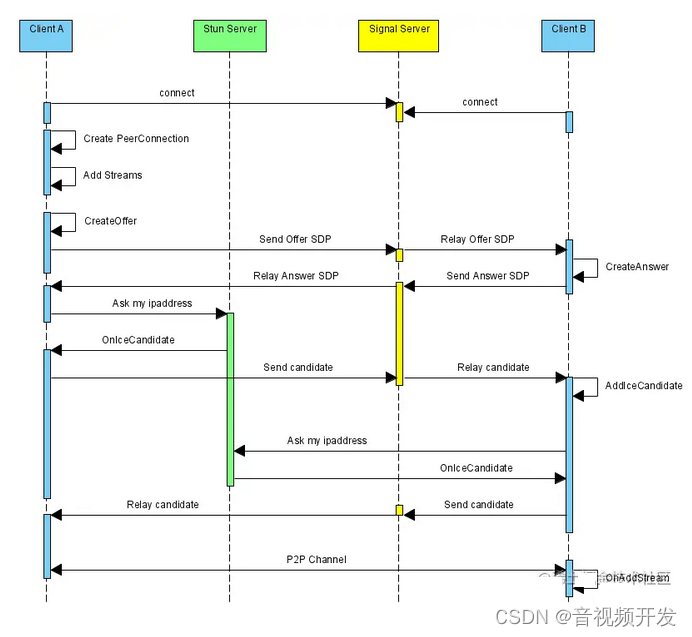
点对点的通信原理:
-
首先客户端需要信令服务器连接,后续双方需要通过信令服务器来了解对方的一些必要的信息,比如告诉对方自己的支持的音视频格式、自己外网IP地址和端口是多少等(此时还无法知道自己的公网地址)。
-
与STUN建立连接,获得自己的外网IP地址和端口,以及是否能够进行内网穿越。不支持内网穿越的情况下还需要连接TURN服务器进行中继通信。
-
WebRTC客户端拿到自己的外网IP地址和端口后,通过信令服务器将自己的信息(candidate信息)交换给对方。当双方都获取到对方的地址后,它们就可以尝试NAT穿越,进行P2P连接了。
WebRTC实现点对点通信
想要实现点对点通信通信,我们需要经历以下的几个步骤:
- 检测本地音视频设备和进行采集音视频的采集;
- 通过信令服务器与对方建立连接;
- 创建RTCPeerConnection对象
- 绑定音视频数据
- 进行媒体协商
- 交换candidate信息
- 音视频数据传输与渲染
接下来我们对各个步骤进行逐步介绍。
本文福利, 免费领取C++音视频学习资料包、技术视频,内容包括(音视频开发,面试题,FFmpeg ,webRTC ,rtmp ,hls ,rtsp ,ffplay ,编解码,推拉流,srs)↓↓↓↓↓↓见下面↓↓文章底部点击免费领取↓↓
前置知识
在介绍实现点对点通信的步骤之前,我们先来了解一些前置的概念知识。
MediaStreamTrack
MediaStreamTrack是WebRTC中的基本媒体单位,一个MediaStreamTrack包含一种媒体源(媒体设备或录制内容)返回的单一类型的媒体(如音频,视频)。单个轨道可包含多个通道,如立体声源尽管由多个音频轨道构成,但也可以看作是一个轨道。
MediaStream
MediaStream是MediaStreamTrack的合集,可以包含 >=0 个 MediaStreamTrack。MediaStream能够确保它所包含的所有轨道都是是同时播放的,以及轨道的单一性。
source 与 sink
再MediaTrack的源码中,MediaTrack都是由对应的source和sink组成的。
//src\pc\video_track.cc
void VideoTrack::AddOrUpdateSink(rtc::VideoSinkInterface<VideoFrame>* sink, const rtc::VideoSinkWants& wants) {
  RTC_DCHECK(worker_thread_->IsCurrent());
  VideoSourceBase::AddOrUpdateSink(sink, wants);
  rtc::VideoSinkWants modified_wants = wants;
  modified_wants.black_frames = !enabled();
  video_source_->AddOrUpdateSink(sink, modified_wants);
}

void VideoTrack::RemoveSink(rtc::VideoSinkInterface<VideoFrame>* sink) {
  RTC_DCHECK(worker_thread_->IsCurrent());
  VideoSourceBase::RemoveSink(sink);
  video_source_->RemoveSink(sink);
}
浏览器中存在从source到sink的媒体管道,其中source负责生产媒体资源,包括多媒体文件,web资源等静态资源以及麦克风采集的音频,摄像头采集的视频等动态资源。而sink则负责消费source生产媒体资源,也就是通过,,等媒体标签进行展示,或者是通过RTCPeerConnection将source通过网络传递到远端。RTCPeerConnection可同时扮演source与sink的角色,作为sink,可以将获取的source降低码率,缩放,调整帧率等,然后传递到远端,作为source,将获取的远端码流传递到本地渲染。
MediaTrackConstraints
MediaTrackConstraints描述MediaTrack的功能以及每个功能可以采用的一个或多个值,从而达到选择和控制源的目的。 MediaTrackConstraints 可作为参数传递给applyConstraints()以达到控制轨道属性的目的,同时可以通过调getConstraints()用来查看最近应用自定义约束。
const constraints = {
  width: {min: 640, ideal: 1280},
  height: {min: 480, ideal: 720},
  advanced: [
    {width: 1920, height: 1280},
    {aspectRatio: 1.333}
  ]
};

//{ video: true }也是一个MediaTrackConstraints对象,用于指定请求的媒体类型和相对应的参数。
navigator.mediaDevices.getUserMedia({ video: true })
.then(mediaStream => {
  const track = mediaStream.getVideoTracks()[0];
  track.applyConstraints(constraints)
  .then(() => {
    // Do something with the track such as using the Image Capture API.
  })
  .catch(e => {
    // The constraints could not be satisfied by the available devices.
  });
});
//移动设备上面,优先使用前置摄像头
{ audio: true, video: { facingMode: "user" } }
//移动设备上面,强制使用后置摄像头
{ audio: true, video: { facingMode: { exact: "environment" } } }
如何播放MediaStream
可将MediaStream对象直接赋值给HTMLMediaElement接口的 srcObject属性。
video.srcObject = stream;检测本地音视频设备和进行采集音视频的采集;
检测本地音视频设备
通过MediaDevices.enumerateDevices()我们可以得到一个本机可用的媒体输入和输出设备的列表,例如麦克风,摄像机,耳机设备等。
//获取媒体设备
navigator.mediaDevices.enumerateDevices().then(res => {
	console.log(res);
});

列表中的每个媒体输入都可作为MediaTrackConstraints中对应类型的值,如一个音频设备输入audioDeviceInput可设置为MediaTrackConstraints中audio属性的值
cosnt constraints = { audio : audioDeviceInput }
复制代码将该constraint值作为参数传入到MediaDevices.getUserMedia(constraints)中,便可获得该设备的MediaStream。
采集本地音视频数据
可通过调用MediaDevices.getUserMedia()来访问本地媒体,调用该方法后浏览器会提示用户给予使用媒体输入的许可,媒体输入会产生一个MediaStream,里面包含了请求的媒体类型的轨道。此流可以包含一个视频轨道(来自硬件或者虚拟视频源,比如相机、视频采集设备和屏幕共享服务等等)、一个音频轨道(同样来自硬件或虚拟音频源,比如麦克风、A/D转换器等等),也可能是其它轨道类型。
navigator.mediaDevices.getUserMedia(constraints)
  .then(function(stream) {
    /* 使用这个stream*/
    video.srcObject = stream;
  })
  .catch(function(err) {
    /* 处理error */
  });
通过信令服务器与对方建立连接
信令服务器主要用于帮我们进行业务逻辑的处理(如加入房间、离开房间)以及进行媒体协商和交换candidate。
信令服务器可以有很多种方案,在这里我们借助node.js和socket.io实现一个简单的信令服务器。
创建HTTP服务器
let http = require('http'); // 提供HTTP 服务
let express = require('express');

let app = express();

let http_server = http.createServer(app);
http_server.listen(8081, '127.0.0.1');
引入 socket.io 实现两端的实时通信
let http = require('http'); // 提供HTTP 服务
const { Server } = require('socket.io');
let express = require('express');

let app = express();

//HTTP 服务
let http_server = http.createServer(app);
http_server.listen(8081, '127.0.0.1');

const io = new Server(http_server, {
  // 处理跨域配置
  cors: {
    origin: ['http://127.0.0.1:3000', 'http://localhost:3000'],
    credentials: true,
  },
});
监听客户端的消息
socket.on('messageName', messageHandler)客户端加入房间
socket.join(roomId);向房间内的客户端发送消息
socket.to(roomId).emit('messageName', data);转发消息
// 用于转发sdp、candidate等消息
socket.on('message', ({ roomId, data }) => {
  socket.to(roomId).emit('message', data);
});
创建RTCPeerConnection对象
RTCPeerConnection 接口代表一个由本地计算机到远端的WebRTC连接。该接口提供了创建,保持,监控,关闭连接的方法的实现。
const pc = new RTCPeerConnection()
绑定音视频数据
我们可以通过 addTrack 方法和 addStream 方法(已过时,不推荐)将音视频数据和 RTCPeerConnection 对象进行绑定。
本文福利, 免费领取C++音视频学习资料包、技术视频,内容包括(音视频开发,面试题,FFmpeg ,webRTC ,rtmp ,hls ,rtsp ,ffplay ,编解码,推拉流,srs)↓↓↓↓↓↓见下面↓↓文章底部点击免费领取↓↓
mediaStream.getTracks().forEach(track => {
  peerConnection.addTrack(track, mediaStream);
});
进行媒体协商
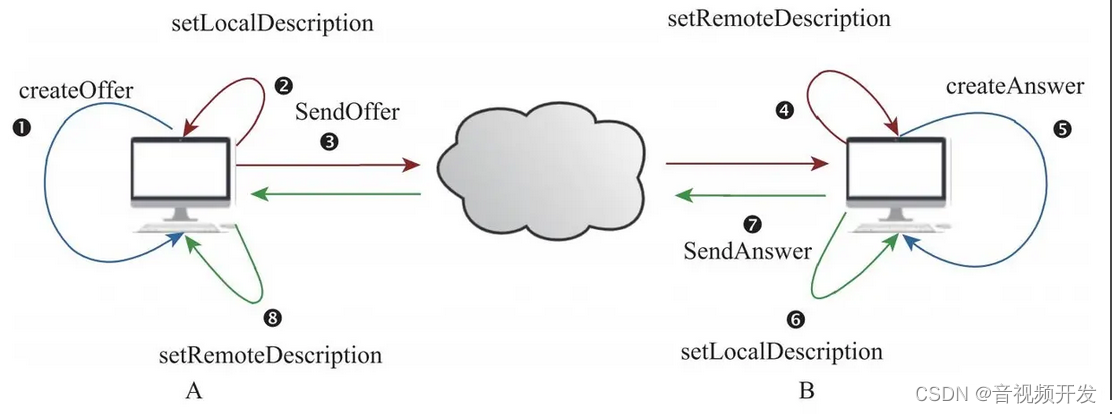
所谓的媒体协商,就是交换双方SDP信息,SDP包含音视频的编解码(coder),源地址,和时间信息等信息。
呼叫端获取本地sdp(offer),调用pc.setLocalDescription(offer)保存本地的sdp信息后,通过信令服务器发送本地sdp到远端。
    // 呼叫端获取本地sdp(offer)
    pc.createOffer().then(offer => {
      console.log('------ 获取到了本地offer', offer);

      // 绑定本地sdp信息
      pc.setLocalDescription(offer);

      // 通过信令服务器发送本地sdp到远端
      signalServer.send({
        type: 'offer',
        value: offer,
      });
    });
被叫端接收到来自远端的offer后,调用 pc.setRemoteDescription(offer) 绑定远端sdp,然后调用pc.createAnswer() 创建本地sdp并使用 pc.setLocalDescription(answer) 进行保存,最后利用信令服务器将 answer sdp 发送给远端。
  const onGetRemoteOffer = offer => {
    console.log('------ 获取到了远端offer', offer);
    // 远端发起呼叫,开始建立连接

    // 绑定远端sdp
    pc.setRemoteDescription(offer);

    // 创建本地sdp
    pc.createAnswer().then(answer => {
      // 绑定本地sdp
      pc.setLocalDescription(answer);

      console.log('------ 获取到了本地answer', answer);
      // 发送本地sdp到远端
      signalServer.send({
        type: 'answer',
        value: answer,
      });
    });
  };
呼叫端接收到远端的answer后,调用 pc.setRemoteDescription(answer) 绑定远端sdp。
  const onGetRemoteAnswer = answer => {
    console.log('------ 获取到了远端answer', answer);

    // 绑定远端sdp
    pc.setRemoteDescription(answer);
  };
ICE
当媒体协商完成后,WebRTC就开始建立网络连接了。建立网络连接的前提是客户端需要知道对端的外网地址,这个获取并交换外网地址的过程,我们称为ICE。
收集
WebRTC内部集成了收集Candidate的功能。收集到Candidate后,为了通知上层,WebRTC还提供onicecandidate事件。
  // 监听 candidate 获取事件
  pc.addEventListener('icecandidate', event => {
    const candidate = event.candidate;
    if (candidate) {
      console.log('------ 获取到了本地 candidate:', candidate)

      //...
    }
  });
交换
收集到candidate后,可以通过信令系统将candidate信息发送给远端。
// 发送candidate到远端
signalServer.send({ type: 'candidate', value: candidate });
远端接收到对端的candidate后,会与本地的candidate形成CandidatePair(即连接候选者对)。有了CandidatePair,WebRTC就可以开始尝试建立连接了。
  // 获取到远端的candidate
  const onGetRemoteCandidate = candidate => {
    console.log('------ 获取到了远端candidate', candidate);

    pc.addIceCandidate(candidate);
  };
远端音视频数据接收与渲染
当双方都获取到对端的candidate信息后,WebRTC内部就开始尝试建立连接了。连接一旦建成,音视频数据就开始源源不断地由发送端发送给接收端。
通过RTCPeerConnection对象的track事件,我们能接收到远端的音视频数据并进行渲染。
  // 监听到远端传过来的媒体数据
  pc.addEventListener('track', e => {
    console.log('------ 获取到了远端媒体数据:', e);
    if (remoteVideo.srcObject !== e.streams[0]) {
      remoteVideo.srcObject = e.streams[0];
    }
  });
完整代码
信令服务器代码
'use strict ';

let http = require('http'); // 提供HTTP 服务
const { Server } = require('socket.io');
let express = require('express');

const MaxUserNum = 2;

let app = express();

const roomsInfo = {};
const userRoomInfo = {};

//HTTP 服务
let http_server = http.createServer(app);
http_server.listen(8081, '127.0.0.1');

const io = new Server(http_server, {
  cors: {
    origin: ['http://127.0.0.1:3000', 'http://localhost:3000'],
    credentials: true,
  },
});

// 处理连接事件
io.sockets.on('connection', socket => {
  console.log('got a connection');
  // 用于转发sdp、candidate等消息
  socket.on('message', ({ roomId, data }) => {
    console.log('message , room: ' + roomId + ', data , type:' + data.type);
    socket.to(roomId).emit('message', data);
  });

  socket.on('join', ({ roomId }) => {
    if (!roomId) return;

    socket.join(roomId);

    console.log(`${socket.id} join ${roomId}`);

    // 登记房间用户
    if (!roomsInfo[roomId]) {
      roomsInfo[roomId] = {};
    }
    roomsInfo[roomId][socket.id] = socket;

    //登记用户房间
    if (!userRoomInfo[socket.id]) {
      userRoomInfo[socket.id] = [];
    }
    userRoomInfo[socket.id].push(roomId);

    let userNum = Object.keys(roomsInfo[roomId]).length;

    // 如果房间里人未满
    if (userNum <= MaxUserNum) {
      // 回复用户已经加入到房间里了
      socket.emit('joined', { roomId, userNum });

      // 通知另一个用户, 有人来了
      if (userNum > 1) {
        socket.to(roomId).emit('otherjoined', { roomId, userId: socket.id });
      }
    } else {
      // 如果房间里人满了
      socket.leave(roomId);
      // 回复用户房间满人了
      socket.emit('full', { roomId, userNum });
    }
  });

  const onLeave = ({ roomId }) => {
    if (!roomId) return;

    socket.leave(roomId);

    roomsInfo[roomId] && roomsInfo[roomId][socket.id] && delete roomsInfo[roomId][socket.id];
    userRoomInfo[socket.id] &&
      (userRoomInfo[socket.id] = userRoomInfo[socket.id].filter(id => id !== roomId));

    console.log(
      'someone leaved the room, the user number of room is: ',
      roomsInfo[roomId] ? Object.keys(roomsInfo[roomId]).length : 0,
    );

    // 通知其他用户有人离开了
    socket.to(roomId).emit('bye', { roomId, userId: socket.id });

    // 回复用户你已经离开房间了
    socket.emit('leaved', { roomId });
  };

  // 用户离开房间
  socket.on('leave', onLeave);

  //disconnect
  socket.on('disconnect', () => {
    console.log(socket.id, 'disconnect, and clear user`s Room', userRoomInfo[socket.id]);
    if (userRoomInfo[socket.id]) {
      userRoomInfo[socket.id].forEach(roomId => {
        onLeave({ roomId });
      });

      delete userRoomInfo[socket.id];
    }
  });
});
客户端的信令服务器处理对象
import { io, Socket } from 'socket.io-client';

interface Option {
  onJoined?: (message: { roomId: string; userNum: number }) => void;
  onOtherJoined?: (message: { roomId: string; userId: number }) => void;
  onMessage: (data: { type: string; value: any }) => void;
  onFull?: (message: { roomId: string }) => void;
  onBye?: (message: { roomId: string; userId: number }) => void;
  onLeaved?: (message: { roomId: string }) => void;
  serverUrl?: string;
}

export default class SignalServer {
  socket: Socket;
  roomId: string;

  constructor(option: Option) {
    this.init(option);
  }

  init(option) {
    this.socket = io(option.serverUrl || 'http://127.0.0.1:8081/');
    this.socket.connect();

    this.socket.on(
      'joined',
      option.onJoined ||
        (({ roomId, usersNum }) => {
          console.log('i joined a room', roomId);
          console.log('current user number:', usersNum);
        }),
    );

    this.socket.on(
      'otherjoined',
      option.onOtherJoined ||
        (({ roomId, userId }) => {
          console.log('other user joined, userId', userId);
        }),
    );

    this.socket.on('message', option.onMessage);

    this.socket.on(
      'full',
      option.onFull ||
        (({ roomId }) => {
          console.log(roomId, 'is full');
        }),
    );

    this.socket.on(
      'bye',
      option.onBye ||
        (({ roomId, userId }) => {
          console.log(userId, `leaved`, roomId);
        }),
    );

    this.socket.on('leaved', option.onLeaved || (({ roomId }) => {}));

    window.addEventListener('beforeunload', () => {
      this.leave();
    });
  }

  send(data) {
    if (!this.roomId) return;
    this.socket.emit('message', { roomId: this.roomId, data });
  }

  join(roomId) {
    this.roomId = roomId;
    this.socket.emit('join', { roomId });
  }

  leave() {
    this.roomId && this.socket.emit('leave', { roomId: this.roomId });
    this.roomId = '';
  }
}
客户端代码
import React, { useEffect, useState, useRef, useMemo } from 'react';
import { Button, Input, message } from 'antd';
import SignalServer from '../components/SignalServer';

import './index.less';

const pcOption = {};

type State = 'init' | 'disconnect' | 'waiting' | 'canCall' | 'connecting';

const Simple1v1 = () => {
  // 远端传递过来的媒体数据
  const remoteMediaStream = useRef<MediaStream>(null);
  // 本地设备采集的媒体数据
  const localMediaStream = useRef<MediaStream>(null);
  const localVideo = useRef<HTMLVideoElement>(null);
  const remoteVideo = useRef<HTMLVideoElement>(null);
  // 信令服务器对象
  const signalServer = useRef<SignalServer>(null);
  const peerConnection = useRef<RTCPeerConnection>(null);

  const [roomId, setRoomId] = useState('');
  const [state, setState] = useState<State>('disconnect');

  const tip = useMemo(() => {
    switch (state) {
      case 'init':
        return '正在获取媒体数据...';
      case 'disconnect':
        return '请输入房间号并加入房间';
      case 'waiting':
        return '等待对方加入房间...';
      case 'canCall':
        return '可点击啊call进行呼叫';
      case 'connecting':
        return '通话中';
      default:
        return '';
    }
  }, [state]);

  useEffect(() => {
    // 初始化信令服务器
    signalServer.current = new SignalServer({ onMessage, onJoined, onOtherJoined });

    const initPeerConnection = () => {
      console.log('------ 初始化本地pc对象');
      // 创建pc实例
      peerConnection.current = new RTCPeerConnection(pcOption);
      const pc = peerConnection.current;
      // 监听 candidate 获取事件
      pc.addEventListener('icecandidate', event => {
        const candidate = event.candidate;
        if (candidate) {
          console.log('------ 获取到了本地 candidate:', candidate);

          // 发送candidate到远端
          signalServer.current.send({ type: 'candidate', value: candidate });
        }
      });

      // 监听到远端传过来的媒体数据
      pc.addEventListener('track', e => {
        console.log('------ 获取到了远端媒体数据:', e);
        if (remoteVideo.current.srcObject !== e.streams[0]) {
          remoteVideo.current.srcObject = e.streams[0];
        }
      });
    };

    //获取本地媒体数据
    const getLocalMediaStream = () => {
      navigator.mediaDevices.getUserMedia({ audio: false, video: true }).then(mediaStream => {
        console.log('------ 成功获取本地设备媒体数据:', mediaStream);
        if (mediaStream) {
          localVideo.current.srcObject = mediaStream;
          localMediaStream.current = mediaStream;

          // 绑定本地媒体数据到pc对象上
          if (localMediaStream.current) {
            console.log('------ 绑定本地媒体数据到pc对象上');
            localMediaStream.current.getTracks().forEach(track => {
              peerConnection.current.addTrack(track, localMediaStream.current);
            });
          }
        }
      });
    };

    initPeerConnection();

    getLocalMediaStream();

    return () => {
      // 离开页面前销毁mediaStream数据
      localMediaStream.current &&
        localMediaStream.current.getTracks().forEach(track => track.stop());
      remoteMediaStream.current &&
        remoteMediaStream.current.getTracks().forEach(track => track.stop());

      //销毁本地pc
      peerConnection.current && peerConnection.current.close();
    };
  }, []);

  const join = () => {
    if (!roomId || state !== 'disconnect') return;
    signalServer.current.join(roomId);
    setState('waiting');
  };

  const onJoined = ({ roomId, userNum }) => {
    message.success('成功加入房间,当前房间人数为:' + userNum);
    console.log('------ 成功加入房间,当前房间人数为:' + userNum);

    if (userNum === 1) {
      setState('waiting');
    } else {
      setState('canCall');
    }
  };

  const onOtherJoined = data => {
    console.log('------ 有人加入房间了');
    setState('canCall');
  };

  const call = () => {
    if (state !== 'canCall') return;
    // 开始建立连接
    setState('connecting');

    const pc = peerConnection.current;

    // 获取本地sdp(offer)
    pc.createOffer().then(offer => {
      console.log('------ 获取到了本地offer', offer);

      // 绑定本地sdp
      pc.setLocalDescription(offer);

      // 发送本地sdp到远端
      signalServer.current.send({
        type: 'offer',
        value: offer,
      });
    });
  };

  const onMessage = ({ type, value }) => {
    switch (type) {
      case 'offer':
        onGetRemoteOffer(value);
        break;
      case 'answer':
        onGetRemoteAnswer(value);
        break;
      case 'candidate':
        onGetRemoteCandidate(value);
        break;
      default:
        console.log('unknown message');
    }
  };

  const onGetRemoteAnswer = answer => {
    console.log('------ 获取到了远端answer', answer);

    const pc = peerConnection.current;

    // 绑定远端sdp
    pc.setRemoteDescription(answer);
  };

  const onGetRemoteOffer = offer => {
    console.log('------ 获取到了远端offer', offer);
    // 远端发起呼叫,开始建立连接
    setState('connecting');

    const pc = peerConnection.current;

    // 绑定远端sdp
    pc.setRemoteDescription(offer);

    // 创建本地sdp
    pc.createAnswer().then(answer => {
      // 绑定本地sdp
      pc.setLocalDescription(answer);

      console.log('------ 获取到了本地answer', answer);
      // 发送本地sdp到远端
      signalServer.current.send({
        type: 'answer',
        value: answer,
      });
    });
  };

  // 获取到远端的candidate
  const onGetRemoteCandidate = candidate => {
    console.log('------ 获取到了远端candidate', candidate);

    peerConnection.current.addIceCandidate(candidate);
  };

  return (
    <div className="one-on-one">
      <h1>Simple1v1{tip && `-${tip}`}</h1>
      <div className="one-on-one-container">
        <div className="one-on-one-operation">
          <div className="room-selector operation-item">
            <Input
              value={roomId || undefined}
              disabled={state !== 'disconnect'}
              onChange={e => setRoomId(e.target.value)}
              placeholder="请输入房间号"></Input>
            <Button disabled={state !== 'disconnect'} onClick={join} type="primary">
              加入房间
            </Button>
          </div>
          <div className="call-btn operation-item">
            <Button disabled={state !== 'canCall'} onClick={call} type="primary">
              call
            </Button>
          </div>
        </div>
        <div className="videos">
          <div className="local-container">
            <h3>local-video</h3>
            <video autoPlay controls ref={localVideo}></video>
          </div>
          <div className="remote-container">
            <h3>remote-video</h3>
            <video autoPlay controls ref={remoteVideo}></video>
          </div>
        </div>
      </div>
    </div>
  );
};

export default Simple1v1;
实现效果

原文地址:WebRTC入门指南 —— 实现一个完整的点对点视频通话(信令服务器+客户端) - 掘金
本文福利, 免费领取C++音视频学习资料包、技术视频,内容包括(音视频开发,面试题,FFmpeg ,webRTC ,rtmp ,hls ,rtsp ,ffplay ,编解码,推拉流,srs)↓↓↓↓↓↓见下面↓↓文章底部点击免费领取↓↓


 1219
1219


 被折叠的 条评论
为什么被折叠?
被折叠的 条评论
为什么被折叠?
 到【灌水乐园】发言


