


<view class="container">
    <canvas canvas-id="arcCanvas" id="arcCanvas" class="arc-canvas"
            width="300" height="300">
    </canvas>
</view>最开始我使用的uni.createSelectorQuery()来获取元素
onMounted(() => {
  const query = uni.createSelectorQuery();
  query.select('#progressCanvas').node().exec((res) => {
    if (res[0] && res[0].node) {
      const canvas = res[0].node;
      const context = canvas.getContext('2d');
      const percentage = 75;  // 进度百分比,可以调整
      drawProgressBar(context, percentage);
    } else {
      console.error('Canvas node not found');
    }
  });
});
网上找了很多都是用这种方法,但是我放到小程序中,不起作用。
于是就换成了uni.createCanvasContext('arcCanvas')方法获取
        const ctx = uni.createCanvasContext('arcCanvas');
		let canvas={width:250,height:250}
		// 外圈圆
		const outerRadius = 110;//半径
		const outerX = canvas.width / 2;//x轴
		const outerY = canvas.height / 2;//y轴
		ctx.beginPath();//开始画路径
		ctx.arc(outerX, outerY, outerRadius, 0, 2 * Math.PI);//画圆
		// 描边
		ctx.strokeStyle = 'white';//边框设置为白色
		ctx.stroke();//画出当前边框
		// 填充
		ctx.fillStyle='white';//填充为白色
		ctx.fill();//为当前圆填色


		// 中间圆
		const middleRadius = 90;//半径
		const middleX = canvas.width / 2;//x轴
		const middleY = canvas.height / 2;//y轴
		ctx.beginPath();//开始画路径
		// 灰色
		ctx.arc(middleX, middleY, middleRadius, 1.5, 1.5 * Math.PI);//画圆
		// 设置边框宽
		ctx.lineWidth = 10;
		// 描边框
		ctx.strokeStyle = '#F5F5F7';
		ctx.stroke();
		// 蓝色填充实
		ctx.beginPath();
		ctx.arc(middleX, middleY, middleRadius, 1.5, 1.2 * Math.PI);
		ctx.lineWidth = 10;//设置边框宽度
		ctx.strokeStyle = '#00C3CE';
		ctx.stroke();
		  // 设置阴影的颜色
		 ctx.setShadow(0, 10, 10, '#E6F9FA');
		 ctx.stroke()
		// 保存状态,以便在中间圆内部绘制文字
		ctx.save();

		// 内圈圆
		const innerRadius = 60;
		const innerX = canvas.width / 2;
		const innerY = canvas.height / 2;
		ctx.beginPath();
		ctx.arc(innerX, innerY, innerRadius, 0, 2 * Math.PI);
		ctx.lineWidth = 4;
		ctx.setShadow(0, 2,30, '#E6F9FA');
		ctx.stroke()
		ctx.strokeStyle = '#f3fafa';
		ctx.stroke();
		ctx.fillStyle = '#fff';
		ctx.fill();

		// 在中间圆内居中加上文字
		const text = '80%';
		const text2 = '已修课程';
		ctx.font = 'bold 40px Arial';
		ctx.textAlign = 'center';
		ctx.fillStyle = 'black';
		ctx.fillText(text, innerX,  innerY+10); // 10是调整文字位置的偏移量,可以根据实际情况调整
		ctx.font = 'bold 14px Arial';
		ctx.fillText(text2, innerX, innerY + 30); // 10是调整文字位置的偏移量,可以根据实际情况调整
		// 恢复状态
		ctx.restore();
ctx.draw() 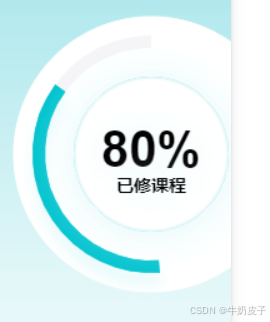


 被折叠的 条评论
为什么被折叠?
被折叠的 条评论
为什么被折叠?
 到【灌水乐园】发言


