


【Hackathon】基于RKNPU2给FastDeploy仓库贡献代码
前言
大家好,我是Zheng_Bicheng。很高兴受到飞桨运营姐姐的邀请,写一篇关于黑客松比赛中No.80 瑞芯微RK3588:通过 Paddle2ONNX 打通 5个 Paddle 模型的部署任务的一些心得体会。
在参加比赛时,FastDeploy仓库中并没有集成RKNPU2的引擎,需要开发者从头编写代码,因此给开发任务带来了不少麻烦。在参加完黑客松之后,我为FastDeploy仓库贡献了RKNPU2的后端推理引擎的代码,现在能直接使用FastDeploy快速开发基于RKNPU2的代码。本次教程将以贡献SCRFD为例子,教你如何给FastDeploy贡献代码。
FastDeploy简介
很多开发者可能会有疑惑,为什么RK提供了RKNPU2和rknn-toolkit2这两个分别面向c++和python的推理引擎,我们还要使用FastDeploy进行开发呢?
从高大上的角度看,FastDeploy是一款全场景、易用灵活、极致高效的AI推理部署工具。提供开箱即用的云边端部署体验, 支持超过 150+ Text, Vision, Speech和跨模态模型,并实现端到端的推理性能优化。包括图像分类、物体检测、图像分割、人脸检测、人脸识别、关键点检测、抠图、OCR、NLP、TTS等任务,满足开发者多场景、多硬件、多平台的产业部署需求。
同时,FastDeploy集成了多种后端推理引擎,其中就包括RKNPU2。开发者能够快速基于现有的模型以及后端来进行开发。简单的说,RKNPU2侧重于推理而FastDeploy侧重于部署。给RKNPU2输入一张图片,会得到一串数字。给FastDeploy输入一张图片,会直接得到经过后处理后的图片。这样就能减少开发者在项目落地过程中的一些困难。
贡献步骤简介
贡献流程介绍
给FastDeploy贡献代码,我一般按以下步骤进行,当然你可以根据自己的能力制定自己的开发步骤。
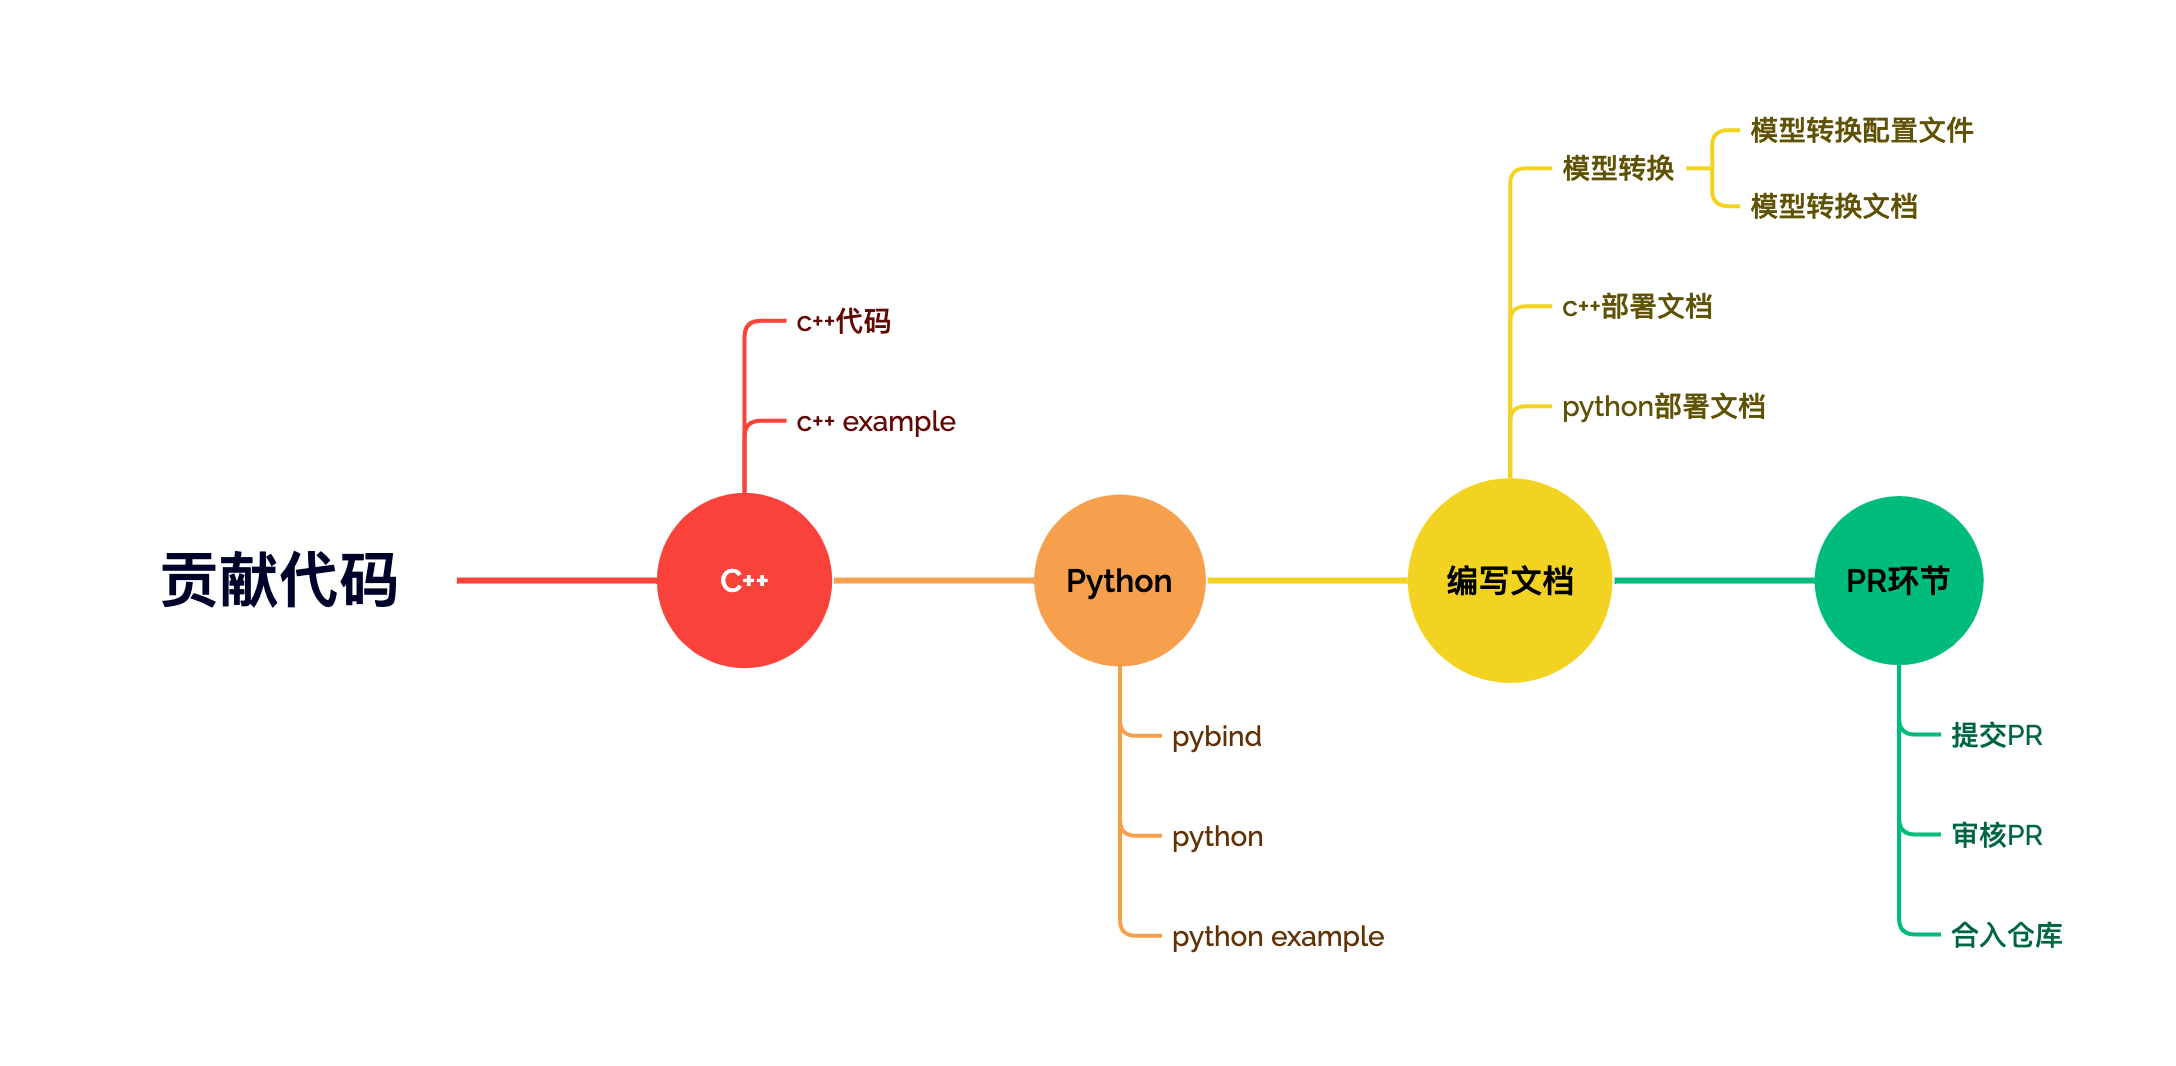
由上图所示,给FastDeploy贡献代码的步骤一般分为编写转换模型,编写c++代码,编写c++ example,编写python代码,编写python example代码,编写文档,提交pr这几个步骤。
贡献流程详解
编写c++代码
FastDeploy是基于c++的开源仓库,因此,最开始我们肯定是需要编写模型的c++代码来提供给用户使用,这是FastDeploy的基石。当然,通过第三方库——pybind, FastDeploy也能提供api给Python调用,实现不同编程语言调用同一个仓库的效果。FastDeploy中C++代码存放在FastDeploy/fastdeploy目录下。以SCRFD为例,这是一个人脸检测模型,因此需要在fastdeploy/vision/facedet/contrib下编写你的代码。
编写Python代码
上文提到,Python是通过调用pybind提供的接口来调用c++执行程序的。在完成c++的代码后,我们还需要编写对应的pybind。这样能够绑定暴露c++的API给Python调用。一般的在模型代码的目录下编写这部分代码。以SCRFD为例,我们需要在fastdeploy/vision/facedet/contrib下编写你的pybind代码。
编写对应的example
FastDeploy为了方便用户快速使用模型,每一个模型都编写了对应的example。以SCRFD为例,RKNPU2的example存放在examples/vision/facedet/scrfd/rknpu2目录下。该目录下包含了cpp和python两个文件夹,分别对应c++和python的源代码。
编写文档
完善的中文文档时Paddle系列仓库的特色之一。在贡献完你的代码之后,用户还需要知道你的代码如何使用,因此在example目录下,你需要编辑并完善你的文档,便于PR的审核。
提交pr
在完成所有的开发工作后,你需要在Github上提交你的PR,等待CI通过以及验收成功后,你的提交将被合入主仓库,你也就成为了贡献者。
贡献代码指南
下面我以贡献SCRFD模型为例子,给大家详细介绍每个贡献环节中的注意事项。
转换模型
不管你是在FastDeploy上开发C++还是Python的代码,转换模型都是你首先需要完成的任务。通常情况下,转换模型的工具一般使用Rockchip提供的rknntoolkit2工具,但是这个工具api比较多,用起来较为复杂。为了让大家能够更快速的转换模型,在FastDeploy中,我已经编写了转换模型的代码并且提供了详细的文档。详情请查看FastDeploy RKNPU2模型转换文档。这里为了缩短篇幅,直接给出模型转换的配置文件以及模型转换的文档。大家可以参考这几个文档转换自己的模型。
编写C++代码
上文提到,SCRFD的C++代码需要在fastdeploy/vision/facedet/contrib这个目录下编写,因此我创建了 scrfd.h 和 scrfd.cc 这两个文件负责模型具体代码的实现。这里要注意与常见的文件命名形式不同, scrfd.cc 这个c++代码文件的后缀不是 .cpp 而是 .cc ,如果scrfd.cc改为scrfd.cpp将无法成功编译!
编写scrfd.h
scrfd.h里定义了SCRFD模型的一些基本参数以及需要重定义的函数。其中定义的SCRFD模型需要继承FastDeployModel这个公共的模型类,为的是继承FastDeploy的一些公共特性。
如下面的代码所示,在头文件中我们需要重写FastDeployModel中的以下几个函数,包括Initialize,Preprocess,Postprocess,Predict,ModelName。分别对应初始化,预处理,后处理,预测,模型名称。如果你需要完整详细的代码,请点击神秘链接。
#pragma once
#include <unordered_map>
#include "fastdeploy/fastdeploy_model.h"
#include "fastdeploy/vision/common/processors/transform.h"
#include "fastdeploy/vision/common/result.h"
namespace fastdeploy {
namespace vision {
namespace facedet {
class FASTDEPLOY_DECL SCRFD : public FastDeployModel {
 public:
  SCRFD(const std::string& model_file, const std::string& params_file = "",
        const RuntimeOption& custom_option = RuntimeOption(), const ModelFormat& model_format = ModelFormat::ONNX);
  std::string ModelName() const { return "scrfd"; }
  virtual bool Predict(cv::Mat* im, FaceDetectionResult* result, float conf_threshold = 0.25f, float nms_iou_threshold = 0.4f);
 private:
  bool Initialize();
  bool Preprocess(Mat* mat, FDTensor* output, std::map<std::string, std::array<float, 2>>* im_info);
  bool Postprocess(std::vector<FDTensor>& infer_result, FaceDetectionResult* result,
                   const std::map<std::string, std::array<float, 2>>& im_info, float conf_threshold, float nms_iou_threshold);
};
}  // namespace facedet
}  // namespace vision
}  // namespace fastdeploy
编写scrfd.cc
scrfd.cc负责对在scrfd.h中声明的函数进行了实现。在编写预处理的过程中要注意,RKNPU2目前仅支持NHWC格式的输入数据,因此必须屏蔽Permute操作。我这里使用 disable_permute_ 变量控制 Permute操作。此外由于FastDeploy采用的是RKNPU2的零拷贝流程来实现后端的处理和运算,因此可以考虑将 Normalize 操作放在NPU上来做,提升速度,我这里使用disable_normalize_ 变量控制 Normalize 的开关。如果需要详细的代码,请点击神秘链接。
#include "fastdeploy/vision/facedet/contrib/scrfd.h"
#include "fastdeploy/utils/perf.h"
#include "fastdeploy/vision/utils/utils.h"
namespace fastdeploy {
namespace vision {
namespace facedet {
bool SCRFD::Preprocess(Mat* mat, FDTensor* output, std::map<std::string, std::array<float, 2>>* im_info) {
  float ratio = std::min(size[1] * 1.0f / static_cast<float>(mat->Height()), size[0] * 1.0f / static_cast<float>(mat->Width()));
  SCRFD::LetterBox(mat, size, padding_value, is_mini_pad, is_no_pad, is_scale_up, stride);
  BGR2RGB::Run(mat);
  if (!disable_normalize_) {
    std::vector<float> alpha = {1.f / 128.f, 1.f / 128.f, 1.f / 128.f};
    std::vector<float> beta = {-127.5f / 128.f, -127.5f / 128.f, -127.5f / 128.f};
    Convert::Run(mat, alpha, beta);
  }
  if(!disable_permute_){
    HWC2CHW::Run(mat);
    Cast::Run(mat, "float");
  }
  (*im_info)["output_shape"] = {static_cast<float>(mat->Height()), static_cast<float>(mat->Width())};
  mat->ShareWithTensor(output);
  output->shape.insert(output->shape.begin(), 1);  // reshape to n, c, h, w
  return true;
}

bool SCRFD::Postprocess(std::vector<FDTensor>& infer_result, FaceDetectionResult* result,
                        const std::map<std::string, std::array<float, 2>>& im_info, float conf_threshold, float nms_iou_threshold) {
  return true;
}

bool SCRFD::Predict(cv::Mat* im, FaceDetectionResult* result, float conf_threshold, float nms_iou_threshold) {
  Mat mat(*im);
  std::vector<FDTensor> input_tensors(1);
  std::map<std::string, std::array<float, 2>> im_info;
  im_info["input_shape"] = {static_cast<float>(mat.Height()), static_cast<float>(mat.Width())};
  im_info["output_shape"] = {static_cast<float>(mat.Height()), static_cast<float>(mat.Width())};
  Preprocess(&mat, &input_tensors[0], &im_info);
  input_tensors[0].name = InputInfoOfRuntime(0).name;
  std::vector<FDTensor> output_tensors;
  Infer(input_tensors, &output_tensors);
  Postprocess(output_tensors, result, im_info, conf_threshold, nms_iou_threshold);
  return true;
}
}  // namespace facedet
}  // namespace vision
}  // namespace fastdeploy
在vision.h中添加我们的模型
我们编写完scrfd的代码之后,我们还需要让FastDeploy知道我们已经编写了scrfd代码,因此我们需要在fastdeploy/vision.h文件中包含scrfd.h头文件的路径。
编译FastDeploy C++ SDK
编写完C++代码后,我们需要编译c++版本的FastDeploy。一是为了测试我们编写的代码是否有程序上的漏洞,二是为了后续编写example可以链接FastDeploy编译出来的动态库。编译的细节详情请参考FastDeploy C++ 代码编译指南。这里直接给出编译时的命令:
git clone https://github.com/PaddlePaddle/FastDeploy.git
cd FastDeploy
mkdir build && cd build
cmake ..  -DENABLE_ORT_BACKEND=ON \
	      -DENABLE_RKNPU2_BACKEND=ON \
	      -DENABLE_VISION=ON \
	      -DRKNN2_TARGET_SOC=RK3588 \
          -DCMAKE_INSTALL_PREFIX=${PWD}/fastdeploy-0.0.3
make -j8
make install
编写C++ example代码
为了调试我们已经完成的c++代码,以及方便用户使用,在编写完上述scrfd代码之后,我们需要编写对应example的代码来验证我们的想法是否正确。在编写c++ example时,目录下的文件一般由infer_model_name.cc以及CMakeLists.txt组成。在CMakeLists.txt中需要对不同的infer_model_name.cc生成不同的infer_model_name程序。
编写infer.cc
infer.cc 主要负责调用FastDeploy的C++代码来对SCRFD的测试。在上文中,我们提到 vision.h 可以让fastdeploy知道我们已经编写了scrfd模型。因此在编写example时,我们只需要包含vision.h,即可让让程序知道,我们已经声明了fastdeploy所有已经实现的视觉模型。针对RKNPU的测试,其流程一般为初始化模型,然后根据转换模型时的配置决定是否需要DisableNormalize和DisablePermute,随后输入测试图片,调用Predict函数进行处理,最后使用对应的可视化函数进行可视化。
#include <iostream>
#include <string>
#include "fastdeploy/vision.h"
void RKNPU2Infer(const std::string& model_dir, const std::string& image_file) {
  auto model = fastdeploy::vision::facedet::SCRFD(model_file, params_file, option, format);
  model.Initialized();
  model.DisableNormalize();
  model.DisablePermute();
  auto im = cv::imread(image_file);
  fastdeploy::vision::FaceDetectionResult res;
  model.Predict(&im, &res)
  auto vis_im = fastdeploy::vision::VisFaceDetection(im, res);
  cv::imwrite("infer_rknn.jpg", vis_im);
  std::cout << "Visualized result saved in ./infer_rknn.jpg" << std::endl;
}

int main(int argc, char* argv[]) {
  if (argc < 3) {
    std::cout
        << "Usage: infer_demo path/to/model_dir path/to/image run_option, "
           "e.g ./infer_model ./picodet_model_dir ./test.jpeg"
        << std::endl;
    return -1;
  }

  RKNPU2Infer(argv[1], argv[2]);
  return 0;
}
编写CMakeLists.txt
编写完C++ example 的代码后,我们还需要编写CMakeLists.txt。 CMakeLists.txt相当于编译时的配置文件,负责链接infer_model_name.cc和FastDeploy的动态库,并且把模型推理需要用到的东西集成在install目录下。
CMAKE_MINIMUM_REQUIRED(VERSION 3.10)
project(rknpu_test)

set(CMAKE_CXX_STANDARD 14)

# 指定下载解压后的fastdeploy库路径
set(FASTDEPLOY_INSTALL_DIR "thirdpartys/fastdeploy-0.7.0")

include(${FASTDEPLOY_INSTALL_DIR}/FastDeployConfig.cmake)
include_directories(${FastDeploy_INCLUDE_DIRS})
add_executable(rknpu_test infer.cc)
target_link_libraries(rknpu_test ${FastDeploy_LIBS})

set(CMAKE_INSTALL_PREFIX ${CMAKE_SOURCE_DIR}/build/install)

install(TARGETS rknpu_test DESTINATION ./)

install(DIRECTORY model DESTINATION ./)
install(DIRECTORY images DESTINATION ./)

file(GLOB FASTDEPLOY_LIBS ${FASTDEPLOY_INSTALL_DIR}/lib/*)
message("${FASTDEPLOY_LIBS}")
install(PROGRAMS ${FASTDEPLOY_LIBS} DESTINATION lib)

file(GLOB ONNXRUNTIME_LIBS ${FASTDEPLOY_INSTALL_DIR}/third_libs/install/onnxruntime/lib/*)
install(PROGRAMS ${ONNXRUNTIME_LIBS} DESTINATION lib)

install(DIRECTORY ${FASTDEPLOY_INSTALL_DIR}/third_libs/install/opencv/lib DESTINATION ./)

file(GLOB PADDLETOONNX_LIBS ${FASTDEPLOY_INSTALL_DIR}/third_libs/install/paddle2onnx/lib/*)
install(PROGRAMS ${PADDLETOONNX_LIBS} DESTINATION lib)

file(GLOB RKNPU2_LIBS ${FASTDEPLOY_INSTALL_DIR}/third_libs/install/rknpu2_runtime/RK3588/lib/*)
install(PROGRAMS ${RKNPU2_LIBS} DESTINATION lib)
编写python代码
python代码的编写主要包括 pybind 文件的编写以及 py本体文件 的编写。上文提到,在FastDeploy中,python代码通过调用pybind暴露出的C++ api来进行工作,因此我们首先需要编写pybind.cc。
编写scrfd_pybind.cc
pybind.cc主要负责提供可用的api给python调用。scrfd_pybind.cc中对SCRFD C++的代码进行了暴露,代码如下:
#include "fastdeploy/pybind/main.h"

namespace fastdeploy {
void BindSCRFD(pybind11::module& m) {
  // Bind SCRFD
  pybind11::class_<vision::facedet::SCRFD, FastDeployModel>(m, "SCRFD")
      .def(pybind11::init<std::string, std::string, RuntimeOption,
                          ModelFormat>())
      .def("predict",
           [](vision::facedet::SCRFD& self, pybind11::array& data,
              float conf_threshold, float nms_iou_threshold) {
             auto mat = PyArrayToCvMat(data);
             vision::FaceDetectionResult res;
             self.Predict(&mat, &res, conf_threshold, nms_iou_threshold);
             return res;
           })
      .def("disable_normalize",&vision::facedet::SCRFD::DisableNormalize)
      .def("disable_permute",&vision::facedet::SCRFD::DisablePermute)
      .def_readwrite("size", &vision::facedet::SCRFD::size)
      .def_readwrite("padding_value", &vision::facedet::SCRFD::padding_value)
      .def_readwrite("is_mini_pad", &vision::facedet::SCRFD::is_mini_pad)
      .def_readwrite("is_no_pad", &vision::facedet::SCRFD::is_no_pad)
      .def_readwrite("is_scale_up", &vision::facedet::SCRFD::is_scale_up)
      .def_readwrite("stride", &vision::facedet::SCRFD::stride)
      .def_readwrite("use_kps", &vision::facedet::SCRFD::use_kps)
      .def_readwrite("max_nms", &vision::facedet::SCRFD::max_nms)
      .def_readwrite("downsample_strides",
                     &vision::facedet::SCRFD::downsample_strides)
      .def_readwrite("num_anchors", &vision::facedet::SCRFD::num_anchors)
      .def_readwrite("landmarks_per_face",
                     &vision::facedet::SCRFD::landmarks_per_face);

}

}  // namespace fastdeploy
在facedet_pybind.cc中添加声明
和在vision.h文件中添加声明一样,在编写完pybind代码之后,我们还需要在fastdeploy/vision/facedet/facedet_pybind.cc中添加声明。目的是告诉编译器我们已经编写了pybind的代码,并且在编译python时请把我们的代码加上。核心代码如下:
#include "fastdeploy/pybind/main.h"

namespace fastdeploy {
void BindSCRFD(pybind11::module& m);
void BindFaceDet(pybind11::module& m) {
  auto facedet_module = m.def_submodule("facedet", "Face detection models.");
  BindSCRFD(facedet_module);
}
}
编写scrfd.py
编写完pybind.cc后,我们还需要编写对应的py文件调用pybind暴露出来的c++ api。代码如下
from __future__ import absolute_import
import logging
from .... import FastDeployModel, ModelFormat
from .... import c_lib_wrap as C


class SCRFD(FastDeployModel):
    def __init__(self,
                 model_file,
                 params_file="",
                 runtime_option=None,
                 model_format=ModelFormat.ONNX):
        super(SCRFD, self).__init__(runtime_option)

        self._model = C.vision.facedet.SCRFD(model_file, params_file, self._runtime_option, model_format)
        assert self.initialized, "SCRFD initialize failed."

    def predict(self, input_image, conf_threshold=0.7, nms_iou_threshold=0.3):
        return self._model.predict(input_image, conf_threshold, nms_iou_threshold)
编译FastDeploy Python SDK
编写example之前我们肯定需要编译python版本的FastDeploy代码,请参考FastDeploy RKNPU2编译指南编译Python版本的FastDeploy。我这里给出我经常使用的编译命令:
cd FastDeploy
cd python
export ENABLE_ORT_BACKEND=ON
export ENABLE_RKNPU2_BACKEND=ON
export ENABLE_VISION=ON
export RKNN2_TARGET_SOC=RK3588
python3 setup.py build
python3 setup.py bdist_wheel
cd dist
pip3 install fastdeploy_python-0.0.0-cp39-cp39-linux_aarch64.whl
编写python example代码
为了调试我们已经完成的Python代码,以及方便用户使用,在编写完上述scrfd代码之后,我们需要编写对应example的代码来验证我们的想法是否正确。在编写Python example时,目录下的文件一般由infer_model_name.py组成。
编写infer.py
infer.py 主要负责调用FastDeploy的Python代码来对SCRFD的测试。与C++ example相似,针对RKNPU的测试,其流程一般为初始化模型,然后根据转换模型时的配置决定是否需要disable_normalize和disable_permute,随后输入测试图片,调用Predict函数进行处理,最后使用对应的可视化函数进行可视化。
import fastdeploy as fd
import cv2
import os
def parse_arguments():
    import argparse
    import ast
    parser = argparse.ArgumentParser()
    parser.add_argument("--model_file", required=True, help="Path of FaceDet model.")
    parser.add_argument("--image", type=str, required=True, help="Path of test image file.")
    return parser.parse_args()
def build_option(args):
    option = fd.RuntimeOption()
    option.use_rknpu2()
    return option

args = parse_arguments()

# 配置runtime,加载模型
runtime_option = build_option(args)
model_file = args.model_file
params_file = ""
model = fd.vision.facedet.SCRFD(model_file, params_file, runtime_option=runtime_option, model_format=fd.ModelFormat.RKNN)
model.disable_normalize()
model.disable_permute()
# 预测图片分割结果
im = cv2.imread(args.image)
result = model.predict(im)
print(result)
# 可视化结果
vis_im = fd.vision.vis_face_detection(im, result)
cv2.imwrite("visualized_result.jpg", vis_im)
print("Visualized result save in ./visualized_result.jpg")
编写文档以及提交pr
请参考SCRFD example编写模型的转换文档、模型的cpp example运行文档、模型的python 运行文档共三份文档,然后向FastDeploy的Github仓库提交pr。待审核过后,你的贡献就会被记录啦。
效果展示
运行c++以及python的代码后正常应该得到如下的效果:

请点击此处查看本环境基本用法.
Please click here for more detailed instructions.
此文章为搬运
原项目链接


 949
949


 被折叠的 条评论
为什么被折叠?
被折叠的 条评论
为什么被折叠?
 到【灌水乐园】发言


