


Class 4:卷积神经网络
Week 2:深度卷积模型
目录
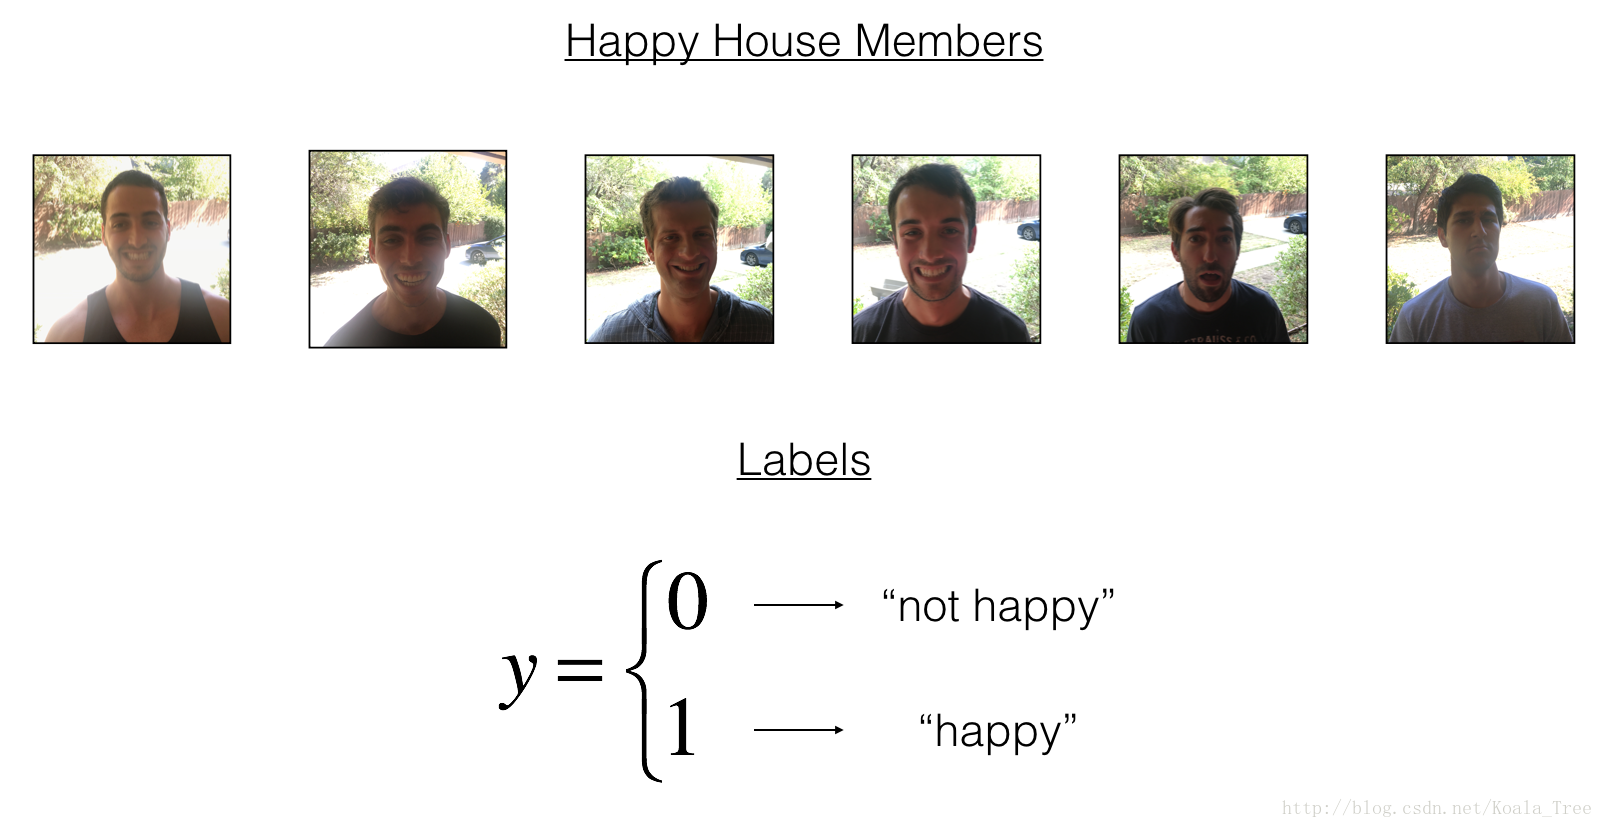
1、Keras(Happy House)
import tensorflow as tf
import numpy as np
import matplotlib.pyplot as plt
import pydot
from matplotlib.pyplot import imshow
from IPython.display import SVG
from keras import layers
from keras.layers import Input, Dense, Activation, ZeroPadding2D, BatchNormalization, Flatten, Conv2D
from keras.layers import AveragePooling2D, MaxPooling2D, Dropout, GlobalMaxPooling2D, GlobalAveragePooling2D
from keras.models import Model
from keras.preprocessing import image
from keras.utils import layer_utils
from keras.utils.data_utils import get_file
from keras.applications.imagenet_utils import preprocess_input
from keras.utils.vis_utils import model_to_dot
from keras.utils import plot_model
from kt_utils import *
import keras.backend as K
K.set_image_data_format('channels_last')

# 1、数据处理
X_train_orig, Y_train_orig, X_test_orig, Y_test_orig, classes = load_dataset()

# Normalize image vectors
X_train = X_train_orig/255.
X_test = X_test_orig/255.

# Reshape
Y_train = Y_train_orig.T
Y_test = Y_test_orig.T

print(X_train.shape, Y_train.shape, X_test.shape, Y_test.shape)

# 2、用Keras建立模型
def model(input_shape):
    # 用input_shape的形状定义一个input placeholder作为tensor
    X_input = Input(input_shape)

    # Zero-padding
    X = ZeroPadding2D((3,3))(X_input)

    # Conv -> BN -> ReLU Block applied to X
    X = Conv2D(32, (7,7), strides=(1,1), name='conv0')(X)
    X = BatchNormalization(axis=3, name='bn0')(X)
    X = Activation('relu')(X)

    # max_pooling
    X = MaxPooling2D((2,2), name='max_pool')(X)

    # flatten X (means convert it to a vector)
    # and fully connected
    X = Flatten()(X)
    X = Dense(1, activation='sigmoid', name='fc')(X)

    # create model.  keras model instance
    model = Model(inputs=X_input, outputs=X, name='HappyModel')

    return model

# 3、Happy model 与 2 相同
def HappyModel(input_shape):
    """
    Implementation of the HappyModel.

    Arguments:
    input_shape -- shape of the images of the dataset

    Returns:
    model -- a Model() instance in Keras
    """
    # Define the input placeholder as a tensor with shape input_shape.
    X_input = Input(input_shape)

    # Zero-Padding: pads the border of X_input with zeroes
    X = ZeroPadding2D((3, 3))(X_input)

    # CONV -> BN -> RELU Block applied to X
    X = Conv2D(32, (7, 7), strides = (1, 1), name = 'conv0')(X)
    X = BatchNormalization(axis = 3, name = 'bn0')(X)
    X = Activation('relu')(X)

    # MAXPOOL
    X = MaxPooling2D((2, 2), name='max_pool')(X)

    # FLATTEN X (means convert it to a vector) + FULLYCONNECTED
    X = Flatten()(X)
    X = Dense(1, activation='sigmoid', name='fc')(X)

    # Create model. This creates your Keras model instance,
    # you'll use this instance to train/test the model.
    model = Model(inputs = X_input, outputs = X, name='HappyModel')

    return model

# 4、(通过调用)模型的创建、编译、训练、测试
happyModel = HappyModel(X_train.shape[1:])
happyModel.compile(optimizer="Adam", loss="binary_crossentropy", metrics=["accuracy"])
happyModel.fit(x=X_train, y=Y_train, epochs=5, batch_size=32)
preds = happyModel.evaluate(X_test, Y_test)

print()
print("Loss = " + str(preds[0]))
print("Test Accuracy = " + str(preds[1]))

# 5、测试自己的图像
img_path = 'images/my_image.jpg'
img = image.load_img(img_path, target_size=(64, 64))
imshow(img)

x = image.img_to_array(img)
x = np.expand_dims(x, axis=0)
x = preprocess_input(x)

print(happyModel.predict(x))

# 6、打印图层细节
happyModel.summary()

# 7、绘制图层布局
plot_model(happyModel, to_file='HappyModel.png')
SVG(model_to_dot(happyModel).create(prog='dot', format='svg'))
运行结果:
(600, 64, 64, 3) (600, 1) (150, 64, 64, 3) (150, 1)

Epoch 10/10

 32/600 [>.............................] - ETA: 11s - loss: 0.1305 - acc: 0.9688
 64/600 [==>...........................] - ETA: 10s - loss: 0.1210 - acc: 0.9688
 96/600 [===>..........................] - ETA: 9s - loss: 0.1608 - acc: 0.9583
128/600 [=====>........................] - ETA: 9s - loss: 0.1346 - acc: 0.9609
160/600 [=======>......................] - ETA: 8s - loss: 0.1195 - acc: 0.9688
192/600 [========>.....................] - ETA: 7s - loss: 0.1098 - acc: 0.9688
224/600 [==========>...................] - ETA: 6s - loss: 0.1017 - acc: 0.9688
256/600 [===========>..................] - ETA: 6s - loss: 0.0955 - acc: 0.9727
288/600 [=============>................] - ETA: 5s - loss: 0.1010 - acc: 0.9688
320/600 [===============>..............] - ETA: 5s - loss: 0.0945 - acc: 0.9719
352/600 [================>.............] - ETA: 4s - loss: 0.0937 - acc: 0.9688
384/600 [==================>...........] - ETA: 3s - loss: 0.0974 - acc: 0.9635
416/600 [===================>..........] - ETA: 3s - loss: 0.0941 - acc: 0.9663
448/600 [=====================>........] - ETA: 2s - loss: 0.1031 - acc: 0.9621
480/600 [=======================>......] - ETA: 2s - loss: 0.1005 - acc: 0.9646
512/600 [========================>.....] - ETA: 1s - loss: 0.0965 - acc: 0.9668
544/600 [==========================>...] - ETA: 0s - loss: 0.0962 - acc: 0.9688
576/600 [===========================>..] - ETA: 0s - loss: 0.0938 - acc: 0.9705
600/600 [==============================] - 10s 17ms/step - loss: 0.0923 - acc: 0.9717

 32/150 [=====>........................] - ETA: 1s
 64/150 [===========>..................] - ETA: 0s
 96/150 [==================>...........] - ETA: 0s
128/150 [========================>.....] - ETA: 0s
150/150 [==============================] - 1s 9ms/step

Loss = 0.253605038722
Test Accuracy = 0.893333332539
[[ 0.]]
_________________________________________________________________
Layer (type)                 Output Shape              Param #
=================================================================
input_1 (InputLayer)         (None, 64, 64, 3)         0
_________________________________________________________________
zero_padding2d_1 (ZeroPaddin (None, 70, 70, 3)         0
_________________________________________________________________
conv0 (Conv2D)               (None, 64, 64, 32)        4736
_________________________________________________________________
bn0 (BatchNormalization)     (None, 64, 64, 32)        128
_________________________________________________________________
activation_1 (Activation)    (None, 64, 64, 32)        0
_________________________________________________________________
max_pool (MaxPooling2D)      (None, 32, 32, 32)        0
_________________________________________________________________
flatten_1 (Flatten)          (None, 32768)             0
_________________________________________________________________
fc (Dense)                   (None, 1)                 32769
=================================================================
Total params: 37,633
Trainable params: 37,569
Non-trainable params: 64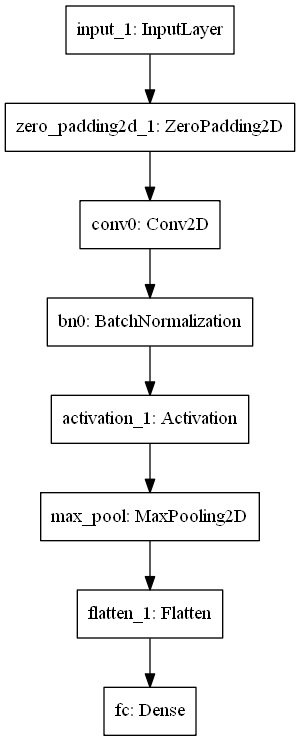
- Keras框架: Create->Compile->Fit/Train->Evaluate/Test.
2、Residual Networks(ResNet-50)
You are now going to solve this problem by building a Residual Network!
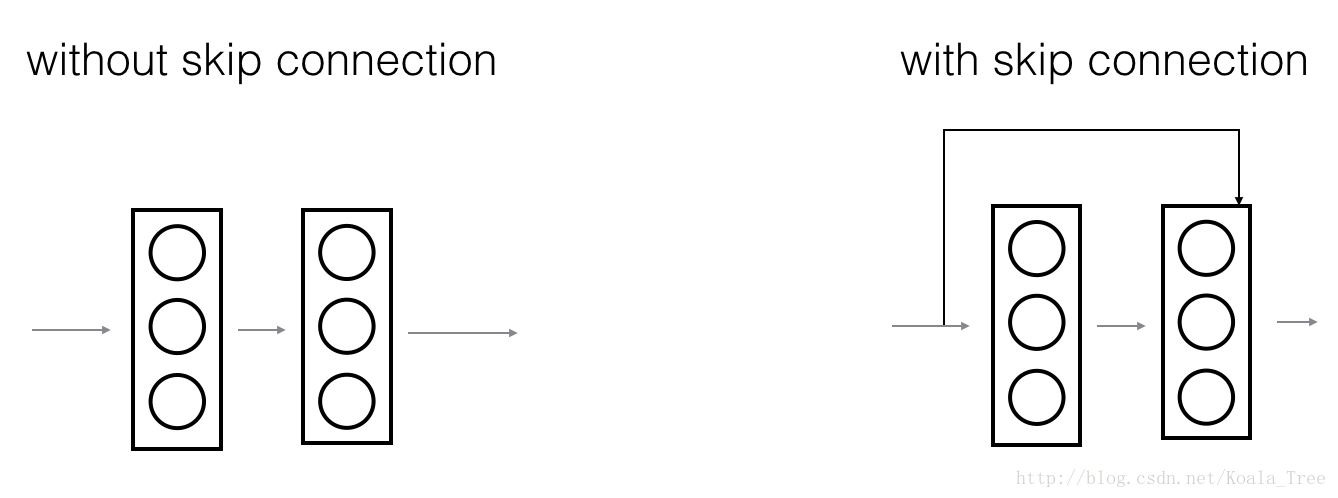
将这些残差块堆叠在一起,可以得到非常深的网络。使用 shortcut的残差块,能非常容易的学习标识功能。意味着您可以在其他ResNet模块上进行堆栈,而不会损害训练集的性能
2.1残差块(识别块、卷积块)
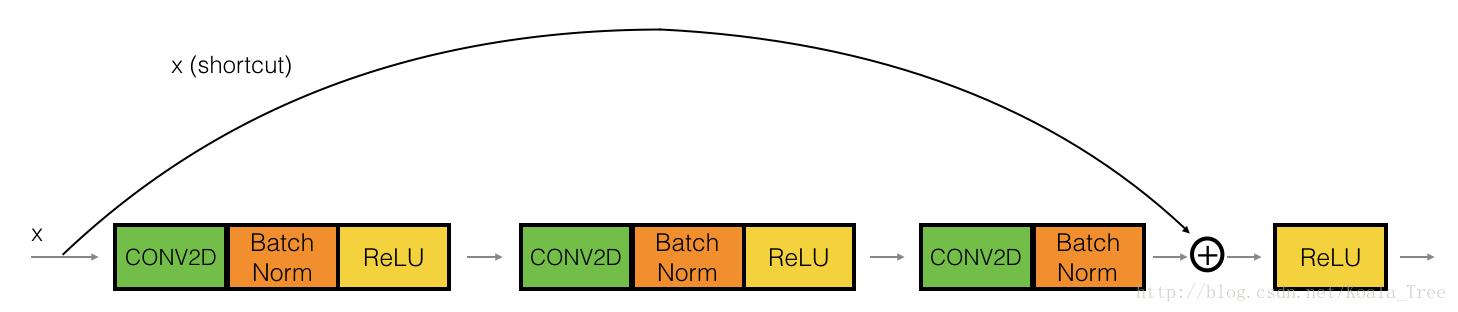
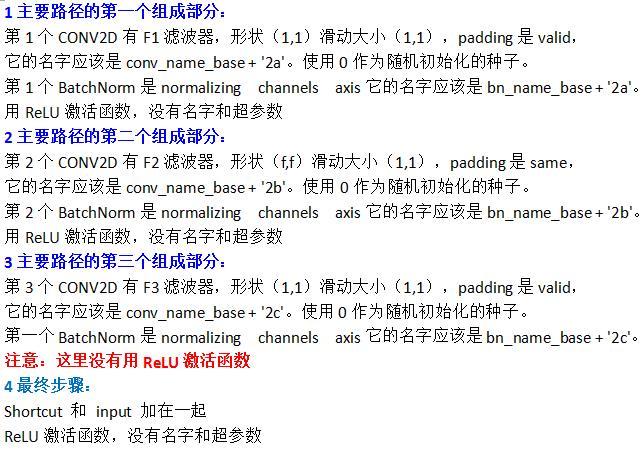
(1)识别块 Identity block
标识块是ResNets中使用的标准块,对应于输入激活a[L],具有与输出激活a[L+2]相同的维度
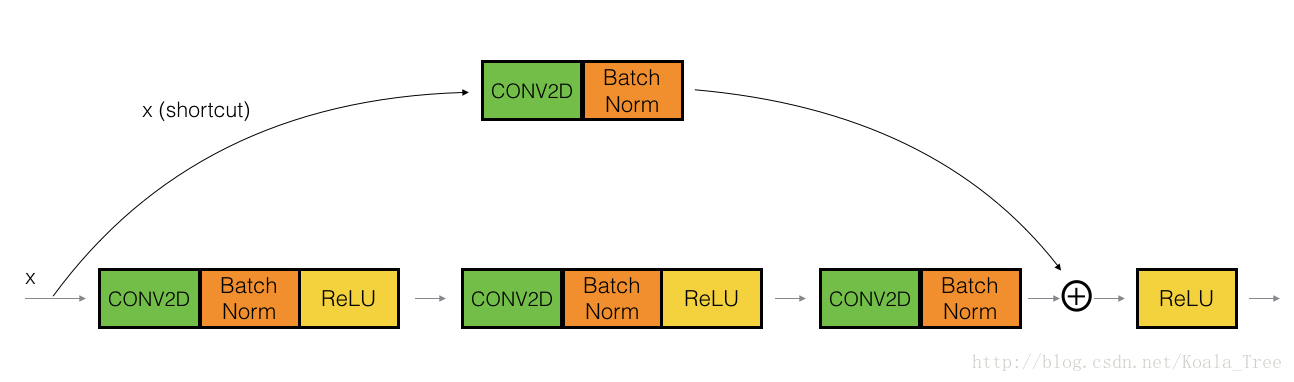
(2)卷积块 Convolutional block
2.2建立第1个ResNet模型(50层)
import tensorflow as tf
import numpy as np
import scipy.misc
import pydot
from matplotlib.pyplot import imshow
from IPython.display import SVG
from keras import layers
from keras.layers import Input, Add, Dense, Activation, ZeroPadding2D, BatchNormalization, Flatten, Conv2D, AveragePooling2D, MaxPooling2D, GlobalMaxPooling2D
from keras.models import Model, load_model
from keras.preprocessing import image
from keras.utils import layer_utils
from keras.utils.data_utils import get_file
from keras.applications.imagenet_utils import preprocess_input
from keras.utils.vis_utils import model_to_dot
from keras.utils import plot_model
from keras.initializers import glorot_uniform
import keras.backend as K
from resnets_utils import *
K.set_image_data_format('channels_last')
K.set_learning_phase(1)


# 1、identity block
def identity_block(X, f, filters, stage, block):
    """
    Implementation of the identity block

    Arguments:
    X -- input tensor of shape (m, n_H_prev, n_W_prev, n_C_prev)
    f -- integer, 主路径中间的那个CONV的窗口形状
    filters -- python整数列表, 定义主路径每个CONV层中的滤波器的数量
    stage --整数,用于命名层,取决于他们在网络中的位置          阶段
    block --字符串/字符,用于命名层,取决于他们在网络中的位置   块

    Returns:
    X -- output of the identity block, tensor of shape (n_H, n_W, n_C)
    """

    # defining name basis
    conv_name_base = 'res' + str(stage) + block + '_branch'
    bn_name_base   = 'bn'  + str(stage) + block + '_branch'

    F1, F2, F3 = filters

    # save the input value
    X_shortcut = X

    # first component of main path
    X = Conv2D(filters=F1, kernel_size=(1,1), strides=(1,1), padding='valid',
               name=conv_name_base+'2a', kernel_initializer=glorot_uniform(seed=0))(X)
    X = BatchNormalization(axis=3, name=bn_name_base+'2a')(X)
    X = Activation('relu')(X)

    # second component of main path
    X = Conv2D(filters=F2, kernel_size=(f,f), strides=(1,1), padding='same',
               name=conv_name_base+'2b', kernel_initializer=glorot_uniform(seed=0))(X)
    X = BatchNormalization(axis=3, name=bn_name_base+'2b')(X)
    X = Activation('relu')(X)

    # Third component of main path
    X = Conv2D(filters=F3, kernel_size=(1,1), strides=(1,1), padding='valid',
               name=conv_name_base+'2c', kernel_initializer=glorot_uniform(seed=0))(X)
    X = BatchNormalization(axis=3, name=bn_name_base+'2c')(X)

    # Final step
    # Add shortcut value to main path, and pass it through a ReLU activation
    X = Add()([X, X_shortcut])
    X = Activation('relu')(X)

    return X

# input (3,4,4,6) -> (3,4,4,2) -> (3,4,4,4) -> (3,4,4,6)
tf.reset_default_graph()

with tf.Session() as test:
    np.random.seed(1)
    A_prev = tf.placeholder("float", [3, 4, 4, 6])
    X = np.random.randn(3, 4, 4, 6)
    A = identity_block(A_prev, f = 2, filters = [2, 4, 6], stage = 1, block = 'a')

    test.run(tf.global_variables_initializer())
    out = test.run([A], feed_dict={A_prev: X, K.learning_phase(): 0})
    out_matrix = np.array(out)
    print(out_matrix.squeeze().shape)
    print("out = " + str(out[0][1][1][0]))


# 2、convolutional block
def convolutional_block(X, f, filters, stage, block, s=2):
    """
    Implementation of the identity block

    Arguments:
    X -- input tensor of shape (m, n_H_prev, n_W_prev, n_C_prev)
    f -- integer, 主路径中间的那个CONV的窗口形状
    filters -- python整数列表, 定义主路径每个CONV层中的滤波器的数量
    stage --整数,用于命名层,取决于他们在网络中的位置          阶段
    block --字符串/字符,用于命名层,取决于他们在网络中的位置   块
    s -- 整数,指定滑动的大小

    Returns:
    X -- output of the identity block, tensor of shape (n_H, n_W, n_C)
    """

    # defining name basis
    conv_name_base = 'res' + str(stage) + block + '_branch'
    bn_name_base   = 'bn'  + str(stage) + block + '_branch'

    F1, F2, F3 = filters

    # save the input value
    X_shortcut = X

    # first component of main path
    X = Conv2D(filters=F1, kernel_size=(1,1), strides=(s,s), padding='valid',
               name=conv_name_base+'2a', kernel_initializer=glorot_uniform(seed=0))(X)
    X = BatchNormalization(axis=3, name=bn_name_base+'2a')(X)
    X = Activation('relu')(X)

    # second component of main path
    X = Conv2D(filters=F2, kernel_size=(f,f), strides=(1,1), padding='same',
               name=conv_name_base+'2b', kernel_initializer=glorot_uniform(seed=0))(X)
    X = BatchNormalization(axis=3, name=bn_name_base+'2b')(X)
    X = Activation('relu')(X)

    # Third component of main path
    X = Conv2D(filters=F3, kernel_size=(1,1), strides=(1,1), padding='valid',
               name=conv_name_base+'2c', kernel_initializer=glorot_uniform(seed=0))(X)
    X = BatchNormalization(axis=3, name=bn_name_base+'2c')(X)

    # shortcut path
    X_shortcut = Conv2D(filters=F3, kernel_size=(1,1), strides=(s,s), padding='valid',
            name=conv_name_base+'1', kernel_initializer=glorot_uniform(seed=0))(X_shortcut)
    X_shortcut = BatchNormalization(axis=3, name=bn_name_base+'1')(X_shortcut)

    # Final step
    # Add shortcut value to main path, and pass it through a ReLU activation
    X = Add()([X, X_shortcut])
    X = Activation('relu')(X)

    return X

# 主路径:  (3,4,4,6) -> (3,2,2,2) -> (3,2,2,4) -> (3,2,2,6)
# shortcut: (3,4,4,6) -> (3,2,2,6)
tf.reset_default_graph()

with tf.Session() as test:
    np.random.seed(1)
    A_prev = tf.placeholder("float", [3, 4, 4, 6])
    X = np.random.randn(3, 4, 4, 6)
    A = convolutional_block(A_prev, f = 2, filters = [2, 4, 6], stage = 1, block = 'a')

    test.run(tf.global_variables_initializer())
    out = test.run([A], feed_dict={A_prev: X, K.learning_phase(): 0})
    out_matrix = np.array(out)
    print(out_matrix.squeeze().shape)
    print("out = " + str(out[0][1][1][0]))
(3, 4, 4, 6)
out = [ 0.94822985  0.          1.16101444  2.747859    0.          1.36677003]
(3, 2, 2, 6)
out = [ 0.09018463  1.23489773  0.46822017  0.0367176   0.          0.65516603]
# 3、building my first ResNet model (50 layers)
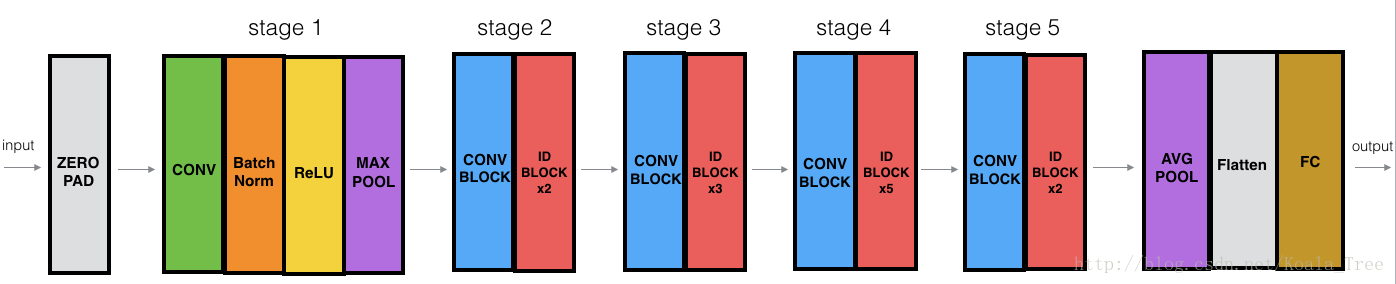
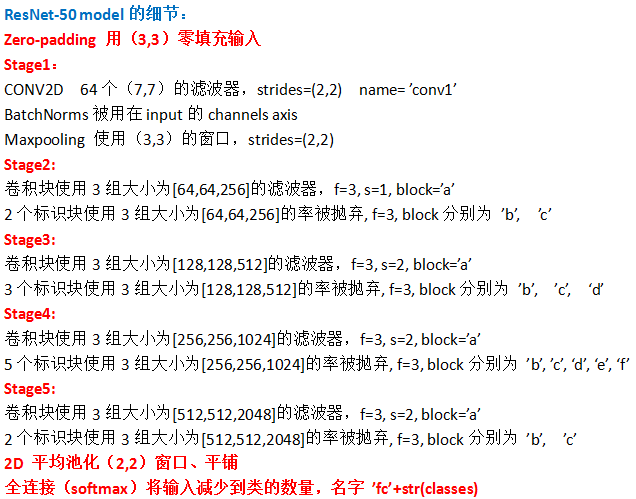
def ResNet50(input_shape=(64,64,3), classes=6):
"""
Implementation of the popular ResNet50 the following architecture:
CONV2D -> BATCHNORM -> RELU -> MAXPOOL ->
CONVBLOCK -> IDBLOCK*2 ->
CONVBLOCK -> IDBLOCK*3 ->
CONVBLOCK -> IDBLOCK*5 ->
CONVBLOCK -> IDBLOCK*2 ->
AVGPOOL -> TOPLAYER
Arguments:
input_shape -- shape of the images of the dataset
classes -- integer, number of classes
Returns:
model -- a Model() instance in Keras
"""
# define the input as a tensor with shape input_shape
X_input = Input(input_shape)
# Zero-padding
X = ZeroPadding2D((3,3))(X_input)
# stage 1
X = Conv2D(filters=64, kernel_size=(7,7), strides=(2,2), padding='valid',
name='conv1', kernel_initializer=glorot_uniform(seed=0))(X)
X = BatchNormalization(axis=3, name='bn_conv1')(X)
X = Activation('relu')(X)
X = MaxPooling2D((3,3), strides=(2,2))(X)
# stage 2
X = convolutional_block(X, f=3, filters=[64,64,256], stage=2, block='a', s=1)
X = identity_block(X, f=3, filters=[64,64,256], stage=2, block='b')
X = identity_block(X, f=3, filters=[64,64,256], stage=2, block='c')
# stage 3
X = convolutional_block(X, f=3, filters=[128,128,512], stage=3, block='a', s=2)
X = identity_block(X, f=3, filters=[128,128,512], stage=3, block='b')
X = identity_block(X, f=3, filters=[128,128,512], stage=3, block='c')
X = identity_block(X, f=3, filters=[128,128,512], stage=3, block='d')
# stage 4
X = convolutional_block(X, f=3, filters=[256,256,1024], stage=4, block='a', s=2)
X = identity_block(X, f=3, filters=[256,256,1024], stage=4, block='b')
X = identity_block(X, f=3, filters=[256,256,1024], stage=4, block='c')
X = identity_block(X, f=3, filters=[256,256,1024], stage=4, block='d')
X = identity_block(X, f=3, filters=[256,256,1024], stage=4, block='e')
X = identity_block(X, f=3, filters=[256,256,1024], stage=4, block='f')
# stage 5
X = convolutional_block(X, f=3, filters=[512,512,2048], stage=5, block='a', s=2)
X = identity_block(X, f=3, filters=[512,512,2048], stage=5, block='b')
X = identity_block(X, f=3, filters=[512,512,2048], stage=5, block='c')
# fully connected output layer
X = AveragePooling2D((2,2), name='avg_pool')(X)
X = Flatten()(X)
X = Dense(classes, activation='softmax', name='fc'+str(classes),
kernel_initializer=glorot_uniform(seed=0))(X)
model = Model(inputs=X_input, outputs=X, name='ResNet50')
return model
# 4、数据处理
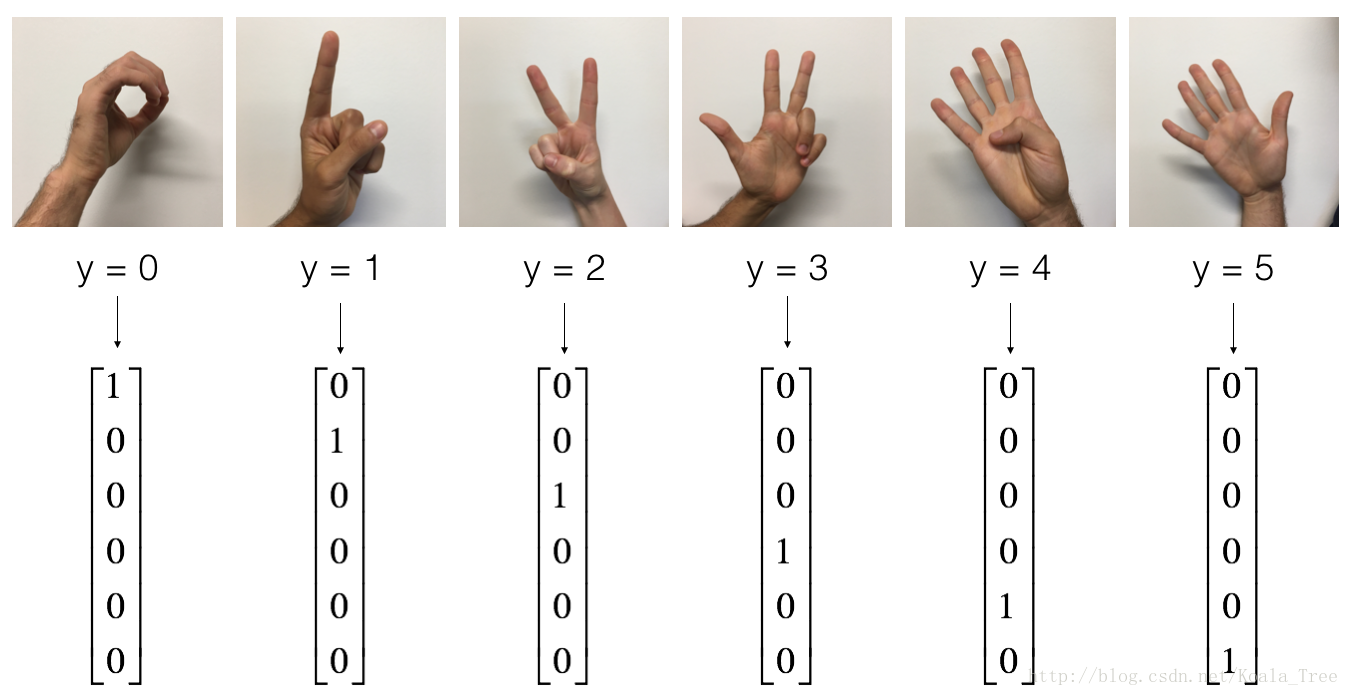
X_train_orig, Y_train_orig, X_test_orig, Y_test_orig, classes = load_dataset()
# Normalize image vectors
X_train = X_train_orig/255.
X_test = X_test_orig/255.
# Convert training and test labels to one hot matrices
Y_train = convert_to_one_hot(Y_train_orig, 6).T
Y_test = convert_to_one_hot(Y_test_orig, 6).T
print ("number of training examples = " + str(X_train.shape[0]))
print ("number of test examples = " + str(X_test.shape[0]))
print ("X_train shape: " + str(X_train.shape))
print ("Y_train shape: " + str(Y_train.shape))
print ("X_test shape: " + str(X_test.shape))
print ("Y_test shape: " + str(Y_test.shape))
number of training examples = 1080
number of test examples = 120
X_train shape: (1080, 64, 64, 3)
Y_train shape: (1080, 6)
X_test shape: (120, 64, 64, 3)
Y_test shape: (120, 6)
# 5、训练模型,并测试测试集
# 构建模型的graph
model = ResNet50(input_shape = (64, 64, 3), classes = 6)
# 训练模型之前,通过编译模型来配置学习过程
model.compile(optimizer='adam', loss='categorical_crossentropy', metrics=['accuracy'])
# 训练模型,batch_size=32,在一个CPU上,每个epoch大约5mins
# 迭代20个周期,会有好的性能,CPU需要训练1h左右
# 下一个程序,下载已经训练好的权重,使用GPU只要1mins的时间
model.fit(X_train, Y_train, epochs=2, batch_size=32)
# 模型在测试集的性能
preds = model.evaluate(X_test, Y_test)
print("Loss = " + str(preds[0]))
print("Test Accuracy = " + str(preds[1]))
Epoch 1/2
1080/1080 [==============================] - 193s 179ms/step - loss: 3.3992 - acc: 0.2481
Epoch 2/2
1080/1080 [==============================] - 167s 155ms/step - loss: 2.3815 - acc: 0.3139
120/120 [==============================] - 6s 51ms/step
Loss = 2.14789908727
Test Accuracy = 0.166666666667
# 6、测试自己的图像
img_path = 'images/my_image.jpg'
img = image.load_img(img_path, target_size=(64, 64))
x = image.img_to_array(img)
x = np.expand_dims(x, axis=0)
x = preprocess_input(x)
print('Input image shape:', x.shape)
my_image = scipy.misc.imread(img_path)
imshow(my_image)
print("class prediction vector [p(0), p(1), p(2), p(3), p(4), p(5)] = ")
print(model.predict(x))Input image shape: (1, 64, 64, 3)
class prediction vector [p(0), p(1), p(2), p(3), p(4), p(5)] =
[[ 0. 0. 0. 0. 0. 1.]]Total params: 23,600,006
Trainable params: 23,546,886
Non-trainable params: 53,120

迭代20次,Epoch=20,train accuracy = 0.9750

显然过拟合


 1160
1160


 被折叠的 条评论
为什么被折叠?
被折叠的 条评论
为什么被折叠?
 到【灌水乐园】发言


