【spring】Spring MVC原理及配置
1.Spring MVC概述:
Spring MVC是Spring提供的一个强大而灵活的web框架。借助于注解,Spring MVC提供了几乎是POJO的开发模式,使得控制器的开发和测试更加简单。这些控制器一般不直接处理请求,而是将其委托给Spring上下文中的其他bean,通过Spring的依赖注入功能,这些bean被注入到控制器中。
Spring MVC主要由DispatcherServlet、处理器映射、处理器(控制器)、视图解析器、视图组成。他的两个核心是两个核心:
处理器映射:选择使用哪个控制器来处理请求
视图解析器:选择结果应该如何渲染
通过以上两点,Spring MVC保证了如何选择控制处理请求和如何选择视图展现输出之间的松耦合。
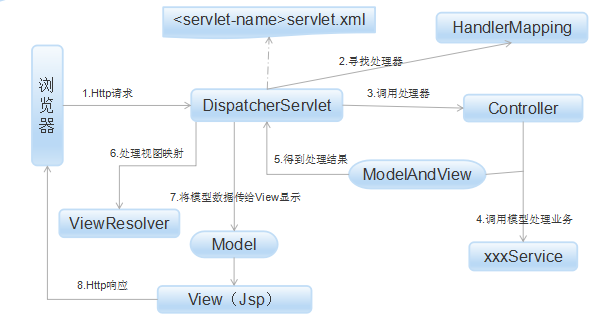
2.SpringMVC运行原理
(1) Http请求:客户端请求提交到DispatcherServlet。
(2) 寻找处理器:由DispatcherServlet控制器查询一个或多个HandlerMapping,找到处理请求的Controller。
(3) 调用处理器:DispatcherServlet将请求提交到Controller。
(4)(5)调用业务处理和返回结果:Controller调用业务逻辑处理后,返回ModelAndView。
(6)(7)处理视图映射并返回模型: DispatcherServlet查询一个或多个ViewResoler视图解析器,找到ModelAndView指定的视图。
(8) Http响应:视图负责将结果显示到客户端。
3.SpringMVC接口解释
(1)DispatcherServlet接口:
Spring提供的前端控制器,所有的请求都有经过它来统一分发。在DispatcherServlet将请求分发给Spring Controller之前,需要借助于Spring提供的HandlerMapping定位到具体的Controller。
(2)HandlerMapping接口:
能够完成客户请求到Controller映射。
(3)Controller接口:
需要为并发用户处理上述请求,因此实现Controller接口时,必须保证线程安全并且可重用。
Controller将处理用户请求,这和Struts Action扮演的角色是一致的。一旦Controller处理完用户请求,则返回ModelAndView对象给DispatcherServlet前端控制器,ModelAndView中包含了模型(Model)和视图(View)。
从宏观角度考虑,DispatcherServlet是整个Web应用的控制器;从微观考虑,Controller是单个Http请求处理过程中的控制器,而ModelAndView是Http请求过程中返回的模型(Model)和视图(View)。
(4)ViewResolver接口:
Spring提供的视图解析器(ViewResolver)在Web应用中查找View对象,从而将相应结果渲染给客户。
4.DispatcherServlet:
是整个Spring MVC的核心。它负责接收HTTP请求组织协调Spring MVC的各个组成部分。其主要工作有以下三项:
(1)截获符合特定格式的URL请求。
(2)初始化DispatcherServlet上下文对应WebApplicationContext,并将其与业务层、持久化层的WebApplicationContext建立关联。
(3)初始化Spring MVC的各个组成组件,并装配到DispatcherServlet中。
5. SpringMVC配置
项目整体结构如下:

(1)在web.xml文件中进行配置,在配置中设置springmvc-context.xml的路径,代码如下:
<servlet>
        <servlet-name>appServlet</servlet-name>
        <servlet-class>org.springframework.web.servlet.DispatcherServlet</servlet-class>
        <init-param>
            <param-name>contextConfigLocation</param-name>
            <param-value>classpath:META-INF/spring/springmvc-context.xml</param-value>
        </init-param>
        <load-on-startup>1</load-on-startup>
    </servlet>
    <servlet-mapping>
        <servlet-name>appServlet</servlet-name>
        <url-pattern>/</url-pattern>
    </servlet-mapping>
- 1
- 2
- 3
- 4
- 5
- 6
- 7
- 8
- 9
- 10
- 11
- 12
- 13
- 1
- 2
- 3
- 4
- 5
- 6
- 7
- 8
- 9
- 10
- 11
- 12
- 13
(2)配置springmvc-context.xml文件,这一部分主要是开启注解功能、配置试图解析器,代码如下:
<?xml version="1.0" encoding="UTF-8"?>
<beans:beans xmlns:beans="http://www.springframework.org/schema/beans"
    xmlns:xsi="http://www.w3.org/2001/XMLSchema-instance" xmlns:context="http://www.springframework.org/schema/context"
    xmlns:mvc="http://www.springframework.org/schema/mvc" xmlns:p="http://www.springframework.org/schema/p"
    xsi:schemaLocation="http://www.springframework.org/schema/mvc http://www.springframework.org/schema/mvc/spring-mvc-3.0.xsd
        http://www.springframework.org/schema/beans http://www.springframework.org/schema/beans/spring-beans-3.0.xsd
        http://www.springframework.org/schema/context http://www.springframework.org/schema/context/spring-context-3.0.xsd ">
    <mvc:annotation-driven />
    <!-- ①:对web包中的所有类进行扫描,以完成Bean创建和自动依赖注入的功能 -->
    <context:component-scan base-package="com.zjn" />

    <!-- 这两个类用来启动基于Spring MVC的注解功能,将控制器与方法映射加入到容器中 -->
    <beans:bean
        class="org.springframework.web.servlet.mvc.annotation.DefaultAnnotationHandlerMapping" />
    <beans:bean
        class="org.springframework.web.servlet.mvc.annotation.AnnotationMethodHandlerAdapter" />

    <!-- 这个类用于Spring MVC视图解析 -->
    <beans:bean id="viewResolver"
        class="org.springframework.web.servlet.view.InternalResourceViewResolver">
        <beans:property name="prefix" value="/WEB-INF/pages/" />
        <beans:property name="suffix" value=".jsp" />
    </beans:bean>

</beans:beans>
- 1
- 2
- 3
- 4
- 5
- 6
- 7
- 8
- 9
- 10
- 11
- 12
- 13
- 14
- 15
- 16
- 17
- 18
- 19
- 20
- 21
- 22
- 23
- 24
- 25
- 26
- 1
- 2
- 3
- 4
- 5
- 6
- 7
- 8
- 9
- 10
- 11
- 12
- 13
- 14
- 15
- 16
- 17
- 18
- 19
- 20
- 21
- 22
- 23
- 24
- 25
- 26
(3)配置文件完成了,下面开始写代码,
两个jsp界面:
create.jsp
<%@ page language="java" contentType="text/html; charset=UTF-8"
    pageEncoding="UTF-8"%>
<!DOCTYPE html PUBLIC "-//W3C//DTD HTML 4.01 Transitional//EN" "http://www.w3.org/TR/html4/loose.dtd">
<html>
<head>
<meta http-equiv="Content-Type" content="text/html; charset=UTF-8">
<title>Add User From</title>
</head>
<body>
    <form action="save" method="post">
        <fieldset>
        <legend>创建用户</legend>
            <p>
                <label>姓名:</label> <input type="text" id="name" name="name"
                    tabindex="1">
            </p>
            <p>
                <label>年龄:</label> <input type="text" id="age" name="age"
                    tabindex="2">
            </p>
            <p>
                <label>密码:</label> <input type="text" id="pwd" name="pwd"
                    tabindex="3">
            </p>
            <p id="buttons">
                <input id="reset" type="reset" tabindex="4" value="取消"> <input
                    id="submit" type="submit" tabindex="5" value="创建">
            </p>
        </fieldset>
    </form>
</body>
</html>
- 1
- 2
- 3
- 4
- 5
- 6
- 7
- 8
- 9
- 10
- 11
- 12
- 13
- 14
- 15
- 16
- 17
- 18
- 19
- 20
- 21
- 22
- 23
- 24
- 25
- 26
- 27
- 28
- 29
- 30
- 31
- 32
- 1
- 2
- 3
- 4
- 5
- 6
- 7
- 8
- 9
- 10
- 11
- 12
- 13
- 14
- 15
- 16
- 17
- 18
- 19
- 20
- 21
- 22
- 23
- 24
- 25
- 26
- 27
- 28
- 29
- 30
- 31
- 32
detail.jsp
<%@ page language="java" contentType="text/html; charset=UTF-8"
    pageEncoding="UTF-8"%>
<!DOCTYPE html PUBLIC "-//W3C//DTD HTML 4.01 Transitional//EN" "http://www.w3.org/TR/html4/loose.dtd">
<html>
<head>
<meta http-equiv="Content-Type" content="text/html; charset=UTF-8">
<title>Insert title here</title>
</head>
<body>
    <div id="gloobal">
        <h4>创建成功</h4>
        <p>
        <h5>详情:</h5>
        姓名:${user.name}<br /> 年龄:${user.age}<br /> 密码:${user.pwd}<br />
        </p>
    </div>
</body>
</html>
- 1
- 2
- 3
- 4
- 5
- 6
- 7
- 8
- 9
- 10
- 11
- 12
- 13
- 14
- 15
- 16
- 17
- 18
- 1
- 2
- 3
- 4
- 5
- 6
- 7
- 8
- 9
- 10
- 11
- 12
- 13
- 14
- 15
- 16
- 17
- 18
UserController.Java
package com.zjn.controller;

import org.springframework.stereotype.Controller;
import org.springframework.ui.Model;
import org.springframework.web.bind.annotation.ModelAttribute;
import org.springframework.web.bind.annotation.RequestMapping;

import com.zjn.entity.User;

/**
 * 用户管理
 *
 * @author zjn
 */
@Controller
public class UserController {

    @RequestMapping("")
    public String Create(Model model) {
        return "create";
    }

    @RequestMapping("/save")
    public String Save(@ModelAttribute("form") User user, Model model) { // user:视图层传给控制层的表单对象;model:控制层返回给视图层的对象
        model.addAttribute("user", user);
        return "detail";
    }
}
- 1
- 2
- 3
- 4
- 5
- 6
- 7
- 8
- 9
- 10
- 11
- 12
- 13
- 14
- 15
- 16
- 17
- 18
- 19
- 20
- 21
- 22
- 23
- 24
- 25
- 26
- 27
- 28
- 29
- 1
- 2
- 3
- 4
- 5
- 6
- 7
- 8
- 9
- 10
- 11
- 12
- 13
- 14
- 15
- 16
- 17
- 18
- 19
- 20
- 21
- 22
- 23
- 24
- 25
- 26
- 27
- 28
- 29
User.java
package com.zjn.entity;

import java.io.Serializable;
import java.util.Date;

public class User implements Serializable {
    /**
     * @author zjn
     */
    private static final long serialVersionUID = 1L;
    private Integer id; // id
    private String name; // name
    private String pwd; // pwd
    private Integer age; // age
    private Date creatTime; // creatTime

    public Integer getId() {
        return id;
    }

    public void setId(Integer id) {
        this.id = id;
    }

    public String getName() {
        return name;
    }

    public void setName(String name) {
        this.name = name;
    }

    public String getPwd() {
        return pwd;
    }

    public void setPwd(String pwd) {
        this.pwd = pwd;
    }

    public Integer getAge() {
        return age;
    }

    public void setAge(Integer age) {
        this.age = age;
    }

    public Date getCreatTime() {
        return creatTime;
    }

    public void setCreatTime(Date creatTime) {
        this.creatTime = creatTime;
    }

}
- 1
- 2
- 3
- 4
- 5
- 6
- 7
- 8
- 9
- 10
- 11
- 12
- 13
- 14
- 15
- 16
- 17
- 18
- 19
- 20
- 21
- 22
- 23
- 24
- 25
- 26
- 27
- 28
- 29
- 30
- 31
- 32
- 33
- 34
- 35
- 36
- 37
- 38
- 39
- 40
- 41
- 42
- 43
- 44
- 45
- 46
- 47
- 48
- 49
- 50
- 51
- 52
- 53
- 54
- 55
- 56
- 57
- 1
- 2
- 3
- 4
- 5
- 6
- 7
- 8
- 9
- 10
- 11
- 12
- 13
- 14
- 15
- 16
- 17
- 18
- 19
- 20
- 21
- 22
- 23
- 24
- 25
- 26
- 27
- 28
- 29
- 30
- 31
- 32
- 33
- 34
- 35
- 36
- 37
- 38
- 39
- 40
- 41
- 42
- 43
- 44
- 45
- 46
- 47
- 48
- 49
- 50
- 51
- 52
- 53
- 54
- 55
- 56
- 57
(4)运行结果
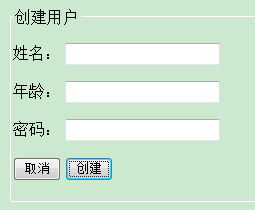
初始页面:
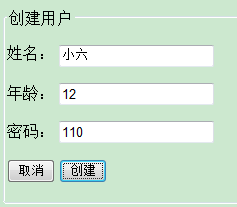
输入参数:
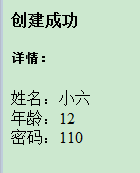
点击创建:
源码下载地址: SpringMVC项目源码下载


 1万+
1万+

 被折叠的 条评论
为什么被折叠?


