


(一)人性化的Requests库
在Python爬虫开发中最为常用的库就是使用Requests实现HTTP请求,因为Requests实现HTTP请求简单、操作更为人性化。
(二)get请求的基本用法
- def get(url, params=None, **kwargs)
get()函数:
| 参数 | 说明 |
|---|---|
| url | 向服务器发送url请求 |
| params | 添加查询参数 |
| **kwargs(headers) | 添加请求头信息 |
1.使用get()函数向服务器发送HTTP中的get请求
from requests import get

url="http://httpbin.org/get"

#1.向服务器发送get请求
response=get(url)

#2.使用response处理服务器的响应内容
print(response.text)
- 1
- 2
- 3
- 4
- 5
- 6
- 7
- 8
- 9
- 10
2.向原URL后添加查询数据
from requests import get

url="http://httpbin.org/get"

#1.数据以字典的形式
data={"project":"Python"}

#2.向服务器发送get请求
response=get(url,params=data)

#3.使用response处理服务器的响应内容
print(response.text)
- 1
- 2
- 3
- 4
- 5
- 6
- 7
- 8
- 9
- 10
- 11
- 12
- 13
3.添加请求头信息
from requests import get

url="http://httpbin.org/get"

#1.数据以字典的形式
data={"project":"Python"}

#2.添加请求头信息
headers={"User-Agent":"Mozilla/5.0 (Windows NT 10.0; WOW64) "
         "AppleWebKit/537.36 (KHTML, like Gecko) Chrome/55.0.2883.87 Safari/537.36"}

#3.向服务器发送get请求
response=get(url,params=data,headers=headers)

#4.使用response处理服务器的响应内容
print(response.text)
- 1
- 2
- 3
- 4
- 5
- 6
- 7
- 8
- 9
- 10
- 11
- 12
- 13
- 14
- 15
- 16
- 17
- 18
4.解析json(获取json格式数据)
from requests import get

url="http://httpbin.org/get"

response=get(url)
#1.打印响应消息类型
print(type(response.text))

#2.解析json
print(response.json())
print(type(response.json()))- 1
- 2
- 3
- 4
- 5
- 6
- 7
- 8
- 9
- 10
- 11
5.获取网络上的二进制数据(图片、视频、音频等)
from requests import get

url="https://img.alicdn.com/tps/i4/TB1eEBOXsyYBuNkSnfoSuwWgVXa.jpg_1080x1800Q60s50.jpg"

response=get(url)

print(type(response.text))
print(response.content)

#1.以IO流的形式把二进制图片数据保存到本地D盘的某个目录
with open("D:\\Picture\\6.jpg","wb")as f:
    f.write(response.content)
    f.close()
print("成功写入文件")- 1
- 2
- 3
- 4
- 5
- 6
- 7
- 8
- 9
- 10
- 11
- 12
- 13
- 14
(三)post请求的基本用法
def post(url, data=None, json=None, **kwargs)
post()函数
| 参数 | 说明 |
|---|---|
| url | 向服务器发送url请求 |
| data | 提交表单的数据 |
| **kwargs(headers) | 添加请求头信息 |
1.表单提交使用post请求,用于隐藏数据保证数据安全。
from requests import post

url="http://httpbin.org/post"

#1.提交表单的数据
form_data={"username":"root","password":"123"}

#2.将表单数据赋值给Params参数
reponse=post(url,data=form_data)

#3.打印服务器响应内容
print(reponse.text)- 1
- 2
- 3
- 4
- 5
- 6
- 7
- 8
- 9
- 10
- 11
- 12
2.添加响应头信息(模拟真实浏览器)
from requests import post

url="http://httpbin.org/post"

#1.提交表单的数据
form_data={"username":"root","password":"123"}

headers={"User-Agent":"Mozilla/5.0 (Windows NT 10.0; WOW64) AppleWebKit/537.36 (KHTML, like Gecko) Chrome/55.0.2883.87 Safari/537.36"}

#2.将表单数据赋值给Params参数
reponse=post(url,data=form_data,headers=headers)

#3.打印服务器响应内容
print(reponse.text)- 1
- 2
- 3
- 4
- 5
- 6
- 7
- 8
- 9
- 10
- 11
- 12
- 13
- 14
(四)response响应基本处理
| 属性 | 说明 |
|---|---|
| response.text | 获取响应文本 |
| response.content | 获取网页上的二进制图片、视频 |
| response.encoding | 获取网页编码 |
| response.encoding=”utf-8” | 设置网页编码 |
| response.status_code | 获取响应状态码 |
| response.headers | 获取响应头信息 |
| response.cookies | 获取cookies信息 |
| response.url | 获取url信息 |
| response.history | 获取history信息 |
1.使用reponse对象处理服务器响应
from requests import get

url="http://www.jianshu.com"

response=get(url)

#1.打印响应状态码
print(type(response.status_code),response.status_code)

#2.打印响应头信息
print(type(response.headers),response.headers)

#3.打印cookies信息
print(type(response.cookies),response.cookies)

#4.打印URL
print(type(response.url),response.url)

#5.打印history
print(type(response.history),response.history)- 1
- 2
- 3
- 4
- 5
- 6
- 7
- 8
- 9
- 10
- 11
- 12
- 13
- 14
- 15
- 16
- 17
- 18
- 19
- 20
2.状态码的判断
from requests import get

url="https://www.baidu.com/"

response=get(url)

#1.如果响应状态码是200,说明请求成功!
if response.status_code==200:
    print("成功请求响应!")
else:
print("请求失败!")- 1
- 2
- 3
- 4
- 5
- 6
- 7
- 8
- 9
- 10
- 11
- 12
(五)提交文件和图像操作
在网络上上传文件非常普遍,但是对于网络数据采集我们不怎么使用。如果向为自己网站的写一个文件上传功能,可以使用Python实现。
1.上传图片到某个网页
from requests import post

#1.字典的键可以任意取名
files={"upload":open('D:\\Picture\\6.jpg',"rb")}

url="http://httpbin.org/post"

#2.将字典赋值个files参数
response=post(url,files=files)

print(response.content)

print(response.text)
- 1
- 2
- 3
- 4
- 5
- 6
- 7
- 8
- 9
- 10
- 11
- 12
- 13
- 14
- 15
- 16
(六)处理cookie
Cookie 是在 HTTP 协议下,服务器或脚本可以维护客户工作站上信息的一种方式。Cookie 是由 Web 服务器保存在用户浏览器(客户端)上的小文本文件,它可以包含有关用户的信息。无论何时用户链接到服务器,Web 站点都可以访问 Cookie 信息,目前有些 Cookie 是临时的,有些则是持续的。临时的 Cookie 只在浏览器上保存一段规定的时间,一旦超过规定的时间,该 Cookie 就会被系统清除。
持续的 Cookie 则保存在用户的 Cookie 文件中,下一次用户返回时,仍然可以对它进行调用。在 Cookie 文件中保存 Cookie,有些用户担心 Cookie 中的用户信息被一些别有用心的人窃取,而造成一定的损害。其实,网站以外的用户无法跨过网站来获得 Cookie 信息。如果因为这种担心而屏蔽 Cookie,肯定会因此拒绝访问许多站点页面。因为,当今有许多 Web 站点开发人员使用 Cookie 技术,例如 Session 对象的使用就离不开 Cookie 的支持。
1.打印浏览器中的cookie信息
from requests import get

url="https://www.baidu.com/"

headers={"User-Agent":"Mozilla/5.0 (Windows NT 10.0; WOW64)"
         " AppleWebKit/537.36 (KHTML, like Gecko) "
         "Chrome/63.0.3239.132 Safari/537.36"}

response=get(url,headers=headers)

#1.遍历出所有cookie字段的值
for cookie in response.cookies.keys():
print(cookie+":"+response.cookies.get(cookie))- 1
- 2
- 3
- 4
- 5
- 6
- 7
- 8
- 9
- 10
- 11
- 12
- 13
2.如果想自定义Cookie值发送出去,可以使用以下方式:
from requests import get

url="https://www.baidu.com"

headers={"User-Agent":"Mozilla/5.0 (Windows NT 10.0; WOW64)"
         " AppleWebKit/537.36 (KHTML, like Gecko) "
         "Chrome/63.0.3239.132 Safari/537.36"}

#1.携带cookie信息
cookies=dict(username='root',password='123')

#2.将cookies打包发送到服务器
response=get(url,headers=headers,cookies=cookies)

#3.response处理cookie信息
print(response.cookies)- 1
- 2
- 3
- 4
- 5
- 6
- 7
- 8
- 9
- 10
- 11
- 12
- 13
- 14
- 15
- 16
3.自动处理Cookie
有时候我们不需要关心Cookie值是多少,只希望每次访问网页的时候,程序自动把Cookie值带上,就向浏览器每次访问服务器网页时自动带有Cookie值。Requests库提供一个session对象,在连续访问网页,处理登陆非常方便。
方式一:

from requests import post,Session

url="http://www.xxx.com/login"

#1.创建Session对象
session=Session()

#2.首次访问登陆界面,作为游客服务器会先分配一个cookie
response=session.get(url,allow_redirects=True)

#3.使用字典保存登陆信息
datas={"username":"root","password":"123"}

#4.向登陆链接发送post请求,验证成功,游客权限转变为会员权限
response01=session.post(url,data=datas,allow_redirects=True)

print(response01.text)


----------
方式二:
from requests import get,post,Session

session=Session()

url="http://www.xxx.com/login"

datas={"username":"root","password":"123"}

response01=session.post(url,data=datas)

print("cookie设置为:")

print(session.cookies.get_dict())

print("------------------------")

print("登陆成功后,可以访问会员权限的任意网页!")

#1.登陆过后,访问网站的其他页面
response02=session.get("http://www.xxx.com/page01")
- 1
- 2
- 3
- 4
- 5
- 6
- 7
- 8
- 9
- 10
- 11
- 12
- 13
- 14
- 15
- 16
- 17
- 18
- 19
- 20
- 21
- 22
- 23
- 24
- 25
- 26
- 27
- 28
- 29
- 30
- 31
- 32
- 33
- 34
- 35
- 36
- 37
- 38
- 39
- 40
- 41
- 42
- 43
- 44
4.实例演示
参考:Python-爬虫-requests库用语post登录
import requests

session= requests.session()
url = 'https://www.douban.com/'
#1.输入账号和密码
postdata = {
    'username':'xxxxxx',
    'password':'xxxxxx'
}
headers = {
            'User-Agent': 'Mozilla/5.0 (Macintosh; Intel Mac OS X 10_12_0) AppleWebKit/537.36 (KHTML, like Gecko) Chrome/55.0.2883.95 Safari/537.36'}
response= session.post(url, data=postdata,headers=headers)
#2.将从网上爬取的数据保存到本地,再打开本地html文件验证爬取的网页
#是否是目标网页
with open('D:\\index.html', 'wb') as f:
    f.write(response.content)

url01 = 'https://movie.douban.com/'
response = session.get(url01, headers=headers)
with open('D:\\movie.html', 'wb') as f:
f.write(response.content)- 1
- 2
- 3
- 4
- 5
- 6
- 7
- 8
- 9
- 10
- 11
- 12
- 13
- 14
- 15
- 16
- 17
- 18
- 19
- 20
- 21
(七)重定向与历史消息
处理重定向只需要设置一下allow_redirects字段即可,allow_redirects=True,则允许重定向,allow_redirects=False,则禁止重定向。通过response.history字段查看历史信息,即访问成功之前的所有请求跳转信息。
1.将所HTTP请求全部重定向为HTTPS
from requests import get,post,Session

response=get("http://github.com")

print(response.url)

print(response.status_code)

print(response.history)- 1
- 2
- 3
- 4
- 5
- 6
- 7
- 8
- 9
(八)请求超时设置
超时选项是通过get()和post()函数中timeout来进行设置。如果发送的HTTP请求超时,则抛出一个 Timeout 异常。
timeout设置的时间是以秒为单位
resquests.get("http://www.baidu.com/",timeout=1)- 1
(九)代理设置
import requests

proxies={"http":"http://0.10.1.10:3128",

          "https":"https//10.10.1.10.1080"}

requests.get("http://example.org",proxies=proxies)
- 1
- 2
- 3
- 4
- 5
- 6
- 7
- 8
(十)错误与异常
- 遇到网络问题(如:DNS 查询失败、拒绝连接等)时,Requests 会抛出一个 ConnectionError 异常。
如果 HTTP 请求返回了不成功的状态码, Response.raise_for_status() 会抛出一个 HTTPError 异常。
- 若请求超时,则抛出一个 Timeout 异常。
- 若请求超过了设定的最大重定向次数,则会抛出一个 TooManyRedirects 异常。
- 所有Requests显式抛出的异常都继承自 requests.exceptions.RequestException 。
(十一)证书验证
安全性较高的网站和公司网站都使用了证书验证,比如www.12306.cn。
1.直接访问www.12306.cn,报SSLError异常。
import requests

response=requests.get("https://www.12306.cn")

print(response.status_code)
- 1
- 2
- 3
- 4
- 5
- 6
- 7
异常信息:
SSLError: HTTPSConnectionPool(host='www.12306.cn', port=443):
 Max retries exceeded with url: / (Caused by SSLError(SSLError
, 'certificate verify failed')],)",),))- 1
- 2
- 3
2.证书认证成功的操作方法
import requests

#1.导入urllib3
from requests.packages import urllib3

#2.调用以下方法消除警告
urllib3.disable_warnings()

#3.将verify属性设置为Fales
response=requests.get("https://www.12306.cn",verify=False)

print(response.status_code)
- 1
- 2
- 3
- 4
- 5
- 6
- 7
- 8
- 9
- 10
- 11
- 12
- 13
(十二)HTTP基本接入认证设置
在发明cookie前,处理网站登陆最常用的方法就是HTTP基本接入认证。意思就是需要输入账号和密码才能登陆某个网址访问其页面。
import requests

from requests.auth import HTTPBasicAuth

url="http://pythonscraping.com/pages/auth/login.php"

#1.设置登陆账号和密码
auth=HTTPBasicAuth("Kaina","123")

#2.将HTTPBasicAuth对象作为auth参数传递到请求中
response=requests.post(url,auth=auth)

print(response.status_code)

#3.打印登陆跳转成功页面的HTML
print(response.text)- 1
- 2
- 3
- 4
- 5
- 6
- 7
- 8
- 9
- 10
- 11
- 12
- 13
- 14
- 15
- 16
- 17
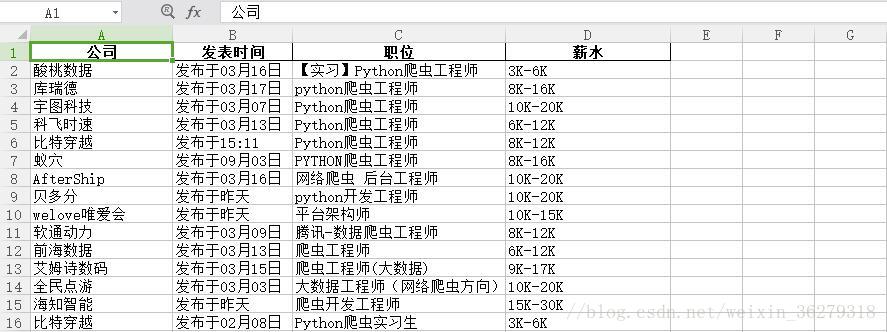
(十三)获取Boss直聘网Python爬虫职位信息
如图所示:
1.代码演示

import requests
import pandas as pd
from lxml import etree
from urllib.error import HTTPError,URLError
def getHtml(url):
    #携带请求头信息,否则无法获取数据
    headers={"User-Agent":"Mozilla/5.0"}
    try:
        response=requests.get(url,headers=headers)
    except(HTTPError, URLError) as e:
        return None
    return response.text
def parseHtml(html):
    tree=etree.HTML(html)
    positions=tree.xpath('//div[@class="job-title"]/text()')
    companies=tree.xpath('//div[@class="company-text"]/h3[@class="name"]/a/text()')
    salarys=tree.xpath('//div/div/h3/a/span/text()')
    releasetime=tree.xpath('//div[@class="info-publis"]/p/text()')
    return positions,companies,salarys,releasetime
def go():
    position=[]
    companies=[]
    releasetime=[]
    salarys=[]
    for i in range(8):
        url = "https://www.zhipin.com/c101280600/h_101280600/?query=python爬虫工程师&page="+str(1+i)+"&ka=page-"+str(i+1)
        html = getHtml(url)
        if html !=None:
            p, c, s, r = parseHtml(html)
            position += p
            companies += c
            salarys += s
            releasetime += r
    dic = {"职位": position, "公司": companies,"薪水":salarys, "发表时间": releasetime}
    df = pd.DataFrame(dic)
    df.to_excel("Test.xlsx", index=False)

if __name__ == '__main__':
     go()
print("数据写入完毕!")- 1
- 2
- 3
- 4
- 5
- 6
- 7
- 8
- 9
- 10
- 11
- 12
- 13
- 14
- 15
- 16
- 17
- 18
- 19
- 20
- 21
- 22
- 23
- 24
- 25
- 26
- 27
- 28
- 29
- 30
- 31
- 32
- 33
- 34
- 35
- 36
- 37
- 38
- 39
- 40
结果:


 5699
5699


 被折叠的 条评论
为什么被折叠?
被折叠的 条评论
为什么被折叠?
 到【灌水乐园】发言


