


原因是在管理工具里打开的ODBC默认是64bit的,
32位的tomcat需要配置32位的ODBC
直接配置一个32bit的ODBC就行了
32位ODBC打开:
C:\Windows\SysWOW64\odbcad32.exe
February 2011 Edition
Working with ODBC DataSources on Microsoft® Windows® (32-bit versus 64-bit)
With an increased demand for performance, many database administrators are taking advantage of a Microsoft® Windows® 64-bit (x64) operating system that can provide additional memory to applications. However, when moving their applications from their legacy 32-bit (x86) Windows systems, administrators are frequently confused - how should they set up the new ODBC database connections for their legacy application?
This article is intended to clarify this difference, and should help illustrate what needs to be done to adopt an existing 32-bit database application that uses ODBC on a 64-bit system.
A 64-bit Windows system can host both 32 and 64-bit applications – this is known as ‘Windows-on-Windows 64’ (WOW64). (Note: In ‘Task Manager’ 32-bit applications are indicated with an asterisk ('*') next to the executable name).
When defining ODBC DataSources (DSNs), the system administrator needs to remember that there are four "types" of DSNs that can be now created on a 64-bit operating system:
-
(32-bit) User DSNs
-
(32-bit) System DSNs
-
(64-bit) User DSNs
-
(64-bit) System DSNs
32-bit applications must reference the 32-bit ODBC driver and 32-bit DSNs. 64-bit applications must reference the 64-bit ODBC driver and 64-bit DSNs. System DSNs must be used for any clients running as Windows Services (e.g. Applications running on web servers, any "daemon" clients, etc.). For .NET applications, the ODBC data source bitness must match the type of architecture of the .NET Common Language Runtime (CLR) that is running. If the .NET project is compiled for ‘Any CPU’, the CLR will pick its own bitness based on the type of operating system that the CLR is currently running on (e.g. x86 on x86, x64 on x64). Compiling the .NET project for ‘x86’ or ‘x64’ will force the CLR to use a particular bitness across all operating systems.
There are also two ODBC Administrators - one that manages 64-bit DSNs, and one that manages 32-bit DSNs. They both have the same executable name but they reside in different locations on the file system:
c:\Windows\System32\odbcad32.exe (64-bit)
c:\Windows\SysWow64\odbcad32.exe (32-bit)
When working with the SQL Anywhere ‘dbdsn’ utility, a system administrator needs to be careful to reference the appropriate ‘dbdsn’ executable, depending on the bitness of the ODBC DSN that is being created.
For a 32-bit application, use:
%SQLANY12%\bin32\dbdsn.exe
For a 64-bit application, use:
%SQLANY12%\bin64\dbdsn.exe
The ‘dbdsn.exe’ utility is a very useful command-line tool to create DSNs when deploying a new application.
To add a new data source:
dbdsn -w "My DSN" -c "UID=DBA;PWD=sql;DBF=C:\mydb.db"
To list existing data sources:
dbdsn -l
To delete a data source:
dbdsn -d "My DSN"
For a full description of the ‘dbdsn’ utility, please refer to the help:
http://dcx.sybase.com/index.html?r=1#1200en/dbadmin/dbdsn-data-dbutilities.html
SQL Anywhere Data Source Utility Version 12.0.0.2601
Usage:
dbdsn [options] -l[s|u] list data sources
dbdsn [options] -d[s|u] <dsn> delete a data source
dbdsn [options] -g[s|u] <dsn> get details of a data source
dbdsn [options] -w[s|u] <dsn> [details] write data source definition
dbdsn -cl list connection keywords
The [s|u] specifier refers to System or User data sources. The default
is User.
@<data> expands <data> from environment variable <data> or file <data>
Options (use specified upper- or lower-case letter, as shown):
-b brief: print connect string
-cm display DSN creation command (with -g or -l)
-dr include DRIVER parameter (with -g or -l)
-o <file> log output messages to file
-or DSN is an iAnywhere Oracle driver DSN (with -c or -cl)
-pe encrypt password
-q do not display messages
-v verbose: print connection values in tabular form
-y delete or overwrite data source without confirmation
Details:
-c "keyword=value;..."
supply database connection parameters (see -cl option)
-cw ensure DBF is stored as an absolute pathname (with -c)
It is important to remember that the 32-bit and 64-bit ODBC entries and associated driver information are stored in different areas within the Windows registry on a 64-bit system:
HKEY_LOCAL_MACHINE\Software\ODBC\ODBC.INI - 64-Bit System DSNs
HKEY_CURRENT_USER\Software\ODBC\ODBC.INI - 64-Bit User DSNs
HKEY_LOCAL_MACHINE\Software\Wow6432Node\ODBC\ODBCINST.INI - 32-Bit ODBC Drivers
HKEY_LOCAL_MACHINE\Software\Wow6432Node\ODBC\ODBC.INI - 32-Bit System DSNs
HKEY_CURRENT_USER\Software\Wow6432Node\ODBC\ODBC.INI - 32-Bit User DSNs
When working with Sybase Technical Support to diagnose an issue with accessing a DSN, it may be required to verify the current ODBC registry settings for the computer.
To do this, you can run the following commands at a ‘Command Prompt’:
regedit /e system_x86.reg HKEY_LOCAL_MACHINE\Software\Wow6432Node\ODBC
regedit /e user_x64.reg HKEY_CURRENT_USER\Software\ODBC
regedit /e user_x86.reg HKEY_CURRENT_USER\Software\Wow6432Node\ODBC
This will export all of the system ODBC settings to “.reg” files which can sent to technical support and verified for correctness. (Note: Be careful of any stored ODBC DSN passwords that were extracted in this step before submitting these files to Sybase).
_______________________________________________________________
在线帮助文档说明 :
http://dcx.sybase.com/index.html#1201/zh/dbprogramming/pg-deploy-codbp.html
安装 OLE DB 提供程序时,必须修改 Windows 注册表。通常,使用内置于 OLE DB 提供程序的自行注册功能进行修改。例如,可以使用 Windows regsvr32 工具来进行此操作。注册表条目的标准集由提供程序创建。
在典型的连接字符串中,提供程序的属性是组成部分之一。要指示将使用的 SQL Anywhere OLE DB 提供程序,需要指定提供程序的名称。下面是 Visual Basic 示例:
connectString = "Provider=SAOLEDB;DSN=SQL Anywhere 12 Demo" |
对于 ADO 和/或 OLE DB,有许多通过名称引用提供程序的其它方法。下面是一个 C++ 示例,其中不仅指定了提供程序名称而且还指定了要使用的版本。
hr = db.Open(_T("SAOLEDB.12"), &dbinit); |
提供程序名称在注册表中查找。如果查看您的计算机系统上的注册表,您会在 HKEY_CLASSES_ROOT 中会找到 SAOLEDB 条目。
[HKEY_CLASSES_ROOT\SAOLEDB] @="SQL Anywhere OLE DB Provider" |
此条目有两个子项,分别包含此提供程序的类标识符 (Clsid) 以及当前版本 (CurVer)。下面是一个示例:
[HKEY_CLASSES_ROOT\SAOLEDB\Clsid]
@="{41dfe9f7-db91-11d2-8c43-006008d26a6f}"

[HKEY_CLASSES_ROOT\SAOLEDB\CurVer]
@="SAOLEDB.12" |
还有若干更类似的条目。它们用于标识 OLE DB 提供程序的特定实例。如果在注册表的 HKEY_CLASSES_ROOT\CLSID 下查找 Clsid 并且查看子项,您将看到其中一个条目标识了提供程序 DLL 的位置。
[HKEY_CLASSES_ROOT\CLSID\
{41dfe9f3-db91-11d2-8c43-006008d26a6f}\
InprocServer32]

@="c:\\sa12\\bin64\\dboledb12.dll"
"ThreadingModel"="Both" |
此处问题是结构非常单一。如果将 SQL Anywhere 软件从您的系统卸载,OLE DB 提供程序注册表条目将从注册表删除,随后提供程序 DLL 将从硬盘驱动器删除。任何依赖提供程序的应用程序将不再工作。
同样,如果来自不同供应商的应用程序都使用相同的 OLE DB 提供程序,则每次安装相同的提供程序时都将覆盖公用注册表设置。您希望应用程序使用的提供程序版本将由另一较新(或较旧!)的提供程序版本代替。
这种情况所引发的不稳定性无疑是不希望发生的。为解决此问题,可以自定义 SQL Anywhere OLE DB 提供程序。下面是创建自定义版本 OLE DB 提供程序所涉及的步骤。
 ♦ 自定义 OLE DB 提供程序
在此练习中,您可以生成一组唯一的 GUID,选择唯一的提供程序名称和 DLL 名称。这三项操作有助于创建可与您的应用程序一起部署的唯一的 OLE DB 提供程序。
-
制作下面所示的示例注册文件的副本。由于注册文件过长,因此将在这些步骤之后列出。文件名应当带有 .reg 后缀。注册表值的名称区分大小写。
-
使用 Microsoft Visual Studio uuidgen 实用程序创建 4 个有顺序的 UUID (GUID)。
uuidgen -n4 -s -x >oledbguids.txt
-
按以下顺序指派 4 个 UUID 或 GUID:
-
提供程序类 ID(下面的 GUID1)。
-
枚举类 ID(下面的 GUID2)。
-
ErrorLookup 类 ID(下面的 GUID3)。
-
提供程序帮助类 ID(下面的 GUID4)。此最后一个 GUID 不在 Windows Mobile 部署中使用。
上述四项之间存在先后顺序(这就是在 uuidgen 命令行中 -x 所起的作用),这一点很重要。每个 GUID 都应出现与以下类似的内容。
Name GUID GUID1 41dfe9f3-db92-11d2-8c43-006008d26a6f GUID2 41dfe9f4-db92-11d2-8c43-006008d26a6f GUID3 41dfe9f5-db92-11d2-8c43-006008d26a6f GUID4 41dfe9f6-db92-11d2-8c43-006008d26a6f 请注意,递增的只是 GUID 的第一部分(例如,41dfe9f3)。
-
-
使用编辑器的 [查找/替换] 功能将文本中所有 GUID1、GUID2、GUID3 和 GUID4 更改为相应的 GUID(例如,如果 41dfe9f3-db92-11d2-8c43-006008d26a6f 是由 uuidgen 生成的 GUID,则 GUID1 将用其替换)。
-
确定提供程序名称。这是可以在您的应用程序的连接字符串中使用的名称(例如,Provider=SQLAny)。请不要使用以下任何名称。这些名称由 SQL Anywhere 使用。
版本 10 或更高版本 版本 9 或更早版本 SAOLEDB ASAProv SAErrorLookup ASAErrorLookup SAEnum ASAEnum SAOLEDBA ASAProvA -
使用编辑器的 [查找/替换] 功能将所有出现的字符串 SQLAny 更改为您所选择的提供程序名称。其中包括所有那些 SQLAny 可能为较长字符串(例如,SQLAnyEnum)的子串的位置。
假定您选择 Acme 作为提供程序名称。将出现在 HKEY_CLASSES_ROOT 注册表配置单元中的名称以及供比较的 SQL Anywhere 名称如下表所示。
SQL Anywhere 提供程序 您自定义的提供程序 SAOLEDB Acme SAErrorLookup AcmeErrorLookup SAEnum AcmeEnum SAOLEDBA AcmeA -
以不同名称制作 SQL Anywhere 提供程序 DLL(dboledb12.dll 和 dboledba12.dll)的副本。请注意,没有用于 Windows Mobile 的 dboledba12.dll。
copy dboledb12.dll myoledb12.dll
copy dboledba12.dll myoledba12.dll
特殊注册表项将由脚本基于您所选择的 DLL 名称创建。此名称应不同于标准的 DLL 名称(例如 dboledb12.dll 或dboledba12.dll),这一点非常重要。如果您将提供程序 DLL 命名为myoledb12,则提供程序将在 HKEY_CLASSES_ROOT 中查找具有相同名称的注册表条目。上述情况同样适用于提供程序模式辅助 DLL。如果您将 DLL 命名为myoledba12,则提供程序将在 HKEY_CLASSES_ROOT 中查找具有相同名称的注册表条目。您选择的名称是唯一的并且不可能被任何其他人选择,这一点非常重要。下面是一些示例。
所选的 DLL 名称 相应的 HKEY_CLASSES_ROOT\名称 myoledb12.dll HKEY_CLASSES_ROOT\myoledb12 myoledba12.dll HKEY_CLASSES_ROOT\myoledba12 acmeOledb.dll HKEY_CLASSES_ROOT\acmeOledb acmeOledba.dll HKEY_CLASSES_ROOT\acmeOledba SAcustom.dll HKEY_CLASSES_ROOT\SAcustom SAcustomA.dll HKEY_CLASSES_ROOT\SAcustomA -
使用编辑器的 [查找/替换] 功能将所有在注册表脚本中出现的 myoledb12 和 myoledba12 更改为您所选择的两个 DLL 名称。
-
使用编辑器的 [查找/替换] 功能将所有在注册表脚本中出现的 d:\\mypath\\bin32\\ 更改为 DLL 的安装位置。请务必使用一对斜线来表示单个斜线。此步骤必须在应用程序安装时自定义。
-
将注册表脚本保存到磁盘并且运行它。
-
尝试运行新的提供程序。切勿忘记将 ADO/OLE DB 应用程序更改为使用新的提供程序名称。
下面列出了将要修改的注册表脚本。
REGEDIT4
; Special registry entries for a private OLE DB provider.
[HKEY_CLASSES_ROOT\myoledb12]
@="Custom SQL Anywhere OLE DB Provider 12.0"
[HKEY_CLASSES_ROOT\myoledb12\Clsid] @="{GUID1}"
; Data1 of the following GUID must be 3 greater than the
; previous, for example, 41dfe9f3 + 3 => 41dfe9ee.
[HKEY_CLASSES_ROOT\myoledba12]
@="Custom SQL Anywhere OLE DB Provider 12.0"
[HKEY_CLASSES_ROOT\myoledba12\Clsid] @="{GUID4}"
; Current version (or version independent prog ID)
; entries (what you get when you have "SQLAny"
; instead of "SQLAny.12")
[HKEY_CLASSES_ROOT\SQLAny]
@="SQL Anywhere OLE DB Provider"
[HKEY_CLASSES_ROOT\SQLAny\Clsid]
@="{GUID1}"
[HKEY_CLASSES_ROOT\SQLAny\CurVer]
@="SQLAny.12"
[HKEY_CLASSES_ROOT\SQLAnyEnum]
@="SQL Anywhere OLE DB Provider Enumerator"
[HKEY_CLASSES_ROOT\SQLAnyEnum\Clsid]
@="{GUID2}" [HKEY_CLASSES_ROOT\SQLAnyEnum\CurVer]
@="SQLAnyEnum.12" [HKEY_CLASSES_ROOT\SQLAnyErrorLookup]
@="SQL Anywhere OLE DB Provider Extended Error Support"
[HKEY_CLASSES_ROOT\SQLAnyErrorLookup\Clsid]
@="{GUID3}"
[HKEY_CLASSES_ROOT\SQLAnyErrorLookup\CurVer]
@="SQLAnyErrorLookup.12"
[HKEY_CLASSES_ROOT\SQLAnyA]
@="SQL Anywhere OLE DB Provider Assist"
[HKEY_CLASSES_ROOT\SQLAnyA\Clsid]
@="{GUID4}"
[HKEY_CLASSES_ROOT\SQLAnyA\CurVer]
@="SQLAnyA.12"
; Standard entries (Provider=SQLAny.12)
[HKEY_CLASSES_ROOT\SQLAny.12]
@="Sybase SQL Anywhere OLE DB Provider 12.0"
[HKEY_CLASSES_ROOT\SQLAny.12\Clsid]
@="{GUID1}"
[HKEY_CLASSES_ROOT\SQLAnyEnum.12]
@="Sybase SQL Anywhere OLE DB Provider Enumerator 12.0"
[HKEY_CLASSES_ROOT\SQLAnyEnum.12\Clsid]
@="{GUID2}"
[HKEY_CLASSES_ROOT\SQLAnyErrorLookup.12]
@="Sybase SQL Anywhere OLE DB Provider Extended Error Support 12.0"
[HKEY_CLASSES_ROOT\SQLAnyErrorLookup.12\Clsid]
@="{GUID3}"
[HKEY_CLASSES_ROOT\SQLAnyA.12]
@="Sybase SQL Anywhere OLE DB Provider Assist 12.0"
[HKEY_CLASSES_ROOT\SQLAnyA.12\Clsid]
@="{GUID4}"
; SQLAny (Provider=SQLAny.12)
[HKEY_CLASSES_ROOT\CLSID\{GUID1}]
@="SQLAny.12"
"OLEDB_SERVICES"=dword:ffffffff
[HKEY_CLASSES_ROOT\CLSID\{GUID1}\ExtendedErrors]
@="Extended Error Service"
[HKEY_CLASSES_ROOT\CLSID\{GUID1}\ExtendedErrors\{GUID3}]
@="Sybase SQL Anywhere OLE DB Provider Error Lookup"
[HKEY_CLASSES_ROOT\CLSID\{GUID1}\InprocServer32]
@="d:\\mypath\\bin32\\myoledb12.dll"
"ThreadingModel"="Both"
[HKEY_CLASSES_ROOT\CLSID\{GUID1}\OLE DB Provider]
@="Sybase SQL Anywhere OLE DB Provider 12.0"
[HKEY_CLASSES_ROOT\CLSID\{GUID1}\ProgID]
@="SQLAny.12"
[HKEY_CLASSES_ROOT\CLSID\{GUID1}\VersionIndependentProgID]
@="SQLAny"
; SQLAnyErrorLookup
[HKEY_CLASSES_ROOT\CLSID\{GUID3}]
@="Sybase SQL Anywhere OLE DB Provider Error Lookup 12.0"
@="SQLAnyErrorLookup.12"
[HKEY_CLASSES_ROOT\CLSID\{GUID3}\InprocServer32]
@="d:\\mypath\\bin32\\myoledb12.dll"
"ThreadingModel"="Both"
[HKEY_CLASSES_ROOT\CLSID\{GUID3}\ProgID]
@="SQLAnyErrorLookup.12"
[HKEY_CLASSES_ROOT\CLSID\{GUID3}\VersionIndependentProgID]
@="SQLAnyErrorLookup"
; SQLAnyEnum [HKEY_CLASSES_ROOT\CLSID\{GUID2}]
@="SQLAnyEnum.12"
[HKEY_CLASSES_ROOT\CLSID\{GUID2}\InprocServer32]
@="d:\\mypath\\bin32\\myoledb12.dll"
"ThreadingModel"="Both"
[HKEY_CLASSES_ROOT\CLSID\{GUID2}\OLE DB Enumerator]
@="Sybase SQL Anywhere OLE DB Provider Enumerator"
[HKEY_CLASSES_ROOT\CLSID\{GUID2}\ProgID]
@="SQLAnyEnum.12"
[HKEY_CLASSES_ROOT\CLSID\{GUID2}\VersionIndependentProgID]
@="SQLAnyEnum"
; SQLAnyA [HKEY_CLASSES_ROOT\CLSID\{GUID4}]
@="SQLAnyA.12"
[HKEY_CLASSES_ROOT\CLSID\{GUID4}\InprocServer32]
@="d:\\mypath\\bin32\\myoledba12.dll"
"ThreadingModel"="Both"
[HKEY_CLASSES_ROOT\CLSID\{GUID4}\ProgID]
@="SQLAnyA.12"
[HKEY_CLASSES_ROOT\CLSID\{GUID4}\VersionIndependentProgID]
@="SQLAnyA" |
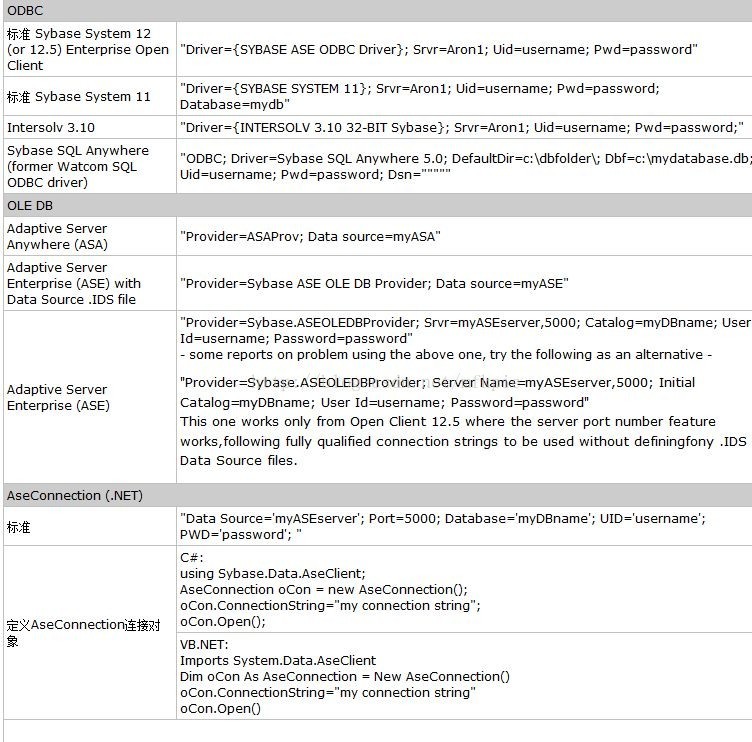
___________________________________.net 连接
Before you can perform any operations on the data, your application must connect to the database. This section describes how to write code to connect to a SQL Anywhere database.
For more information, see SAConnectionStringBuilder class and ConnectionName property.
To connect to a SQL Anywhere database
-
Allocate an SAConnection object.
The following code creates an SAConnection object named
conn:SAConnection conn = new SAConnection(connection-string)
You can have more than one connection to a database from your application. Some applications use a single connection to a SQL Anywhere database, and keep the connection open all the time. To do this, you can declare a global variable for the connection:
private SAConnection _conn;
For more information, see the sample code in samples-dir\SQLAnywhere\ADO.NET\TableViewer and Understanding the Table Viewer sample project.
-
Specify the connection string used to connect to the database.
For example:
"Data Source=SQL Anywhere 11 Demo"
For a complete list of connection parameters, see Connection parameters.
Instead of supplying a connection string, you can prompt users for their user ID and password.
-
Open a connection to the database.
The following code attempts to connect to a database. It autostarts the database server if necessary.
conn.Open();
-
Catch connection errors.
Your application should be designed to catch any errors that occur when attempting to connect to the database. The following code demonstrates how to catch an error and display its message:
try {
    _conn = new SAConnection( txtConnectString.Text );
    _conn.Open();
  } catch( SAException ex ) {
    MessageBox.Show( ex.Errors[0].Source + " : "
     + ex.Errors[0].Message + " (" +
     ex.Errors[0].NativeError.ToString() + ")",
         "Failed to connect" );
Alternately, you can use the ConnectionString property to set the connection string, rather than passing the connection string when the SAConnection object is created:
SAConnection _conn; _conn = new SAConnection(); _conn.ConnectionString = "Data Source=SQL Anywhere 11 Demo"; _conn.Open(); -
Close the connection to the database. Connections to the database stay open until they are explicitly closed using the
conn.Close()method.
Visual Basic connection example
The following Visual Basic code opens a connection to the SQL Anywhere sample database:
Private Sub Button1_Click(ByVal sender As _
    System.Object, ByVal e As System.EventArgs) _
    Handles Button1.Click
    ' Declare the connection object
    Dim myConn As New _
      iAnywhere.Data.SQLAnywhere.SAConnection()
    myConn.ConnectionString = _
      "Data Source=SQL Anywhere 11 Demo"
    myConn.Open()
    myConn.Close()
End Sub |
Connection pooling
Checking the connection state


 1万+
1万+

 被折叠的 条评论
为什么被折叠?
被折叠的 条评论
为什么被折叠?
 到【灌水乐园】发言


