


智慧北京项目第一天不讲项目,主要是一些需要了解和用到的知识点。比如:
屏幕适配
LogUtil
SlidingMenu-master
ViewPager实现导航界面
ViewPager预加载
控件的宽高
屏幕适配
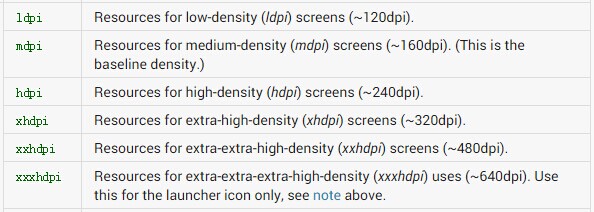
dpi
|缩写| 全拼|含义|
|l|low|低密度|
|m|medium|中密度|
|h|hign|高密度|
|xh|extra-hign|额外高密度|
|xxh|extra-extra-hign|双额外高密度|
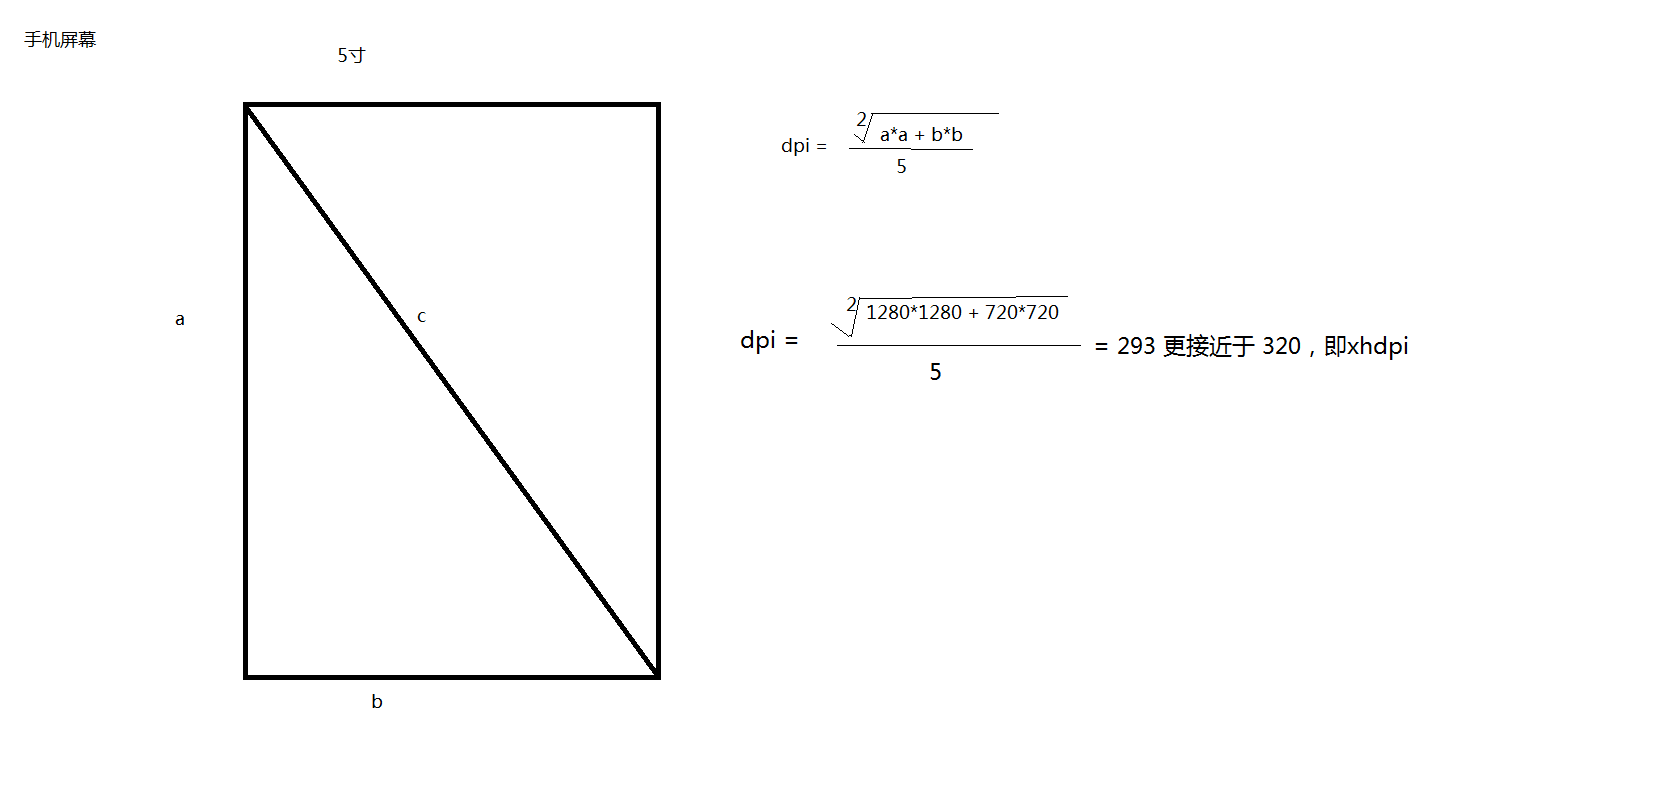
如何计算dpi?
dpi是像素密度,根据勾股定理得出手机对角线的长度,除以手机是x寸的x,得出的值是dpi。
图:
规则
| 型号 | dpi | 比例 | 常见的分辨率 |
|---|---|---|---|
| L | 120 | 1dp = 0.75dpi | |
| M | 160 | 1dp = 1dpi | |
| H | 240 | 1dp = 1.5dpi | |
| XH | 320 | 1dp = 2dpi | 1280*720(5寸) |
| XXH | 480 | 1dp = 3dpi |
图:

分类:
- 图片适配
- layout适配
- dimens适配
- 权重适配weight
- java代码适配
其中,前4种就是为不同分辨率的手机,加载不同的文件。每一种分辨率都已对应的一个文件夹。
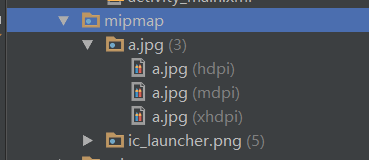
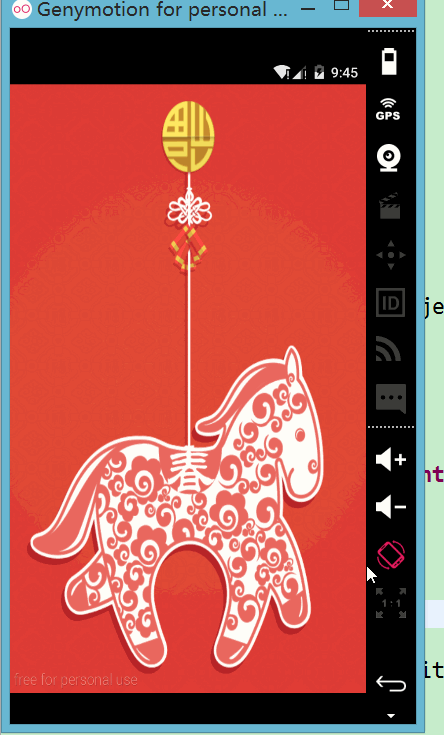
1 图片适配
在5中drawable文件夹下分别放置对应的图片,当app开启后,会根据手机的分辨率去动态的加载分辨率对应的drawable文件夹中的图片。
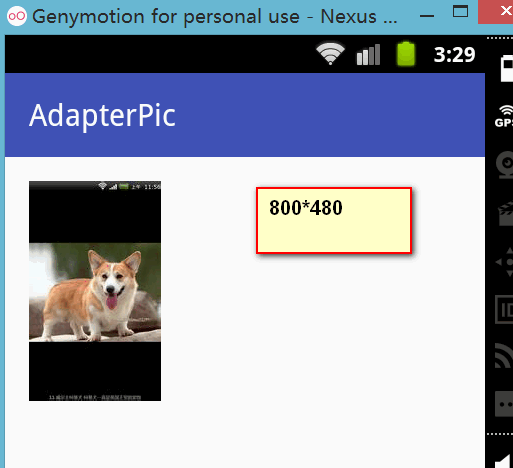
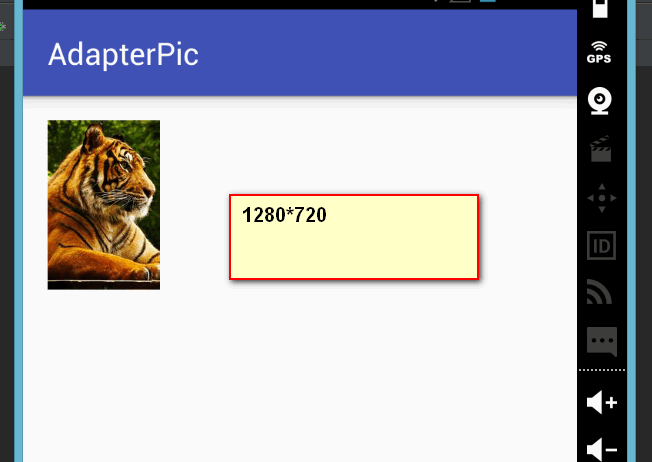
我们分别在mipmap-hdpi 和mipmap-xhdpi下放置了猫和狗的图片,启动2个手机,分辨率分别是800*480、1280*720
逻辑
| 型号 | 动物 |
|---|---|
| mdpi | 猫 |
| hdpi | 狗 |
| xhdpi | 老虎 |
模拟器都是5寸
| 分辨率 | dpi | 屏幕尺寸 | 接近的型号 |
|---|---|---|---|
| 800*480 | 252dpi | 3.7寸 | hdpi |
| 1280*720 | 293dpi | 5寸 | xhdpi |
结果如图:
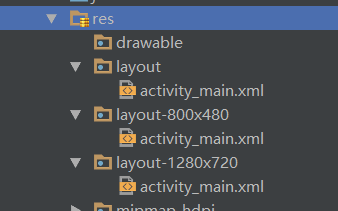
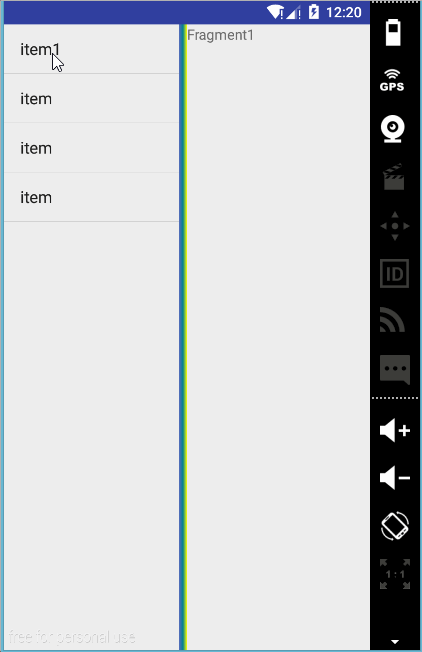
2 layout适配
为特定的手机分辨率额外创建对应的layout文件夹
我们创建layout_1280x720 + layout-800*480这2个文件夹,里面的内容分别是“1280x720”、“800x480”,运行到分辨率是1280x720的手机上,只显示“1280x720”。
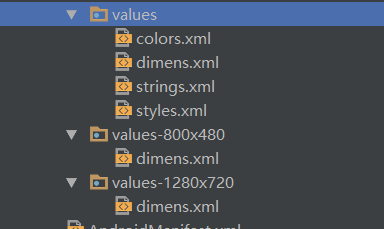
3 dimens适配
在5种values文件夹下放置不同的dimens.xml,当app开启后,会根据手机的分辨率去动态的加载分辨率对应的values文件夹中dimens.xml,实现控件的宽高的适配。
4 权重适配
就是利用属性weight来确定占用几份
效果图:
代码:
<LinearLayout
    android:layout_width="match_parent"
    android:layout_height="50dp"
    android:orientation="horizontal">
    <!--只占1份,共3份-->
    <TextView
        android:layout_width="0dp"
        android:layout_height="match_parent"
        android:layout_weight="1"
        android:background="#ff0000"
        android:text="tab1"/>
    <!--占用2份,共3份-->
    <TextView
        android:layout_width="0dp"
        android:layout_height="match_parent"
        android:layout_weight="2"
        android:background="#ff00ff"
        android:text="tab2"/>
</LinearLayout>
- 1
- 2
- 3
- 4
- 5
- 6
- 7
- 8
- 9
- 10
- 11
- 12
- 13
- 14
- 15
- 16
- 17
- 18
- 19
- 20
- 1
- 2
- 3
- 4
- 5
- 6
- 7
- 8
- 9
- 10
- 11
- 12
- 13
- 14
- 15
- 16
- 17
- 18
- 19
- 20
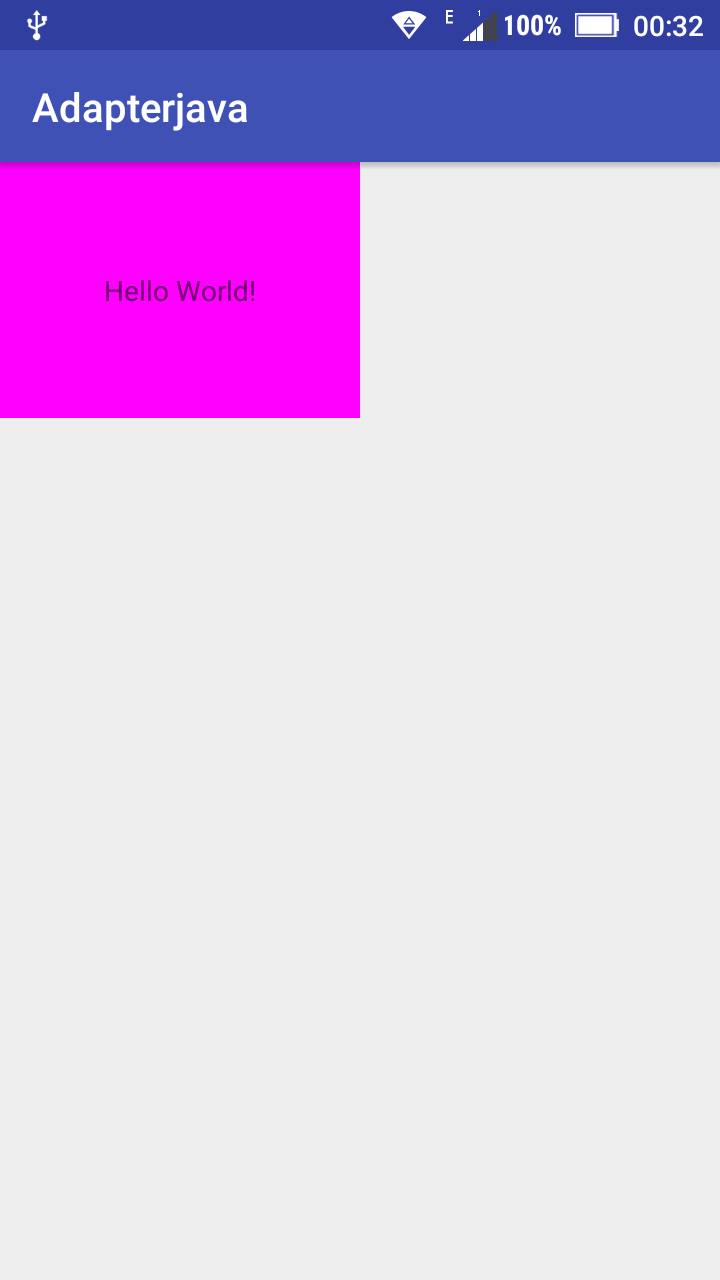
5 代码适配
利用代码动态设置,比如设置TextView的宽度是屏幕的宽的一半,再设置控件的高为屏幕的1/5.
效果图:
代码:
<?xml version="1.0" encoding="utf-8"?>
<RelativeLayout
    xmlns:android="http://schemas.android.com/apk/res/android"
    xmlns:tools="http://schemas.android.com/tools"
    android:layout_width="match_parent"
    android:layout_height="match_parent"

    tools:context="com.cqc.adapterjava.MainActivity">

    <TextView
        android:id="@+id/tv"
        android:layout_width="wrap_content"
        android:layout_height="wrap_content"
        android:gravity="center"
        android:background="#ff00ff"
        android:text="Hello World!"/>
</RelativeLayout>
- 1
- 2
- 3
- 4
- 5
- 6
- 7
- 8
- 9
- 10
- 11
- 12
- 13
- 14
- 15
- 16
- 17
- 18
- 1
- 2
- 3
- 4
- 5
- 6
- 7
- 8
- 9
- 10
- 11
- 12
- 13
- 14
- 15
- 16
- 17
- 18
public class MainActivity extends AppCompatActivity {

    private TextView tv;

    @Override
    protected void onCreate(Bundle savedInstanceState) {
        super.onCreate(savedInstanceState);
        setContentView(R.layout.activity_main);

        tv = (TextView) findViewById(R.id.tv);
        //拿到屏幕的宽高
        getWindowParams();
    }

    private void getWindowParams() {
        //创建对象
        DisplayMetrics metrics = new DisplayMetrics();
        //将宽高信息存放在对象中
        MainActivity.this.getWindowManager().getDefaultDisplay().getMetrics(metrics);

        //取值
        int width = (int) (metrics.widthPixels/2 + 0.5);
        int height = (int) (metrics.heightPixels/5+0.5);

        //设置宽高,至于导入哪个layout,要看tv的父布局是哪个layout
        RelativeLayout.LayoutParams params = new RelativeLayout.LayoutParams(width,height);
        tv.setLayoutParams(params);
    }
}
- 1
- 2
- 3
- 4
- 5
- 6
- 7
- 8
- 9
- 10
- 11
- 12
- 13
- 14
- 15
- 16
- 17
- 18
- 19
- 20
- 21
- 22
- 23
- 24
- 25
- 26
- 27
- 28
- 29
- 1
- 2
- 3
- 4
- 5
- 6
- 7
- 8
- 9
- 10
- 11
- 12
- 13
- 14
- 15
- 16
- 17
- 18
- 19
- 20
- 21
- 22
- 23
- 24
- 25
- 26
- 27
- 28
- 29
其它:
flot转int:直接把小数点去掉,只保留整数,即:
(int)5.1 –》5
(int)5.6–》5
5.6更接近6,而不是5,取整显然不符合现实,所以通常+0.5,即:
(int)(5.1+0.5) –》5
(int)(5.6+0.5)–》6
屏幕适配源码:
LogUtil
log工具类,代码在Module:adapterjava中
LogUtil.java
public class LogUtil {
    private static final boolean ISDEBUG = true;

    public static void d(String tag,String content){
        if (ISDEBUG){
            Log.d(tag,content);
        }
    }
}
 使用的时候直接调用
 LogUtil.d(TAG,"onCreate");
- 1
- 2
- 3
- 4
- 5
- 6
- 7
- 8
- 9
- 10
- 11
- 1
- 2
- 3
- 4
- 5
- 6
- 7
- 8
- 9
- 10
- 11
SlidngMenu-master的使用
SlidngMenu-master是实现侧滑菜单的效果的开源库,github:jfeinstein10/SlidingMenu,可以参考我的另外几篇博客,
第三方开源库:SlidingMenu-Master实现侧拉效果
当然用DrawLayout也可以实现侧滑效果
ActionBar + DrawerLayout实现侧滑菜单
Toolbar + DrawerLayout 实现侧滑效果
如何导入libary并添加依赖?
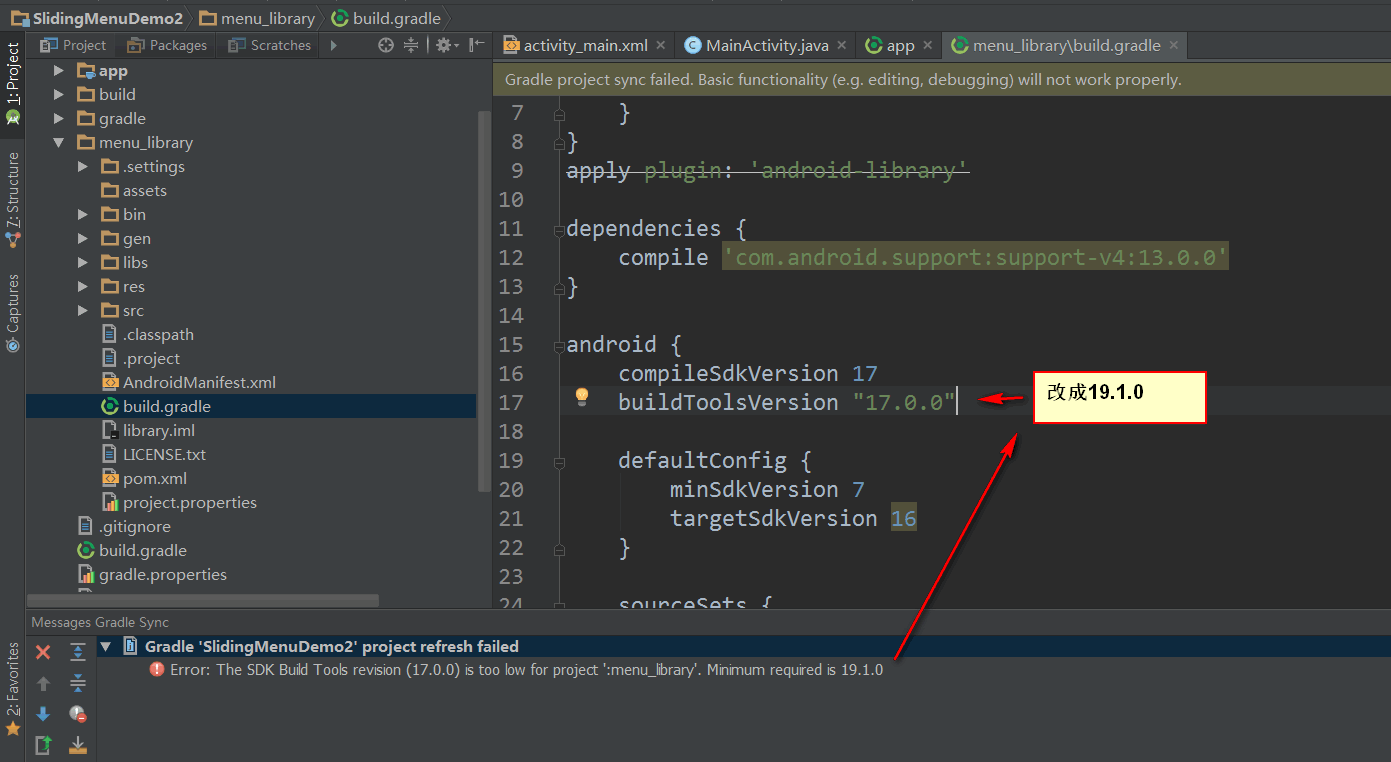
1 修改library的buildToolsVersion
在project目录下修改library的build.gradle的buildToolsVersion
下载完成后,只导入library,github上已经有build.gradle,所以我们可以直接导入到Android Studio中,导入前修改library中的:gradle + buildToolsVersion
修改前:
classpath 'com.android.tools.build:gradle:0.4+'
buildToolsVersion "17.0.0"
- 1
- 2
- 1
- 2
修改后:
classpath 'com.android.tools.build:gradle:2.1.3'
buildToolsVersion "19.1.0"
- 1
- 2
- 1
- 2

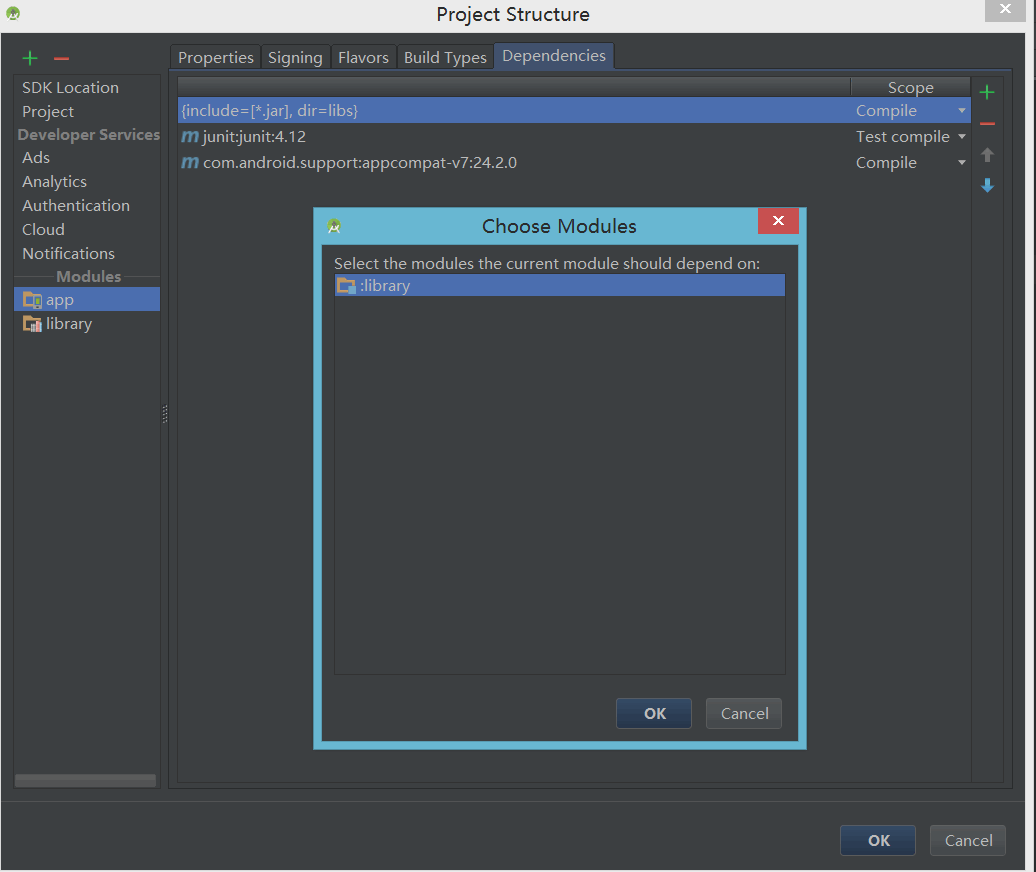
2. import module

3. 报错 ###
如果第一步没有修改build.gradle的话,就会报错。
4. 添加依赖
添加成功后:
代码
Activity继承自SlidingFragmentActivity
效果图:
步骤:
- 设置布局
- 获取SlidingMenu对象,并设置参数
- 用fragment替换frameLayout
1. 设置布局
都是FrameLayout ,里面没有控件
setContentView(R.layout.frame_content);
setBehindContentView(R.layout.frame_menu_left);
- 1
- 2
- 1
- 2
frame_menu_left.XML
<?xml version="1.0" encoding="utf-8"?>
<FrameLayout android:id="@+id/frame_menu_left"
             xmlns:android="http://schemas.android.com/apk/res/android"
             android:layout_width="match_parent"
             android:layout_height="match_parent">

</FrameLayout>
- 1
- 2
- 3
- 4
- 5
- 6
- 7
- 1
- 2
- 3
- 4
- 5
- 6
- 7
2. 获取SlidingMenu对象,并设置参数
SlidingMenu menu = getSlidingMenu();
menu.setMode(SlidingMenu.LEFT_RIGHT);//左右都有侧拉栏
menu.setTouchModeAbove(SlidingMenu.TOUCHMODE_FULLSCREEN);//点击全屏
menu.setBehindWidthRes(R.dimen.behind_offset);//内容页宽度
menu.setShadowDrawable(R.drawable.shadow);//分隔线图片
menu.setShadowWidthRes(R.dimen.shadow_width);//分隔线宽度

menu.setSecondaryMenu(R.layout.frame_menu_right);//右侧栏布局
menu.setSecondaryShadowDrawable(R.drawable.shadow_secondary);//右分割线图片
- 1
- 2
- 3
- 4
- 5
- 6
- 7
- 8
- 9
- 1
- 2
- 3
- 4
- 5
- 6
- 7
- 8
- 9
3. 用fragment替换frameLayout
//替换左侧侧安栏
LeftMenuFragment leftFragmetLeft = new LeftMenuFragment();
getSupportFragmentManager()
        .beginTransaction()
        .replace(R.id.frame_menu_left,leftFragmetLeft,"LeftMenuFragment")
        .commit();

//替换右侧侧拉栏
RightMenuFragment rightFragment = new RightMenuFragment();
getSupportFragmentManager()
        .beginTransaction()
        .replace(R.id.frame_menu_right,rightFragment,"RightMenuFragment")
        .commit();

//替换内容页
HomeFragment homeFragment = new HomeFragment();
getSupportFragmentManager()
        .beginTransaction()
        .replace(R.id.frame_content,homeFragment,"HomeFragment")
        .commit();
- 1
- 2
- 3
- 4
- 5
- 6
- 7
- 8
- 9
- 10
- 11
- 12
- 13
- 14
- 15
- 16
- 17
- 18
- 19
- 20
- 1
- 2
- 3
- 4
- 5
- 6
- 7
- 8
- 9
- 10
- 11
- 12
- 13
- 14
- 15
- 16
- 17
- 18
- 19
- 20
源码
ViewPager 实现导航界面
需求:
先进入欢迎界面,停留3秒,若是第一次打开app,则再次进入导航界面;若不是,则进入主界面。
欢迎界面(a.jpg)
导航界面 (b.jpg + c.jpg + d.jpg)
主界面
效果图:
用到的类
Handler + SharedPreferences + ViewPager + PagerAdapter
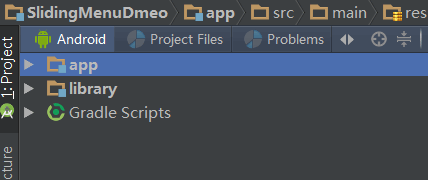
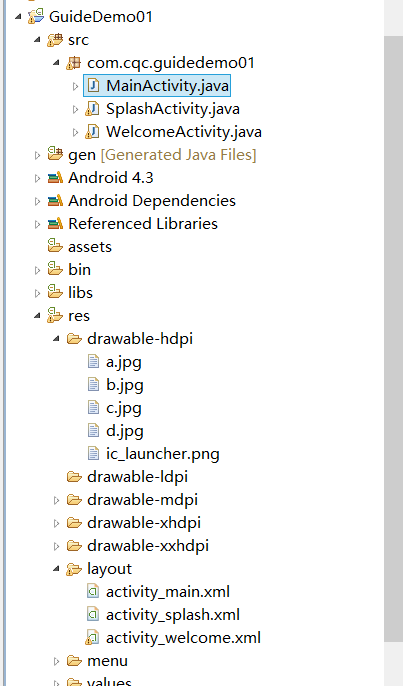
项目结构目录:
Step1:欢迎界面布局 activity_welcome.xml
<RelativeLayout xmlns:android="http://schemas.android.com/apk/res/android"
    xmlns:tools="http://schemas.android.com/tools"
    android:layout_width="match_parent"
    android:layout_height="match_parent"
    tools:context=".MainActivity" >

    <ImageView
        android:layout_width="match_parent"
        android:layout_height="match_parent"
        android:background="@drawable/a" />

</RelativeLayout>
- 1
- 2
- 3
- 4
- 5
- 6
- 7
- 8
- 9
- 10
- 11
- 12
- 1
- 2
- 3
- 4
- 5
- 6
- 7
- 8
- 9
- 10
- 11
- 12
Step2:导航界面布局 activity_splash.xml
<RelativeLayout xmlns:android="http://schemas.android.com/apk/res/android"
    xmlns:tools="http://schemas.android.com/tools"
    android:layout_width="match_parent"
    android:layout_height="match_parent"
    tools:context=".MainActivity" >

    <android.support.v4.view.ViewPager

        android:id="@+id/viewpager"
        android:layout_width="match_parent"
        android:layout_height="match_parent" >
    </android.support.v4.view.ViewPager>

    <Button
        android:id="@+id/btn"
        android:layout_width="wrap_content"
        android:layout_height="wrap_content"
        android:layout_alignParentBottom="true"
        android:layout_centerHorizontal="true"
        android:layout_marginBottom="30dp"
        android:visibility="gone"
        android:text="进入主页面">
    </Button>

</RelativeLayout>
- 1
- 2
- 3
- 4
- 5
- 6
- 7
- 8
- 9
- 10
- 11
- 12
- 13
- 14
- 15
- 16
- 17
- 18
- 19
- 20
- 21
- 22
- 23
- 24
- 25
- 1
- 2
- 3
- 4
- 5
- 6
- 7
- 8
- 9
- 10
- 11
- 12
- 13
- 14
- 15
- 16
- 17
- 18
- 19
- 20
- 21
- 22
- 23
- 24
- 25
Step3:主界面布局 activity_main.xml
<RelativeLayout xmlns:android="http://schemas.android.com/apk/res/android"
    xmlns:tools="http://schemas.android.com/tools"
    android:layout_width="match_parent"
    android:layout_height="match_parent"
    android:paddingBottom="@dimen/activity_vertical_margin"
    android:paddingLeft="@dimen/activity_horizontal_margin"
    android:paddingRight="@dimen/activity_horizontal_margin"
    android:paddingTop="@dimen/activity_vertical_margin"
    tools:context=".MainActivity" >

    <TextView
        android:layout_width="wrap_content"
        android:layout_height="wrap_content"
        android:text="@string/hello_world" />

</RelativeLayout>
- 1
- 2
- 3
- 4
- 5
- 6
- 7
- 8
- 9
- 10
- 11
- 12
- 13
- 14
- 15
- 16
- 1
- 2
- 3
- 4
- 5
- 6
- 7
- 8
- 9
- 10
- 11
- 12
- 13
- 14
- 15
- 16
Step4:欢迎界面WelcomeActivity.java
需要判断是不是第一次进入,是:进入导航页;否:进入主界面。
package com.cqc.guidedemo01;

import android.app.Activity;
import android.content.Intent;
import android.os.Bundle;
import android.os.Handler;
import android.os.Message;

public class WelcomeActivity extends Activity {

    @Override
    protected void onCreate(Bundle savedInstanceState) {
        // TODO Auto-generated method stub
        super.onCreate(savedInstanceState);
        setContentView(R.layout.activity_welcome);

        Message msg = Message.obtain();
        handler.sendEmptyMessageDelayed(0, 3000);

    }


    public Handler handler = new Handler(){
        public void handleMessage(android.os.Message msg) {
            if (msg.what == 0) {
                boolean is_First = getSharedPreferences("config", MODE_PRIVATE).getBoolean("is_First", true);
                if (is_First) {
                    Intent intent = new Intent(getBaseContext(), SplashActivity.class);
                    startActivity(intent);
                } else {
                    Intent intent = new Intent(getBaseContext(), MainActivity.class);
                    startActivity(intent);
                }
                finish();
            }
        };
    };
}
- 1
- 2
- 3
- 4
- 5
- 6
- 7
- 8
- 9
- 10
- 11
- 12
- 13
- 14
- 15
- 16
- 17
- 18
- 19
- 20
- 21
- 22
- 23
- 24
- 25
- 26
- 27
- 28
- 29
- 30
- 31
- 32
- 33
- 34
- 35
- 36
- 37
- 38
- 39
- 1
- 2
- 3
- 4
- 5
- 6
- 7
- 8
- 9
- 10
- 11
- 12
- 13
- 14
- 15
- 16
- 17
- 18
- 19
- 20
- 21
- 22
- 23
- 24
- 25
- 26
- 27
- 28
- 29
- 30
- 31
- 32
- 33
- 34
- 35
- 36
- 37
- 38
- 39
Step5:导航界面SplashActivity.java
Viewpager
package com.cqc.guidedemo01;

import java.util.ArrayList;

import android.os.Bundle;
import android.os.Handler;
import android.app.Activity;
import android.content.Intent;
import android.content.SharedPreferences.Editor;
import android.support.v4.view.PagerAdapter;
import android.support.v4.view.ViewPager;
import android.support.v4.view.ViewPager.OnPageChangeListener;
import android.view.Menu;
import android.view.View;
import android.view.ViewGroup;
import android.widget.Button;
import android.widget.ImageView;

public class SplashActivity extends Activity {

    private ArrayList<ImageView> list;
    private Button btn;

    @Override
    protected void onCreate(Bundle savedInstanceState) {
        super.onCreate(savedInstanceState);
        setContentView(R.layout.activity_splash);

        initIsFirst();

        initData();

        btn = (Button) findViewById(R.id.btn);

        ViewPager viewpager = (ViewPager) findViewById(R.id.viewpager);
        MyAdapter adapter = new MyAdapter();
        viewpager.setAdapter(adapter);

        viewpager.setOnPageChangeListener(new OnPageChangeListener() {

            @Override
            public void onPageSelected(int position) {
                if (position == list.size() - 1) {
                    btn.setVisibility(View.VISIBLE);
                    btn.setOnClickListener(new Button.OnClickListener() {

                        @Override
                        public void onClick(View v) {
                            Intent intent = new Intent(getBaseContext(),
                                    MainActivity.class);
                            startActivity(intent);
                            finish();
                        }
                    });
                } else {
                    btn.setVisibility(Button.GONE);
                }
            }

            @Override
            public void onPageScrolled(int position, float positionOffset,
                    int positionOffsetPixels) {

            }

            @Override
            public void onPageScrollStateChanged(int state) {

            }
        });

    }

    private void initIsFirst() {
        Editor edit = getSharedPreferences("config", MODE_PRIVATE).edit();
        edit.putBoolean("is_First", false);
        edit.commit();
    }

    private void initData() {
        list = new ArrayList<ImageView>();

        ImageView iv1 = new ImageView(getBaseContext());
        iv1.setBackgroundResource(R.drawable.b);
        list.add(iv1);

        ImageView iv2 = new ImageView(getBaseContext());
        iv2.setBackgroundResource(R.drawable.c);
        list.add(iv2);

        ImageView iv3 = new ImageView(getBaseContext());
        iv3.setBackgroundResource(R.drawable.d);
        list.add(iv3);

    }

    class MyAdapter extends PagerAdapter {

        @Override
        public int getCount() {
            return list.size();
        }

        @Override
        public boolean isViewFromObject(View view, Object obj) {
            return view == obj;
        }

        @Override
        public Object instantiateItem(ViewGroup container, int position) {
            container.addView(list.get(position));
            return list.get(position);
        }

        @Override
        public void destroyItem(ViewGroup container, int position, Object object) {
            container.removeView((View) object);
        }
    }

}
- 1
- 2
- 3
- 4
- 5
- 6
- 7
- 8
- 9
- 10
- 11
- 12
- 13
- 14
- 15
- 16
- 17
- 18
- 19
- 20
- 21
- 22
- 23
- 24
- 25
- 26
- 27
- 28
- 29
- 30
- 31
- 32
- 33
- 34
- 35
- 36
- 37
- 38
- 39
- 40
- 41
- 42
- 43
- 44
- 45
- 46
- 47
- 48
- 49
- 50
- 51
- 52
- 53
- 54
- 55
- 56
- 57
- 58
- 59
- 60
- 61
- 62
- 63
- 64
- 65
- 66
- 67
- 68
- 69
- 70
- 71
- 72
- 73
- 74
- 75
- 76
- 77
- 78
- 79
- 80
- 81
- 82
- 83
- 84
- 85
- 86
- 87
- 88
- 89
- 90
- 91
- 92
- 93
- 94
- 95
- 96
- 97
- 98
- 99
- 100
- 101
- 102
- 103
- 104
- 105
- 106
- 107
- 108
- 109
- 110
- 111
- 112
- 113
- 114
- 115
- 116
- 117
- 118
- 119
- 120
- 121
- 122
Step6:主界面:MainActivity.Java
没有内容
package com.cqc.guidedemo01;

import android.os.Bundle;
import android.app.Activity;
import android.view.Menu;

public class MainActivity extends Activity {

    @Override
    protected void onCreate(Bundle savedInstanceState) {
        super.onCreate(savedInstanceState);
        setContentView(R.layout.activity_main);
    }

    @Override
    public boolean onCreateOptionsMenu(Menu menu) {
        // Inflate the menu; this adds items to the action bar if it is present.
        getMenuInflater().inflate(R.menu.main, menu);
        return true;
    }

}
- 1
- 2
- 3
- 4
- 5
- 6
- 7
- 8
- 9
- 10
- 11
- 12
- 13
- 14
- 15
- 16
- 17
- 18
- 19
- 20
- 21
- 22
- 23
- 1
- 2
- 3
- 4
- 5
- 6
- 7
- 8
- 9
- 10
- 11
- 12
- 13
- 14
- 15
- 16
- 17
- 18
- 19
- 20
- 21
- 22
- 23
源码:
ViewPager的预加载
Viewpager会预加载当前页的左右两边隔一页数据。
可以参考:
BUG:The specified child already has a parent. You must call removeView() on the child’s parent first
控件的宽高
控件默认是没有宽高的,其宽高是由父布局决定的,所有如果我们xml文件的根节点是view,不是layout,那么设置他的宽高是无效的,最终呈现的都是wrap_content效果。
例如:
<?xml version="1.0" encoding="utf-8"?>
<Button xmlns:android="http://schemas.android.com/apk/res/android"
    android:layout_width="200dp"
    android:layout_height="200dp"
    android:orientation="vertical" >
</Button>
- 1
- 2
- 3
- 4
- 5
- 6
- 1
- 2
- 3
- 4
- 5
- 6
接着我们把这个button加入Layout中,linearLayout.addView(button),button的宽高依然是wrap_content效果。
服务器端代码的修改
解压后,需要修改代码中的ip地址,然后放在tomcat的安装目录中,步骤见下图:
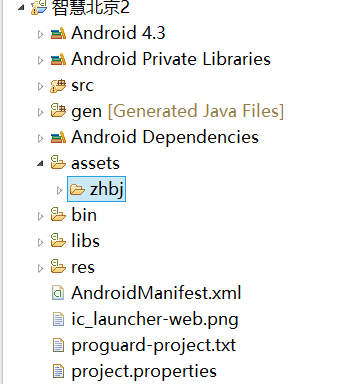
Step1:复制到assets中
将解压后的文件zhbj放在新建项目的assets文件夹中
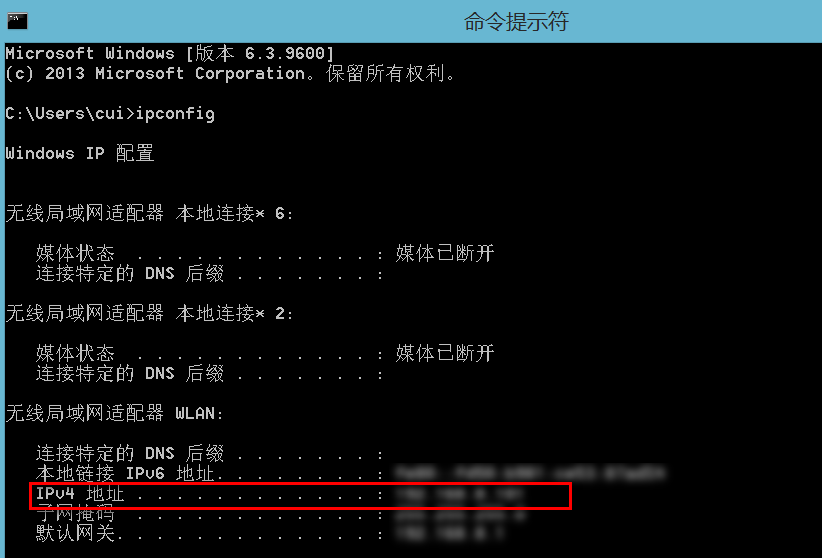
Step2:获取本机ip
打开命令提示符,输入ipconfig,获取ip地址
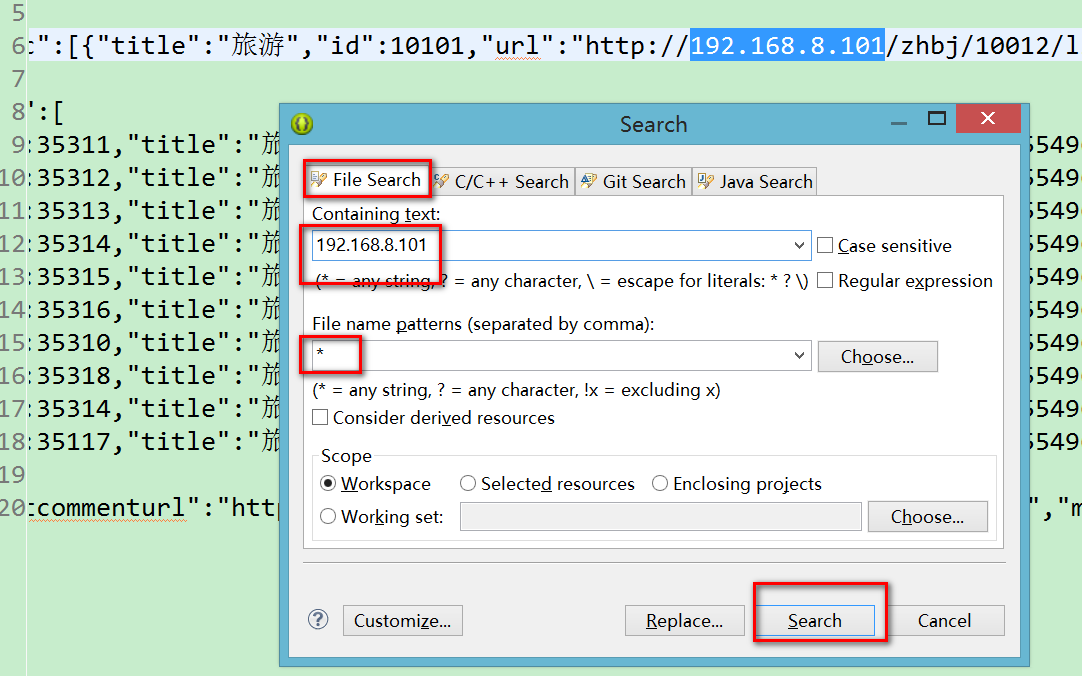
Step3:查找zhbj中的ip
ctrl +H
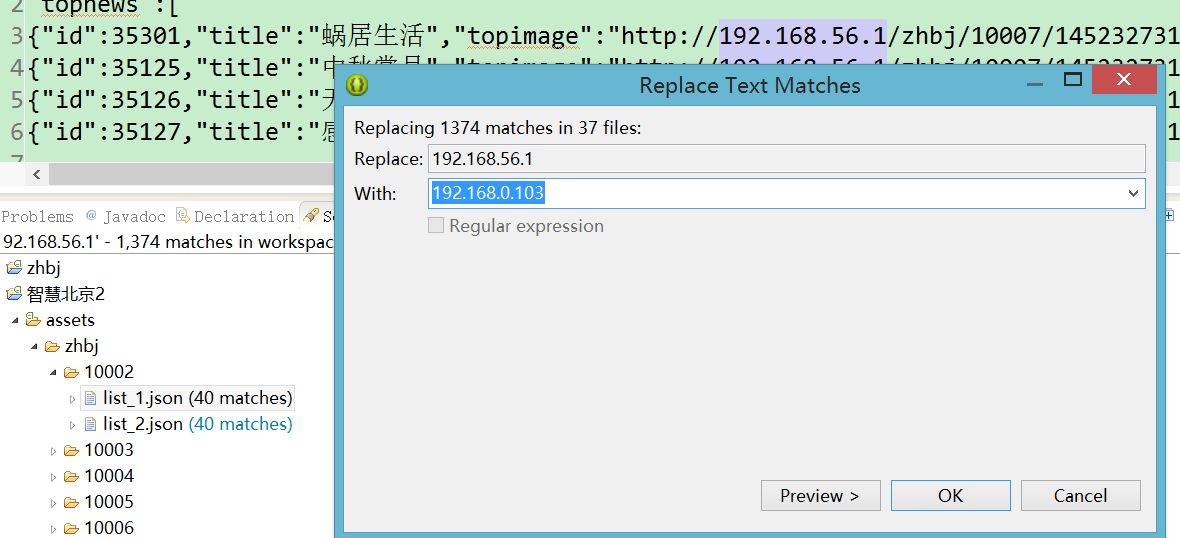
Step4:替换zhbj中的ip
右键 replece all

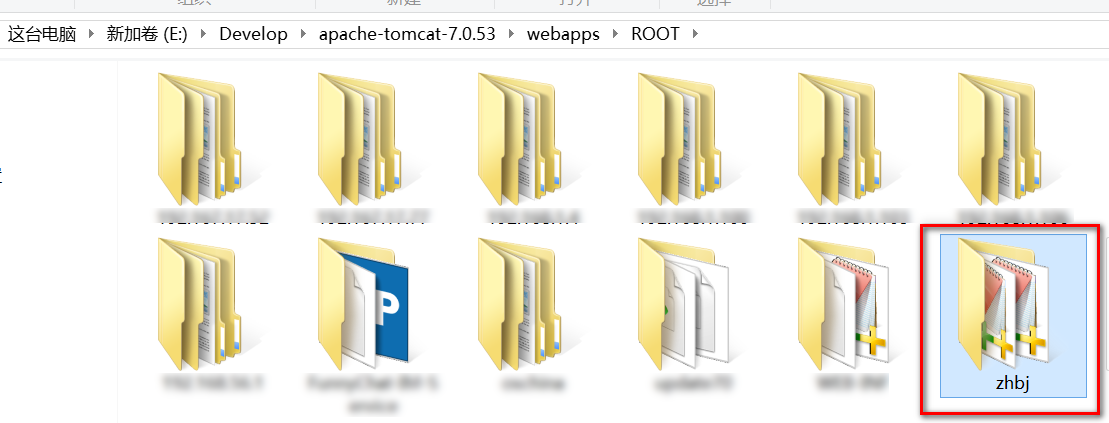
Step5:将修改完的zhbj文件夹放入tomcat中
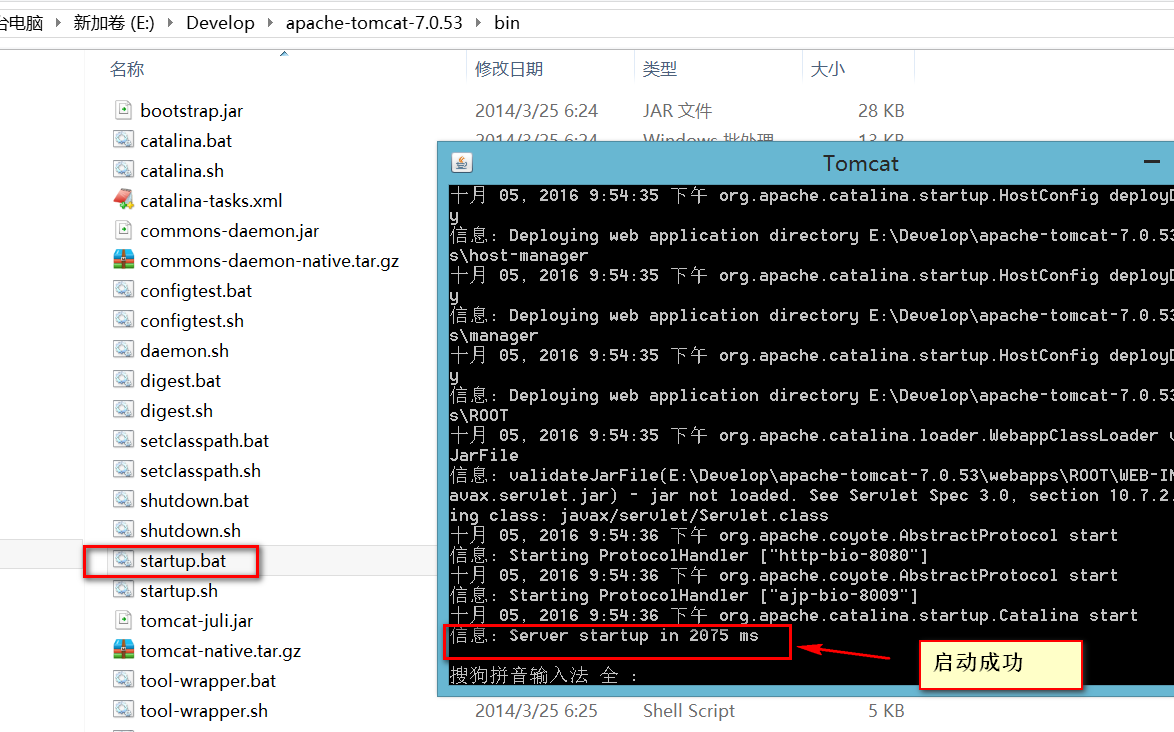
Step6:启动tomcat


 381
381

 被折叠的 条评论
为什么被折叠?
被折叠的 条评论
为什么被折叠?
 到【灌水乐园】发言


