1 自定义标签
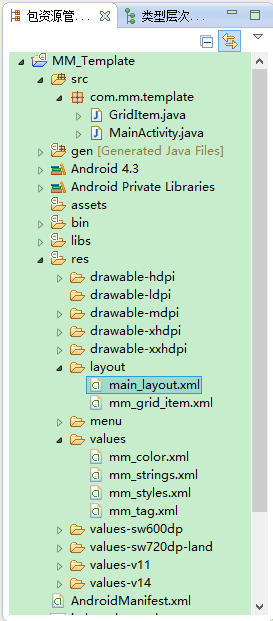
这是我的模板项目目录

既然想像 android:text 那样使用自己的标签,那么首先得有标签。
在 res/values/ 下我新建了个
mm_tag.xml (切记不可出现大写,只能是 小写字母、数字、下划线)
第一步: 自定义 标签
mm_tag.xml
<?xml version="1.0" encoding="utf-8"?>
<resources>
    <declare-styleable name="GridItem">
        <attr name="bkground" format="reference|color"/>
        <attr name="text1"    format="string"/>
        <attr name="text2"    format="string"/>
        <attr name="image"    format="reference|integer"/>
    </declare-styleable>
</resources>
format 参考:
1. reference:参考某一资源ID
2. color:颜色值
3. boolean:布尔值
4. dimension:尺寸值
5. float:浮点值
6. integer:整型值
7. string:字符串
8. fraction:百分数
9. enum:枚举值
//属性定义:
< declare -styleable name = "名称" >
    <attr name = "orientation" >
        <enum name = "horizontal" value = "0" />
        <enum name = "vertical" value = "1" />
    </attr>
</ declare -styleable>

//属性使用:
<LinearLayout
    xmlns:android = "http://schemas.android.com/apk/res/android"
    android:orientation = "vertical"
    android:layout_width = "fill_parent"
    android:layout_height = "fill_parent"
>
</LinearLayout>
10. flag:位或运算
//属性定义:
< declare -styleable name = "名称" >
    <attr name = "windowSoftInputMode" >
        <flag name = "stateUnspecified" value = "0" />
        <flag name = "stateUnchanged" value = "1" />
        <flag name = "stateHidden" value = "2" />
    </attr>
</ declare -styleable>

//属性使用:
<activity
    android: name = ".StyleAndThemeActivity"
    android:label = "@string/app_name"
    android:windowSoftInputMode = "stateUnspecified | stateUnchanged | stateHidden" >
    <intent-filter>
        < action android: name = "android.intent.action.MAIN" />
        <category android: name = "android.intent.category.LAUNCHER" />
    </intent-filter>
</activity>
11.注意:属性定义时可以指定多种类型值。
//属性定义:
< declare -styleable name = "名称" >
    <attr name = "background" format = "reference|color" />
</ declare -styleable>

//属性使用:
<ImageView
    android:layout_width = "42dip"
    android:layout_height = "42dip"
    android: background = "@drawable/图片ID|#00FF00" />
第二步: 在自定义组件中获得标签传回的数据
比如我们在布局中使用自定义组件 GridItem:
首先 声明好 标签的命名空间
xmlns:griditem = "http://schemas.android.com/apk/res/com.mm.template"
//对比下 android 的命名空间:
xmlns:android = "http://schemas.android.com/apk/res/android"
发现只有 res/后面的不同,
com.mm.template 是我的应用程序包名,通过
上文中的 项目目录图片可以看出来,
griditem 是我随便想的一个命名空间的名字。
接下来就是使用自定义组件
< com.mm.template.GridItem
     griditem:image = "@drawable/mm_1"
     android:padding = "5dp"
     android:layout_width = "wrap_content"
     android:layout_height = "wrap_content"
     android:layout_weight = "1"
     griditem:bkground = "@color/orange"
     griditem:text1 = "Android"       griditem:text2 = "手机开发" />
其中 用到了我们的自定义标签:
griditem:image = "@drawable/mm_1"
griditem:bkground = "@color/orange"
griditem:text1 = "Android"
griditem:text2 = "手机开发"
怎么获取标签传回的数据呢呢?
在自定义组件 GridItem 的实现代码中使用如下方法即可
public GridItem(Context context, AttributeSet attrs) {
	super(context, attrs);

	TypedArray typedarray=context.obtainStyledAttributes(attrs, R.styleable.GridItem);

	bk_color =typedarray.getResourceId(R.styleable.GridItem_bkground, R.color.burlywood);
	text1 =typedarray.getString(R.styleable.GridItem_text1);
	text2 =typedarray.getString(R.styleable.GridItem_text2);
	image=typedarray.getDrawable(R.styleable.GridItem_image);

	typedarray.recycle();

	view=LayoutInflater.from(context).inflate(R.layout.mm_grid_item, this,true);

	layout=(LinearLayout)view.findViewById(R.id.item_layout);
	textview1=(TextView)view.findViewById(R.id.text1);
	textview2=(TextView)view.findViewById(R.id.text2);
	imageview=(ImageView)view.findViewById(R.id.imageview);

	layout.setBackgroundResource(bk_color);	//设置背景色
	textview1.setText(text1);				//设置第一行文字
	textview2.setText(text2);				//设置第二行文字
	imageview.setImageDrawable(image);		//设置图标
}
即可获得 我们自定义标签传过来的数据,并且正确的在界面中显示出来。
下面我将结合自定义 组件 GridItem 来一起讲。
2 自定义组件
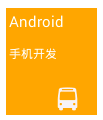
我想实现一个组件,类似于这样的

方法有很多种,自定义布局即可,现在我想让它以组件的形式在 布局中直接 像 TextView 一样使用,

那么就用到自定义组件。
下面我将实现一个自定义组件 GridItem 实现。
一般都是继承于 Layout(我用继承于View时出现问题 ~~!)
GridItem.java
package com.mm.template;

import android.content.Context;
import android.content.res.TypedArray;
import android.graphics.drawable.Drawable;
import android.util.AttributeSet;
import android.view.LayoutInflater;
import android.view.View;
import android.widget.ImageView;
import android.widget.LinearLayout;
import android.widget.TextView;

public class GridItem extends LinearLayout {

	private	int bk_color;	//背景色
	private String text1;	//第一行文字
	private String text2;	//第二行文字
	private Drawable image;	//图标

	private LinearLayout layout;
	private TextView textview1;
	private TextView textview2;
	private ImageView imageview;

	private View view;

	public GridItem(Context context, AttributeSet attrs) {
		super(context, attrs);

		TypedArray typedarray=context.obtainStyledAttributes(attrs, R.styleable.GridItem);

		bk_color =typedarray.getResourceId(R.styleable.GridItem_bkground, R.color.burlywood);
		text1 =typedarray.getString(R.styleable.GridItem_text1);
		text2 =typedarray.getString(R.styleable.GridItem_text2);
		image=typedarray.getDrawable(R.styleable.GridItem_image);

		typedarray.recycle();

		view=LayoutInflater.from(context).inflate(R.layout.mm_grid_item, this,true);

		layout=(LinearLayout)view.findViewById(R.id.item_layout);
		textview1=(TextView)view.findViewById(R.id.text1);
		textview2=(TextView)view.findViewById(R.id.text2);
		imageview=(ImageView)view.findViewById(R.id.imageview);

		layout.setBackgroundResource(bk_color);	//设置背景色
		textview1.setText(text1);				//设置第一行文字
		textview2.setText(text2);				//设置第二行文字
		imageview.setImageDrawable(image);		//设置图标
	}

}
这个自定义组件 GridItem 用到的布局文件
mm_grid_item.xml
<? xml   version = "1.0"    encoding = "utf-8" ?>
< LinearLayout   xmlns:android = "http://schemas.android.com/apk/res/android"
     xmlns:tools = "http://schemas.android.com/tools"
     android: id = "@+id/item_layout"
     android:layout_width = "match_parent"
     android:layout_height = "match_parent"
     android:orientation = "vertical"
     android: background = "@color/black"
     android:padding = "3dp"
     android:paddingLeft = "6dp"
     tools:ignore = "HardcodedText,ContentDescription"    >
     < TextView
         android: id = "@+id/text1"
         android:layout_weight = "1"
          style = "@style/MM_TextView" />
     < TextView
         android: id = "@+id/text2"
         android:layout_weight = "1"
         android:textSize = "12sp"
          style = "@style/MM_TextView" />
     < ImageView
         android: id = "@+id/imageview"
         android:layout_width = "wrap_content"
         android:layout_height = "0dp"
         android:layout_gravity = "right"
         android: src = "@drawable/mm_title_1"
         android:layout_weight = "2"
         android:layout_marginTop = "10dp"
         android:scaleType = "fitCenter" />

      <!--图片缩放
        android:scaleX="0.8"
        android:scaleY="0.8" --> </ LinearLayout >
3 使用方法
在
main_layout.xml (我的主布局文件)中使用
< LinearLayout   xmlns:android = "http://schemas.android.com/apk/res/android"
     xmlns:tools = "http://schemas.android.com/tools"
     xmlns:griditem = "http://schemas.android.com/apk/res/com.mm.template"
     android:layout_width = "match_parent"
     android:layout_height = "match_parent"
     android: background = "@color/white"
     android:orientation = "vertical"
     tools:ignore = "HardcodedText,ContentDescription,NestedWeights"    >

      <!-- Head start -->
     < LinearLayout
         android:layout_width = "match_parent"
         android:layout_height = "44dp"
         android:orientation = "horizontal"
         android:padding = "10dp"
         android: background = "@color/red" >
         < ImageView
             android:layout_width = "wrap_content"
             android:layout_height = "match_parent"
             android: src = "@drawable/mm_title_1"    />
         < TextView
             android:layout_width = "0dp"
             android:layout_height = "match_parent"
             android:layout_weight = "1"
             android:gravity = "center"
             android: text = "测试案例"
             android:textStyle = "bold"
             android:textSize = "16sp"
             android:textColor = "@android:color/white" />
         < ImageView
             android:layout_width = "wrap_content"
             android:layout_height = "match_parent"
             android: src = "@drawable/mm_title_2"    />
     </ LinearLayout >
      <!-- Head end   -->

      <!-- Search start-->
     < LinearLayout
         android:layout_width = "match_parent"
         android:layout_height = "36dp"
         android:orientation = "vertical"
         android:paddingTop = "3dp"
         android:layout_margin = "8dp" >
         < EditText
             android: id = "@+id/search_edit"
             android:layout_width = "match_parent"
             android:layout_height = "match_parent"
             android:drawableLeft = "@drawable/mm_search"
               android: background = "@drawable/mm_shape_editview"
               android:hint = "请输入关键字"
             android:textSize = "16sp"
             android:textColorHint = "@color/darkgray"
             android:textStyle = "bold"
             android:padding = "6dp" />
     </ LinearLayout >
      <!-- Search end  -->
      <!-- GridItem start  -->
     < LinearLayout
           android:layout_width = "match_parent"
           android:layout_height = "0dp"
           android:layout_weight = "1"
           android:orientation = "horizontal"
         android:layout_margin = "10dp" >
         < com.mm.template.GridItem
             griditem:image = "@drawable/mm_1"
             android:padding = "5dp"
               android:layout_width = "wrap_content"
               android:layout_height = "wrap_content"
               android:layout_weight = "1"
               griditem:bkground = "@color/orange"
               griditem:text1 = "Android"
               griditem:text2 = "手机开发" />
         < com.mm.template.GridItem
             griditem:image = "@drawable/mm_2"
             android:padding = "5dp"
               android:layout_width = "wrap_content"
               android:layout_height = "wrap_content"
               android:layout_weight = "1"
               griditem:bkground = "@color/blueviolet"
               griditem:text1 = "C++"
               griditem:text2 = "编程语言" />
         < com.mm.template.GridItem
             griditem:image = "@drawable/mm_3"
             android:padding = "5dp"
               android:layout_width = "wrap_content"
               android:layout_height = "wrap_content"
               android:layout_weight = "1"
               griditem:bkground = "@color/blue"
               griditem:text1 = "服务端"
               griditem:text2 = "后台开发" />
     </ LinearLayout >
      <!-- GridItem end  --> </ LinearLayout >
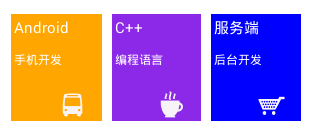
也就是 <com /> 标签为我们自定义的 GridItem 组件。
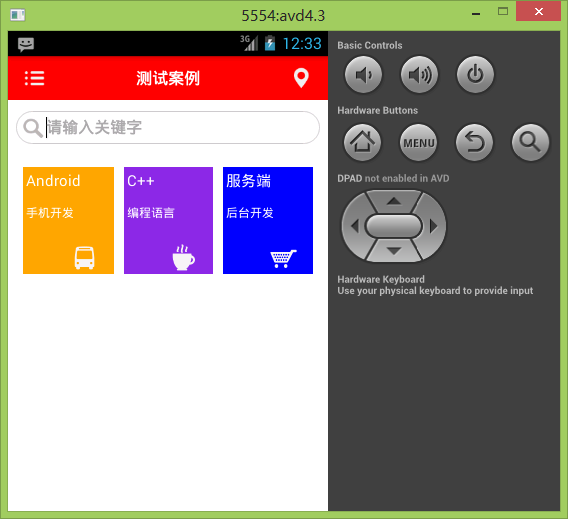
4 结果展示

注:转载请注明出处 :) 毕竟代码是一个一个敲出来的啊,O(∩_∩)O~


 1590
1590


 被折叠的 条评论
为什么被折叠?


