

简介
Codeuml是一个基于Web的UML设计工具,你可以用一种特别的语言编写图例,并快速输出图形。它比任何图形化设计工具(拖拽元素和点击鼠标连接元素)都来得更有效率。Codeuml使用开源引擎plantuml来从文本产生图形。你可以像编写代码一样迅速地设计图例。
这个web应用展示了一些有趣的设计和编程挑战。首先,它告诉你如何创建一个基于web的IDE环境,并模仿了Windows 8 Metro UI。其次,它展示了怎样定期地从网站收集数据,异步地后台发送给服务器,并迅速返回结果。最后并且是最重要的,它显示了如何维护一个服务器端的数据池,来持久化一些必要的资源,你不可能在用户每次访问的时候生成它们,所以必须要有一个有限的数据池供所有web用户使用。
获取代码
实时演示地址: www.codeuml.com
程序源码: http://code.google.com/p/codeuml/
前端的创建

我从Windows 8的Metro UI中得到了灵感,并且它对平板也很友好。你可以轻松地在平板上点击按钮。我使用jQuery Splitter plugin创建了三列的可变宽度面板;文本编辑器使用了CodeMirror,它功能很轻大但是图标很吓人;并用 jQuery New Ticker 插件创建了滚动新闻效果。
3列的视图是使用下面的html实现的:
02 | <div class="SplitterPane unselectable"> |
03 | <div id="umlsnippets"> |
09 | <div id="CenterAndRight"> |
10 | <div class="SplitterPane"> |
11 | <img src="img/ajax-loader.gif" id="ProgressIndicator" /> |
12 | <textarea id="umltext" rows="10" cols="40"></textarea> |
14 | <div class="SplitterPane"> |
15 | <div id="umlimage_container"> |
16 | <img id="umlimage" src="img/defaultdiagram.png" /> |
首先将屏幕分成两部分——左边的UML片段栏和右边的编辑器和图像栏。之后将右边分成两部分——文本编辑器和图示图像。之后的Javascript初始化了这种分割:
02 | $("#MySplitter").splitter({ |
05 | minLeft: 60, sizeLeft: 100, maxLeft: 250, |
11 | $("#CenterAndRight").splitter({ |
14 | minRight: 200, sizeRight: ($(window).width() * 0.6), maxRight: ($(window).width() * 0.9), |
17 | $(window).resize(function () { |
18 | $("#MySplitter").trigger("resize"); |
之后,将CodeMirror编辑器作用于文本域,让其变成一个出色的文本编辑器。
1 | myCodeMirror = CodeMirror.fromTextArea($('#umltext').get(0), |
3 | onChange: refreshDiagram |
6 | myCodeMirror.setCursor({ line: myCodeMirror.lineCount() + 1, ch: 1 }); |
然后初始化左边的UML片段栏。每个按钮都有一段相关联的UML文本,当点击按钮的时候它们就会被写入编辑器。一个按钮的例子:
06 | <div class="sequence_diagram"> |
12 | <pre class="umlsnippet">A -> B: Sync Message</pre> |
被插入文本编辑器中的代码在<pre>标签中。
你可以创建任意多的UML片段按钮,只要将UML片段放入<pre>中,并设置其类为umlsnippet就可以了。
当按钮被点击时,下面的代码用于将<pre>中的片段插入文本编辑器中:
01 | $("#umlsnippets").find(".button").click(function () { |
02 | var diagramType = $(this).parent().attr("class"); |
04 | if (lastUmlDiagram !== diagramType) { |
05 | if (!confirm("The current diagram will be cleared? Do you want to continue?")) |
08 | myCodeMirror.setValue(""); |
11 | changeDiagramType(diagramType); |
13 | var umlsnippet = $(this).find("pre.umlsnippet").text(); |
15 | var pos = myCodeMirror.getCursor(true); |
20 | myCodeMirror.replaceRange(umlsnippet, myCodeMirror.getCursor(true)); |
23 | myCodeMirror.toTextArea(); |
24 | myCodeMirror = CodeMirror.fromTextArea($('#umltext').get(0), |
26 | onChange: refreshDiagram |
30 | myCodeMirror.setCursor(pos); |
这里有一个问题,如果我插入的文本中叫replaceRange,CodeMirror编辑器就会停止工作。我需要重写它使其重新正确地工作。
边输入边生成图表
在你输入的时候刷新图表是最具挑战的部分。下面的 javascript 函数会在文本编辑器的内容发生改变时触发。考虑到及时性和有效性的均衡,它被设置成每秒只向服务器发送一次 UML 。所以,即使你连续快速敲击,也不会导致对服务器的轰炸式请求。
01 | function refreshDiagram() { |
03 | if (lastTimer == null) { |
05 | lastTimer = window.setTimeout(function () { |
07 | var umltext = myCodeMirror.getValue().replace(/(^[\s\xA0]+|[\s\xA0]+$)/g, ''); |
10 | (umltext !== lastUmlText) |
11 | && validDiagramText(umltext); |
14 | $('#ProgressIndicator').show(); |
16 | lastUmlText = umltext; |
18 | $.post("SendUml.ashx", { uml: umltext }, function (result) { |
19 | var key = $.trim(result); |
20 | $("#umlimage").attr("src", "getimage.ashx?key=" + key); |
24 | var forCookie = $.base64.encode(umltext).replace(/==/, ''); |
26 | if (forCookie.length > 3800) { |
27 | alert("Sorry maximum 3800 characters allowed in a diagram"); |
30 | createCookie('uml', forCookie, 30); |
31 | var test = readCookie('uml'); |
33 | if (test !== forCookie) { |
34 | createCookie('uml', '', 30); |
43 | window.clearTimeout(lastTimer); |
这个代码的确比较聪慧。首先,它确保当用户只是输入空格或敲回车时,由于并没有发生导致需要呈现一幅新图表的变化,所以就不把UML文本发往服务器,节省了没有必要的昂贵的图像生成过程。它还有一点验证以防止尚属半成品的图表表示文本被过早地发送到服务器。你越是能在这里捕捉越多验证细节,就越能在服务器上减少生成无用的图像。
首先,它将UML文本提交到名为endUml.ashx的http处理器.它会保存文本并返回一个GUID,GUID触发生成图的GetImage.ashx。SendUml.ashx很简单:
01 | public class SendUml : IHttpHandler { |
03 | public void ProcessRequest (HttpContext context) { |
04 | string uml = context.Request["uml"]; |
05 | string key = Guid.NewGuid().ToString(); |
07 | context.Cache.Add(key, uml, null, DateTime.Now.AddSeconds(60), System.Web.Caching.Cache.NoSlidingExpiration, |
08 | System.Web.Caching.CacheItemPriority.Default, null); |
10 | context.Response.ContentType = "text/plain"; |
11 | context.Response.Write(key); |
它只是将其短暂的存储在缓存之中,因为当获得GUID后立刻就会触发GetImage.ashx。
01 | public void ProcessRequest (HttpContext context) { |
03 | string key = context.Request["key"]; |
04 | string umltext = context.Cache[key] as string; |
06 | context.Response.ContentType = "image/png"; |
07 | context.Response.Cache.SetCacheability(HttpCacheability.Private); |
08 | context.Response.Cache.SetExpires(DateTime.Now.AddMinutes(5)); |
10 | if (context.Request["saveMode"] == "1") |
12 | context.Response.AddHeader("Content-Disposition", "attachment; filename=diagram.png"); |
15 | var connection = PlantUmlConnectionPool.Get(TimeSpan.FromSeconds(15)); |
16 | if (connection == null) |
17 | throw new ApplicationException("Connection not found in pool."); |
21 | var uploadFileName = key + ".txt"; |
22 | var downloadFileName = key + ".png"; |
24 | connection.Upload(uploadFileName, |
25 | "@startuml " + downloadFileName + Environment.NewLine + |
26 | umltext + Environment.NewLine + |
29 | System.Threading.Thread.Sleep(100); |
31 | using (MemoryStream memoryStream = new MemoryStream()) |
33 | connection.Download(downloadFileName, stream => |
35 | byte[] buffer = new byte[0x1000]; |
37 | while ((bytesRead = stream.Read(buffer, 0, 0x1000)) > 0) |
39 | memoryStream.Write(buffer, 0, bytesRead); |
首先,从查询字符串中进行读取然后从缓存中读取UML 文本.紧接着,它会获取一个到PlantUml ftp服务器的链接(下一节将会被提到)并且将UML文本作为一个文件上传到FTP服务器,PlantUml 然后生成图片以便下载。然后该Handler将会从ftp服务器上下载。最后添加水印并返回给浏览器。
01 | using (Bitmap b = Bitmap.FromStream(memoryStream, true, false) as Bitmap) |
02 | using (Bitmap newBitmap = new Bitmap(b.Width, b.Height + 20)) |
03 | using (Graphics g = Graphics.FromImage(newBitmap)) |
06 | g.FillRectangle(Brushes.White, 0, 0, newBitmap.Width, newBitmap.Height); |
10 | SizeF size = g.MeasureString(WatermarkText, _font); |
11 | g.DrawString(WatermarkText, _font, Brushes.Black, newBitmap.Width - size.Width, newBitmap.Height - 15); |
14 | newBitmap.Save(context.Response.OutputStream, System.Drawing.Imaging.ImageFormat.Png); |
17 | context.Response.Flush(); |
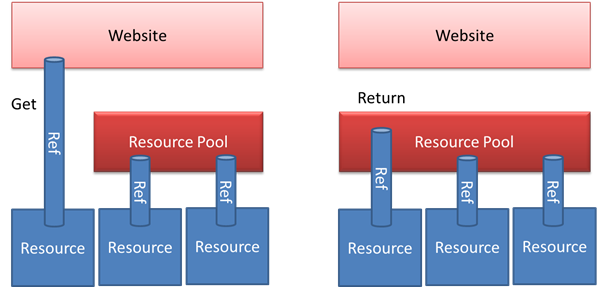
一旦作业完成,它将会返回到连接池中以便下一个会话进行连接。
1 | PlantUmlConnectionPool.Put(connection); |
这就是全部的运行过程
使用Plantuml生成图
Plantuml是一个可以作为FTP服务器运行的java应用程序,把文本以文件方式上传,然后生成图片方便下载。因为它可以作为一个FTP服务器运行,我必须有个保持运行FTP服务器的池子。我不能只是启动FTP服务器来生成图片,这样做会太慢了。所以,我得在启动应用程序时同时启动几个FTP的实例,然后一直保持与FTP服务器的连接池相连接。每当为了生成图表而触发getimage.ashx,它会从连接池里获得一个连接来处理这个请求,然后再返回到连接池里去。当你不得不在许多客户请求中共享有限数量的资源时,这是一个你可以使用的通用模式。
首先,我保持运行一个Plantuml实例的池子。在Application_Start事件中,以下代码可以启动多个Plantuml的FTP服务器,并准备好连接池。
01 | public static class PlantUmlProcessManager |
03 | private static readonly List_processes = new List(); |
05 | public static void Startup() |
07 | if (_processes.Count > 0) |
10 | var javaPath = ConfigurationManager.AppSettings["java"]; |
12 | if (!File.Exists(javaPath)) |
13 | throw new ApplicationException("Java.exe not found: " + javaPath); |
15 | var host = ConfigurationManager.AppSettings["plantuml.host"]; |
16 | var startPort = Convert.ToInt32(ConfigurationManager.AppSettings["plantuml.start_port"]); |
17 | var instances = Convert.ToInt32(ConfigurationManager.AppSettings["plantuml.instances"]); |
19 | var plantumlPath = ConfigurationManager.AppSettings["plantuml.path"]; |
20 | if (!File.Exists(plantumlPath)) |
21 | throw new ApplicationException("plantuml.jar not found in " + plantumlPath); |
23 | for (int i = 0; i < instances; i++) |
25 | var argument = "-jar " + plantumlPath + " -ftp:" + (startPort + i); |
26 | ProcessStartInfo pInfo = new ProcessStartInfo(javaPath, argument); |
28 | pInfo.CreateNoWindow = true; |
29 | pInfo.UseShellExecute = false; |
30 | pInfo.RedirectStandardInput = true; |
31 | pInfo.RedirectStandardError = true; |
32 | pInfo.RedirectStandardOutput = true; |
34 | Process process = Process.Start(pInfo); |
36 | _processes.Add(process); |
38 | PlantUmlConnection connection = new PlantUmlConnection(); |
39 | connection.Connect(host, startPort + i); |
40 | PlantUmlConnectionPool.Put(connection); |
连接池的定义如下:
01 | public static class PlantUmlConnectionPool |
03 | private readonly static Queue_connectionPool = new Queue(); |
04 | private readonly static ManualResetEvent _availableEvent = new ManualResetEvent(false); |
06 | public static PlantUmlConnection Get(TimeSpan timeout) |
08 | if (_connectionPool.Count == 0) |
10 | _availableEvent.Reset(); |
11 | if (_availableEvent.WaitOne(timeout)) |
13 | return _connectionPool.Dequeue(); |
22 | lock (_connectionPool) |
24 | if (_connectionPool.Count == 0) |
27 | return _connectionPool.Dequeue(); |
算法如下:
把连接放回池中很简单:
1 | public static void Put(PlantUmlConnection connection) |
4 | _connectionPool.Enqueue(connection); |
为了能维持一个到时刻运行的FTP服务器的连接,我使用了 Alex Pilotti 的 FTP 客户端(http://ftps.codeplex.com)。
01 | public class PlantUmlConnection : IDisposable |
03 | private FTPSClient client = new FTPSClient(); |
06 | public void Connect(string host, int port) |
10 | Debug.WriteLine("Connecting to FTP " + host + ":" + port); |
11 | client.Connect(host, port, |
12 | new NetworkCredential("yourUsername","yourPassword"), |
13 | ESSLSupportMode.ClearText, |
21 | EDataConnectionMode.Active |
23 | Debug.WriteLine("Connection successful " + host + ":" + port); |
在FTP服务器初始化期间,对FTP服务器的每个实例来说,这个连接类的一个实例会建立一个打开的连接。
当需要生成一个图表的时候,它将一个包含图表代码文本的文本文件上传到FTP服务器,然后调用plantuml引擎根据该文件生成图表。
01 | public void Upload(string remoteFileName, string content) |
03 | Debug.WriteLine("Uploading to " + _host + ":" + _port + "/" + remoteFileName); |
04 | using (var stream = client.PutFile(remoteFileName)) |
06 | byte[] data = Encoding.UTF8.GetBytes(content); |
07 | stream.Write(data, 0, data.Length); |
09 | Debug.WriteLine("Successfully uploaded " + _host + ":" + _port + "/" + remoteFileName); |
然后你可以用 Download 函数来下载图表:
01 | public void Download(string remoteFileName, ActionprocessStream) |
03 | Debug.WriteLine("Downloading from " + _host + ":" + _port + "/" + remoteFileName); |
04 | using (var stream = client.GetFile(remoteFileName)) |
06 | processStream(stream); |
09 | Debug.WriteLine("Successfully downloaded " + _host + ":" + _port + "/" + remoteFileName); |
这就是所有关于 PlantUML 服务器管理的部分。
在你自己的服务器上配置 codeuml
你可以在你自己的服务器上安装 codeUML 。在这种情况下,你需要认真按说明文件操作,因为要想让 PlantUML 引擎能够工作,需要一些细心的设置。为了你的方便,我把说明文件粘贴在这里,但请你注意查看最新的代码和说明文件。
01 | There are several pre-requisits before you run this website. |
05 | Download and install latest Java. Make sure you know where |
06 | you are installing java. Usually it will be: |
07 | "c:\Program Files\Java\jre6\bin" |
10 | ============================================================= |
11 | First, you have to install graphviz. |
13 | Once you have installed, create a SYSTEM environment variable |
14 | called GRAPHVIZ_DOT which points to the dot.exe found in the |
15 | graphviz bin folder. Usually it is: |
16 | c:\Program Files\Graphviz2.26.3\bin\dot.exe |
17 | Once you have done so, start a new command line window and run |
21 | GRAPHVIZ_DOT=c:\Program Files\Graphviz2.26.3\bin\dot.exe |
24 | 2. Installing on IIS 7+ |
25 | ============================================================= |
26 | If you are hosting this on a Windows Server, there are various |
28 | * First create a new app pool. |
29 | * Create a new website or virtual directory that points to this |
31 | * Give the app pool user (IIS AppPool\YourAppPoolName or NETWORK |
33 | Read & Execute permission on the: |
34 | ** Java folder. Eg. "c:\Program Files\Java\jre6\bin" |
35 | ** Graphviz bin folder: Eg c:\Program Files\Graphviz2.26.3\bin |
36 | ** Within this website: |
39 | 3. Configuring web.config |
40 | ============================================================== |
41 | You must fix the following entries before you can run:These are both absolute paths. No relative path allowed. |
43 | 4. Running and testing the website |
44 | ============================================================ |
47 | It will take a while to start the page as it tries to launch java |
48 | and run the plantuml engine at the application_start event. |
49 | Once the site is up and running, click on Test button to test |
50 | a UML generation. If it works, you have configured everything |
52 | Disable the Manage.aspx on production. |
结论
Codeuml 作为一个Web应用程序,虽然较小,但它展示了如何建立高度灵敏的模拟 Visual Studio 样式的 IDE 的AJAX前端,和在服务器上针对有限资源创建昂贵的资源池来有效地生成输出。


 930
930

 被折叠的 条评论
为什么被折叠?
被折叠的 条评论
为什么被折叠?
 到【灌水乐园】发言


