


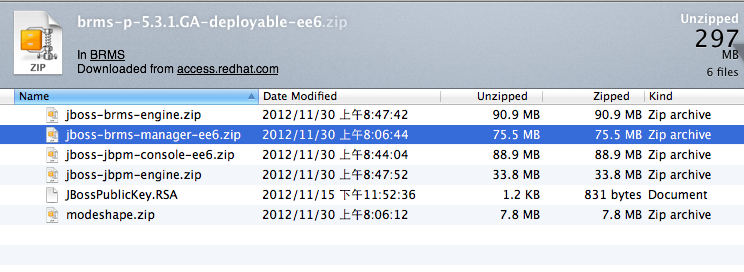
1. 首先,你要先有兩個檔案,
A. BRMS 的檔案, brms-p-5.3.1.GA-deployable-ee6.zip
B. EAP 6.1的檔案, jboss-eap-6.1.0.zip
接下來,我們先安裝JBoss EAP 6.1,安裝方法也是老樣子, 先解壓縮到你的安裝路徑後即可。因為提供的WAR檔是檔案夾形式的,所以這裡是用 Standalone mode 安裝。
2. 將BRMS 所需要使用的WAR檔,部署到 JBoss EAP 6.1上,很簡單,
A. 解壓縮 brms-p-5.3.1.GA-deployable-ee6.zip 裡面的 jboss-brms-manager-ee6.zip 。
 打開裡面會有一個 jboss-brms.war 的folder, 請把這個放到你的EAP_install_path/standalone/deployments 的目錄下

B. 解壓縮 brms-p-5.3.1.GA-deployable-ee6.zip 裡面的 jboss-jbpm-console-ee6.zip
打開裡面會有四個war的folder,
請把所有的檔案都放到你的 EAP_install_path/standalone/deployments 的目錄下
C. 請在 EAP_install_path/standalone/deployments 的目錄下建立五個檔案 (內容可空白)

3. 修改 EAP_install_path/standalone/configuration 下的 standalone.xml (如果你使用別的xml, 請記得改對咧~)!
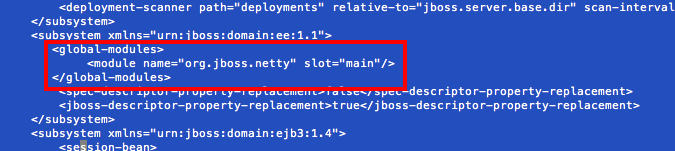
A. 設定讀取netty的相關library, 請找到 Java EE 的 subsystem, 加上這段XML.

<global-modules>
<module name="org.jboss.netty" slot="main"/>
</global-modules>
B. 增加BRMS 使用的datasource設定,這邊使用的是內建的h2 資料庫,如果你喜歡,也可以建立在普通的RDBMS, 有機會我再來講怎麼建立。
請找到 datasource 的 subsystem,
基本上,只要把原先那個ExampleDS的 datasource整個複製,改成jbpmDS 即可。

<datasource jndi-name="java:jboss/datasources/jbpmDS" pool-name="jbpmDS" enabled="true" use-java-context="true">
<connection-url>jdbc:h2:mem:test;DB_CLOSE_DELAY=-1</connection-url>
<driver>h2</driver>
<security>
</security>
</datasource>
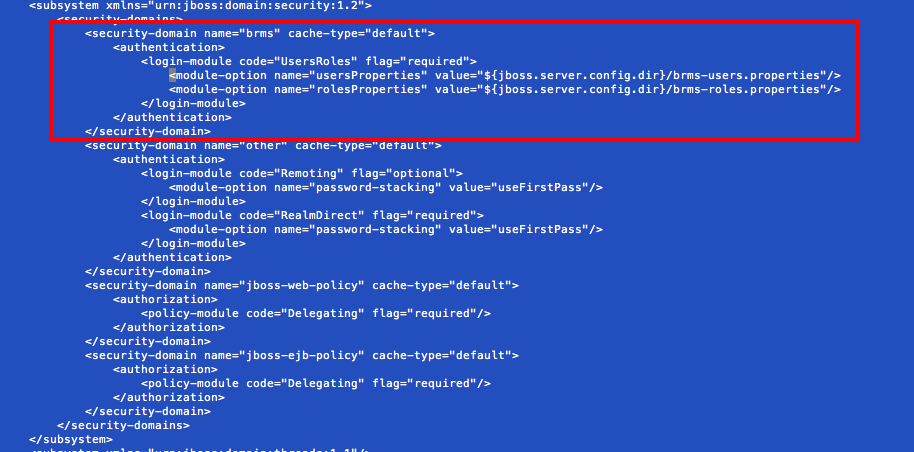
B. 使用者登入認證設定。
請找到 security 的 subsystem,新增一個brms專用的認證設定。(到我們指定的地方抓取login 的ID 與 Password. )

<security-domain name="brms" cache-type="default">
<authentication>
<module-option name="rolesProperties" value="${jboss.server.config.dir}/brms-roles.properties"/>
</login-module>
</authentication>
</security-domain>
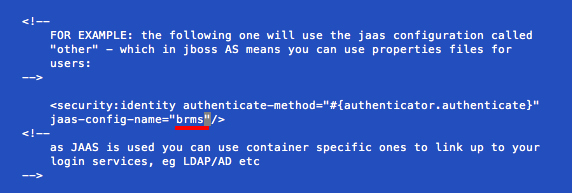
這裡也需要去修改 EAP_install_path/standalone/deployments/jboss-brms.war/WEB-INF/components.xml ,將原先的jaas-config-name 油 jmx-console 改為 brms

4. 最後再去 EAP_install_path/standalone/configuration 下,增加brms-users.properties 與 brms-users.properties 與 brms-roles.properties 兩個檔案,並在裡面打入要使用的使用者以及他/她的群組。即可啓動拉~!

在 brms-users.properties 增加使用者,如
admin=admin
在 brms-roles.properties 寫上對應的角色,如
username=JBossAdmin,httpInvoker,user,admin
4. 啟動JBoss EAP 6.1 Server, 位置在 EAP_install_path/bin 下的 ./standalone.sh

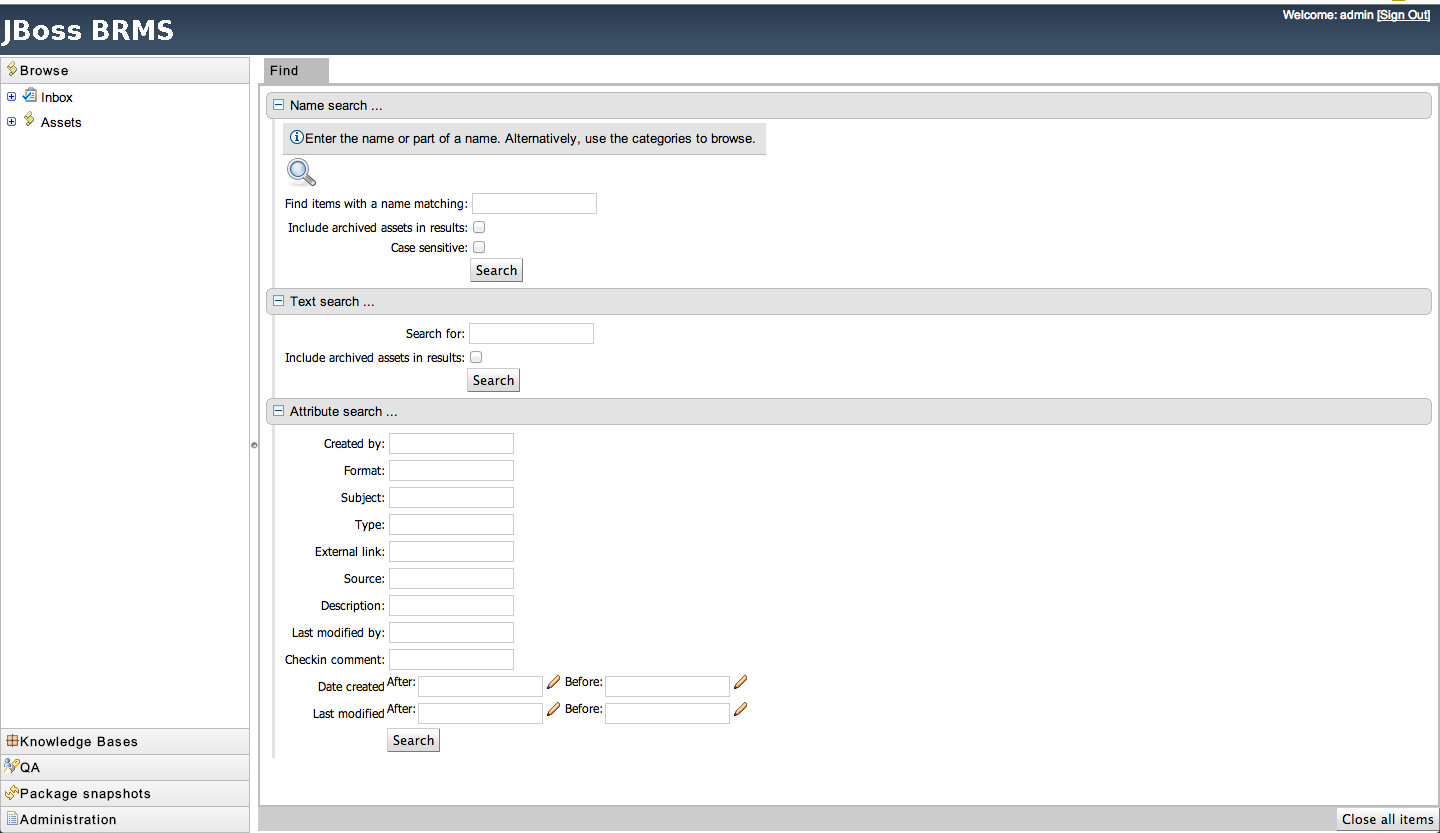
到 http://localhost:8080/jboss-brms/ 下,用剛剛的ID/PWD 登入,
看到畫面就成功拉~

以上。
A. BRMS 的檔案, brms-p-5.3.1.GA-deployable-ee6.zip
B. EAP 6.1的檔案, jboss-eap-6.1.0.zip
接下來,我們先安裝JBoss EAP 6.1,安裝方法也是老樣子, 先解壓縮到你的安裝路徑後即可。因為提供的WAR檔是檔案夾形式的,所以這裡是用 Standalone mode 安裝。
2. 將BRMS 所需要使用的WAR檔,部署到 JBoss EAP 6.1上,很簡單,
A. 解壓縮 brms-p-5.3.1.GA-deployable-ee6.zip 裡面的 jboss-brms-manager-ee6.zip 。

B. 解壓縮 brms-p-5.3.1.GA-deployable-ee6.zip 裡面的 jboss-jbpm-console-ee6.zip
打開裡面會有四個war的folder,
- business-central-server.war
- business-central.war
- designer.war
- jbpm-human-task.war
請把所有的檔案都放到你的 EAP_install_path/standalone/deployments 的目錄下
C. 請在 EAP_install_path/standalone/deployments 的目錄下建立五個檔案 (內容可空白)
- jboss-brms.war.dodeploy
- business-central.war.dodeploy
- business-central-server.war.dodeploy
- desginer.war.dodeploy
- jbpm-human-task.war.dodeploy

3. 修改 EAP_install_path/standalone/configuration 下的 standalone.xml (如果你使用別的xml, 請記得改對咧~)!
A. 設定讀取netty的相關library, 請找到 Java EE 的 subsystem, 加上這段XML.
<global-modules>
<module name="org.jboss.netty" slot="main"/>
</global-modules>
B. 增加BRMS 使用的datasource設定,這邊使用的是內建的h2 資料庫,如果你喜歡,也可以建立在普通的RDBMS, 有機會我再來講怎麼建立。
請找到 datasource 的 subsystem,
基本上,只要把原先那個ExampleDS的 datasource整個複製,改成jbpmDS 即可。

<datasource jndi-name="java:jboss/datasources/jbpmDS" pool-name="jbpmDS" enabled="true" use-java-context="true">
<connection-url>jdbc:h2:mem:test;DB_CLOSE_DELAY=-1</connection-url>
<driver>h2</driver>
<security>
</security>
</datasource>
B. 使用者登入認證設定。
請找到 security 的 subsystem,新增一個brms專用的認證設定。(到我們指定的地方抓取login 的ID 與 Password. )
<security-domain name="brms" cache-type="default">
<authentication>
<module-option name="rolesProperties" value="${jboss.server.config.dir}/brms-roles.properties"/>
</login-module>
</authentication>
</security-domain>
這裡也需要去修改 EAP_install_path/standalone/deployments/jboss-brms.war/WEB-INF/components.xml ,將原先的jaas-config-name 油 jmx-console 改為 brms
4. 最後再去 EAP_install_path/standalone/configuration 下,增加brms-users.properties 與 brms-users.properties 與 brms-roles.properties 兩個檔案,並在裡面打入要使用的使用者以及他/她的群組。即可啓動拉~!

在 brms-users.properties 增加使用者,如
admin=admin
在 brms-roles.properties 寫上對應的角色,如
username=JBossAdmin,httpInvoker,user,admin
4. 啟動JBoss EAP 6.1 Server, 位置在 EAP_install_path/bin 下的 ./standalone.sh

到 http://localhost:8080/jboss-brms/ 下,用剛剛的ID/PWD 登入,
看到畫面就成功拉~
以上。


 181
181

 被折叠的 条评论
为什么被折叠?
被折叠的 条评论
为什么被折叠?
 到【灌水乐园】发言


