


ContentProvider是一种共享型组件,它通过Binder向其他组件或者其他应用程序提供数据,当ContentProvider所在进程启动时候,ContentProvider会被
同时启动并被发布到AMS中,需要注意的是:ContentProvider的onCreate要优先于Application的onCreate而执行。
ContentProvider的初始化过程
Application的创建
我们都知道当一个应用启动的时候,会最先执行ActivityThread#main方法、那么ContentProvider的初始化过程也一定是在这里进行的。
public static void main(String[] args) {
        ...
        Looper.prepareMainLooper();

        ActivityThread thread = new ActivityThread();
        // attach方法中会初始化很多,比如绑定ContextImpl等
        thread.attach(false);

        if (sMainThreadHandler == null) {
            sMainThreadHandler = thread.getHandler();
        }

        Looper.loop();

}
ActivityThread#attach
private void attach(boolean system) {
        if (!system) {
            final IActivityManager mgr = ActivityManagerNative.getDefault();
            try {
                // 调用AMS的attachApplication,并且将ApplicationThread实例传递给AMS,ApplicationThread是一个Binder对象,主要用于ActivityThread和AMS通信
                mgr.attachApplication(mAppThread);
            } catch (RemoteException ex) {
                // Ignore
            }

        } else {
            try {
                ContextImpl context = ContextImpl.createAppContext(
                        this, getSystemContext().mPackageInfo);
                mInitialApplication = context.mPackageInfo.makeApplication(true, null);
                mInitialApplication.onCreate();
            } catch (Exception e) {
                throw new RuntimeException(
                        "Unable to instantiate Application():" + e.toString(), e);
            }
        }
        ....
}
ActivityManagerService#attachApplication
@Override
public final void attachApplication(IApplicationThread thread) {
        synchronized (this) {
            int callingPid = Binder.getCallingPid();
            final long origId = Binder.clearCallingIdentity();
            // 调用了attachApplicationLocked传递ApplicationThread
            attachApplicationLocked(thread, callingPid);
            Binder.restoreCallingIdentity(origId);
        }
}
ActivityManagerService#attachApplicationLocked
private final boolean attachApplicationLocked(IApplicationThread thread,
                                                  int pid) {
        ....
        try {
            // thread是一个ApplicationThread实例
            thread.bindApplication(processName, appInfo, providers, app.instrumentationClass,
                    profilerInfo, app.instrumentationArguments, app.instrumentationWatcher,
                    app.instrumentationUiAutomationConnection, testMode, enableOpenGlTrace,
                    isRestrictedBackupMode || !normalMode, app.persistent,
                    new Configuration(mConfiguration), app.compat,
                    getCommonServicesLocked(app.isolated),
                    mCoreSettingsObserver.getCoreSettingsLocked());

        } catch (Exception e) {
        }
        ....
        return true;
}
ApplicationThread#bindApplication
public final void bindApplication(String processName, ApplicationInfo appInfo,
                List<ProviderInfo> providers, ComponentName instrumentationName,
                ProfilerInfo profilerInfo, Bundle instrumentationArgs,
                IInstrumentationWatcher instrumentationWatcher,
                IUiAutomationConnection instrumentationUiConnection, int debugMode,
                boolean enableOpenGlTrace, boolean isRestrictedBackupMode, boolean persistent,
                Configuration config, CompatibilityInfo compatInfo, Map<String, IBinder> services,
                Bundle coreSettings) {

            ....
            AppBindData data = new AppBindData();
            data.processName = processName;
            data.appInfo = appInfo;
            data.providers = providers;
            data.instrumentationName = instrumentationName;
            data.instrumentationArgs = instrumentationArgs;
            data.instrumentationWatcher = instrumentationWatcher;
            data.instrumentationUiAutomationConnection = instrumentationUiConnection;
            data.debugMode = debugMode;
            data.enableOpenGlTrace = enableOpenGlTrace;
            data.restrictedBackupMode = isRestrictedBackupMode;
            data.persistent = persistent;
            data.config = config;
            data.compatInfo = compatInfo;
            data.initProfilerInfo = profilerInfo;
            // 发送BIND_APPLICATION消息,交给H处理
            sendMessage(H.BIND_APPLICATION, data);
}
H#handleMessage
case BIND_APPLICATION:
     AppBindData data = (AppBindData)msg.obj;
     handleBindApplication(data);
     break;


private void handleBindApplication(AppBindData data) {
        ....
        try {
            // 创建Application
            Application app = data.info.makeApplication(data.restrictedBackupMode, null);
            mInitialApplication = app;
            if (!data.restrictedBackupMode) {
                List<ProviderInfo> providers = data.providers;
                if (providers != null) {
                    // 加载provider
                    installContentProviders(app, providers);
                }
            }

            try {
                // 调用Application的onCreate
                mInstrumentation.callApplicationOnCreate(app);
            } catch (Exception e) {
            }
        } finally {
            StrictMode.setThreadPolicy(savedPolicy);
        }
}
ContentProvider的初始化过程小结:
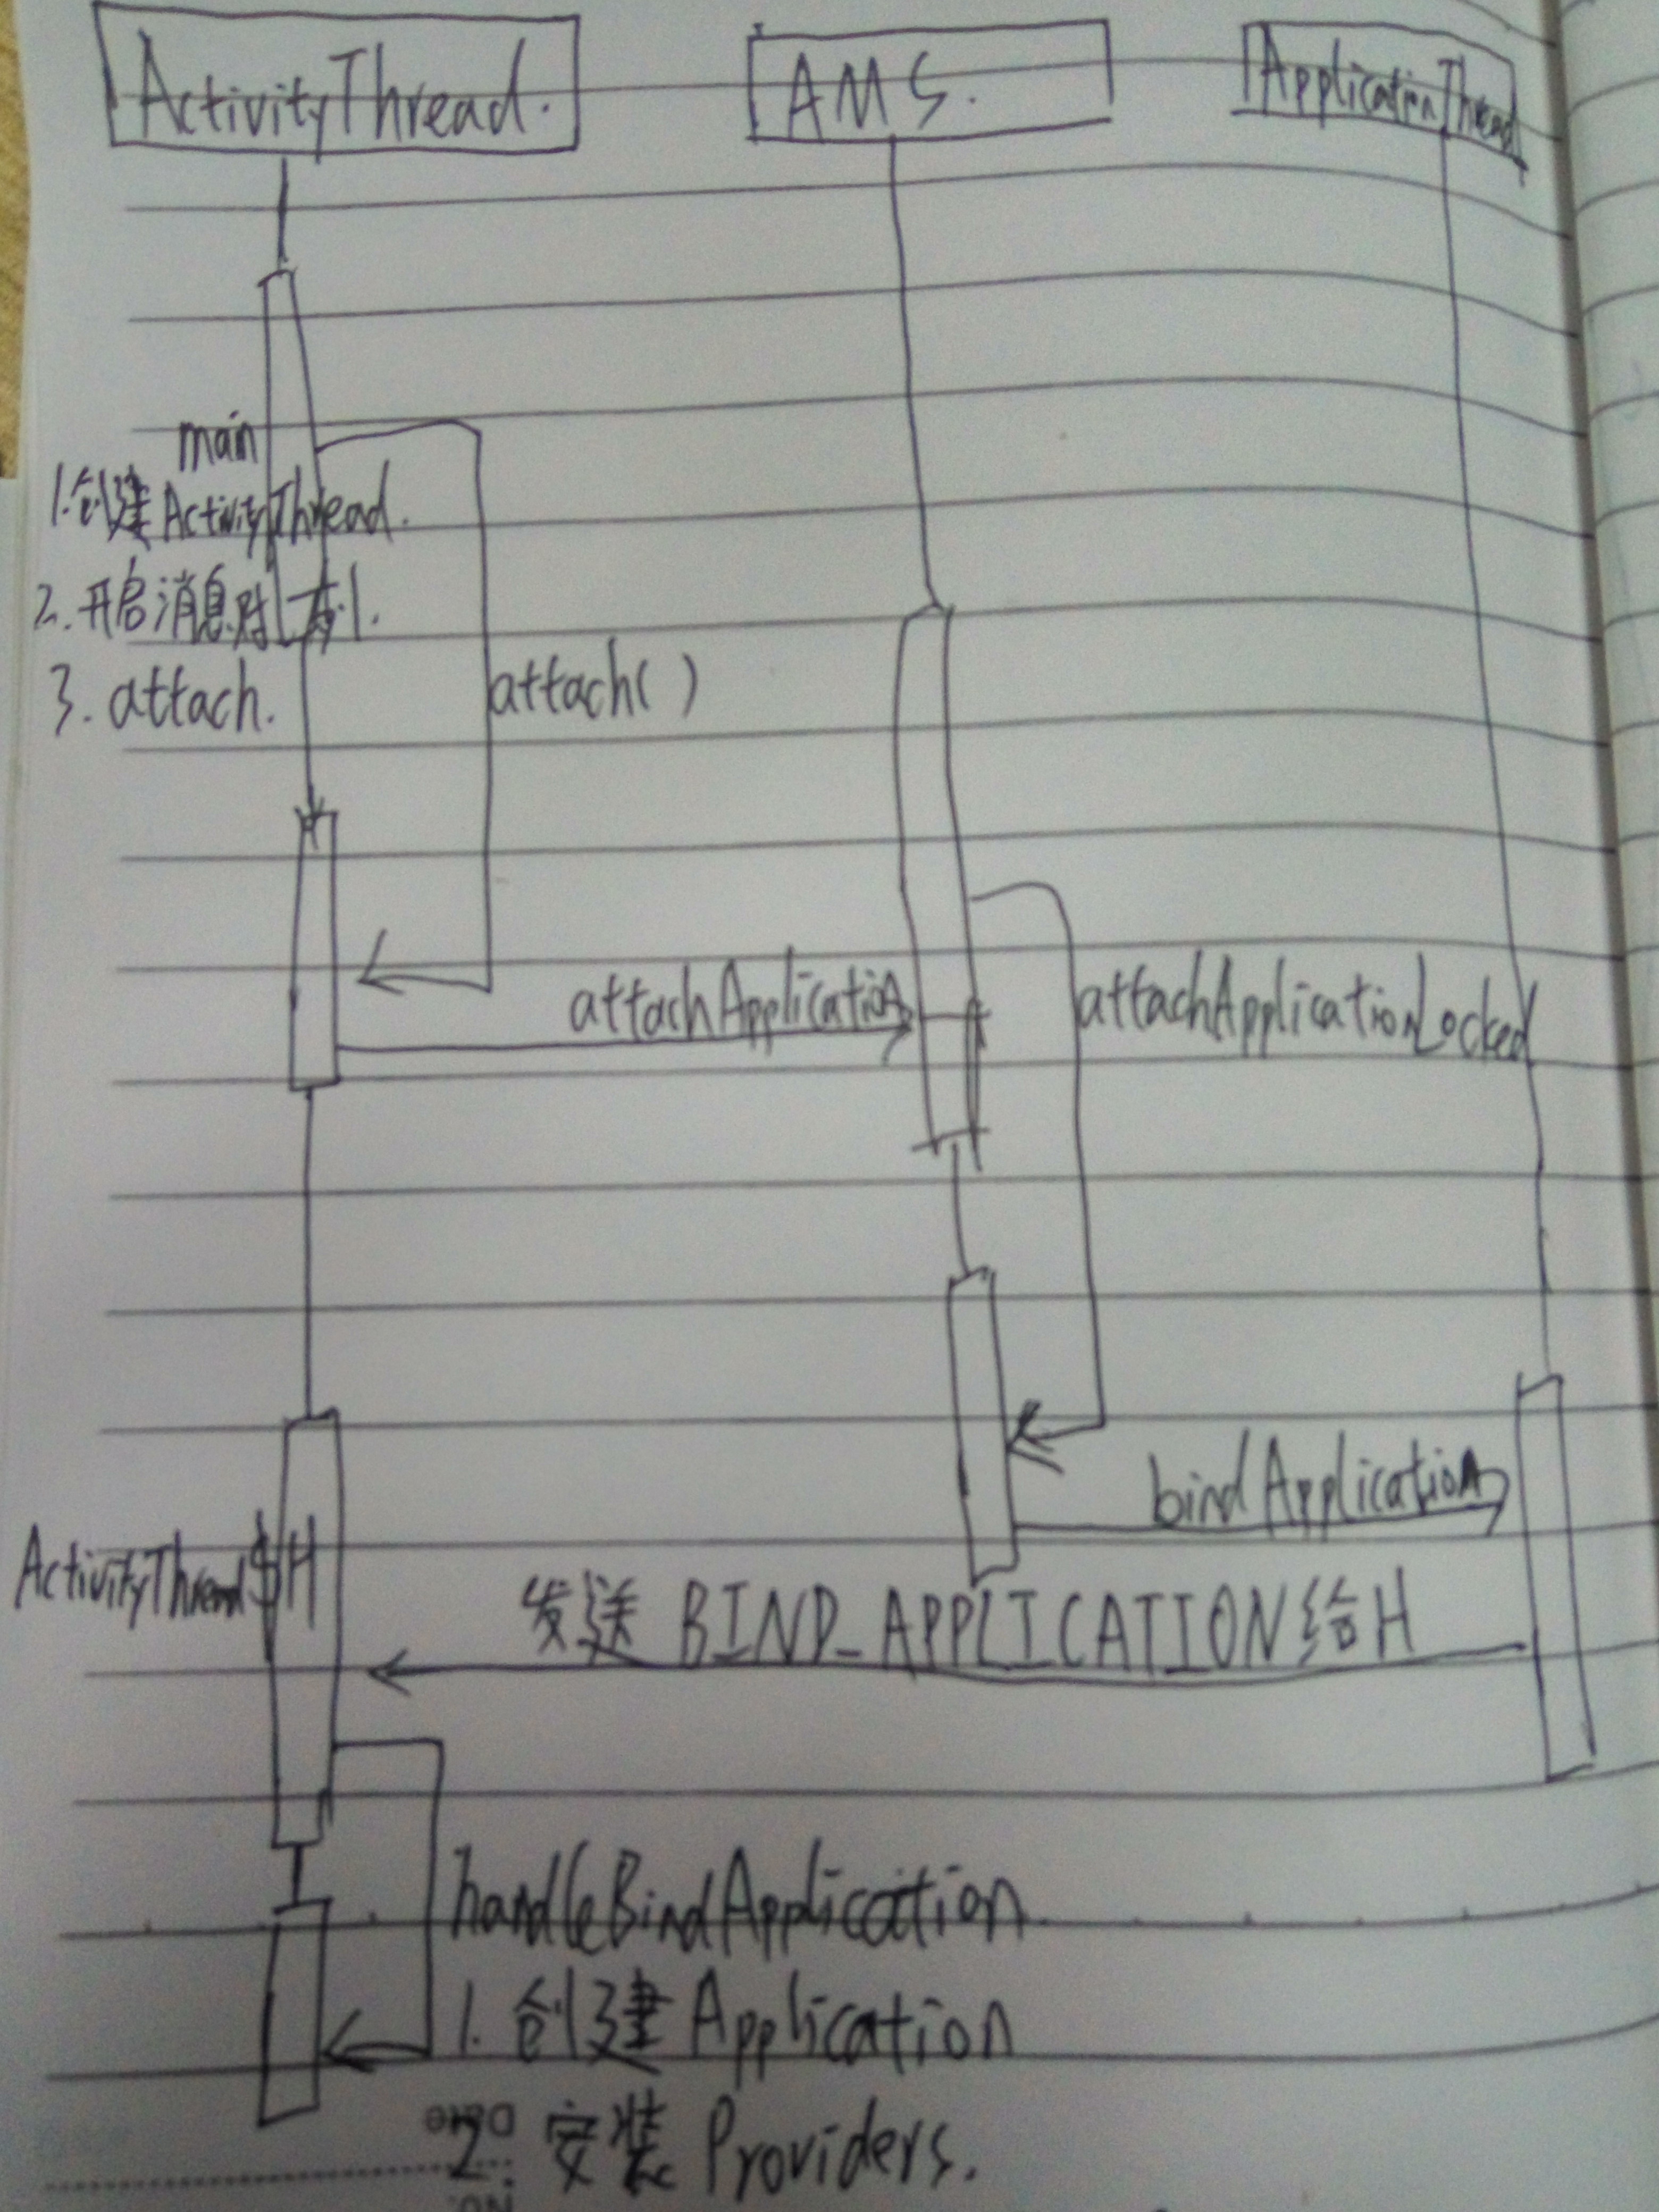
当一个应用启动的时候,会最先执行ActivityThread#main方法,在会最先执行main方法中会创建ActivityThread实例,并开启主线程的消息队列,
然后在ActivityThread#attach中会远程调用AMS中的attachApplication,并且将ApplicationThread实例传递给AMS,ApplicationThread是一个Binder对象,
主要用于ActivityThread和AMS通信,接着会回到ApplicationThread#bindApplication,接着交给H处理绑定application,在handleBindApplication中,
先创建Application,在加载provider,最后调用Application的onCreate,如下图:
ContentResolver访问数据源
我们可以通过ContentResolver来访问ContentProvider中提供的数据,ContentResolver是一个抽象类,我们可以通过Context的getContentResolver来获取,实际上
获取的是ApplicationContentResolver,ApplicationContentResolver继承自ContentResolver,当ContentProvider所在的进程没有启动的时候,第一次访问时候,
会触发ContentProvider的创建和其所在进程的启动,通过增删查改四个方法都可以触发,我们以query为栗子:
获取ContentResolver实现类
@Override
public ContentResolver getContentResolver() {
        // mContentResolver是ApplicationContentResolver的一个实例
        return mContentResolver;
}


private static final class ApplicationContentResolver extends ContentResolver {
        private final ActivityThread mMainThread;
        private final UserHandle mUser;

        public ApplicationContentResolver(
                Context context, ActivityThread mainThread, UserHandle user) {
            super(context);
            mMainThread = Preconditions.checkNotNull(mainThread);
            mUser = Preconditions.checkNotNull(user);
        }

        @Override
        protected IContentProvider acquireProvider(Context context, String auth) {
            return mMainThread.acquireProvider(context,
                    ContentProvider.getAuthorityWithoutUserId(auth),
                    resolveUserIdFromAuthority(auth), true);
        }

        @Override
        protected IContentProvider acquireUnstableProvider(Context c, String auth) {
            return mMainThread.acquireProvider(c,
                    ContentProvider.getAuthorityWithoutUserId(auth),
                    resolveUserIdFromAuthority(auth), false);
        }

        //释放当前Provider
        @Override
        public boolean releaseProvider(IContentProvider provider) {
            return mMainThread.releaseProvider(provider, true);
        }

        @Override
        public boolean releaseUnstableProvider(IContentProvider icp) {
            return mMainThread.releaseProvider(icp, false);
        }
     ....
}
可以看到在ApplicationContentResolver中主要复写了父类ContentResolver中的acquireProvider和acquireUnstableProvider这两个方法,其实,当我们
执行”增删查改”任何一个操作时,最终都会由acquireUnstableProvider获取的IContentProvider实例执行。
调用query方法查询数据
public final @Nullable Cursor query(final @NonNull Uri uri, @Nullable String[] projection,
            @Nullable String selection, @Nullable String[] selectionArgs,
            @Nullable String sortOrder, @Nullable CancellationSignal cancellationSignal) {
        IContentProvider unstableProvider = acquireUnstableProvider(uri);
        if (unstableProvider == null) {
            return null;
        }
        IContentProvider stableProvider = null;
        Cursor qCursor = null;
        try {
            try {
                // 通过unstableProvider执行查询操作
                qCursor = unstableProvider.query(mPackageName, uri, projection,
                        selection, selectionArgs, sortOrder, remoteCancellationSignal);
            } catch (DeadObjectException e) {
                // 远程进程死亡
                unstableProviderDied(unstableProvider);
                // 当unstable死亡后,再创建stable类型的provider
                stableProvider = acquireProvider(uri);
                if (stableProvider == null) {
                    return null;
                }
                // 再次执行查询操作
                qCursor = stableProvider.query(mPackageName, uri, projection,
                        selection, selectionArgs, sortOrder, remoteCancellationSignal);
            }
            if (qCursor == null) {
                return null;
            }

            stableProvider = null;
            qCursor = null;
            return wrapper;
        } catch (RemoteException e) {
            return null;
        } finally {
            //  释放资源
            if (qCursor != null) {
                qCursor.close();
            }
            if (cancellationSignal != null) {
                cancellationSignal.setRemote(null);
            }
            if (unstableProvider != null) {
                releaseUnstableProvider(unstableProvider);
            }
            if (stableProvider != null) {
                releaseProvider(stableProvider);
            }
        }
}
如上面所说,最终交给了ApplicationContentResolver中acquireUnstableProvider获取到的IContentProvider接口实例取执行具体的操作,所以接下来看下acquireUnstableProvider方法
@Override
protected IContentProvider acquireUnstableProvider(Context c, String auth) {
        // mMainThread是ActivityThread的实例
        return mMainThread.acquireProvider(c,
               ContentProvider.getAuthorityWithoutUserId(auth),
               resolveUserIdFromAuthority(auth), false);
}

public final IContentProvider acquireProvider(
            Context c, String auth, int userId, boolean stable) {
        // 在ActivityThread中有一个mProviderMap的集合,每次会先从这里获取,如果不存在,则在创建对应的Provider并存入mProviderMap中
        final IContentProvider provider = acquireExistingProvider(c, auth, userId, stable);
        if (provider != null) {
            return provider;
        }
        IActivityManager.ContentProviderHolder holder = null;
        // 通过installProvider创建ContentProvider,并调用其onCreate方法
        holder = installProvider(c, holder, holder.info,
                true /*noisy*/, holder.noReleaseNeeded, stable);
        return holder.provider;
}
ActivityThread#installProvider
private IActivityManager.ContentProviderHolder installProvider(Context context,
                                                                   IActivityManager.ContentProviderHolder holder, ProviderInfo info,
                                                                   boolean noisy, boolean noReleaseNeeded, boolean stable) {
        ContentProvider localProvider = null;
        IContentProvider provider;
        if (holder == null || holder.provider == null) {
            // 创建对应包的Context对象
            Context c = null;
            ApplicationInfo ai = info.applicationInfo;
            if (context.getPackageName().equals(ai.packageName)) {
                c = context;
            } else if (mInitialApplication != null &&
                    mInitialApplication.getPackageName().equals(ai.packageName)) {
                c = mInitialApplication;
            } else {
                try {
                    c = context.createPackageContext(ai.packageName,
                            Context.CONTEXT_INCLUDE_CODE);
                } catch (PackageManager.NameNotFoundException e) {
                    // Ignore
                }
            }
            try {
                //通过ClassLoader加载ContentProvider
                final java.lang.ClassLoader cl = c.getClassLoader();
                localProvider = (ContentProvider)cl.
                        loadClass(info.name).newInstance();
                provider = localProvider.getIContentProvider();
                if (provider == null) {
                    return null;
                }
                // 在ContentProvider.attachInfo方法中,会调用其onCreate方法
                localProvider.attachInfo(c, info);
            } catch (java.lang.Exception e) {
                return null;
            }
        } else {
            provider = holder.provider;
        }
        ....
        // 在installProviderAuthoritiesLocked中会将当前providerf放入mProviderMap集合中
        pr = installProviderAuthoritiesLocked(provider, localProvider, holder);
        ....

        return retHolder;
}
上面 方法主要做了三件事情:
1. 创建对应包的Context对象
2. 通过ClassLoader加载ContentProvider,并执行attachInfo,在attachInfo中会执行当前provider的onCreate方法
3. 将当前provider放入mProviderMap集合中
到此为止,在代码中通过ContentResolver来访问操作数据时候,对应的ContentProvider也已经成功调用onCreate并且启动成功,并且ContentProvider所在进程的
Application也已经启动了。此时就可以通过AMS来访问该ContentProvider了,需要注意的是,该ContentProvider其实是一个Binder类型的对象IContentProvider,
在android系统中有一个抽象类ContentProviderNative实现了IContentProvider接口,其中ContentProvider的内部类Transport又继承自ContentProviderNative,所以
其他应用调用IContentProvider的query方法,最终会以进程间通信的方式调用到了ContentProvider$Transport的query方法.
自定义contentprovider
在Android开发中,有时需要在一个应用中调用操作系统中的另一个应用,而这个操作需要用到contentprovider,今天学习自定义的contentprovider,在android中contentprovider实际上是操作sqlite数据库来增删查改数据的,所以我们需要先写一个继承自SqliteOpenhelper的类,来创建数据库
MysqliteOpenhelper类
public class MySqliteOpenhelper extends SQLiteOpenHelper {
    private String dbName = "people.db";
    public MySqliteOpenhelper(Context context, String name,
            CursorFactory factory, int version) {
        super(context, name, null,1);

    }

    @Override
    public void onCreate(SQLiteDatabase db) {
        //创建userinfo表的sql语句
        String sql = "create table userinfo(id int auto_increate,name varchar(30),age int,phone varchar(50))";
        db.execSQL(sql);//创建表
    }

    @Override
    public void onUpgrade(SQLiteDatabase arg0, int arg1, int arg2) {
    }

}
UserInfo实体类
public class UserInfo {
    private int id;
    private String name;
    private String phone;
    private int age;
    public int getId() {
        return id;
    }
    public void setId(int id) {
        this.id = id;
    }
    public String getName() {
        return name;
    }
    public void setName(String name) {
        this.name = name;
    }
    public String getPhone() {
        return phone;
    }
    public void setPhone(String phone) {
        this.phone = phone;
    }
    public int getAge() {
        return age;
    }
    public void setAge(int age) {
        this.age = age;
    }
    public UserInfo(int id, String name, String phone, int age) {
        super();
        this.id = id;
        this.name = name;
        this.phone = phone;
        this.age = age;
    }
    public UserInfo(String name, String phone, int age) {
        super();
        this.name = name;
        this.phone = phone;
        this.age = age;
    }
    @Override
    public String toString() {
        return "UserInfo [id=" + id + ", name=" + name + ", phone=" + phone
                + ", age=" + age + "]";
    }
}
MyContentProvider类
创建需要向其他应用提供数据操作的contentprovider,MyContentProvider类
public class MyContentProvider extends ContentProvider {

    private  UriMatcher uriMatcher;//声明需要封装uri的urimatcher
    private  MySqliteOpenhelper helper;//声明创建数据库的helper
    private static final int USERINFO = 1;
    private static final int USERINFOS = 2;


    @Override
    public boolean onCreate() {
        // TODO Auto-generated method stub
        uriMatcher = new UriMatcher(UriMatcher.NO_MATCH);
        //添加uri
        uriMatcher.addURI("com.test.self.provider","userinfo/#",USERINFO);//#是一个通配符
        uriMatcher.addURI("com.test.self.provider","userinfos",USERINFOS);//整张表
        helper = new MySqliteOpenhelper(getContext());
        return true;
    }


    @Override
    public int delete(Uri uri, String selection, String[] selectionArgs) {
        // TODO Auto-generated method stub
        SQLiteDatabase db = helper.getWritableDatabase();
        int deleteNumber;
        switch (uriMatcher.match(uri)) {
        case USERINFOS://删除全部数据
            deleteNumber = db.delete("userinfo",selection,selectionArgs);
            return deleteNumber;
        case USERINFO:
            long id = ContentUris.parseId(uri);//解析得到需要删除的行的id
            String where = "id="+id;
            if (selection != null && !"".equals(selection)) {//如果有其他条件
                where = selection +" and "+where;
            }
            deleteNumber = db.delete("userinfo",where,selectionArgs);
            return deleteNumber;
        default:
            throw new IllegalArgumentException("unknow uri:"+uri);
        }
    }

    @Override
    public String getType(Uri arg0) {
        // TODO Auto-generated method stub
        return null;
    }

    @Override
    public Uri insert(Uri uri, ContentValues values) {
        // TODO Auto-generated method stub
        SQLiteDatabase db = helper.getWritableDatabase();
        long insertId;
        switch (uriMatcher.match(uri)) {
        case USERINFOS:
            insertId = db.insert("userinfo",null,values);//null表示每一列都插入
            return ContentUris.withAppendedId(uri, insertId);//更新uri
        default:
            throw new IllegalArgumentException("unknow uri:"+uri);
        }

    }

    @Override
    public Cursor query(Uri uri, String[] projection, String where, String[] whereArgs,
            String sortOrder) {
        // TODO Auto-generated method stub
        Cursor cursor;
        SQLiteDatabase db = helper.getWritableDatabase();//得到创建好的db数据库
        switch (uriMatcher.match(uri)) {
        case USERINFO://content://com.test.self.provider/userinfo/4,,,,对id为4的userinfo查询操作
            long id = ContentUris.parseId(uri);//解析得到id,即id=4
            String wheres = "id="+id;
            if (null != where && !"".equals(where)) {
                wheres = where +" and "+wheres;
            }
            cursor = db.query("userinfo",projection,wheres,whereArgs,null,null,sortOrder);
            return cursor;
        case USERINFOS://查询所有
            cursor = db.query("userinfo",projection,where,whereArgs,null,null,sortOrder);
            return cursor;
        default:
            throw new IllegalArgumentException("unknow uri:"+uri);
        }
    }

    @Override
    public int update(Uri uri, ContentValues values, String where, String[] whereArgs) {
        // TODO Auto-generated method stub
        SQLiteDatabase db = helper.getWritableDatabase();
        int updateNumber;
        switch (uriMatcher.match(uri)) {
        case USERINFOS://更改所有数据
            updateNumber = db.update("userinfo",values,where, whereArgs);
            return updateNumber;
        case USERINFO://更改一条数据
            long id = ContentUris.parseId(uri);
            String whereClause = "id="+id;
            if (where != null && !"".equals(where)) {
                whereClause = where + " and "+whereClause;
            }

            updateNumber= db.update("userinfo", values, whereClause, whereArgs);
            return updateNumber;
        default:
            throw new IllegalArgumentException("unknow uri:"+uri);
        }
    }

}
需要注意这里需要在清单文件里配置该provider
<provider
           android:name="com.example.mycontentprovider.MyContentProvider"
           android:authorities="com.test.self.provider"
           android:exported="true"
           >
调用contentprovider操作数据
public class MyClickListener implements OnClickListener {
        Uri uri = null;
        Cursor cursor;
        @Override
        public void onClick(View view) {
            // TODO Auto-generated method stub
            switch (view.getId()) {
            case R.id.addone:
                uri = Uri.parse("content://com.test.self.provider/userinfos");
                ContentValues values = new ContentValues();
                values.put("name","wangwu");
                values.put("phone","264546");
                values.put("age", 20);
                getContentResolver().insert(uri, values);
                break;
            case R.id.addAll:
                uri = Uri.parse("conent://com.test.self.provider/userinfos");
                for (int i = 0; i < 5; i++) {
                    ContentValues values2 = new ContentValues();
                    values2.put("name","zhangsan");
                    values2.put("phone","264546");
                    values2.put("age", 20);
                    getContentResolver().insert(uri, values2);
                }
            case R.id.deleteone:
                uri = Uri.parse("conent://com.test.self.provider/userinfo/3");//删除第三条数据
                getContentResolver().delete(uri, null, null);
            case R.id.deleteall:
                uri = uri.parse("conent://com.test.self.provider/userinfos");
                getContentResolver().delete(uri, null, null);
            case R.id.queryone:
                uri = Uri.parse("conent://com.test.self.provider/userinfo/6");//查询第六条数据
                cursor = getContentResolver().query(uri, null, null, null, null);
                if (cursor.moveToNext()) {
                    int id = cursor.getInt(cursor.getColumnIndex("id"));
                    String name = cursor.getString(cursor.getColumnIndex("name"));
                    int age = cursor.getInt(cursor.getColumnIndex("age"));
                    String phone = cursor.getString(cursor.getColumnIndex("phone"));
                    System.out.println("id---"+id+"--name--"+name+"--age--"+age+"--phone--"+phone);
                }
                cursor.close();
            case R.id.queryall:
                uri = Uri.parse("conent://com.test.self.provider/userinfos");
                cursor = getContentResolver().query(uri, null, null, null, null);
                while (cursor.moveToNext()) {
                    int id = cursor.getInt(cursor.getColumnIndex("id"));
                    String name = cursor.getString(cursor.getColumnIndex("name"));
                    int age = cursor.getInt(cursor.getColumnIndex("age"));
                    String phone = cursor.getString(cursor.getColumnIndex("phone"));
                    System.out.println("id---"+id+"--name--"+name+"--age--"+age+"--phone--"+phone);
                }
                cursor.close();
            case R.id.updateone:
                uri = Uri.parse("conent://com.test.self.provider/userinfo/6");
                ContentValues values3 = new ContentValues();
                values3.put("age",50);
                getContentResolver().update(uri, values3, null, null);
            case R.id.updateall:
                uri = Uri.parse("conent://com.test.self.provider/userinfos");
                ContentValues values4 = new ContentValues();
                values4.put("name","lisi");
                getContentResolver().update(uri, values4, null,null);
            default:
                break;
            }
} 


 6558
6558

 被折叠的 条评论
为什么被折叠?
被折叠的 条评论
为什么被折叠?
 到【灌水乐园】发言


