


注:此文交由跟我一起维护Android-PickerView 项目的伙伴totcw写的,友情链接:http://blog.csdn.net/totcw
一、概述
这是Android-pickerview系列的第三篇文章,主要是讲解一下时间选择器TimePickerView是如何封装的,关于怎么使用这个控件的可以查看Android-PickerView系列之介绍与使用篇(一),想要研究WheelView原理的话可以看这篇Android-PickerView系列之源码解析篇(二)。
二、封装
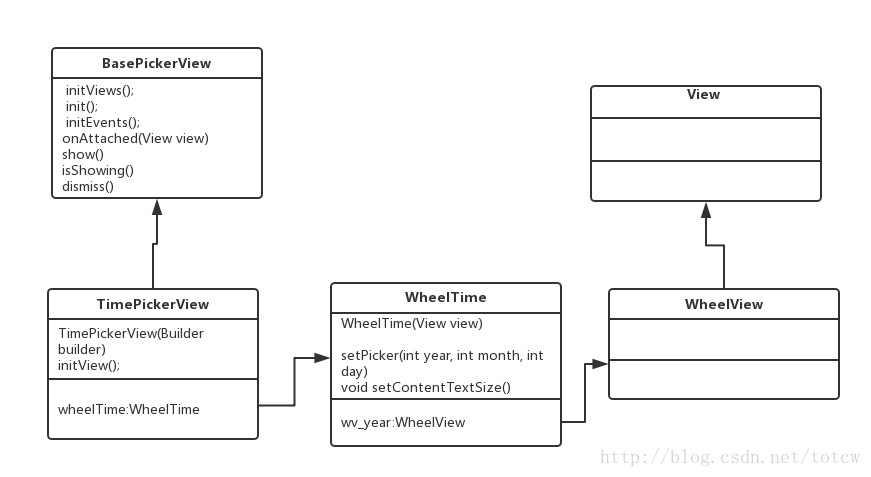
这是一张类的关系图
构造函数使用的Builder设计模式来封装的,通过builder来设置参数,最重要的就是initview()方法。源码如下:
 public TimePickerView(Builder builder) {
        super(builder.context);
        this.timeSelectListener = builder.timeSelectListener;
        this.gravity = builder.gravity;
        this.type = builder.type;
        this.Str_Submit = builder.Str_Submit;
        this.Str_Cancel = builder.Str_Cancel;
        this.Str_Title = builder.Str_Title;
        this.Color_Submit = builder.Color_Submit;
        this.Color_Cancel = builder.Color_Cancel;
        this.Color_Title = builder.Color_Title;
        this.Color_Background_Wheel = builder.Color_Background_Wheel;
        this.Color_Background_Title = builder.Color_Background_Title;
        this.Size_Submit_Cancel = builder.Size_Submit_Cancel;
        this.Size_Title = builder.Size_Title;
        this.Size_Content = builder.Size_Content;
        this.startYear = builder.startYear;
        this.endYear = builder.endYear;
        this.date = builder.date;
        this.cyclic = builder.cyclic;
        this.cancelable = builder.cancelable;
        this.label_year = builder.label_year;
        this.label_month = builder.label_month;
        this.label_day = builder.label_day;
        this.label_hours = builder.label_hours;
        this.label_mins = builder.label_mins;
        this.label_seconds = builder.label_seconds;
        this.textColorCenter = builder.textColorCenter;
        this.textColorOut = builder.textColorOut;
        this.dividerColor = builder.dividerColor;
        this.lineSpacingMultiplier = builder.lineSpacingMultiplier;
        this.isDialog = builder.isDialog;
        initView(builder.context);
    }
- 1
- 2
- 3
- 4
- 5
- 6
- 7
- 8
- 9
- 10
- 11
- 12
- 13
- 14
- 15
- 16
- 17
- 18
- 19
- 20
- 21
- 22
- 23
- 24
- 25
- 26
- 27
- 28
- 29
- 30
- 31
- 32
- 33
- 34
- 35
- 36
- 1
- 2
- 3
- 4
- 5
- 6
- 7
- 8
- 9
- 10
- 11
- 12
- 13
- 14
- 15
- 16
- 17
- 18
- 19
- 20
- 21
- 22
- 23
- 24
- 25
- 26
- 27
- 28
- 29
- 30
- 31
- 32
- 33
- 34
- 35
- 36

initView()的源码如下:
void initView(Context context) {
        initViews();
        init();
        initEvents();

      LayoutInflater.from(context).inflate(R.layout.pickerview_time, contentContainer);

        //顶部标题
        tvTitle = (TextView) findViewById(R.id.tvTitle);

        //确定和取消按钮
        btnSubmit = (Button) findViewById(R.id.btnSubmit);
        btnCancel = (Button) findViewById(R.id.btnCancel);

        btnSubmit.setTag(TAG_SUBMIT);
        btnCancel.setTag(TAG_CANCEL);

        btnSubmit.setOnClickListener(this);
        btnCancel.setOnClickListener(this);

        //设置文字
        btnSubmit.setText(TextUtils.isEmpty(Str_Submit)?context.getResources().getString(R.string.pickerview_submit):Str_Submit);
        btnCancel.setText(TextUtils.isEmpty(Str_Cancel)?context.getResources().getString(R.string.pickerview_cancel):Str_Cancel);
        tvTitle.setText(TextUtils.isEmpty(Str_Title)?"":Str_Title);//默认为空

        //设置文字颜色
        btnSubmit.setTextColor(Color_Submit==0?pickerview_timebtn_nor:Color_Submit);
        btnCancel.setTextColor(Color_Cancel==0?pickerview_timebtn_nor:Color_Cancel);
        tvTitle.setTextColor(Color_Title==0?pickerview_topbar_title:Color_Title);

        //设置文字大小
        btnSubmit.setTextSize(Size_Submit_Cancel);
        btnCancel.setTextSize(Size_Submit_Cancel);
        tvTitle.setTextSize(Size_Title);

        // 时间转轮 自定义控件,xml下面给出
        LinearLayout timePickerView = (LinearLayout) findViewById(R.id.timepicker);

        RelativeLayout rv_top_bar = (RelativeLayout) findViewById(R.id.rv_topbar);
        //设置标题颜色
        rv_top_bar.setBackgroundColor(Color_Background_Title==0?pickerview_bg_topbar:Color_Background_Title);
      //设置滚轮背景颜色  timePickerView.setBackgroundColor(Color_Background_Wheel==0?bgColor_default:Color_Background_Wheel);

        wheelTime = new WheelTime(timePickerView, type, gravity,Size_Content);

        if (startYear!=0&&endYear!=0&&startYear<=endYear){
            //设置年的起始范围
            setRange();
        }
        //设置一开始的选中时间
        setTime();

//设置单位        wheelTime.setLabels(label_year,label_month,label_day,label_hours,label_mins,label_seconds);
        //设置是否可以点击外部关闭界面
        setOutSideCancelable(cancelable);
        //设置是否循环滚动
        wheelTime.setCyclic(cyclic);
        //设置分隔线的颜色
        wheelTime.setDividerColor(dividerColor);
        //设置行距的大小
        wheelTime.setLineSpacingMultiplier(lineSpacingMultiplier);
        //设置文字颜色
        wheelTime.setTextColorOut(textColorOut);
        wheelTime.setTextColorCenter(textColorCenter);
    }
- 1
- 2
- 3
- 4
- 5
- 6
- 7
- 8
- 9
- 10
- 11
- 12
- 13
- 14
- 15
- 16
- 17
- 18
- 19
- 20
- 21
- 22
- 23
- 24
- 25
- 26
- 27
- 28
- 29
- 30
- 31
- 32
- 33
- 34
- 35
- 36
- 37
- 38
- 39
- 40
- 41
- 42
- 43
- 44
- 45
- 46
- 47
- 48
- 49
- 50
- 51
- 52
- 53
- 54
- 55
- 56
- 57
- 58
- 59
- 60
- 61
- 62
- 63
- 64
- 65
R.id.timepicker 时间选择器的xml:
<?xml version="1.0" encoding="utf-8"?>
<LinearLayout xmlns:android="http://schemas.android.com/apk/res/android"
    android:layout_width="wrap_content"
    android:layout_height="wrap_content"
    android:orientation="vertical">

    <include
        layout="@layout/include_pickerview_topbar"
        android:layout_width="match_parent"
        android:layout_height="@dimen/pickerview_topbar_height" />

    <LinearLayout
        android:id="@+id/timepicker"
        android:layout_width="fill_parent"
        android:layout_height="wrap_content"
        android:background="@android:color/white"
        android:orientation="horizontal">

        <com.bigkoo.pickerview.lib.WheelView
            android:id="@+id/year"
            android:layout_width="fill_parent"
            android:layout_height="wrap_content"
            android:layout_weight="1" />

        <com.bigkoo.pickerview.lib.WheelView

            android:id="@+id/month"
            android:layout_width="fill_parent"
            android:layout_height="wrap_content"
            android:layout_weight="1.1" />

        <com.bigkoo.pickerview.lib.WheelView
            android:id="@+id/day"
            android:layout_width="fill_parent"
            android:layout_height="wrap_content"
            android:layout_weight="1.1" />

        <com.bigkoo.pickerview.lib.WheelView
            android:id="@+id/hour"
            android:layout_width="fill_parent"
            android:layout_height="wrap_content"
            android:layout_weight="1.1" />

        <com.bigkoo.pickerview.lib.WheelView
            android:id="@+id/min"
            android:layout_width="fill_parent"
            android:layout_height="wrap_content"
            android:layout_weight="1.1" />

        <com.bigkoo.pickerview.lib.WheelView
            android:id="@+id/second"
            android:layout_width="fill_parent"
            android:layout_height="wrap_content"
            android:layout_weight="1.1" />
    </LinearLayout>


</LinearLayout>
- 1
- 2
- 3
- 4
- 5
- 6
- 7
- 8
- 9
- 10
- 11
- 12
- 13
- 14
- 15
- 16
- 17
- 18
- 19
- 20
- 21
- 22
- 23
- 24
- 25
- 26
- 27
- 28
- 29
- 30
- 31
- 32
- 33
- 34
- 35
- 36
- 37
- 38
- 39
- 40
- 41
- 42
- 43
- 44
- 45
- 46
- 47
- 48
- 49
- 50
- 51
- 52
- 53
- 54
- 55
- 56
- 57
- 58
- 1
- 2
- 3
- 4
- 5
- 6
- 7
- 8
- 9
- 10
- 11
- 12
- 13
- 14
- 15
- 16
- 17
- 18
- 19
- 20
- 21
- 22
- 23
- 24
- 25
- 26
- 27
- 28
- 29
- 30
- 31
- 32
- 33
- 34
- 35
- 36
- 37
- 38
- 39
- 40
- 41
- 42
- 43
- 44
- 45
- 46
- 47
- 48
- 49
- 50
- 51
- 52
- 53
- 54
- 55
- 56
- 57
- 58
这个方法就真正负责加载View的方法,首先调用initViews(),intViews方法会根据builder中的isDialog参数来判断是要显示成对话框模式还是显示在屏幕的下边。源码如下:
protected void initViews() {
        LayoutInflater layoutInflater = LayoutInflater.from(context);
        if (isDialog()) {
            //如果是对话框模式
            //这个是控件的布局,xml的源码在下面会贴出来
            dialogView = (ViewGroup) layoutInflater.inflate(R.layout.layout_basepickerview, null, false);
            //设置界面的背景为透明
            dialogView.setBackgroundColor(Color.TRANSPARENT);
            //这个是真正要加载时间选取器的父布局
            contentContainer = (ViewGroup) dialogView.findViewById(R.id.content_container);
            //设置对话框 左右间距屏幕30
            this.params.leftMargin = 30;
            this.params.rightMargin = 30;
            contentContainer.setLayoutParams(this.params);
            //创建对话框,将dialogView设置成dialog要显示的view
              if (dialogView != null) {
            mDialog = new Dialog(context, R.style.custom_dialog2);
            mDialog.setCancelable(true);//不能点外面取消,也不 能点back取消
            mDialog.setContentView(dialogView);
        }
            //给背景设置点击事件,这样当点击内容以外的地方会关闭界面
            dialogView.setOnClickListener(new View.OnClickListener() {
                @Override
                public void onClick(View view) {
                    dismiss();
                }
            });
        } else {
            //如果只是要显示在屏幕的下方
            //decorView是activity的根View
            decorView = (ViewGroup) ((Activity) context).getWindow().getDecorView().findViewById(android.R.id.content);
            //将控件添加到decorView中
            rootView = (ViewGroup) layoutInflater.inflate(R.layout.layout_basepickerview, decorView, false);
            rootView.setLayoutParams(new FrameLayout.LayoutParams(
                    ViewGroup.LayoutParams.MATCH_PARENT, ViewGroup.LayoutParams.MATCH_PARENT
            ));
            //这个是真正要加载时间选取器的父布局
            contentContainer = (ViewGroup) rootView.findViewById(R.id.content_container);
            contentContainer.setLayoutParams(params);
        }
    }
- 1
- 2
- 3
- 4
- 5
- 6
- 7
- 8
- 9
- 10
- 11
- 12
- 13
- 14
- 15
- 16
- 17
- 18
- 19
- 20
- 21
- 22
- 23
- 24
- 25
- 26
- 27
- 28
- 29
- 30
- 31
- 32
- 33
- 34
- 35
- 36
- 37
- 38
- 39
- 40
- 41
- 1
- 2
- 3
- 4
- 5
- 6
- 7
- 8
- 9
- 10
- 11
- 12
- 13
- 14
- 15
- 16
- 17
- 18
- 19
- 20
- 21
- 22
- 23
- 24
- 25
- 26
- 27
- 28
- 29
- 30
- 31
- 32
- 33
- 34
- 35
- 36
- 37
- 38
- 39
- 40
- 41
R.layout.layout_basepickerview的xml文件源码如下:
<?xml version="1.0" encoding="utf-8"?>
<FrameLayout
    android:id="@+id/outmost_container"
    xmlns:android="http://schemas.android.com/apk/res/android"
    android:layout_width="match_parent"
    android:layout_height="match_parent"
    android:clickable="true"
    android:background="@color/bgColor_overlay">

    <FrameLayout
        android:id="@+id/content_container"
        android:layout_width="wrap_content"
        android:layout_height="wrap_content">
    </FrameLayout>

</FrameLayout>
- 1
- 2
- 3
- 4
- 5
- 6
- 7
- 8
- 9
- 10
- 11
- 12
- 13
- 14
- 15
- 16
- 1
- 2
- 3
- 4
- 5
- 6
- 7
- 8
- 9
- 10
- 11
- 12
- 13
- 14
- 15
- 16
然后调用init()方法加载动画。然后通过LayoutInflater.inflate()方法将时间选择器的布局加载到要显示的布局contentContainer中。最后通过wheelTime 类来初始化时间选择器.在调用wheeltime的setPicker来初始化滚轮的数据.
接下来看看WheelTime的构造方法:
   public WheelTime(View view, Type type, int gravity, int textSize) {
        super();
        this.view = view;//这个view就是时间选择器的布局也就R.id.timepicker
        this.type = type;//表示要显示模式,例如:年月日时分秒,年月日
        this.gravity = gravity; 滚轮文字的显示位置 默认居中
        this.textSize = textSize;//这个表示滚轮文字的大小

    }
- 1
- 2
- 3
- 4
- 5
- 6
- 7
- 8
- 1
- 2
- 3
- 4
- 5
- 6
- 7
- 8
构造方法其实就只是给对应的属性赋值,通过调用setPicker方法来给wheelview设置数据,下面就看下它的源码:
 public void setPicker(int year, int month, int day, int h, int m, int s) {
        // 添加大小月月份并将其转换为list,方便之后的判断
        String[] months_big = {"1", "3", "5", "7", "8", "10", "12"};
        String[] months_little = {"4", "6", "9", "11"};

        final List<String> list_big = Arrays.asList(months_big);
        final List<String> list_little = Arrays.asList(months_little);

        Context context = view.getContext();
        // 年 这view就是R.layout.timepicker布局
        wv_year = (WheelView) view.findViewById(R.id.year);
        wv_year.setAdapter(new NumericWheelAdapter(startYear, endYear));// 设置"年"的显示数据
        wv_year.setLabel(context.getString(R.string.pickerview_year));// 添加文字
        wv_year.setCurrentItem(year - startYear);// 初始化时显示的数据
        wv_year.setGravity(gravity);
        // 月
        wv_month = (WheelView) view.findViewById(R.id.month);
        wv_month.setAdapter(new NumericWheelAdapter(1, 12));
        wv_month.setLabel(context.getString(R.string.pickerview_month));
        wv_month.setCurrentItem(month);
        wv_month.setGravity(gravity);
        // 日
        wv_day = (WheelView) view.findViewById(R.id.day);
        // 判断大小月及是否闰年,用来确定"日"的数据
        if (list_big.contains(String.valueOf(month + 1))) {
            wv_day.setAdapter(new NumericWheelAdapter(1, 31));
        } else if (list_little.contains(String.valueOf(month + 1))) {
            wv_day.setAdapter(new NumericWheelAdapter(1, 30));
        } else {
            // 闰年
            if ((year % 4 == 0 && year % 100 != 0) || year % 400 == 0)
                wv_day.setAdapter(new NumericWheelAdapter(1, 29));
            else
                wv_day.setAdapter(new NumericWheelAdapter(1, 28));
        }
        wv_day.setLabel(context.getString(R.string.pickerview_day));
        wv_day.setCurrentItem(day - 1);
        wv_day.setGravity(gravity);
        //时
        wv_hours = (WheelView) view.findViewById(R.id.hour);
        wv_hours.setAdapter(new NumericWheelAdapter(0, 23));
        wv_hours.setLabel(context.getString(R.string.pickerview_hours));// 添加文字
        wv_hours.setCurrentItem(h);
        wv_hours.setGravity(gravity);
        //分
        wv_mins = (WheelView) view.findViewById(R.id.min);
        wv_mins.setAdapter(new NumericWheelAdapter(0, 59));
        wv_mins.setLabel(context.getString(R.string.pickerview_minutes));// 添加文字
        wv_mins.setCurrentItem(m);
        wv_mins.setGravity(gravity);
        //秒
        wv_seconds = (WheelView) view.findViewById(R.id.second);
        wv_seconds.setAdapter(new NumericWheelAdapter(0, 59));
        wv_seconds.setLabel(context.getString(R.string.pickerview_seconds));// 添加文字
        wv_seconds.setCurrentItem(s);
        wv_seconds.setGravity(gravity);

        // 添加"年"监听
        OnItemSelectedListener wheelListener_year = new OnItemSelectedListener() {
            @Override
            public void onItemSelected(int index) {
                int year_num = index + startYear;
                // 判断大小月及是否闰年,用来确定"日"的数据
                int maxItem ;
                if (list_big
                        .contains(String.valueOf(wv_month.getCurrentItem() + 1))) {
                    wv_day.setAdapter(new NumericWheelAdapter(1, 31));
                    maxItem = 31;
                } else if (list_little.contains(String.valueOf(wv_month
                        .getCurrentItem() + 1))) {
                    wv_day.setAdapter(new NumericWheelAdapter(1, 30));
                    maxItem = 30;
                } else {
                    if ((year_num % 4 == 0 && year_num % 100 != 0)
                            || year_num % 400 == 0) {
                        wv_day.setAdapter(new NumericWheelAdapter(1, 29));
                        maxItem = 29;
                    } else {
                        wv_day.setAdapter(new NumericWheelAdapter(1, 28));
                        maxItem = 28;
                    }
                }
                if (wv_day.getCurrentItem() > maxItem - 1) {
                    wv_day.setCurrentItem(maxItem - 1);
                }
            }
        };
        // 添加"月"监听
        OnItemSelectedListener wheelListener_month = new OnItemSelectedListener() {
            @Override
            public void onItemSelected(int index) {
                int month_num = index + 1;
                int maxItem = 30;
                // 判断大小月及是否闰年,用来确定"日"的数据
                if (list_big.contains(String.valueOf(month_num))) {
                    wv_day.setAdapter(new NumericWheelAdapter(1, 31));
                    maxItem = 31;
                } else if (list_little.contains(String.valueOf(month_num))) {
                    wv_day.setAdapter(new NumericWheelAdapter(1, 30));
                    maxItem = 30;
                } else {
                    if (((wv_year.getCurrentItem() + startYear) % 4 == 0 && (wv_year
                            .getCurrentItem() + startYear) % 100 != 0)
                            || (wv_year.getCurrentItem() + startYear) % 400 == 0) {
                        wv_day.setAdapter(new NumericWheelAdapter(1, 29));
                        maxItem = 29;
                    } else {
                        wv_day.setAdapter(new NumericWheelAdapter(1, 28));
                        maxItem = 28;
                    }
                }
                if (wv_day.getCurrentItem() > maxItem - 1) {
                    wv_day.setCurrentItem(maxItem - 1);
                }

            }
        };
        wv_year.setOnItemSelectedListener(wheelListener_year);
        wv_month.setOnItemSelectedListener(wheelListener_month);
        //根据type 来显示特定的模式
        switch (type) {
            case ALL:
               /* textSize = textSize * 3;*/
                break;
            case YEAR_MONTH_DAY:
               /* textSize = textSize * 4;*/
                wv_hours.setVisibility(View.GONE);
                wv_mins.setVisibility(View.GONE);
                wv_seconds.setVisibility(View.GONE);
                break;
            case HOURS_MINS:
                /*textSize = textSize * 4;*/
                wv_year.setVisibility(View.GONE);
                wv_month.setVisibility(View.GONE);
                wv_day.setVisibility(View.GONE);
                wv_seconds.setVisibility(View.GONE);
                break;
            case MONTH_DAY_HOUR_MIN:
               /* textSize = textSize * 3;*/
                wv_year.setVisibility(View.GONE);
                wv_seconds.setVisibility(View.GONE);
                break;
            case YEAR_MONTH:
               /* textSize = textSize * 4;*/
                wv_day.setVisibility(View.GONE);
                wv_hours.setVisibility(View.GONE);
                wv_mins.setVisibility(View.GONE);
                wv_seconds.setVisibility(View.GONE);
        }
        //设置文字的大小
        setContentTextSize();
    }
- 1
- 2
- 3
- 4
- 5
- 6
- 7
- 8
- 9
- 10
- 11
- 12
- 13
- 14
- 15
- 16
- 17
- 18
- 19
- 20
- 21
- 22
- 23
- 24
- 25
- 26
- 27
- 28
- 29
- 30
- 31
- 32
- 33
- 34
- 35
- 36
- 37
- 38
- 39
- 40
- 41
- 42
- 43
- 44
- 45
- 46
- 47
- 48
- 49
- 50
- 51
- 52
- 53
- 54
- 55
- 56
- 57
- 58
- 59
- 60
- 61
- 62
- 63
- 64
- 65
- 66
- 67
- 68
- 69
- 70
- 71
- 72
- 73
- 74
- 75
- 76
- 77
- 78
- 79
- 80
- 81
- 82
- 83
- 84
- 85
- 86
- 87
- 88
- 89
- 90
- 91
- 92
- 93
- 94
- 95
- 96
- 97
- 98
- 99
- 100
- 101
- 102
- 103
- 104
- 105
- 106
- 107
- 108
- 109
- 110
- 111
- 112
- 113
- 114
- 115
- 116
- 117
- 118
- 119
- 120
- 121
- 122
- 123
- 124
- 125
- 126
- 127
- 128
- 129
- 130
- 131
- 132
- 133
- 134
- 135
- 136
- 137
- 138
- 139
- 140
- 141
- 142
- 143
- 144
- 145
- 146
- 147
- 148
- 149
- 150
- 151
- 152
setContentTextSize()设置文字的大小,源码很简单了就调用wheelview提供的设置文字大小的方法就可以了,源码如下:
private void setContentTextSize() {
        //分别设置年,月,日,时,分,秒的文字大小
        wv_day.setTextSize(textSize);
        wv_month.setTextSize(textSize);
        wv_year.setTextSize(textSize);
        wv_hours.setTextSize(textSize);
        wv_mins.setTextSize(textSize);
        wv_seconds.setTextSize(textSize);
    }
- 1
- 2
- 3
- 4
- 5
- 6
- 7
- 8
- 9
- 1
- 2
- 3
- 4
- 5
- 6
- 7
- 8
- 9
再来看看显示TimePickerView的代码,也就是show方法,源码如下:
   public void show() {
        //首先判断是不是对话框模式
        if (isDialog()) {
        //如果是对话框模式就直接调用对话框的show方法即可
             if (mDialog != null) {
            mDialog.show();
        }
        } else {
          //如果不是对话框模式,先判断有没有显示
            if (isShowing()) {
                return;
            }
            isShowing = true;
            //将时间选择器的布局添加到activity的根view上
            onAttached(rootView);
            //请求重新绘制,将时间选择器显示出来
            rootView.requestFocus();
        }

    }

    /**
     * 检测该View是不是已经添加到根视图
     *
     * @return 如果视图已经存在该View返回true
     */
    public boolean isShowing() {
        if (isDialog()) {
            return false;
        } else {
            return rootView.getParent() != null || isShowing;
        }

    }

   /**
     * show的时候调用
     *
     * @param view 这个View
     */
    private void onAttached(View view) {
        decorView.addView(view);
        //开启显示的动画
        contentContainer.startAnimation(inAnim);
    }
- 1
- 2
- 3
- 4
- 5
- 6
- 7
- 8
- 9
- 10
- 11
- 12
- 13
- 14
- 15
- 16
- 17
- 18
- 19
- 20
- 21
- 22
- 23
- 24
- 25
- 26
- 27
- 28
- 29
- 30
- 31
- 32
- 33
- 34
- 35
- 36
- 37
- 38
- 39
- 40
- 41
- 42
- 43
- 44
- 45
- 46
- 1
- 2
- 3
- 4
- 5
- 6
- 7
- 8
- 9
- 10
- 11
- 12
- 13
- 14
- 15
- 16
- 17
- 18
- 19
- 20
- 21
- 22
- 23
- 24
- 25
- 26
- 27
- 28
- 29
- 30
- 31
- 32
- 33
- 34
- 35
- 36
- 37
- 38
- 39
- 40
- 41
- 42
- 43
- 44
- 45
- 46
显示TimePickerView的方法看完了,再看看关闭TimePickerView的方法,源码如下:
 public void dismiss() {
        if (isDialog()) {
        //如果是对话框模式,就直接调用对话框的dismiss方法
            dismissDialog();
        } else {
            //如果已经关闭了,就不继续执行下去了
            if (dismissing) {
                return;
            }

            dismissing = true;

            //消失动画
            outAnim.setAnimationListener(new Animation.AnimationListener() {
                @Override
                public void onAnimationStart(Animation animation) {

                }

                @Override
                public void onAnimationEnd(Animation animation) {
                    decorView.post(new Runnable() {
                        @Override
                        //动画结束,就将时间控件的布局,从activity的根view中移除
                            dismissImmediately();
                        }
                    });
                }

                @Override
                public void onAnimationRepeat(Animation animation) {

                }
            });
            contentContainer.startAnimation(outAnim);
        }

    }

    public void dismissImmediately() {
        //从activity根视图移除
        decorView.removeView(rootView);
        isShowing = false;
        dismissing = false;
        if (onDismissListener != null) {
            onDismissListener.onDismiss(BasePickerView.this);
        }

    }
- 1
- 2
- 3
- 4
- 5
- 6
- 7
- 8
- 9
- 10
- 11
- 12
- 13
- 14
- 15
- 16
- 17
- 18
- 19
- 20
- 21
- 22
- 23
- 24
- 25
- 26
- 27
- 28
- 29
- 30
- 31
- 32
- 33
- 34
- 35
- 36
- 37
- 38
- 39
- 40
- 41
- 42
- 43
- 44
- 45
- 46
- 47
- 48
- 49
- 1
- 2
- 3
- 4
- 5
- 6
- 7
- 8
- 9
- 10
- 11
- 12
- 13
- 14
- 15
- 16
- 17
- 18
- 19
- 20
- 21
- 22
- 23
- 24
- 25
- 26
- 27
- 28
- 29
- 30
- 31
- 32
- 33
- 34
- 35
- 36
- 37
- 38
- 39
- 40
- 41
- 42
- 43
- 44
- 45
- 46
- 47
- 48
- 49
到此将如何显示TimePickerView的封装分析完了,再来看看TimePickerView中是如何处理取消和确定按钮的点击事件的,源码如下:
  @Override
    public void onClick(View v) {
        String tag = (String) v.getTag();
        if (tag.equals(TAG_CANCEL)) {
        //取消,就是直接关闭界面
            dismiss();
        } else {
            //确定
            if (timeSelectListener != null) {
                try {
                //获取选中的时间
                    Date date = WheelTime.dateFormat.parse(wheelTime.getTime());
                    //回调,将时间传递给使用者
                    timeSelectListener.onTimeSelect(date,v);
                } catch (ParseException e) {
                    e.printStackTrace();
                }
            }
            dismiss();
        }
    }
三.总结
以上是我对Android-PickerView如何封装TimePickerView的分析,如果看的不是很懂的朋友,下载demo结合源代码进行理解,代码都有注释.Github项目地址:Android-PickerView


 1660
1660


 被折叠的 条评论
为什么被折叠?
被折叠的 条评论
为什么被折叠?
 到【灌水乐园】发言


