


自定义一个ViewEngine
一般的,不需要自定义创建一个View Engine,但为了说明View部分的全貌,先从自定义ViewEngine开始,逐渐全面了解MVCFramework的View部分实现。
需要实现的接口
public interface IViewEngine {
ViewEngineResult  FindPartialView(ControllerContextcontrollerContext,
string partialViewName, bool useCache);
ViewEngineResult  FindView(ControllerContext controllerContext,
string viewName, string masterName, bool useCache);
void ReleaseView(ControllerContext controllerContext, IViewview);
}
接口说明:
1.查找PartialView
2.查找View
3.释放View
除了最后一个函数返回值为空外,前两个函数都需要返回一个ViewEngineResult ,代码如下:
public class ViewEngineResult {
public  ViewEngineResult(IEnumerable<string> searchedLocations) {
if (searchedLocations == null) {
throw  new  ArgumentNullException("searchedLocations");
}
SearchedLocations  =  searchedLocations;
}
public  ViewEngineResult(IView view ,  IViewEngine  viewEngine) {
if (view == null) { throw newArgumentNullException("view");}
if (viewEngine == null) { throw  new  ArgumentNullException("viewEngine");}
View = view;
ViewEngine = viewEngine;
}
public IEnumerable<string> SearchedLocations { get;private set; }
public IView View { get; private set; }
public IViewEngine ViewEngine { get; private set; }
}
可以看到,ViewEngineResult的构造可以通过两种构造函数:
1.如果找不到View,那么给一个已经找了哪些路径(最后会show给user,如果找了所有的路径,到最后都没有找到)
2.如果找到了,那么给这个view对象和它的ViewEngine(由谁来render)
IView接口:
public interface IView {
void  Render(ViewContext  viewContext, TextWriter  writer);
}
一个函数:一手拿着ViewContext(包含了这次请求的信息),一手拿着writer,把信息写成html,render到客户端,推送到浏览器直接消费。
示例实现:
1.Controller
  public class TestController : Controller
{

        public ActionResult Index()
        {
            ViewData["Key1"] ="Value1";
            ViewData["Key2"] =DateTime.Now;
            ViewData["Key3"] = 3;
            return View("Test");
        }
}
实现了TestController,里面有一个Index Action,返回了一个Test View(在Viewsfolder中不存在)。
2.Customize View
public class ViewDataPrinter : IView
    {
       public void Render(ViewContext viewContext, TextWriter writer)
       {
           Write(writer, "---View Data---");
           foreach (string key in viewContext.ViewData.Keys)
           {
                Write(writer, "Key: {0},Value: {1}", key,
                viewContext.ViewData[key]);
           }
       }
       private void  Write(TextWriter writer, string  template, params object[] values)
       {
           writer.Write(string.Format(template, values) + "<p/>");
       }
}
功能:把viewContext中的ViewData打印出来
3.Customize View Engine 实现
public class TestViewEngine : IViewEngine
    {
       Public  ViewEngineResult  FindView(ControllerContext  controllerContext,
       String  viewName, string  masterName, bool  useCache)
       {
           if (viewName == "Test")
           {
                return new ViewEngineResult(new ViewDataPrinter(), this);
           }
           return new  ViewEngineResult(new [] { "Sorry , Only service for TestView" });
       }

       public ViewEngineResult  FindPartialView(ControllerContext controllerContext,
       string partialViewName, bool useCache)
       {
           return new  ViewEngineResult(new[] { "Sorry , Not Support ParcialView Currently" });
       }
       public void ReleaseView(ControllerContext controllerContext, IView view)
       {

       }
}
功能:
我们只实现了FindView,不支持FindPartialView,FindView中只支持名字为“Test”的View,如果名字匹配,返回一个ViewDataPrinter实例,把自己也传进去。
4.注册ViewEngine
MVC Framework中支持多个ViewEngine,如果只希望添加到ViewEngine中的最后一个,那么直接用Add就可以了:
ViewEngines.Engines.Add(new TestViewEngine());
当然,如果考虑到Apply的顺序,那么也可以insert到第一个:
ViewEngines.Engines.Insert(0, new TestViewEngine());
如果想把默认的ViewEngine删掉,只保留自己customize的:
ViewEngines.Engines.Clear();
ViewEngines.Engines.Add(new TestViewEngine());
5.测试

访问TestController的Index Action,会调用刚才customize的ViewEngine,创建一个ViewDataResult,里面传递的是ViewDataPrinter,render时打印ViewData的信息。
测试2:
在 Test Controller 添加一个Action,指向一个不存在的View
 public ActionResult NoExist()
       {
           return View("NoExist");
       }
public ActionResult NoExist()
{
return View("NoExist");
}
访问这个Action :

可以看到,出现了”Sorry , Only Service For TestView “ ,是我们Customize的ViewEngine打印的信息。
注意,如果试图访问一个根本不存在的Controller,或者是Action,会得到404。
Razor
透过一个例子初探语法:
Controller :
public class HomeController : Controller {
public  ActionResult Index() {
string[]  names = { "Apple", "Orange", "Pear" };
return View(names);
}
}
View:
@model string[]
@{
ViewBag.Title = "Index";
}
This is a list of fruit names:
@foreach (string name in Model) {
<span><b>@name</b></span>
}
测试:

Razor的工作原理:
1.搜索View,顺序:
Views/<ControllerName>/<ViewName>.cshtml
Views/Shared/<ViewName>.cshtml
对于AreaView,顺序为:
Area/<AreaName>/Views/<ControllerName>/<ViewName>.cshtml
Area/<AreaName>/Views/Shared/<ViewName>.cshtml
2.解析View代码,生成临时c#code,存在临时目录,生成代码取样:
public class _Page_Views_Home_Index_cshtml :System.Web.Mvc.WebViewPage<string[]> {
public _Page_Views_Home_Index_cshtml() {
}
public override void Execute() {
ViewBag.Title = "Index";
WriteLiteral("\r\n\r\nThis is a list of fruit names:\r\n\r\n");
foreach (string name in Model) {
WriteLiteral(" <span><b>");
Write(name);
WriteLiteral("</b></span>\r\n");
}
}
}
可见,Razor把我们的frontend代码完全解析为了c#。
3.当浏览器开始Render View时,会动态编译这个临时文件,把内容写成html发送到浏览器。
Customize Razor
我们可以改变Razor哪些行为?搜索范围。例子如下:
Customize Razor实现
public class CustomizeRazor : RazorViewEngine
    {
        public CustomizeRazor()
        {
            ViewLocationFormats =new[] { "~/Views/{1}/{0}.cshtml","~/Views/Common/{0}.cshtml" };

        }
}
代码说明: 希望razor的查找范围和顺序为:
Views/<ControllerName>/<ViewName>.cshtml
Views/Common/<ViewName>.cshtml
在global文件中注册
ViewEngines.Engines.Add(new CustomizeRazor());1.添加Common文件夹
2.添加View ,名称为NoExist.cshtml在Common文件夹
View 代码:
<!DOCTYPE html>

<html>
<head>
    <meta name="viewport" content="width=device-width" />
    <title></title>
</head>
<body>
    <div>
    This View is located under common folder , which is supposed be found by Custmized Razor
    </div>
</body>
</html>
3.在Test Controller 添加Action:
   public ActionResult NoExist()
        {
            return View("NoExist");
        }
4.测试:

按照Razor默认的行为,会去:
Views/<ControllerName>/<ViewName>.cshtml
Views/<ControllerName>/Shared/<ViewName>.cshtml
由于我们都没有提供,只是把NoExistView放在了Common,我们在global文件注册了我们的CustomizeRazor,Razor的查找行为成功的被customize了。
Razor dynamic Content
目前支持:
Inline Code
Html Helper Method
Sections
Partial view
Child Actions
使用Section
1.在View中定义section
@{
    ViewBag.Title ="View1";
    Layout ="~/Views/Shared/_LayoutPage1.cshtml";
}

@model string[]
@{
ViewBag.Title = "Index";
}

@section Header {
<div class="view">
@foreach (string str in new [] {"Home", "List","Edit"}) {
@Html.ActionLink(str, str, null, new { style = "margin: 5px" })
}
</div>
}

<!--
    Suppose to be caught as body ,Body Start
    -->
<div class="view">
This is a list of fruit names(let Razor Catch Body part):
@foreach (string name in Model) {
<span><b>@name</b></span>
}
</div>

<!--
    Body end
-->


@section Footer {
<div class="view">
This is the footer
</div>
}
代码说明:定义了两个action:header 和footer, 并期望中间部分被razor成功的解析为 body部分。
2.添加一个layout(就是上面View指向的_LayoutPage1):
<!DOCTYPE html>
<html>
<head>
<meta charset="utf-8" />
<meta name="viewport" content="width=device-width"/>
<style type="text/css">
div.layout { background-color: lightgray;}
div.view { border: thin solid black; margin: 10px 0;}
</style>
<title>@ViewBag.Title</title>
</head>
<body>
@RenderSection("Header")
<div class="layout">
This is part of the layout
</div>
    @RenderBody()

    <div class="layout">
This is part of the layout
</div>
@RenderSection("Footer")

<div class="layout">
This is part of the layout
</div>
</body>
</html>
4.测试
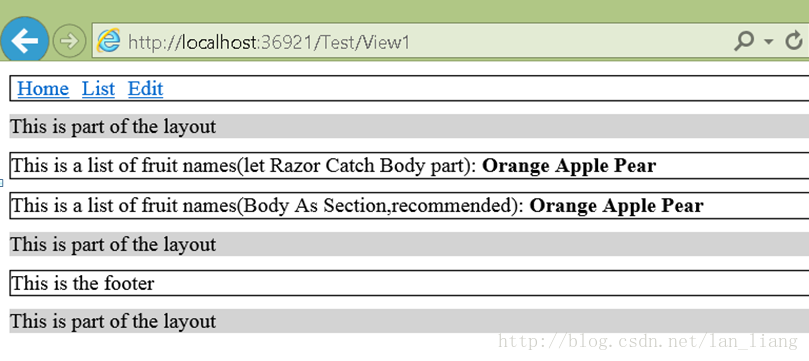
可以看到,razor已经成功的把header,footer解析了,并且把我们期望它解析的body部分也捕捉到了,但是通常我们为了稳妥,可以显示的把body部分也定义为section里面:
@section Body {
<div class="view">
This is a list of fruit names(Body As Section,recommended):
@foreach (string name in Model) {
<span><b>@name</b></span>
}
</div>
}
在Layout的Render代码相应改为:
@RenderSection("Body")Optional Section
考虑场景:
1.如果View中定义了Section : Footer才显示footer,否则显示一个默认的footer:
@if (IsSectionDefined("Footer")) {
@RenderSection("Footer")
} else {
<h4>This is the default footer</h4>
}
2.如果View中定义了scripts则render,否则不要render:
@RenderSection("scripts",false)Partial View
定义一个PartialView
<div>
This is the message from the partial view.
@Html.ActionLink("This is a link to the Index action", "Index")
</div>
Consume partial view
@{
ViewBag.Title = "List";
Layout = null;
}
<h3>This is the/Views/Common/List.cshtml View</h3>
@Html.Partial("MyPartial")
语法很简单,就是使用html helper method中的renderpartial,关于htmlhelper method,下一章会讲。
Strong type的partialview 也类似:
1.定义
@model IEnumerable<string>
<div>
This is the message from the partial view.
<ul>
@foreach (string str in Model) {
<li>@str</li>
}
</ul>
</div>
2.在View中消费
@{
ViewBag.Title = "List";
Layout = null;
}
<h3>This is the /Views/Common/List.cshtml View</h3>
@Html.Partial("MyStronglyTypedPartial", new []{"Apple", "Orange", "Pear"})
View在消费时主要注意参数要给对。
Child Action
1.定义Action:
[ChildActionOnly]
public  ActionResult Time() {
return  PartialView(DateTime.Now);
}
2.定义配套的PartialView:
<p>The time is: @Model.ToShortTimeString()</p>3.消费child action
@{
ViewBag.Title = "List";
Layout = null;
}
<h3>This is the /Views/Common/List.cshtml View</h3>
@Html.Partial("MyStronglyTypedPartial", new []{"Apple", "Orange", "Pear"})
@Html.Action("Time")
这样,Action会被触发,并render出partialView 。
与PartialView不同,这里HtmlHelper触发的是Action,而PartialView那里是直接render一个PartialView。
Action通常和partialView一起使用的,主要针对一些场景,希望不仅仅封装View,并希望把Action这部分也重用了,这时考虑使用child Action。但是child Action 是不能被请求消费的。


 699
699

 被折叠的 条评论
为什么被折叠?
被折叠的 条评论
为什么被折叠?
 到【灌水乐园】发言


