


简介
在您第1次接触和学习Spring框架的时候,是否因为其繁杂的配置而退却了?在你第n次使用Spring框架的时候,是否觉得一堆反复黏贴的配置有一些厌烦?那么您就不妨来试试使用Spring Boot来让你更易上手,更简单快捷地构建Spring应用!
Spring Boot让我们的Spring应用变的更轻量化。比如:你可以仅仅依靠一个Java类来运行一个Spring引用。你也可以打包你的应用为jar并通过使用java -jar来运行你的Spring Web应用。
Spring Boot的主要优点:
* 为所有Spring开发者更快的入门
* 开箱即用,提供各种默认配置来简化项目配置
* 内嵌式容器简化Web项目
* 没有冗余代码生成和XML配置的要求
快速入门
本章主要目标完成Spring Boot基础项目的构建,并且实现一个简单的Http请求处理,通过这个例子对Spring Boot有一个初步的了解,并体验其结构简单、开发快速的特性。
系统要求:
- Java 7及以上
- Spring Framework 4.1.5及以上
使用Maven构建项目
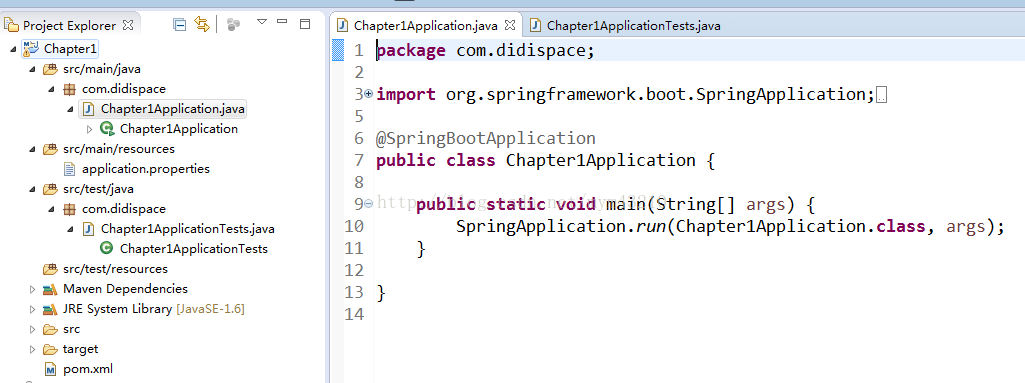
通过上面步骤完成了基础项目的创建,如上图所示,Spring Boot的基础结构共三个文件(具体路径根据用户生成项目时填写的Group所有差异):
src/main/java下的程序入口:Chapter1Application
src/main/resources下的配置文件:application.properties
src/test/下的测试入口:Chapter1ApplicationTests
Chapter1Application
和
Chapter1ApplicationTests
类都可以直接运行来启动当前创建的项目,由于目前该项目未配合任何数据访问或Web模块,程序会在加载完Spring之后结束运行。
引入Web模块
当前的pom.xml
内容如下,仅引入了两个模块:
spring-boot-starter:核心模块,包括自动配置支持、日志和YAML
spring-boot-starter-test:测试模块,包括JUnit、Hamcrest、Mockito
                <dependency>
			<groupId>org.springframework.boot</groupId>
			<artifactId>spring-boot-starter</artifactId>
		</dependency>

		<dependency>
			<groupId>org.springframework.boot</groupId>
			<artifactId>spring-boot-starter-test</artifactId>
			<scope>test</scope>
</dependency>spring-boot-starter-web
模块:
    <dependency>
        <groupId>org.springframework.boot</groupId>
        <artifactId>spring-boot-starter-web</artifactId>
    </dependency>
编写HelloWorld服务
- 创建
package命名为com.didispace.web(根据实际情况修改) - 创建
HelloController类,内容如下
@RestController
public class HelloController {

    @RequestMapping("/hello")
    public String index() {
        return "Hello World";
    }

}- 启动主程序,打开浏览器访问
http://localhost:8080/hello,可以看到页面输出Hello World
编写单元测试用例
打开的src/test/
下的测试入口
Chapter1ApplicationTests
类。下面编写一个简单的单元测试来模拟http请求,具体如下:
@RunWith(SpringJUnit4ClassRunner.class)
@SpringApplicationConfiguration(classes = MockServletContext.class)
@WebAppConfiguration
public class Chapter1ApplicationTests {

    private MockMvc mvc;

    @Before
    public void setUp() throws Exception {
        mvc = MockMvcBuilders.standaloneSetup(new HelloController()).build();
    }

    @Test
    public void getHello() throws Exception {
        mvc.perform(MockMvcRequestBuilders.get("/hello").accept(MediaType.APPLICATION_JSON))
                .andExpect(status().isOk())
                .andExpect(content().string(equalTo("Hello World")));
    }

}MockServletContext
来构建一个空的
WebApplicationContext
,这样我们创建的
HelloController
就可以在
@Before
函数中创建并传递到
MockMvcBuilders.standaloneSetup()
函数中。
- 注意引入下面内容,让
status、content、equalTo函数可用
import static org.hamcrest.Matchers.equalTo;
import static org.springframework.test.web.servlet.result.MockMvcResultMatchers.content;
import static org.springframework.test.web.servlet.result.MockMvcResultMatchers.status;


 2256
2256

 被折叠的 条评论
为什么被折叠?
被折叠的 条评论
为什么被折叠?
 到【灌水乐园】发言


