


angular学习笔记
1.基本概览
模块 Module
组件 Component
指令 Directive
服务 Service
路由 Router
Component(组件)是整个框架的核心,也是终极目标。
	“组件 化”的意义有 2 个:
        一是分治,因为有了组件之后,我们可以把各种逻辑 封装在组件内部,避免混在一起;
        二是复用,封装成组件之后不仅可以在 项目内部复用,而且还可以沉淀下来跨项目复用。
    NgModule(模块)是组织业务代码的利器,按照自己的业务场景, 把组件、服务、路由打包到模块里面,形成一个个的积木块,然后再用这些积木块来搭建出高楼大厦。 	Router(路由)的角色也非常重要,它有 3 个重要的作用:
        一是封装 浏览器的 History 操作;
        二是负责异步模块的加载;
        三是管理组件的生命周期
2. 模块
2.1 模块的含义
angular Module就是一个普通的类,但是这个类,一旦被@NgModule所装饰,那这个类就可以被称为angular Module
模块包含了主要的应用代码。
一个应用可以包含多个模块,每一个模块都包含了定义具体功能的代码。
可以将module理解成一个容器,可以往其中放入controllers、services、filters、directives等应用的组成部分。
模块由一块代码组成,可用于执行一个简单的任务。
Angular 应用是由模块化的,它有自己的模块系统:NgModules。
每个 Angular 应该至少要有一个模块(根模块),一般可以命名为:AppModule。
Angular 模块是一个带有 @NgModule 装饰器的类,它接收一个用来描述模块属性的元数据对象。
NgModule 模块是Angular种一个重要的点,因为Angular的基本构造块就是NgModule。
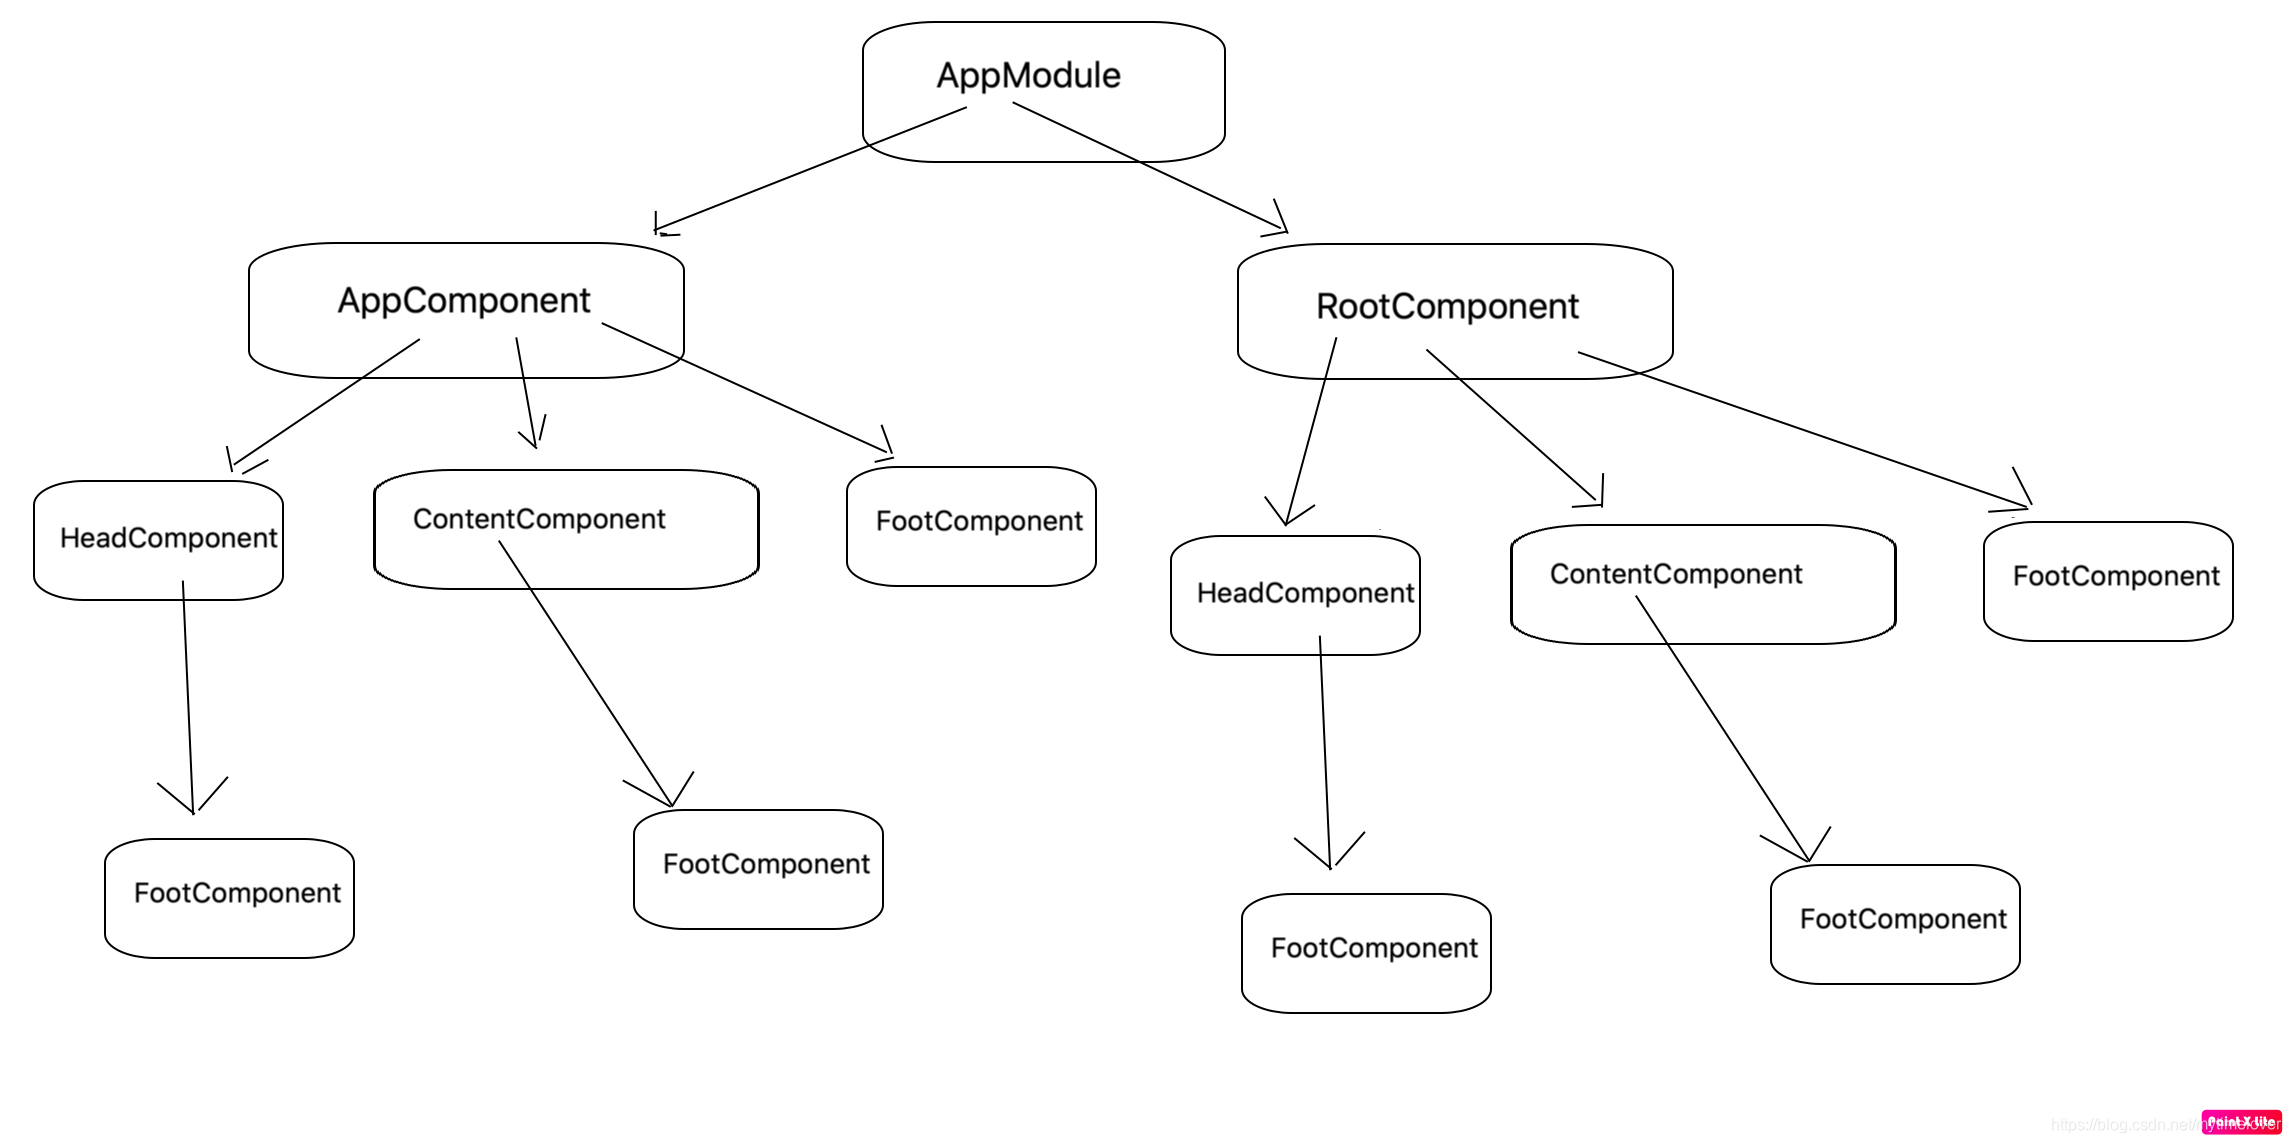
NgModule 会把相关的代码收集到一些功能集中,形成功能单元。在使用Angular CL 命令新建一个项目的时候,会给我们生成一个根模块,命名为 AppModule,根模块有一个根组件AppComponent,引导这个根模块就可以启动应用。Angular 应用是模块化的,我们在开发中会根据其功能 作用 以及其特性,建立大大小小各种模块,从而构建其成为一个应用程序,任何模块都能包含任意数量的其它组件。
几个重要的属性如下:
declarations 该模块的依赖项。 (声明) - 视图类属于这个模块。 Angular 有三种类型的视图类: 组件 、 指令 和 管道 。
imports - 导入其他的ngModule。 本模块组件模板中需要由其它导出类的模块。
exports - 声明( declaration )的子集,可用于其它模块中的组件模板 。
providers - 提供各种服务。 服务的创建者。本模块把它们加入全局的服务表中,让它们在应用中的任何部分都可被访问到。
bootstrap - 根组件,Angular 创建它并插入 index.html 宿主页面。只有根模块需要设置 bootstrap 属性中。
entryComponents - 入口组件 是通过组件的类型动态加载
import { BrowserModule } from '@angular/platform-browser';
import { NgModule } from '@angular/core';
import { AppComponent } from './app.component';
@NgModule({//装饰器
declarations: [//声明模块有什么(只能声明组件、指令、管道)
AppComponent
],
imports: [//声明引用的其他模块
BrowserModule
],
providers: [],//声明模块中提供的服务
bootstrap: [AppComponent]//声明模块的主组件是什么
})
export class AppModule { }//控制器
2.1.1 declarations
该模块的依赖项。

	该模块想要正常工作,可能会依赖一些组件、指令和管道,那就必须将它们声明到declarations中,不过引入也有一些规则,以组件为例:
		模块中不能使用未声明过(没有添加到declarations中)的组件
		一个组件只能被一个模块声明
		在declarations中的组件默认只能在当前模块中使用,要想让其他模块使用,必须exports出去(参考下文的exports)

以上规则同样适用于指令和管道
2.1.2 imports
导入其他的ngModule。

	imports数组只会出现在@NgModule装饰器中,一个模块想要正常工作,除了本身的依赖项(declarations),还可能需要其他模块导出的依赖项。 只要是angular module,都可以导入imports数组中,比如自定义的模块,第三方或者ng内置的都可以
2.1.3 providers
提供一系列服务
2.1.4 bootstrap
根组件
	Angular 创建它并插入 index.html 宿主页面
	应用是通过引导根模块 AppModule 来启动的,引导过程还会创建 bootstrap 数组中列出的组件,并把它们逐个插入到浏览器的 DOM 中。 该数组中的每个组件,都作为组件树的根(根组件),后续所有组件都是基于根组件的(如图)。 虽然也可以在宿主页面中放多个组件,但是大多数应用只有一个组件树,并且只从一个根组件开始引导。 这个根组件通常叫做 AppComponent,并且位于根模块的 bootstrap 数组中。
2.1.5 exports
声明( declaration )的子集,可用于其它模块中的组件模板.
2.1.6 entryComponents
入口组件

入口组件是通过指定的组件类加载组件。
https://www.ddpool.cn/article/55870.html


主要分为三类:

在@NgModule.bootstrap里声明的启动组件,如AppComponent。
在路由配置里引用的组件
其他通过编程使用组件类型加载的动态组件


app.component.ts

点击复制代码 JavaScript
@Component({
 selector: 'app-root',
 templateUrl: './app.component.html',
 styleUrls: ['./app.component.scss']
})
export class AppComponent{}
app.module.ts

点击复制代码 JavaScript
@NgModule({
 declarations: [
 AppComponent
 ],
 imports: [
 BrowserModule,
 BrowserAnimationsModule,
 AppRoutingModule
 ],
 providers: [],
 bootstrap: [AppComponent]
})
export class AppModule { }


路由配置引用的组件
@Component({
 selector: 'app-nav',
 template: `
 <nav>
 <a routerLink="/home" routerLinkActive #rla="routerLinkActive" selected="#rla.isActive">首页</a>
 <a routerLink="/users" routerLinkActive #rla="routerLinkActive" selected="#rla.isActive">用户</a>
 </nav>
 <router-outlet></router-outlet>
 `
})
export class NavComponent {}
我们需要配置一个路由

点击复制代码 JavaScript
const routes: Routes = [
 {
 path: "home",
 component: HomeComponent
 },
 {
 path: "user",
 component: UserComponent
 }
];

@NgModule({
 imports: [RouterModule.forRoot(routes)],
 exports: [RouterModule]
})
export class AppRoutingModule { }
Angular根据配置的路由,根据路由指定的组件类来加载组件,而不是通过组件的selector加载。
3.组件
3.1 组件的含义
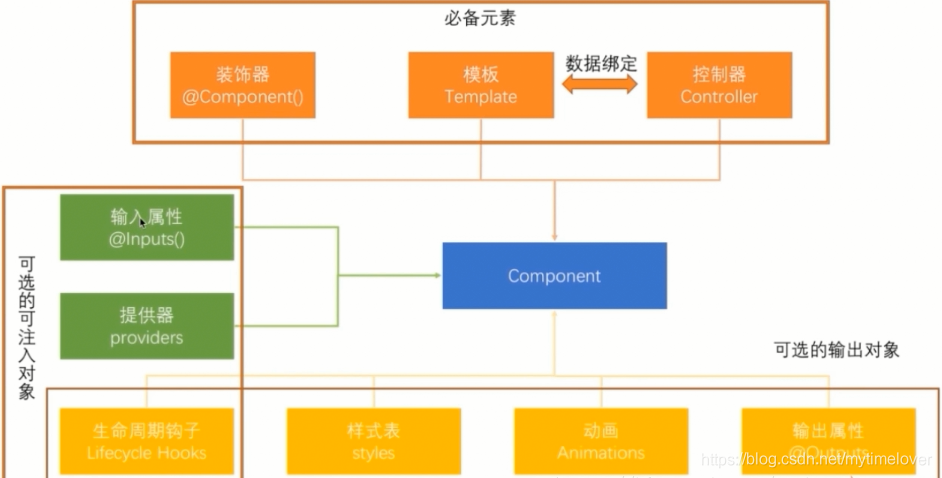
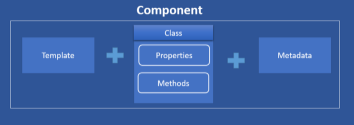
组件=装饰器+模板+控制器
	组件(ts文件):将页面上的能够复用的区域(块)封装在一个ts文件中
    装饰器(@Component):告知angular框架如何处理TypeScript类
    模板(html文件):定义组件外观,如何渲染组件(html展示组件外观)
    控制器(TypeScript类):控制器通过数据绑定与模板通讯,模板展示控制器数据,控制器处理模板上发生的事件(与模板通讯、处理模板事件)
	https://blog.csdn.net/newbie_907486852/article/details/83176980


angular的应用就是一系列组件的集合  我们需要创建可复用的组件供多个组件重复使用  组件是嵌套的,实际应用中组件是相互嵌套使用的  组件中的数据调用可以使用inputs和outputs

一个组件可以包含前端表现及后端逻辑  一个组件可以是一个代码片段,能够独立运行


组件是一个模板的控制类用于处理应用和逻辑页面的视图部分。
组件是构成 Angular 应用的基础和核心,可用于整个应用程序中。
组件知道如何渲染自己及配置依赖注入。
组件通过一些由属性和方法组成的 API 与视图交互。
创建 Angular 组件的方法有三步:
从 @angular/core 中引入 Component 修饰器
建立一个普通的类,并用 @Component 修饰它
在 @Component 中,设置 selector 自定义标签,以及 template 模板
3.1.1 装饰器-元数据
@Component 中的配置项说明:
selector - 一个 css 选择器,它告诉 Angular 在 父级 HTML 中寻找一个 <mylist> 标签,然后创建该组件,并插入此标签中。
templateUrl - 组件 HTML 模板的地址。
directives - 一个数组,包含 此 模板需要依赖的组件或指令。
providers - 一个数组,包含组件所依赖的服务所需要的依赖注入提供者。


元数据告诉 Angular 如何处理一个类。
有一个组件叫作 Component ,它是一个类,可以把元数据附加到这个类上来告诉 Angular Component 是一个组件。
在 TypeScript 中,我们用 装饰器 (decorator) 来附加元数据。
@Component 装饰器能接受一个配置对象,并把紧随其后的类标记成了组件类。
Angular 会基于这些信息创建和展示组件及其视图。


(1)selector: ‘app-root’,
表示这个组件可以通过app-root这个HTML标签来调用,打开项目根目录下的index.html可以看到里面有这样一行代码
Loading…
调用了这个组件

(2)templateUrl: ‘./app.component.html’,
我们已经知道了怎么调用组件,这行代码来说明组件现实的内容是什么,打开app.component.html代码如下

<h1>
  {{title}}
</h1>

(3)styleUrls: [‘./app.component.css’]
表示组件的css
3.1.2 模板
用来定义组件的外观,元数据中的tempateUrl指定的文件其实就是组建的模板
3.1.3 控制器
控制器包含了组件的所有属性和方法,用来定义页面,逻辑,这段代码定义的类,其实就是定义了一个控制器
export class AppComponent { title = ‘app works!’; }
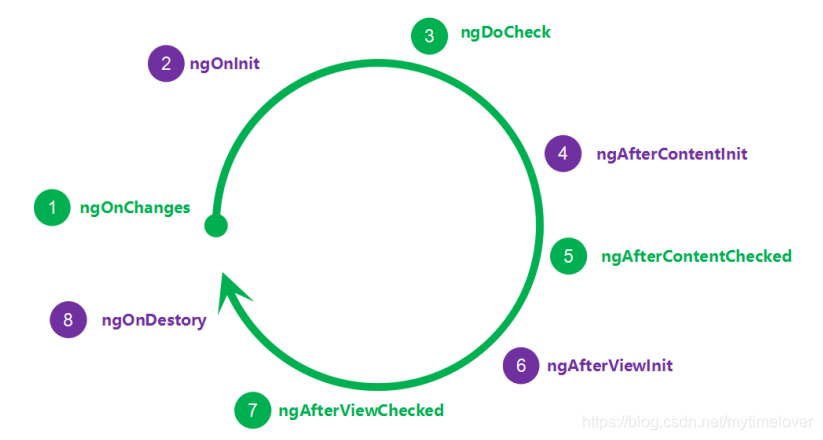
3.2 组件的生命周期
constructor:
	一个组件被创件的时候,他的构造函数肯定是存在的且被首个调用的。下面其他接口在组件中并不是必须的,可以不用去实现接口。
ngOnChanges:
	当这个组件被父组件初始化输入属性或修改输入属性的时候被调用的,这里特地强调了是输入属性,如果不是输入属性是不会被调用的。假如没有输入属性,那它是不会被调用。每次修改输入属性都会被调用,首次发生在ngOnInit之前。输入属性被初始化。
ngOnInit:
	他是第3个被调用的。假如组件逻辑要依赖输入属性值,那么务必放在这个函数里面处理。
ngDoCheck:
	这是Angular变更检测周期被调用。如果一个组件没有被声明为OnPush检测机制,而是用默认方式,那么一个属性或者用户点击输入框都会调用ngDoCheck 方法。所有带check关键字的借口都要小心使用,很耗性能。
ngAfterContentInit:
	投影内容组装初始化的时候被调用,接着调用ngAfterContentChecked下,如果有子组件,开始子组件的调用。直到投影内容完全初始化好,这个api,是在ngAfterViewInit之前被调用。
ngAfterContentChecked:
	上面已经讲了,只是在上个api之后被调用。
ngAfterViewInit:
	组件的视图组装完毕后被调用的。如果有子组件,那等子组件组装完毕后才会被调用。(调用顺序是 子ngAfterViewInit,ngAfterViewChecked-->父组件 ngAfterViewInit,ngAfterViewChecked)。这2个接口最好都不要尝试去改变视图的代码,否者会抛出异常,除非用setTimeout启用一个延迟。
ngAfterViewChecked:
	上面已经讲了,只是他被多次调用,且在ngAfterViewInit之后。
ngOnDestroy:
	组件被销毁的时候执行。销毁发生在路由切换的时候。


	https://www.cnblogs.com/starof/p/8641491.html
3.3 组件间交互
1.通过输入型绑定把数据从父组件传到子组件,@Input @Output。
	通过setter截听输入属性值的变化 Input在父组件传递数据到子组件中,子组件接受数据,可以对其接收的数据进行处理后再显示在页面中,这里就要用到set与get方法
	通过ngOnChanges()来截听输入属性值的变化
	父组件监听子组件的事件 Output

2.父组件与子组件通过本地变量互动  				html #child  <app-child #child></app-child>

3.父组件调用@ViewChild()         			@ViewChild(CountdownTimerComponent) private timerComponent: CountdownTimerComponent;

4.使用中间人通信 							  共同的上层父组件

5.父组件和子组件通过服务来通讯

6.直接将父组件当做服务注入到子组件中

7.利用 cookie 或者 localstorage 或者 Session进行通讯
3.3.1 @Input @Output方式
<parent-component>
<child-component></child-component>
</parent-component>
<parent-component> 充当了 <child-component> 的上下文。
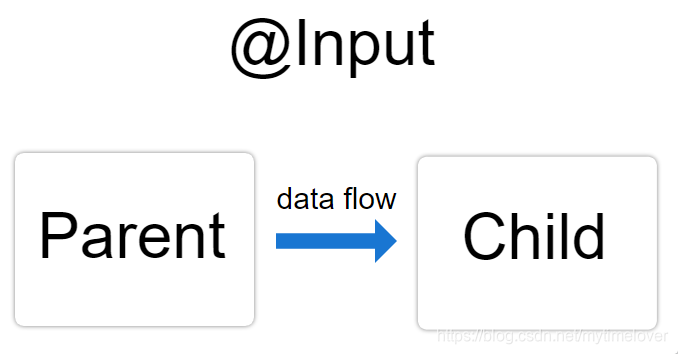
@Input() 和 @Output() 为子组件提供了一种与其父组件通信的方法。
@Input() 允许父组件更新子组件中的数据。相反,@Output() 允许子组件向父组件发送数据。
@Input
要使用 @Input(),就必须对父组件和子组件进行配置。

1.配置子组件:
要使用 @Input() 装饰器,首先要导入 Input,然后用 @Input() 装饰该属性,如下例所示。

src/app/item-detail/item-detail.component.ts
import { Component, Input } from '@angular/core'; // First, import Input
export class ItemDetailComponent {
  @Input() item: string; // decorate the property with @Input()
}
在这个例子中, @Input() 会修饰属性 item,它的类型为 string,但 @Input() 属性可以是任意类型,比如 number、string、boolean 或 object。item 的值来自父组件。
接下来,在子组件模板中添加以下内容:

src/app/item-detail/item-detail.component.html
content_copy
<p>
  Today's item: {{item}}
</p>


2.配置父组件:
下一步是在父组件的模板中绑定该属性。在这个例子中,父组件模板是 app.component.html 。

使用子组件的 selector (<app-item-detail>) 作为父组件模板中的指令。

使用属性绑定把子组件的 item 属性绑定到父组件的 currentItem 属性上。

src/app/app.component.html
content_copy
<app-item-detail [item]="currentItem"></app-item-detail>
在父组件类中,为 currentItem 指定一个值:

src/app/app.component.ts
content_copy
export class AppComponent {
  currentItem = 'Television';
}

监视 @Input() 的变更
要想监视 @Input() 属性的变化,你可以使用 Angular 的生命周期钩子OnChanges 。
@Output
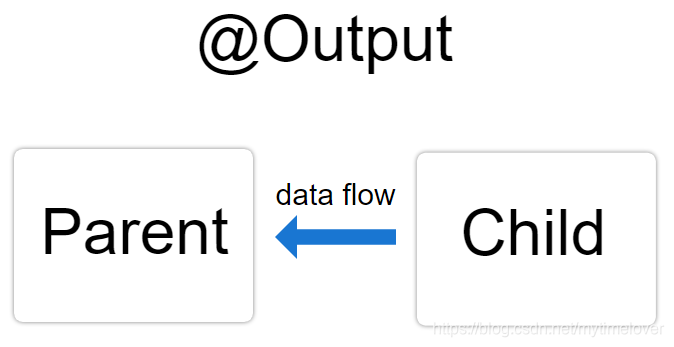
把数据发送到父组件
子组件或指令中的 @Output() 装饰器允许数据从子组件传给父组件。

@Output() 在子组件中标记了一个属性,作为数据从子组件传递到父组件的途径。

子组件使用 @Output() 属性来引发事件,以通知父组件这一变化。为了引发事件, @Output() 必须是 EventEmitter 类型,它是 @angular/core 中用来发出自定义事件的类。

下面的例子给出了如何在组件中设置 @Output(),来把数据从 HTML 的 <input> 推送到父组件的数组中。

要使用 @Output() ,就必须配置父组件和子组件。


1.配置子组件
下面的例子中有一个 <input> ,用户可以输入一个值,然后点击一个引发事件 <button> 然后, EventEmitter 数据中继到父组件。

在子组件类中导入 Output 和 EventEmitter

content_copy
import { Output, EventEmitter } from '@angular/core';
在组件类中,用 @Output() 装饰一个属性。下面的例子中 newItemEvent 这个 @Output() 的类型为 EventEmitter ,这意味着它是一个事件。

src/app/item-output/item-output.component.ts
content_copy
@Output() newItemEvent = new EventEmitter<string>();
上述声明中的差异点如下:

@Output() - 一个装饰器函数,它把该属性标记为数据从子组件进入父组件的一种途径

newItemEvent - 这个 @Output() 的名字

EventEmitter<string> - 这个 @Output() 的类型

new EventEmitter<string>() - 使用 Angular 来创建一个新的事件发射器,它发出的数据是 string 类型的。

关于 EventEmitter 的详细信息,请参阅 EventEmitter API 文档。

在同一个组件类中创建一个 addNewItem() 方法:

src/app/item-output/item-output.component.ts
content_copy
export class ItemOutputComponent {

  @Output() newItemEvent = new EventEmitter<string>();

  addNewItem(value: string) {
    this.newItemEvent.emit(value);
  }
}
addNewItem() 函数使用 newItemEvent 这个 @Output() 来引发一个事件,该事件带有用户输入到 <input> 中的值。

配置子组件的模板
子组件的模板有两个控件。第一个是带有模板引用变量 #newItem 的 <input>,用户可在其中输入条目名称。 #newItem 变量的 value 属性存储了用户输入到 <input> 中的值。

src/app/item-output/item-output.component.html
content_copy
<label>Add an item: <input #newItem></label>
<button (click)="addNewItem(newItem.value)">Add to parent's list</button>
第二个元素是带有 click 事件绑定 的 <button> 元素。

(click) 事件绑定到了子组件类中 addNewItem() 方法。addNewItem() 方法接受一个 #newItem.value 属性的值作为参数。


2.配置父组件
此范例中的 AppComponent 有一个 items 列表,以及一个向数组中添加更多条目的方法。

src/app/app.component.ts
content_copy
export class AppComponent {
  items = ['item1', 'item2', 'item3', 'item4'];

  addItem(newItem: string) {
    this.items.push(newItem);
  }
}
addItem() 方法接受一个字符串形式的参数,然后把该字符串添加到 items 数组中。

配置父组件的模板
在父模板中,把父组件的方法绑定到子组件的事件上。

把子组件选择器(<app-item-output>)放在父组件的模板 app.component.html 中。

src/app/app.component.html
content_copy
<app-item-output (newItemEvent)="addItem($event)"></app-item-output>

事件绑定 (newItemEvent)='addItem($event)' 会把子组件中的 newItemEvent 事件连接到父组件的 addItem() 方法。

$event 中包含用户在子组件模板上的 <input> 中键入的数据。

要了解 @Output() 的工作方式,你可以把以下内容添加到父组件的模板中:

content_copy
<ul>
  <li *ngFor="let item of items">{{item}}</li>
</ul>
*ngFor 会迭代 items 数组中的条目。当你在子组件的 <input> 中输入一个值并单击该按钮时,子组件就会发出该事件,而父组件的 addItem() 方法会把这个值追加到其 items 数组中,并且列表中会渲染出这个新条目。
3.3.2 父组件与子组件通过本地变量互动
  <button (click)="timer.start()">Start</button>
  <button (click)="timer.stop()">Stop</button>
  <div class="seconds">{{timer.seconds}}</div>
  <app-countdown-timer #timer></app-countdown-timer>

这个本地变量方法是个简单便利的方法。但是它也有局限性,因为父组件-子组件的连接必须全部在父组件的模板中进行。父组件本身的代码对子组件没有访问权。


父组件与子组件通过本地变量互动
父组件不能使用数据绑定来读取子组件的属性或调用子组件的方法。但可以在父组件模板里,新建一个本地变量来代表子组件,然后利用这个变量来读取子组件的属性和调用子组件的方法,如下例所示。

子组件 CountdownTimerComponent 进行倒计时,归零时发射一个导弹。start 和 stop 方法负责控制时钟并在模板里显示倒计时的状态信息。

component-interaction/src/app/countdown-timer.component.ts
content_copy
import { Component, OnDestroy } from '@angular/core';

@Component({
  selector: 'app-countdown-timer',
  template: '<p>{{message}}</p>'
})
export class CountdownTimerComponent implements OnDestroy {

  intervalId = 0;
  message = '';
  seconds = 11;

  ngOnDestroy() { this.clearTimer(); }

  start() { this.countDown(); }
  stop()  {
    this.clearTimer();
    this.message = `Holding at T-${this.seconds} seconds`;
  }

  private clearTimer() { clearInterval(this.intervalId); }

  private countDown() {
    this.clearTimer();
    this.intervalId = window.setInterval(() => {
      this.seconds -= 1;
      if (this.seconds === 0) {
        this.message = 'Blast off!';
      } else {
        if (this.seconds < 0) { this.seconds = 10; } // reset
        this.message = `T-${this.seconds} seconds and counting`;
      }
    }, 1000);
  }
}
计时器组件的宿主组件 CountdownLocalVarParentComponent 如下:

component-interaction/src/app/countdown-parent.component.ts
content_copy
import { Component } from '@angular/core';
import { CountdownTimerComponent } from './countdown-timer.component';

@Component({
  selector: 'app-countdown-parent-lv',
  template: `
  <h3>Countdown to Liftoff (via local variable)</h3>
  <button (click)="timer.start()">Start</button>
  <button (click)="timer.stop()">Stop</button>
  <div class="seconds">{{timer.seconds}}</div>
  <app-countdown-timer #timer></app-countdown-timer>
  `,
  styleUrls: ['../assets/demo.css']
})
export class CountdownLocalVarParentComponent { }
父组件不能通过数据绑定使用子组件的 start 和 stop 方法,也不能访问子组件的 seconds 属性。

把本地变量(#timer)放到(<countdown-timer>)标签中,用来代表子组件。这样父组件的模板就得到了子组件的引用,于是可以在父组件的模板中访问子组件的所有属性和方法。

这个例子把父组件的按钮绑定到子组件的 start 和 stop 方法,并用插值来显示子组件的 seconds 属性。

下面是父组件和子组件一起工作时的效果。
3.3.3 @ViewChild
本地变量方法是个简单便利的方法。但是它也有局限性,因为父组件-子组件的连接必须全部在父组件的模板中进行。父组件本身的代码对子组件没有访问权。
如果父组件的类需要读取子组件的属性值或调用子组件的方法,就不能使用本地变量方法。
当父组件类需要这种访问时,可以把子组件作为 ViewChild,注入到父组件里面。


export class CountdownViewChildParentComponent implements AfterViewInit {

  @ViewChild(CountdownTimerComponent)
  private timerComponent: CountdownTimerComponent;

  seconds() { return 0; }

  ngAfterViewInit() {
    // Redefine `seconds()` to get from the `CountdownTimerComponent.seconds` ...
    // but wait a tick first to avoid one-time devMode
    // unidirectional-data-flow-violation error
    setTimeout(() => this.seconds = () => this.timerComponent.seconds, 0);
  }

  start() { this.timerComponent.start(); }
  stop() { this.timerComponent.stop(); }
}


//父组件ts文件
dataSet = [
    {"id":0,"name":"张三"},
    {"id":1,"name":"李四"}
  ]
  //@ViewChild(子组件名称)  随便命名:子组件名称
  @ViewChild(ChildComponent) child:ChildComponent;
  father(){
    //调用子组件方法
    this.child.childFn();
  }
//父组件html代码
<li *ngFor="let item of dataSet">
  <app-child [names] = "item" (click)="father()"></app-child>
</li>

https://blog.csdn.net/kuangshp128/article/details/71172934
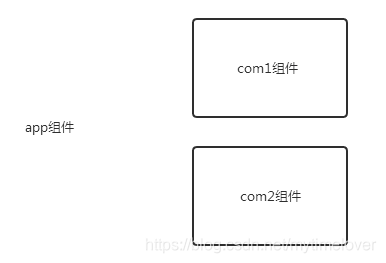
3.3.4 使用中间人通信
中间人模式就是第一种方式的改版,如果两个组件没有父子关系,那么久查找他们共同的父组件,我们知道angular是有一个根组件组成的组件树,那么至少有根组件可以使用的。

//com1组件html代码
<div class="com1">
    <p>我是com1组件</p>
    <input type="button" value="com1按钮" (click)="com1Fn($event)" />
</div>
//com1组件ts代码
//创建一个输出
@Output()
outcom1Fn = new EventEmitter<string>();

com1Fn(){
  this.outcom1Fn.emit("我是com1组件的");
}

//根组件作为中间者模式代码
//中间者ts文件
private com1Tocom2;
//根组件作为中间者
appFn(event:any){
  console.log(event);
  this.com1Tocom2 = event;
}
//中间者html代码
<app-com1 (outcom1Fn)="appFn($event)"></app-com1>
<app-com2 [com2]="com1Tocom2"></app-com2>

//com2组件ts代码
@Input() com2:string = "";
//com2组件的html代码
<div class="com2">
    <p>我是com2组件</p>
    <p>我是com1组件传递过来的:{{com2}}</p>
</div>

原文链接:https://blog.csdn.net/kuangshp128/article/details/71172934
3.3.5.通过服务来通讯
ChidTofatherService表示子组件传递数据到父组件
改服务中创建一个list存储数据,定义一个方法往这个list里面追加数据

import { Injectable } from '@angular/core';

@Injectable()
export class ChidTofatherService {
  list:string[] = [];
  constructor() { }
  append(str:any){
    this.list.push(str);
  }
}

//父组件的ts文件
import { Component, OnInit } from '@angular/core';
//引入创建的服务
import {ChidTofatherService} from "./../service/chid-tofather.service";
@Component({
  selector: 'app-father',
  templateUrl: './father.component.html',
  styleUrls: ['./father.component.css'],
  providers:[ChidTofatherService] //模块中依赖的服务,引入后该模块下所有的组件都可以使用(注入服务)
})
export class FatherComponent implements OnInit {
  //本组件中的list
  list:string[] = [];
  //申明引用
  constructor(private service:ChidTofatherService) { }

  ngOnInit() {
    this.list = this.service.list; //把服务里面的list数据赋值给组件的list中
  }
}

//父组件的html代码,如果list有数据就循环出来展现
<app-child></app-child>
<ul>
  <li *ngFor="let item of list">{{item}}</li>
</ul>

//子组件的ts文件
import { Component, OnInit } from '@angular/core';
import {ChidTofatherService} from "./../service/chid-tofather.service";
@Component({
  selector: 'app-child',
  templateUrl: './child.component.html',
  styleUrls: ['./child.component.css']
})
export class ChildComponent implements OnInit {
  inputText:string = "";
  constructor(private service:ChidTofatherService) { }

  ngOnInit() {
  }
  add(){
    this.service.append(this.inputText);
    this.inputText = "";
  }
}

//子组件的html代码
<input type="text" [(ngModel)]="inputText"/>
<input type="button" value="新增" (click)="add()"/>

原文链接:https://blog.csdn.net/kuangshp128/article/details/71518112
3.3.6 直接将父组件当做服务注入到子组件中
//父组件ts文件
import { Component, OnInit } from '@angular/core';

@Component({
  selector: 'app-father1',
  templateUrl: './father1.component.html',
  styleUrls: ['./father1.component.css']
})
export class Father1Component implements OnInit {

  constructor() { }
  public name:string = "我是父组件的名字";
  public dataSet:Array<any> = [
    {"id":"0","name":"张三"},
    {"id":"1","name":"李四"},
    {"id":"2","name":"王五"}
  ]
  ngOnInit() {
  }

}


//子组件ts文件
import { Component, OnInit } from '@angular/core';
import {Father1Component} from "app/father1/father1.component";

@Component({
  selector: 'app-child1',
  templateUrl: './child1.component.html',
  styleUrls: ['./child1.component.css']
})
export class Child1Component implements OnInit {

  constructor(private father1:Father1Component) { }

  ngOnInit() {
  }

}

//子组件html代码
<p>{{father1.name}}</p>
<ul>
    <li *ngFor="let item of father1.dataSet">{{item.name}}</li>
</ul>

https://blog.csdn.net/kuangshp128/article/details/71172934
3.3.7 利用 cookie 或者 localstorage 或者 Session进行通讯
public writeData():void{
	window.localStorage.setItem("json",JSON.stringify({name:'aaa信息',age:18}));
}

var json=window.localStorage.getItem("json");
//window.localStorage.removeItem("json");
var obj=JSON.parse(json);
console.log(obj.name);
console.log(obj.age)
3.4 动态组件
3.5 组件懒加载
3.6 组件样式
4.指令
4.1 指令的含义
在html中存在一些附加在元素节点上的标记,例如属性,事件等等.它们能够改变元素的行为,甚至操作DOM,改变DOM元素,以及它的各级子节点.
在angular中也有这样的存在,那就是指令.
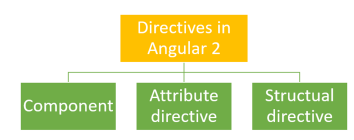
Angular 的指令分为三种:
组件(Component directive):用于构建UI组件,继承于 Directive 类
结构指令(Structural directive):用于动态添加或删除 DOM 元素来改变 DOM 布局
属性指令(Attribute directive):用于改变组件的外观或行为
4.2 结构型指令
*ngFor
*ngIf
4.3 属性型指令
ngStyle
ngClass
ngSwitch
ngNonBindable
4.4 自定义指令
4.4.1 自定义属性型指令
https://segmentfault.com/a/1190000009674089
1 创建指令
    该指令用于演示如何利用 HostBinding 装饰器,设置元素的 innerText 属性。
    import { Directive, HostBinding} from '@angular/core';

    @Directive({
        selector: '[greet]'
    })
    export class GreetDirective {
      @HostBinding() innerText = 'Hello, Everyone!';
    }

    import { Component } from '@angular/core';

    @Component({
      selector: 'app-root',
      template: `
        <h2>Hello, Angular</h2>
        <h2 greet>Hello, Angular</h2>
      `,
    })
    export class AppComponent { }


2.定义输入属性
    为了能够让用户自定义 GreetDirective 指令的问候内容,我们需要使用 Input 装饰器去定义指令的输入属性。
    import { Directive, HostBinding, Input } from '@angular/core';

    @Directive({
        selector: '[greet]'
    })
    export class GreetDirective {
        @Input() greet: string;
        @HostBinding() get innerText() {
            return this.greet;
        }
    }

    import { Component } from '@angular/core';

    @Component({
      selector: 'app-root',
      template: `
        <h2>Hello, Angular</h2>
        <h2 [greet]="'Hello, Semlinker!'">Hello, Angular</h2>
      `,
    })
    export class AppComponent { }


3.事件处理
    在 Angular 中,我们可以使用 HostListener 属性装饰器,实现元素的事件绑定。
    import { Directive, HostBinding, HostListener, Input } from '@angular/core';

    @Directive({
        selector: '[greet]'
    })
    export class GreetDirective {
       @Input() greet: string;

       @HostBinding() get innerText() {
          return this.greet;
       }

       @HostListener('click',['$event'])
        onClick(event) {
          this.greet = 'Clicked!';
       }
    }


    import { Component } from '@angular/core';

    @Component({
      selector: 'app-root',
      template: `
        <h2>Hello, Angular</h2>
        <h2 [greet]="'Hello, Semlinker!'">Hello, Angular</h2>
      `,
    })
    export class AppComponent { }


4.获取宿主元素属性值
在 Angular 中,我们可以通过 Attribute 装饰器来获取指令宿主元素的属性值。
    import { Directive, HostBinding, HostListener, Input, Attribute } from '@angular/core';

    @Directive({
        selector: '[greet]'
    })
    export class GreetDirective {
        @Input() greet: string;

        @HostBinding() get innerText() {
            return this.greet;
        }

        @HostListener('click',['$event'])
        onClick(event) {
            this.greet = 'Clicked!';
            console.dir(event);
        }

        constructor(@Attribute('author') public author: string) {
            console.log(author);
        }
    }


    import { Component } from '@angular/core';

    @Component({
      selector: 'app-root',
      template: `
        <h2>Hello, Angular</h2>
        <h2 [greet]="'Hello, Semlinker!'"
          author="semlinker">Hello, Angular</h2>
      `,
    })
    export class AppComponent { }


5.<ng-template> 元素
在 Angular 中,我们可以通过 ViewChild 装饰器来获取视图中定义的模板元素,然后利用 ViewContainerRef 对象的 createEmbeddedView() 方法,创建内嵌视图。
    import { Component, TemplateRef, ViewContainerRef, ViewChild,
      AfterViewInit } from '@angular/core';

    @Component({
      selector: 'app-root',
      template: `
        <ng-template #tpl>
          Hello, Semlinker!
        </ng-template>
      `,
    })
    export class AppComponent implements AfterViewInit{
      @ViewChild('tpl')
      tplRef: TemplateRef<any>;

      constructor(private vcRef: ViewContainerRef) {}

      ngAfterViewInit() {
        this.vcRef.createEmbeddedView(this.tplRef);
      }
    }

6.ngTemplateOutlet 指令
该指令用于基于已有的 TemplateRef 对象,插入对应的内嵌视图。在应用 NgTemplateOutlet 指令时,我们可以通过 [ngTemplateOutletContext] 属性来设置 EmbeddedViewRef 的上下文对象。绑定的上下文应该是一个对象,此外可通过 let语法来声明绑定上下文对象属性名。
    import { Component } from '@angular/core';

    @Component({
      selector: 'app-root',
      template: `
        <ng-template #stpl>
          Hello, Semlinker!
        </ng-template>
        <ng-template #atpl>
          Hello, Angular!
        </ng-template>
        <div [ngTemplateOutlet]="atpl"></div>
        <div [ngTemplateOutlet]="stpl"></div>
      `,
    })
    export class AppComponent { }


	import { Component } from '@angular/core';

    @Component({
      selector: 'app-root',
      template: `
        <ng-template #stpl let-message="message">
          <p>{{message}}</p>
        </ng-template>
        <ng-template #atpl let-msg="message">
          <p>{{msg}}</p>
        </ng-template>
        <ng-template #otpl let-msg>
          <p>{{msg}}</p>
        </ng-template>
        <div [ngTemplateOutlet]="atpl"
          [ngTemplateOutletContext]="context">
        </div>
        <div [ngTemplateOutlet]="stpl"
          [ngTemplateOutletContext]="context">
        </div>
        <div [ngTemplateOutlet]="otpl"
          [ngTemplateOutletContext]="context">
        </div>
      `,
    })
    export class AppComponent {
      context = { message: 'Hello ngOutletContext!',
        $implicit: 'Hello, Semlinker!' };
    }
4.4.2 自定义结构性指令
该指令实现 ngIf 指令相反的效果,当指令的输入条件为 Falsy 值时,显示DOM元素。
    import { Directive, Input, TemplateRef, ViewContainerRef } from '@angular/core';

    @Directive({
        selector: '[exeUnless]'
    })
    export class UnlessDirective {

        @Input('exeUnless')
        set condition(newCondition: boolean) {
            if (!newCondition) {
                this.viewContainer.createEmbeddedView(this.templateRef);
            } else {
                this.viewContainer.clear();
            }
        }

        constructor(private templateRef: TemplateRef<any>,
            private viewContainer: ViewContainerRef) {
        }
    }


    import { Component } from '@angular/core';

    @Component({
      selector: 'app-root',
      template: `
       <h2 *exeUnless="condition">Hello, Semlinker!</h2>
      `,
    })
    export class AppComponent {
      condition: boolean = false;
    }
5.服务
5.1 服务的含义
Angular的service是一个简单的TypeScript类,它封装了一些用于完成应用程序中特定任务的方法,例如从服务器获取数据或者向服务器发送数据。

1.为什么需要服务?
	组件不应该直接获取或保存数据, 它们应该聚焦于展示数据,而把数据访问的职责委托给某个服务。而服务就充当着数据访问,逻辑处理的功能。把组件和服务区分开,以提高模块性和复用性。通过把组件中和视图有关的功能与其他类型的处理分离开,可以让组件类更加精简、高效。


2.服务的作用?
	用来将应用程序中的业务逻辑组件中的渲染逻辑分离
    用来在Angular应用中的多个组件之间共享数据
    让程序易于测试和调试
    用于编写可重用的代码

3.创建服务
ng g s auth
ng generate service hero

import {Injectable} from '@angular/core';
import {HttpClient} from '@angular/common/http';

@Injectable({
  providedIn: 'root',
})
export class AuthService {

    constructor(
        private http: HttpClient,
    ) {
    }

    getUserInfo(userId: string) {
        return this.http.get('http://localhost:8080/user/get', {
            responseType: 'json',
            params: {id: userId}
        });
    }
}


4.使用服务
import {Component, OnInit} from '@angular/core';
import {AuthService} from './auth.service';

({
    selector: 'app-root',
    templateUrl: './app.component.html',
    styleUrls: ['./app.component.scss']
})
export class AppComponent implements OnInit{
    constructor(
        private authService: AuthService,
    ) {
    }

    ngOnInit(): void {
        this.authService.getUserInfo('test').subscribe(res => {
            console.log(res);
        });
    }

}
5.2 依赖注入
1.注入器是Angular主要的机制。Angular 会在启动过程中为你创建全应用级注入器以及所需的其它注入器。你不用自己创建注入器。

2.该注入器会创建依赖、维护一个容器来管理这些依赖,并尽可能复用它们。

3.提供商是一个对象,用来告诉注入器应该如何获取或创建依赖。


我们使用命令ng g s servicename创建一个服务,在新建的服务中我们可以看到@Injectable()装饰器,它把这个类标记为依赖注入系统的参与者之一。组件中如何使用服务呢,必须将服务依赖注入系统、组件或者模块,才能够使用服务。我们可以用注册提供商和根注入器实现。

      该服务本身是 CLI 创建的一个类,并且加上了 @Injectable() 装饰器。默认情况下,该装饰器是用 providedIn 属性进行配置的,它会为该服务创建一个提供商。在这个例子中,providedIn: 'root' 指定 Angular 应该在根注入器中提供该服务,从而实现根注入器将服务注入,它就在整个应用程序中可用了。


@Injectable() 服务
	这个新的服务导入了 Angular 的Injectable  符号,并且给这个服务类添加了 @Injectable() 装饰器。 它把这个类标记为依赖注入系统的参与者之一。HeroService 类将会提供一个可注入的服务,并且它还可以拥有自己的待注入的依赖。 目前它还没有依赖.
https://blog.csdn.net/wjyyhhxit/article/details/81806046
	在要求 Angular 把 HeroService 注入到 HeroesComponent 之前,你必须先把这个服务提供给依赖注入系统。通过注册提供商来做到这一点。提供商用来创建和交付服务,在这个例子中,它会对 HeroService 类进行实例化,以提供该服务,需要确保 HeroService 已经作为该服务的提供商进行过注册。 你要用一个注入器注册它。注入器就是一个对象,负责在需要时选取和注入该提供商。默认情况下,Angular CLI 命令 ng generate service 会通过给 @Injectable 装饰器添加元数据的形式,为该服务把提供商注册到根注入器上。如果你看看 HeroService 紧前面的 @Injectable() 语句定义,就会发现 providedIn 元数据的值是 'root',当你在顶层提供该服务时,Angular 就会为 HeroService 创建一个单一的、共享的实例,并把它注入到任何想要它的类上。 在 @Injectable 元数据中注册该提供商,还能让 Angular 可以通过移除那些完全没有用过的服务,来进行优化。
    ng generate service hero --module=app

	让构造函数保持简单,只做初始化操作,比如把构造函数的参数赋值给属性。 构造函数不应该做任何事。 它肯定不能调用某个函数来向远端服务(比如真实的数据服务)发起 HTTP 请求。
	而是选择在 ngOnInit 生命周期钩子中调用 getHeroes(),之后交由 Angular 处理,它会在构造出 HeroesComponent 的实例之后的某个合适的时机调用 ngOnInit。


testService.ts
import { Injectable } from '@angular/core';

@Injectable({
  providedIn: 'root',
})
export class TestService {
}


也可以指定某个服务只有在特定的模块中提供,类似于一个业务模块中专属于这个模块的服务,只会应用于此模块中,我们就可以这么做。
import { Injectable } from '@angular/core';
import { TestModule } from './test.module';

@Injectable({
  providedIn: TestModule,
})
export class TestService {
}

或者模块中指定服务
import { NgModule } from '@angular/core';
import { TestService } from './test.service';

@NgModule({
  providers: [TestService],
})
export class TestModule {
}


也可以直接在某个组件中注入服务。
@Component({
/* . . . */
  providers: [TestService]
})


服务而已,有多种注入的方法的区别就在于这个服务作用于哪里,用于限定服务使用的界限。当我们将某个服务根注入意味着在整个应用中都可以使用,注入于某个模块,只能应用于某个模块,注入于组件中,只应用于此组件。我们根据对服务的功能定义,来选择合适的注入方式,以提高性能。


单例服务的方法:
	1)把 @Injectable() 的 providedIn 属性声明为 root。
    2)把该服务包含在 AppModule 或某个只会被 AppModule 导入的模块中。

forRoot() 模式
	   如果模块同时定义了 providers (服务),当你在多个特性模块中加载此模块时,这些服务就会被注册在多个地方。这会导致出现多个服务实例,并且该服务的行为不再像单例一样 。有多种方式来防止这种现象:
        a.用 providedIn 语法代替在模块中注册服务的方式。
        b.把你的服务分离到它们自己的模块中。
        c.在模块中分别定义 forRoot() 和 forChild() 方法。


https://www.cnblogs.com/huangenai/p/12214806.html

https://blog.tcs-y.com/2020/03/22/ng2-serivce/
5.3 forRoot forChild
angular里forRoot的作用
模块A是这样定义的

@NgModule({
    providers: [AService],
    declarations: [ TitleComponent ],
    exports:      [ TitleComponent ],
})
export class A {}
如果有惰性模块lazyModule导入模块A,那么会生成子注入器将AService重新生成

这时如果想将AService变成全局唯一的,那么在lazyModule导入的时候就不要导入providers而只导入TitleComponent

forRoot这时就有用武之地了

改写A

复制代码
@NgModule({
    providers: [],
    declarations: [ TitleComponent ],
    exports:      [ TitleComponent ],
})
export class A {
   static forRoot() {
        return {ngModule: A, providers: [AService]};
   }
}
复制代码
在appModule中使用A.forRoot导入A模块

@NgModule({
  imports: [A.forRoot()]
})
export class AppModule {}
在lazyModule中正常导入A模块

@NgModule({
  imports: [A]
})
export class LazyModule{}
6.路由
6.1 路由的含义
在用户使用应用程序时,Angular 的路由器能让用户从一个视图导航到另一个视图。
Angular 中的 Router 模块会负责模块的加载、组件的初始化、 销毁等操作,它是整个乐队的总指挥。

路由的作用
	浏览器的历史日志
	对应URL
	可以配合 NgModule 进行模块的懒加载、预加载操作
	管理组件的生命周期,它会负责创建、销毁组件


路由的使用
const routes: Routes = [
    { path: '', component: HappyComponent },
    { path: 'work', component: WorkComponent },
    { path: 'happy', component: HappyComponent },
    { path: 'study', component: StudyComponent },
    { path: '**', component: HappyComponent },
 ];


<router-outlet></router-outlet>
[外链图片转存失败,源站可能有防盗链机制,建议将图片保存下来直接上传(img-mlghzVoh-1620799640104)(angular%E5%AD%A6%E4%B9%A0%E7%AC%94%E8%AE%B0.assets/image-20210508160536882.png)]
6.2 路由模块
随着应用的成长,会用到更多路由器特性,比如:守卫,解析器和子路由等,这时候再在模块中进行配置,就会显得杂乱冗肿。
官方建议重构路由,将路由信息移到一个单独的特殊用途模块之中,叫做路由模块。

路由模块的作用:
    1.把路由这个关注点从其它应用类关注点中分离出去。
    2.测试特性模块时,可以替换或移除路由模块。
    3.为路由服务提供商(包括守卫和解析器等)提供一个共同的地方。
    4.不要声明组件。


我们有两种配置路由的方法,即在路由模块或者在模块内部配置路由,但不要同时在两处都配置。

路由模块 代码如下:

│  app-routing.module.ts
│  app.component.html
│  app.component.ts
│  app.module.ts
│
└─routes
    │
    ├─happy
    │      happy.component.html
    │      happy.component.ts
    │
    ├─study
    │      study.component.html
    │      study.component.ts
    │
    └─work
            work.component.html
            work.component.ts


 1 import { BrowserModule } from '@angular/platform-browser';
 2 import { NgModule } from '@angular/core';
 3 import { AppComponent } from './app.component';
 4 import { AppRoutingModule } from './app-routing.module';
 5 import { WorkComponent } from './routes/work/work.component';
 6 import { StudyComponent } from './routes/study/study.component';
 7 import { HappyComponent } from './routes/happy/happy.component';
 8
 9
10 @NgModule({
11   declarations: [
12     AppComponent,
13     WorkComponent,
14     StudyComponent,
15     HappyComponent
16   ],
17   imports: [
18     BrowserModule,
19     AppRoutingModule
20   ],
21   providers: [],
22   bootstrap: [AppComponent]
23 })
24
25 export class AppModule { }


 1 import { NgModule } from '@angular/core';
 2 import { Routes, RouterModule } from '@angular/router';
 3 import { HappyComponent } from './routes/happy/happy.component';
 4 import { StudyComponent } from './routes/study/study.component';
 5 import { WorkComponent } from './routes/work/work.component';
 6
 7 const routes: Routes = [
 8   { path: '', component: HappyComponent },
 9   { path: 'work', component: WorkComponent },
10   { path: 'happy', component: HappyComponent },
11   { path: 'study', component: StudyComponent },
12   { path: '**', component: HappyComponent },
13 ];
14
15 @NgModule({
16   imports: [RouterModule.forRoot(routes)],
17   exports: [RouterModule]
18 })
19 export class AppRoutingModule { }


模块内部配置路由:
1 import { BrowserModule } from '@angular/platform-browser';
 2 import { NgModule } from '@angular/core';
 3 import { AppComponent } from './app.component';
 4 import { WorkComponent } from './routes/work/work.component';
 5 import { StudyComponent } from './routes/study/study.component';
 6 import { HappyComponent } from './routes/happy/happy.component';
 7 import { Routes, RouterModule } from '@angular/router';
 8
 9 const appRoutes: Routes = [
10   { path: '', component: HappyComponent },
11   { path: 'work', component: WorkComponent },
12   { path: 'happy', component: HappyComponent },
13   { path: 'study', component: StudyComponent },
14   { path: '**', component: HappyComponent },
15 ]
16
17 @NgModule({
18   declarations: [
19     AppComponent,
20     WorkComponent,
21     StudyComponent,
22     HappyComponent
23   ],
24   imports: [
25     RouterModule.forRoot(appRoutes),
26     BrowserModule,
27   ],
28   providers: [],
29   bootstrap: [AppComponent]
30 })
31
32 export class AppModule { }
6.3 路由嵌套
路由和组件一样,都是树形结构的,可以层层嵌套,配置子路由
│  app-routing.module.ts
│  app.component.html
│  app.component.ts
│  app.module.ts
│
└─routes
    │
    ├─happy
    │  │  happy-routing.module.ts
    │  │  happy.component.html
    │  │  happy.component.ts
    │  │  happy.module.ts
    │  │
    │  ├─picture
    │  │      picture.component.html
    │  │      picture.component.ts
    │  │
    │  ├─text
    │  │      text.component.html
    │  │      text.component.ts
    │  │
    │  └─video
    │          video.component.html
    │          video.component.ts
    │
    ├─study
    │      study.component.html
    │      study.component.ts
    │
    └─work
            work.component.html
            work.component.ts
6.4 路由跳转
路由跳转的方式有如下几种

import { Router, ActivationEnd } from '@angular/router';
constructor(
        private router: Router,
        private route: ActivatedRoute,
        ...
    ) { }


1.通过url跳转
    this.router.navigateByUrl(`/mg/account/center/result`);
    this.router.navigateByUrl(`/door/doc/${id}`);

2.带参数
    this.router.navigate(["/pt/c"], {queryParams: {cartType: 1}});

3.html页面里直接写死
    <a routerLink="/door/news">新闻资讯</a>
    <button [routerLink]="['/about',1]">跳转</button>
	<button [routerLink]="['/about',"home"]">跳转</button>

4.获取
this.route.snapshot.queryParams['cartType']
this.route.snapshot.params['id'];


路由跳转 在angular里有个问题一直不知道怎么做:
如何在跳转路由时,传递的参数不在url上显示,也就是隐藏传递的参数。queryParams和restful方式都会在url上,当传递一个大对象时,url会显示一堆信息。
6.5 路由守卫
canload(加载)
canActivate(进入)
canActivateChild(进入子路由)
canDeactivate(离开)


使用场景分析
1.canLoad
	默认值为true,表明路由是否可以被加载,一般不会认为控制这个守卫逻辑,99.99%情况下,默认所有app模块下路由均允许canLoad

2.canActivate
	是否允许进入该路由,此场景多为权限限制的情况下,比如客户未登录的情况下查询某些资料页面,在此方法中去判断客户是否登陆,如未登录则强制导航到登陆页或者提示无权限,即将返回等信息提示。

3.canActivateChild
	是否可以导航子路由,同一个路由不会同时设置canActivate为true,canActivateChild为false的情况,此外,这个使用场景很苛刻,尤其是懒加载路由模式下,暂时未使用到设置为false的场景。

4.CanDeactivate
	路由离开的时候进行触发的守卫,使用场景比较经典,通常是某些页面比如表单页面填写的内容需要保存,客户突然跳转其它页面或者浏览器点击后退等改变地址的操作,可以在守卫中增加弹窗提示用户正在试图离开当前页面,数据还未保存等提示。


https://www.jb51.net/article/168754.htm
6.6 路由认证
增添一个登陆的功能,在访问/work的时候需要登陆才能访问,否则跳转到登陆页面
    首先添加一个auth的服务,来保存登录状态和登陆与注销的功能
        ng generate service auth/auth    (简写ng g s auth/auth)
    再添加一个auth守卫
        ng generate guard auth/auth    (简写ng g g auth/auth)
    最后在对应路由中添加这个守卫

{ path: 'work', canActivate: [AuthGuard], component: WorkComponent },

auth.guard.ts
 1 import { Injectable } from '@angular/core';
 2 import { CanActivate, CanLoad, Route, UrlSegment, ActivatedRouteSnapshot, RouterStateSnapshot, UrlTree, Router } from '@angular/router';
 3 import { Observable } from 'rxjs';
 4 import { AuthService } from './auth.service';
 5
 6 @Injectable({
 7   providedIn: 'root'
 8 })
 9 export class AuthGuard implements CanActivate {
10   constructor(
11     private authService: AuthService,
12     private router: Router
13   ) { }
14
15   canActivate(
16     next: ActivatedRouteSnapshot,
17
18     state: RouterStateSnapshot): Observable<boolean | UrlTree> | Promise<boolean | UrlTree> | boolean | UrlTree {
19
20     let url = state.url
21
22     return this.checkLogin(url);
23   }
24
25   checkLogin(url: string) {
26     if (this.authService.isLoggedIn) return true;
27
28     this.authService.redirectUrl = url;
29
30     this.router.navigate(["login"]);
31
32     return false;
33   }
34 }

auth.service.ts
1 import { Injectable } from '@angular/core';
 2 import { Observable, of } from 'rxjs';
 3 import { tap, delay } from 'rxjs/operators';
 4
 5 @Injectable({
 6   providedIn: 'root'
 7 })
 8 export class AuthService {
 9   //是否登陆的状态
10   isLoggedIn: boolean = false;
11
12   // 登录后重定向的地址
13   redirectUrl: string = '';
14
15   constructor() { }
16
17   login(): Observable<boolean> {
18     return of(true).pipe(
19       delay(1000),
20       tap(val => this.isLoggedIn = true)
21     );
22   }
23
24   logout(): void {
25     this.isLoggedIn = false;
26   }
27 }
6.7 异步路由 惰性加载
着应用程序的不断壮大,程序的加载时间将会过长,这是我们不得不正视的一个严重问题.
    如何才能解决这个问题呢?最好的办法就是引进异步路由:可以获得在请求时才惰性加载特性模块的能力. 惰性加载有多个优点:
        你可以只在用户请求时才加载某些特性区。
        对于那些只访问应用程序某些区域的用户,这样能加快加载速度。
        你可以持续扩充惰性加载特性区的功能,而不用增加初始加载的包体积。

惰性加载是加载的模块,所以需要对上述的结构改进一下:


HappyModule是启动后的默认路由模块,需要在启动时加载,所有没有惰性加载
对于WorkModule和StudyModule,只有在我们访问的时候,它们才会加载,这样就节约了启动时的加载时间
惰性加载和重新配置工作只会发生一次,也就是在该路由首次被请求时.在后续的请求中,该模块和路由都是立即可用的。


│  app-routing.module.ts
│  app.component.html
│  app.component.ts
│  app.module.ts
│
└─routes
    │  routes-routing.module.ts
    │  routes.module.ts
    │
    ├─happy
    │  │  happy-routing.module.ts
    │  │  happy.component.html
    │  │  happy.component.ts
    │  │  happy.module.ts
    │  │
    │  ├─picture
    │  │      picture.component.html
    │  │      picture.component.ts
    │  │
    │  ├─text
    │  │      text.component.html
    │  │      text.component.ts
    │  │
    │  └─video
    │          video.component.html
    │          video.component.ts
    │
    ├─study
    │      study-routing.module.ts
    │      study.component.html
    │      study.component.ts
    │      study.module.ts
    │
    └─work
            work-routing.module.ts
            work.component.html
            work.component.ts
            work.module.ts


app-routing.module.ts
 1 import { NgModule } from '@angular/core';
 2 import { Routes, RouterModule } from '@angular/router';
 3
 4 const routes: Routes = [];
 5
 6 @NgModule({
 7   imports: [RouterModule.forRoot(routes)],
 8   exports: [RouterModule]
 9 })
10
11 export class AppRoutingModule { }

app.module.ts
 1 import { BrowserModule } from '@angular/platform-browser';
 2 import { NgModule } from '@angular/core';
 3 import { AppComponent } from './app.component';
 4 import { AppRoutingModule } from './app-routing.module';
 5 import { RoutesModule } from './routes/routes.module';
 6
 7
 8 @NgModule({
 9   declarations: [
10     AppComponent
11   ],
12   imports: [
13     BrowserModule,
14     RoutesModule,
15     AppRoutingModule
16   ],
17   providers: [],
18   bootstrap: [AppComponent]
19 })
20
21 export class AppModule { }


routes-routing.module.ts
 1 import { NgModule } from '@angular/core';
 2 import { Routes, RouterModule } from '@angular/router';
 3 import { HappyComponent } from './happy/happy.component';
 4
 5 const routes: Routes = [
 6   { path: '', component: HappyComponent },
 7   {
 8     path: 'work',
 9     loadChildren: './work/work.module#WorkModule'
10   },
11   {
12     path: 'study',
13     loadChildren: './study/study.module#StudyModule'
14   },
15   { path: '**', component: HappyComponent },
16 ]
17 @NgModule({
18   imports: [RouterModule.forRoot(routes)],
19   exports: [RouterModule]
20 })
21 export class RoutesRoutingModule { }


routes.module.ts
 1 import { NgModule } from '@angular/core';
 2 import { CommonModule } from '@angular/common';
 3 import { RoutesRoutingModule } from './routes-routing.module';
 4 import { HappyModule } from './happy/happy.module';
 5
 6 @NgModule({
 7   declarations: [],
 8   imports: [
 9     CommonModule,
10     HappyModule,
11     RoutesRoutingModule
12   ]
13 })
14 export class RoutesModule { }


happy-routing.module.ts
 1 import { NgModule } from '@angular/core';
 2 import { Routes, RouterModule } from '@angular/router';
 3 import { HappyComponent } from './happy.component';
 4 import { TextComponent } from './text/text.component';
 5 import { PictureComponent } from './picture/picture.component';
 6 import { VideoComponent } from './video/video.component';
 7
 8 const routes: Routes = [
 9   {
10     path: 'happy',
11     component: HappyComponent,
12     children: [
13       {
14         path: '',
15         children: [
16           {
17             path: '',
18             component: TextComponent
19           },
20           {
21             path: 'text',
22             component: TextComponent
23           },
24           {
25             path: 'picture',
26             component: PictureComponent
27           },
28           {
29             path: 'video',
30             component: VideoComponent
31           },
32           {
33             path: '**',
34             component: TextComponent
35           }
36         ]
37       }
38     ]
39   }
40 ];
41
42 @NgModule({
43   imports: [RouterModule.forChild(routes)],
44   exports: [RouterModule]
45 })
46
47 export class HappyRoutingModule { }


happy.module.ts
 1 import { NgModule } from '@angular/core';
 2 import { CommonModule } from '@angular/common';
 3 import { HappyRoutingModule } from './happy-routing.module';
 4 import { VideoComponent } from './video/video.component';
 5 import { PictureComponent } from './picture/picture.component';
 6 import { TextComponent } from './text/text.component';
 7 import { HappyComponent } from './happy.component';
 8
 9 @NgModule({
10   declarations: [
11     HappyComponent,
12     VideoComponent,
13     PictureComponent,
14     TextComponent
15   ],
16   imports: [
17     CommonModule,
18     HappyRoutingModule
19   ]
20 })
21 export class HappyModule { }

work-routing.module.ts
import { NgModule } from '@angular/core';
 2 import { Routes, RouterModule } from '@angular/router';
 3 import { WorkComponent } from './work.component';
 4
 5 const routes: Routes = [
 6   { path: '', redirectTo: 'work', pathMatch: 'full' },
 7   { path: 'work', component: WorkComponent }
 8 ];
 9
10 @NgModule({
11   imports: [RouterModule.forChild(routes)],
12   exports: [RouterModule]
13 })
14 export class WorkRoutingModule { }


work.module.ts
import { NgModule } from '@angular/core';
 2 import { CommonModule } from '@angular/common';
 3
 4 import { WorkRoutingModule } from './work-routing.module';
 5 import { WorkComponent } from './work.component';
 6
 7 @NgModule({
 8   declarations: [WorkComponent],
 9   imports: [
10     CommonModule,
11     WorkRoutingModule
12   ]
13 })
14 export class WorkModule { }


 976
976


 被折叠的 条评论
为什么被折叠?
被折叠的 条评论
为什么被折叠?
 到【灌水乐园】发言


