


目录
介绍
在第1部分中,我们从Visual Studio 2022创建了一个Angular 13前端和.NET 6后端。本文继续构建这个金融应用程序,在后端调用Yahoo Finance API并使用Angular Material增强前端。
Yahoo Finance API
Yahoo Finance API是一系列库/API/方法,用于获取各种金融市场和产品的历史和实时数据,如Yahoo Finance所示。
其中一些产品包括加密货币、常规货币、股票和债券、基本面和期权数据以及市场分析和新闻的市场数据。使用Yahoo Finance API的一个很好的理由是它可以完全免费。此外,它简单易用。
在开始使用之前,您需要登录Yahoo Finance以获取您自己的API密钥。
全球市场API
让我们回到GlobalMarketAPI项目。删除默认创建的WeatherForecastController.cs和WeatherForecast.cs。我们将使用Yahoo Finance API构建金融控制器。
查看Yahoo Finance API规范,我们使用http Get /v6/finance/quote获取股票、加密货币、期货等的实时报价数据。
金融控制器
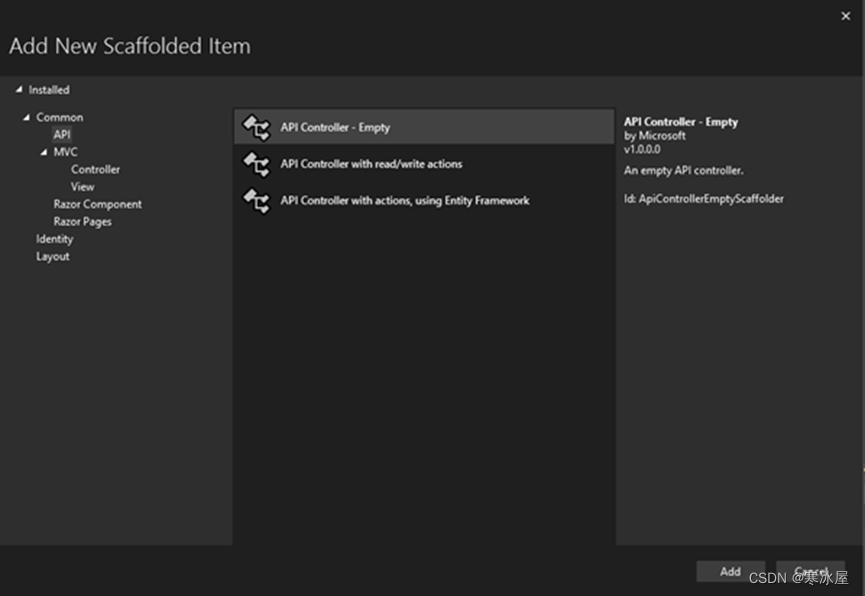
右键单击“Controllers”文件夹以添加新控制器。
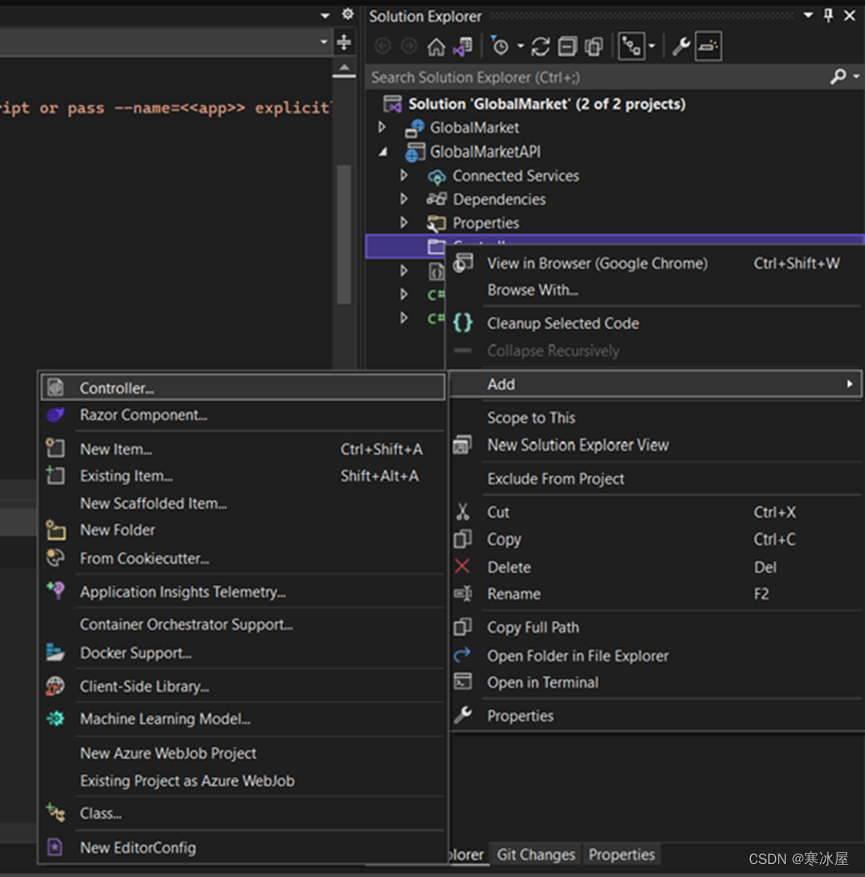
选择“API Controller – Empty”添加一个空控制器。
将其命名为FinanceController.cs,使用以下代码创建一个空的API控制器:
using Microsoft.AspNetCore.Http;
using Microsoft.AspNetCore.Mvc;

namespace GlobalMarketAPI.Controllers
{
    [Route("api/[controller]")]
    [ApiController]
    public class FinanceController : ControllerBase
    {
    }
}
报价响应模型
从Yahoo Finance API规范中,我们得到Get Quote API的响应JSON。
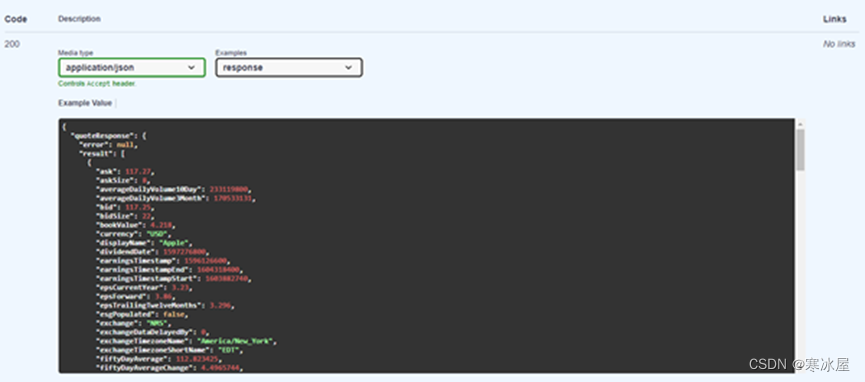
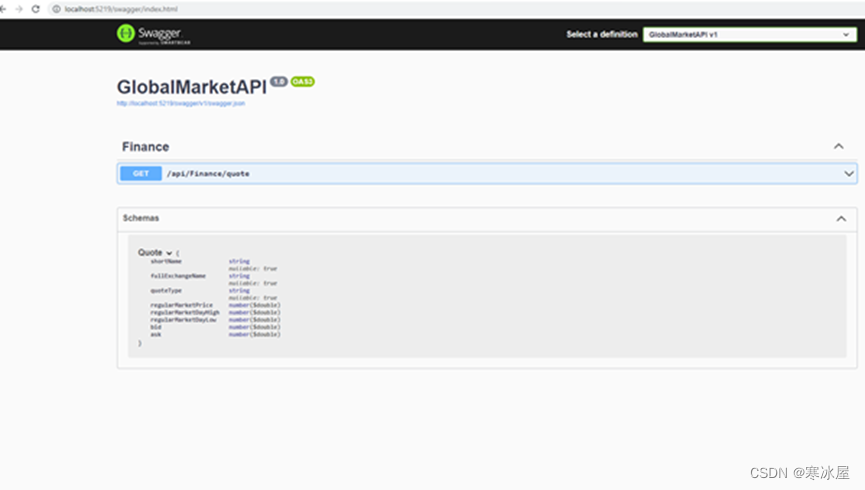
根据规范,我们首先添加Quote类,它有ShortName, FullExchangeName, QuoteType, RegularMarketPrice, RegularMarketDayHigh, RegularMarketDayLow, Bid, Ask。
namespace GlobalMarketAPI.Models
{
    public class Quote
    {
        public string? ShortName { get; set; }

        public string? FullExchangeName { get; set; }

        public string? QuoteType { get; set; }

        public decimal RegularMarketPrice { get; set; }

        public decimal RegularMarketDayHigh { get; set; }

        public decimal RegularMarketDayLow { get; set; }

        public decimal Bid { get; set; }

        public decimal Ask { get; set; }
    }
}然后添加具有Quote和error string列表的QuoteResult类。
namespace GlobalMarketAPI.Models
{
    public class QuoteResult
    {
        public List<Quote>? Result { get; set; }

        public string? Error { get; set; }
    }
}最后是具有QuoteResult的YahooQuoteResponse类。
namespace GlobalMarketAPI.Models
{
    public class YahooQuoteResponse
    {
        public QuoteResult? QuoteResponse { get; set; }
    }
}
雅虎金融设置
当我们调用Yahoo Finance API时,我们需要API URL和API密钥。我们将这些放在应用程序设置中。在appsettings.json中添加Yahoo Finance设置。
{
  "Logging": {
    "LogLevel": {
      "Default": "Information",
      "Microsoft.AspNetCore": "Warning"
    }
  },
  "AllowedHosts": "*",
  "YahooFinanceSettings": {
    /* Please replace with your own api key */
    "APIKey": "****************",
    "BaseURL": "https://yfapi.net"
}基本URL是常量字符串https://yfapi.net。将API密钥替换为您自己的API密钥。
创建YahooFinanceSettings类。
namespace GlobalMarketAPI.Settings
{
    public class YahooFinanceSettings
    {
        public string? APIKey { get; set; }
        public string? BaseURL { get; set; }
    }
}在Program.cs中注入雅虎金融设置。
using GlobalMarketAPI.Settings;

var builder = WebApplication.CreateBuilder(args);
ConfigurationManager configuration = builder.Configuration;

builder.Services.AddTransient(p =>
{
    YahooFinanceSettings settings = configuration.GetSection
                (nameof(YahooFinanceSettings)).Get<YahooFinanceSettings>();

    return settings;
});
金融服务
现在创建雅虎金融服务。报价URL是/v6/finance/quote。
我们可以像这样编写“获取报价”函数:
var url = $"v6/finance/quote?symbols={symbol}";
var httpClient = new HttpClient();
httpClient.DefaultRequestHeaders.Add("X-API-KEY", new[] { settings.APIKey });
httpClient.BaseAddress = new Uri(settings.BaseURL ?? "");
var data = await httpClient.GetStringAsync(url);
添加金融服务接口:
using GlobalMarketAPI.Models;

namespace GlobalMarketAPI.Services
{
    public interface IFinanceService
    {
        Task<Quote> GetQuote(string symbol);
    }
}
添加金融服务类:
using GlobalMarketAPI.Models;
using Newtonsoft.Json;
using GlobalMarketAPI.Settings;

namespace GlobalMarketAPI.Services
{
    public class FinanceService : IFinanceService
    {
        private readonly HttpClient _httpClient;
        const string QuoteURL = "v6/finance/quote";

        public FinanceService(YahooFinanceSettings settings)
        {
            _httpClient = new HttpClient();
            _httpClient.DefaultRequestHeaders.Add
                 ("X-API-KEY", new[] { settings.APIKey });
            _httpClient.BaseAddress = new Uri(settings.BaseURL ?? "");
        }

        public async Task<Quote> GetQuote(string symbol)
        {
            var url = QuoteURL + $"?symbols={symbol}";
            try
            {
                var data = await _httpClient.GetStringAsync(url);
                var result = JsonConvert.DeserializeObject<YahooQuoteResponse>(data);
                return result?.QuoteResponse?.Result?.FirstOrDefault() ?? new Quote();
            }
            catch (Exception)
            {
                throw;
            }
        }
    }
}在Program.cs中注入FinanceService实例:
builder.Services.AddTransient<IFinanceService, FinanceService>();Http获取报价端点
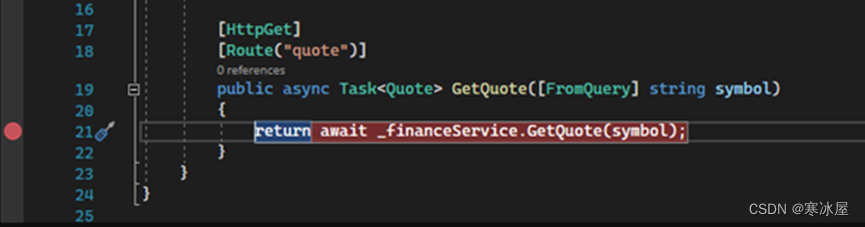
现在我们可以在金融控制器中编写HttpGet Quote端点。
[HttpGet]
[Route("quote")]
public async Task<Quote> GetQuote([FromQuery] string symbol)
{
    return await _financeService.GetQuote(symbol);
}每个控制器方法的路由模板是前缀加上Route属性中指定的string。对于该GetQuote方法,route模板包含字符串“quote”,URL包含string Symbol作为查询字符串参数。
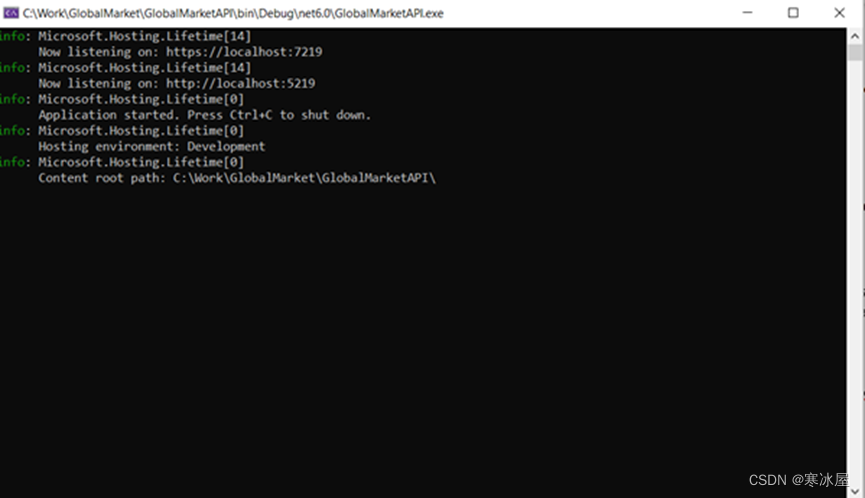
现在单击“开始”按钮运行解决方案。GlobalMarketAPI和GlobalMarket都启动了。
您应该能够看到GlobalMarketAPI控制台窗口。
然后我们可以检查Swagger UI来验证API端点。
http://localhost:5219/swagger
全球市场前端
我们尝试做什么?
交易小部件在我们的前端运行良好。现在我们只是增加一点乐趣。我们想要一个符号下拉列表。当我们从下拉列表中选择一个交易品种时,调用后端API以获取该交易品种的实时报价,同时重新加载该交易品种的交易小部件。
集成后端API项目
更改反向代理配置以连接后端金融控制器。
更新GlobalMarket/projects/trading下的proxy.config.js。
const PROXY_CONFIG = [
  {
    context: [
      "/api",
    ],
    target: "https://localhost:7219",
    secure: false
  }
]

module.exports = PROXY_CONFIG;虽然我们可以在上下文中添加多个URL,但如果您不想在每个控制器中更改此代理配置文件,可以添加父URL,例如“/api”。
现在我们开始使用Angular Material样式前端。
Angular Material
Angular团队构建和维护常见的UI组件和工具,以帮助您构建自己的自定义组件。Angular Material是Angular应用程序的Material Design UI组件。
在Visual Studio 2022解决方案资源管理器中右键单击GlobalMarket项目,然后单击“在终端中打开”。
运行以下命令来安装Angular Material。
ng add @angular/material- 为自定义主题选择预建主题名称或“自定义”。
- 设置全局Angular Material排版样式。
- 为Angular Material设置浏览器动画。
当然,我们也需要最流行的CSS bootstrap库。
npm install bootstrap --save安装后,我们在GlobalMarkt/projects/trading/src/styles.css中导入bootstrap和Angular Material CSS样式。
/* You can add global styles to this file, and also import other style files */

@import "~bootstrap/dist/css/bootstrap.css";

@import '~@angular/material/prebuilt-themes/deeppurple-amber.css';
Angular Material提供高质量的组件。您可以 在此链接中查看。在使用这些组件之前,您需要导入组件模块。以下是我们前端使用的组件。
- mat-card
<mat-card>是单个主题上下文中的文本、照片和动作的内容容器。
- mat-form-field
<mat-form-field>是一个组件,用于包装多个Angular Material组件并应用常见的文本字段样式,例如下划线、浮动标签和提示消息。
- mat-select
<mat-select>是一个表单控件,用于从一组选项中选择一个值,类似于原生<select>元素。
- mat-chip-list
<mat-chip-list>显示单个、键盘可访问、chip等值的列表。
- mat-progress-bar
<mat-progress-bar>是用于指示进度和活动的水平进度条。
- mat-divider
<mat-divider>是一个组件,它允许使用各种方向选项对行分隔符进行Material样式设置。
在app.module.ts中导入这些模块。
import { HttpClientModule } from '@angular/common/http';
import { NgModule } from '@angular/core';
import { BrowserModule } from '@angular/platform-browser';
import { AppComponent } from './app.component';
import { TradingviewWidgetModule } from 'tradingview-widget';
import { BrowserAnimationsModule } from '@angular/platform-browser/animations';
import { ClipboardModule } from '@angular/cdk/clipboard';
import { DragDropModule } from '@angular/cdk/drag-drop';
import { FormsModule, ReactiveFormsModule } from '@angular/forms';
import { MatCardModule } from '@angular/material/card';
import { MatChipsModule } from '@angular/material/chips'
import { MatDividerModule } from '@angular/material/divider'
import { MatFormFieldModule } from '@angular/material/form-field'
import { MatSelectModule } from '@angular/material/select'
import { MatProgressBarModule } from '@angular/material/progress-bar'

@NgModule({
  declarations: [
    AppComponent
  ],
  imports: [
    BrowserModule,
    HttpClientModule,
    TradingviewWidgetModule,
    BrowserAnimationsModule,
    FormsModule,
    ReactiveFormsModule,
    ClipboardModule,
    DragDropModule,
    MatCardModule,
    MatChipsModule,
    MatDividerModule,
    MatFormFieldModule,
    MatSelectModule,
    MatProgressBarModule
  ],
  providers: [],
  bootstrap: [AppComponent]
})
export class AppModule { }我们想使用mat-form-field和 mat-select,所以需要导入FomrsModule和ReactiveFormsModule。
现在使用这些组件来更改app.component.html。
整个页面分为两张卡片。最上面的一张是符号卡,另一张是显示交易小部件。
<mat-card>
  <mat-card-subtitle style="margin-top:-10px">Symbol Quote</mat-card-subtitle>
</mat-card>
<mat-divider></mat-divider>
<mat-card>
  <mat-card-subtitle style="margin-top:-10px">Live Chart</mat-card-subtitle>
  <tradingview-widget [widgetConfig]="widgetConfig"></tradingview-widget>
</mat-card>
显示符号下拉列表
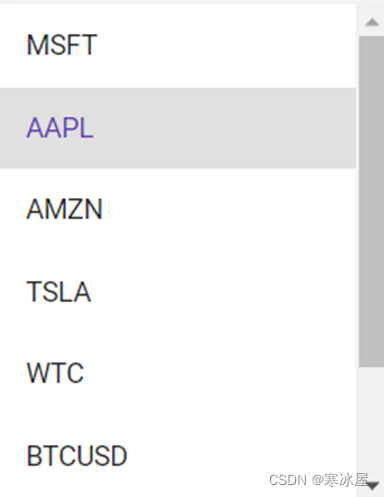
打开AppComponent类文件并定义符号数组。
symbols = ['MSFT',
    'AAPL',
    'AMZN',
    'TSLA',
    'WTC',
    'BTCUSD',
    'ETHUSD',
    'CLN2022'
];打开AppComponent模板文件添加<mat-select>。使用ngFor显示列表,并将选定的符号值绑定到widgetConfig.symbol。
<mat-form-field appearance="fill">

  <mat-select id="symbol" class="symbol" [ngModel]="widgetConfig.symbol"
                          (ngModelChange)="onSymbolChange($event)" required>

<mat-option *ngFor="let symbol of symbols" [value]="symbol">{{symbol}}</mat-option>

  </mat-select>

</mat-form-field>我们希望在所选symbol更改时重新加载交易视图小部件。打开AppComponent类文件以添加OnSymbolChange事件。
onSymbolChange(event: any) {
  this.widgetConfig = {
    symbol: event,
    widgetType: 'widget',
    allow_symbol_change: true,
    height: 560,
    width: 980,
    hideideas: true,
    hide_legend: false,
    hide_side_toolbar: true,
    hide_top_toolbar: false,
    theme: Themes.LIGHT,
  };
  this.ngOnInit();
}在Angular中,调用ngOnInit会刷新组件。
显示获取报价结果
添加一个新app.model类(app.model.ts),然后定义Quote接口和DataItem接口。
export interface Quote {
  shortName: string;
  fullExchangeName: string;
  quoteType: string;
  regularMarketPrice: number;
  regularMarketDayHigh: number;
  regularMarketDayLow: number;
  bid: number;
  ask: number;
}
export interface DataItem {
  name: string;
  value: number;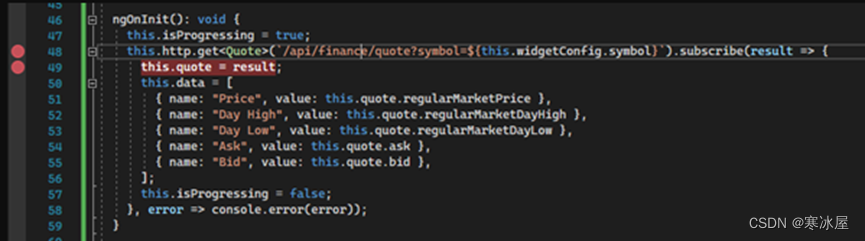
}打开AppComponent类文件调用后端获取报价API。
this.http.get<Quote>(`/finance/quote?symbol=
      ${this.widgetConfig.symbol}`).subscribe(result => {
      this.quote = result;
      this.data = [
        { name: "Price", value: this.quote.regularMarketPrice },
        { name: "Day High", value: this.quote.regularMarketDayHigh },
        { name: "Day Low", value: this.quote.regularMarketDayLow },
        { name: "Ask", value: this.quote.ask },
        { name: "Bid", value: this.quote.bid },
      ];
}, error => console.error(error));打开AppComponent模板文件添加<mat-chip-list>以显示获取报价结果。
<mat-chip-list class="symbol-price-chip"
           cdkDropList
           cdkDropListOrientation="horizontal"
           (cdkDropListDropped)="drop($event)">
    <mat-chip class="symbol-price-box"
            cdkDrag
            *ngFor="let item of data">
    {{item.name}}: {{item.value}}
    </mat-chip>
</mat-chip-list><mat-chip>元素可以通过拖放更改顺序。在AppComponent类中添加drop事件:
drop(event: CdkDragDrop<DataItem[]>) {
  moveItemInArray(this.data, event.previousIndex, event.currentIndex);
}
显示进度条
打开AppComponent模板文件添加<mat-progress-bar>。
<mat-progress-bar color="warn" mode="indeterminate" *ngIf="isProgressing">
</mat-progress-bar>打开AppComponent类文件进行设置isProgressing。在调用API之前,设置isProgessing为true,然后在订阅回调中设置isProgressing为false。
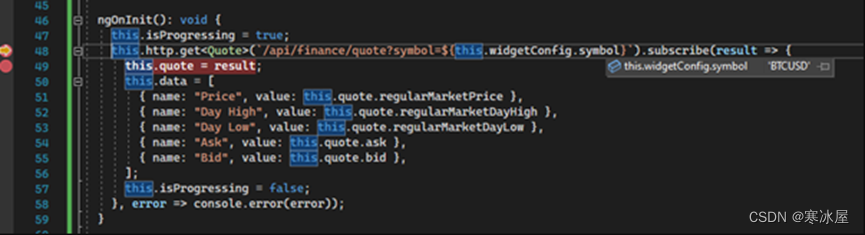
this.isProgressing = true;
this.http.get<Quote>(`/finance/quote?symbol=
     ${this.widgetConfig.symbol}`).subscribe(result => {
  ...
  this.isProgressing = false;
}, error => console.error(error));
全球市场新面貌
现在我们的应用程序在后端和前端更改后有了新的外观。按F5或单击顶部菜单栏的“开始”按钮。正如我们之前配置的那样,GlobalMarketAPI(后端)和GlobalMarket(前端)都已启动。
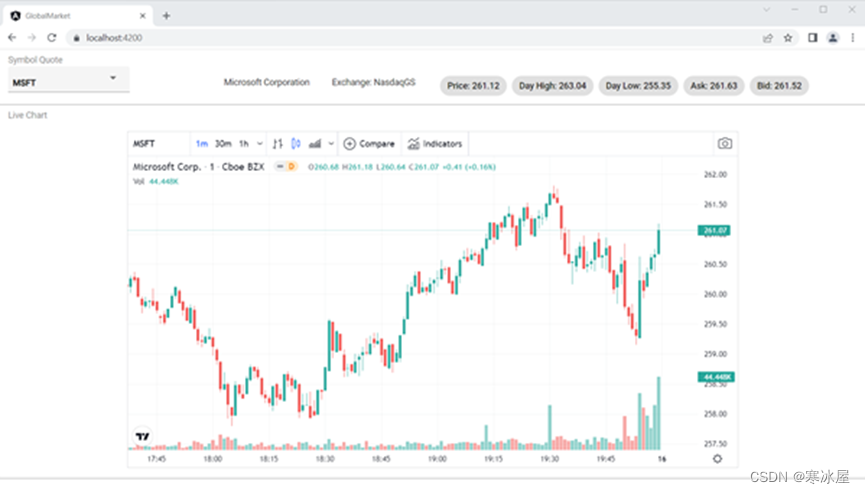
您可以拖放“价格”“当日最高价” “当日最低价”“要价”“出价”以更改为您想要的任何顺序。

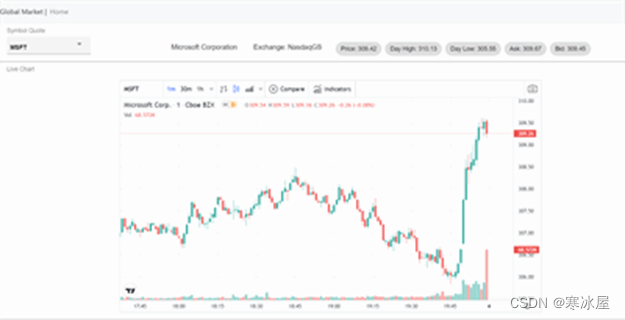
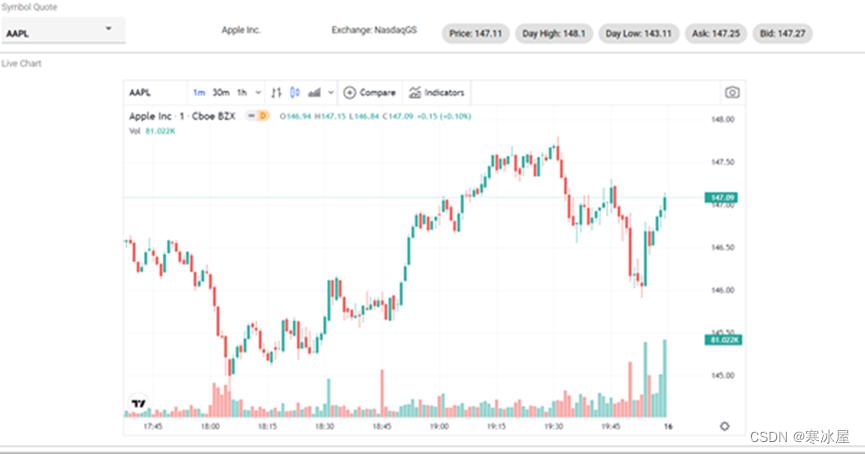
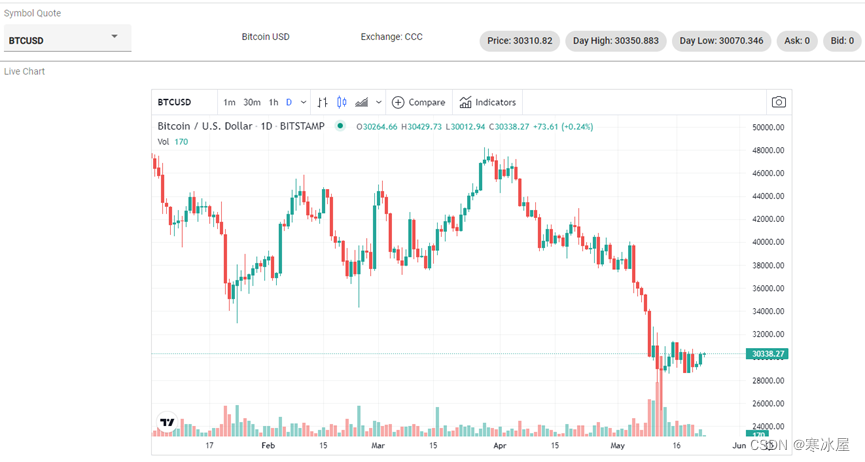
在符号下拉列表中将符号更改为AAPL – Apple。
然后你可以看到苹果公司的交易图表和报价信息。
如你所知,加密货币最近崩盘了。所以我真的很想看看比特币交易图表。在下拉列表中将符号更改为“BTCUSD”(比特币)。
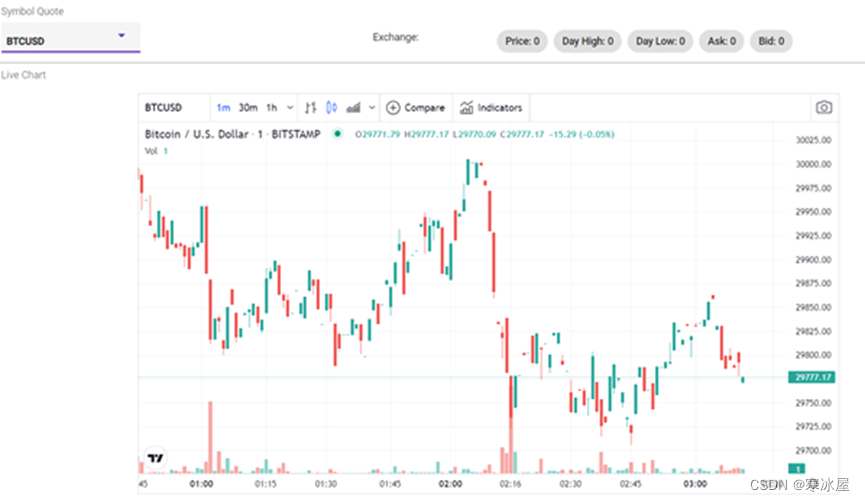
唉,悲剧了。
但是等等,为什么没有报价信息?让我们调试一下。
调试Angular前端和.NET后端
在前端,我们在调用获取报价API和订阅回调处设置断点。
在后端,我们在金融控制器的GetQuote函数处设置了一个断点。
现在将符号更改为BTCUSD。
第一个断点被触发。你可以看到我们正确地传递了符号“BTCUSD”。
按F5或单击菜单栏上的“继续”即可。
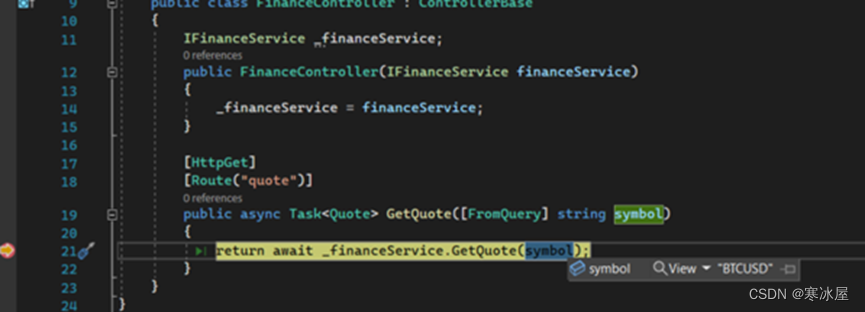
金融控制器的断点GetQuote被触发。您还可以看到符号“ BTCISD”正确传递。
让我们按F11进入。
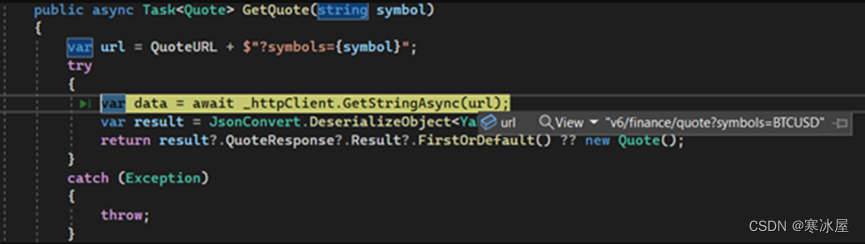
Yahoo Finance API URL也是正确的。让我们在异常捕获处设置断点。
按F10跳过。
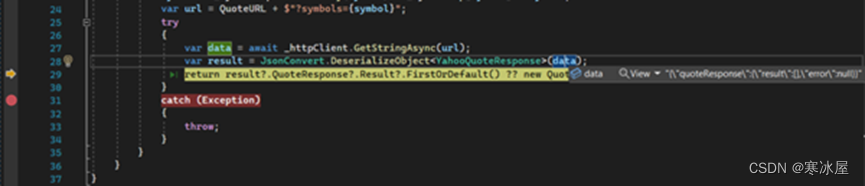
也不例外,但结果似乎什么也没有。这意味着雅虎金融找不到有关此符号的任何信息。为什么?那是因为雅虎金融符号与交易视图符号并不完全相同。例如,雅虎金融符号为“BTCUSD”变为”BTC-USD”,“ETHUSD”变为“ ETH-USD”等。
要解决此问题,我们需要在交易视图符号和Yahoo Finance符号之间添加映射。
我们可以将此映射添加到GlobalMarketAPI应用程序设置中。
"YahooFinanceSettings": {
    /* Please replace with your own api key */
    "APIKey": "******",
    "BaseURL": "https://yfapi.net",
    "SymbolMapInfo": {
      "WTC": "WTC.AX",
      "BTCUSD": "BTC-USD",
      "ETHUSD": "ETH-USD",
      "CLN2022": "CLN22.NYM"
    }
}- WTC_智科技环球
- BTCUSD——比特币
- ETHUSD——以太坊
- CLN2022——2022年7月
现在GlobalMarketAPI中将字典添加到YahooFinaceSettings.cs中。它将在程序启动时加载。
namespace GlobalMarketAPI.Settings
{
    public class YahooFinanceSettings
    {
        public string? APIKey { get; set; }
        public string? BaseURL { get; set; }
        public Dictionary<string, string>? SymbolMapInfo
        {
            get;
            set;
        }
    }
}公开FinanceService类,添加符号映射字典。
private readonly Dictionary<string, string> _symbolMap = new Dictionary<string, string>();在构造函数中设置此字典。
if (settings.SymbolMapInfo != null && settings.SymbolMapInfo.Count > 0)
{
    _symbolMap = settings.SymbolMapInfo.ToDictionary(x => x.Key, x => x.Value);
}
如果符号有映射符号,请替换它。
symbol = _symbolMap.ContainsKey(symbol) ? _symbolMap[symbol] : symbol;现在再次调试。
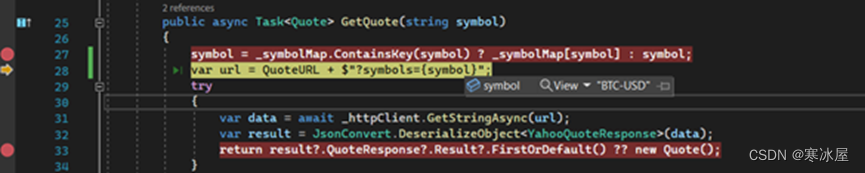
Symbol是映射一个的,“BTC-USD”。
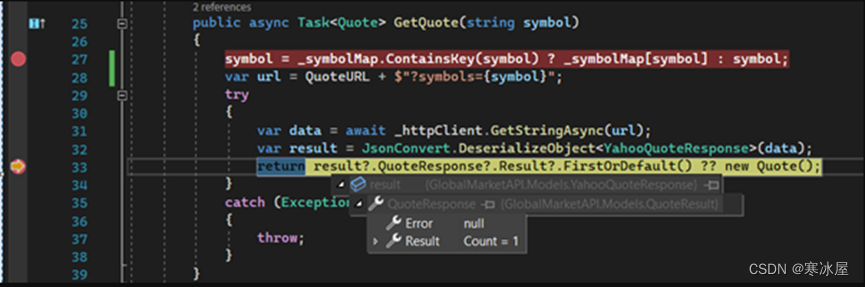
Yahoo Finance API返回结果。
按“F5”继续。触发Angular http客户端回调函数的断点。
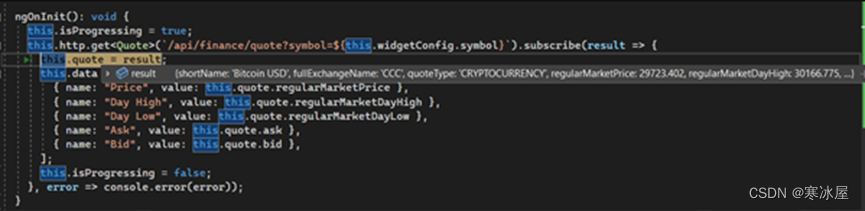
按“F5”继续。最后,获取比特币报价信息。
如何使用源代码
下载并提取源代码,使用Visual Studio 2022打开GlobalMaket.sln。
然后,在解决方案资源管理器中右键单击GlobalMarket项目,选择“在终端中打开”。
需要先建tradingview-widget库。
npm install

ng build tradingview-widget
结论
从第1部分继续,在本文中,我们将Angular前端与ASP.NET Core Web API集成,并使用Angular Material来设置前端样式。最后,我们向您展示了在Visual Studio 2022中同时调试前端和后端是多么容易。您可以从github获取所有源代码。
https://www.codeproject.com/Articles/5332007/Building-an-Angular-13-Application-with-NET-6-Gl-2


 3892
3892

 被折叠的 条评论
为什么被折叠?
被折叠的 条评论
为什么被折叠?
 到【灌水乐园】发言


