


目录
- 下载源代码 - 271.2 KB
- 现场演示
- Github
- 在Nuget可用
- PM> NuGet\Install-Package Html-PDF-Edge
介绍
如果您在Windows Server 2019上运行,则可以在以下位置下载Microsoft Edge: Download Microsoft Edge
以下是完成这项工作的基本命令行:
*注意:出于文档目的,下面显示的逗号行是分开的,但在运行时,所有参数必须在同一行上(没有换行符)。
msedge
--headless
--disable-gpu
--run-all-compositor-stages-before-draw
--print-to-pdf="{filePath}"
{url}
例:
msedge --headless --disable-gpu --run-all-compositor-stages-before-draw
--print-to-pdf="D:\\mysite\temp\pdf\2059060194.pdf"
http://localhost:50964/temp/pdf/2059060194.html基于此,我编写了一个简单的C#类库来自动化此操作:
首先,可以下载源代码并将 C# 类文件“pdf_edge.cs”添加到项目中,也可以安装Nuget包(Html-PDF-Edge);
然后,在您的项目中:
要生成PDF并作为附件下载:
pdf_edge.GeneratePdfAttachment(html, "file.pdf");要生成PDF并在浏览器中显示:
pdf_edge.GeneratePdfInline(html);背景
之前,我发布了一篇[关于使用Chrome作为PDF生成器的文章]将HTML转换为PDF。
后来,我发现Microsoft Edge也可以做同样的事情。由于Microsoft Edge也是基于铬的网络浏览器,因此Chrome和Edge共享相同的参数。
我已经在以下环境中测试了此实现(使用Edge):
- 本地IIS托管
- 网络共享主机(smarterasp.net)
- 虚拟主机
上述所有环境都能够毫无问题地生成PDF。它运行平稳,无需配置权限、应用程序池标识和网站IIS身份验证。与使用Chrome相比,我获得了更无缝的集成体验。
以下屏幕截图显示,即使使用默认权限设置,也允许执行MS Edge:
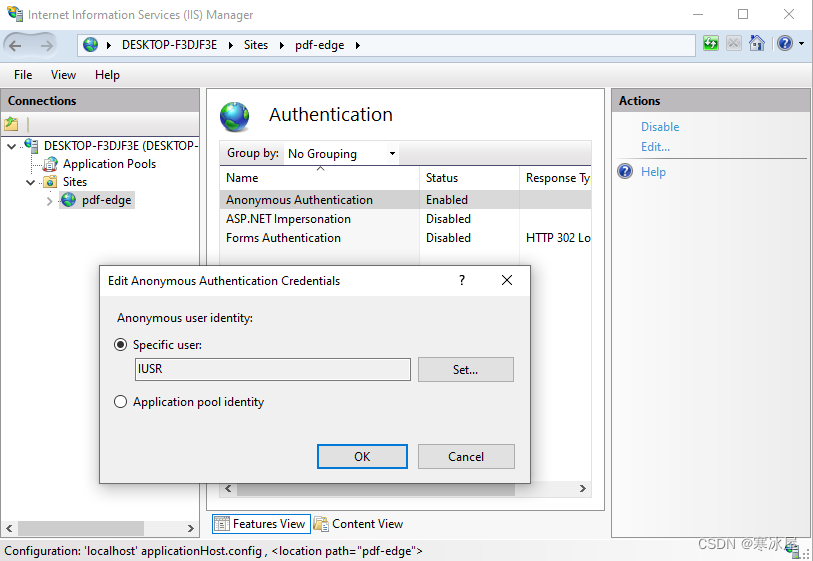
然而,Chrome.exe在大多数环境中并不那么宽松。这是因为由于安全问题,通常禁止通过Web服务器执行EXE。
对于 Chrome.exe,我无法在网络托管环境(smarterasp.net)上运行它。
即使在本地IIS托管中,我也必须将应用程序池标识设置为“LocalSystem”才能使Chrome.exe正常运行。

但微软边缘没有这样的要求。Microsoft Edge能够以最低/默认权限和安全设置执行。
因此,强烈建议使用Microsoft Edge而不是Chrome.exe。
重要的 CSS 属性
您必须在 HTML 页面中包含一些必要的 CSS 才能正常工作。
- 将页边距设置为0(zero)。
- 设置纸张大小。
- 将所有内容换行在具有固定宽度和边距的“div”内。
- 使用page-break-always的CSS在页面之间拆分。
- 所有字体必须已安装或托管在您的网站上。
- 图像的URL链接,外部CSS样式表引用必须包含根路径。
1. 将页边距设置为0(zero)
@page {
    margin: 0;
}
这样做的目的是隐藏页眉和页脚:
2. 设置纸张大小
例 1
@page {
    margin: 0;
    size: A4 portrait;
}
例 2
@page {
    margin: 0;
    size: letter landscape;
}
例 3
自定义尺寸(英寸)*宽度然后高度
@page {
    margin: 0;
    size: 4in 6in;
}
例 4
自定义尺寸(厘米)*宽然后高
@page {
    margin: 0;
    size: 14cm 14cm;
}有关@page的CSS的更多选项/信息,您可以参考此链接。
3. 以固定宽度和边距将所有内容包装在DIV内
例子:
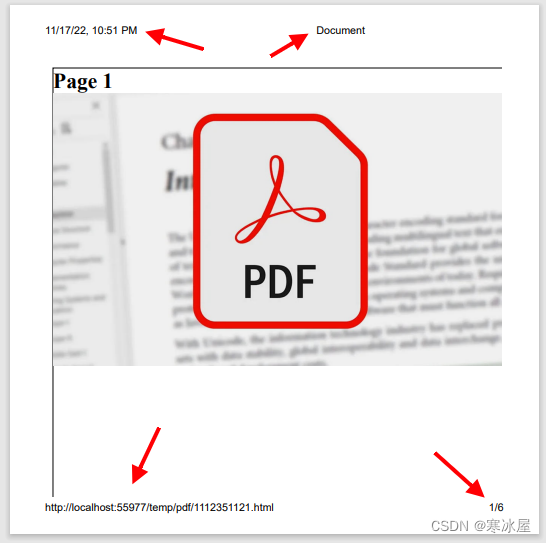
<div class="page">
    <h1>Page 1</h1>
    <img src="/pdf.jpg" style="width: 100%; height: auto;" />
    <!-- The rest of the body content -->
</div>使用类“page”设置样式“div"(充当主块/包装器/容器)。由于页面的边距为零,我们需要在CSS中手动指定上边距:
.page {
    width: 18cm;
    margin: auto;
    margin-top: 10mm;
}
必须指定宽度。
“margin: auto”将div块水平对齐居中。
"margin-top: 10mm“,将在主块和顶部纸张边缘之间提供空间。
4. 使用“分页后”的CSS在页面之间拆分
要拆分页面,请使用“div”和样式,CSS为“page-break-after”。
page-break-after: always例子:
<div class="page">
    <h1>Page 1</h1>
</div>

<div style="page-break-after: always"></div>

<div class="page">
    <h1>Page 2</h1>
</div>

<div style="page-break-after: always"></div>

<div class="page">
    <h1>Page 3</h1>
</div>
5. 所有字体必须已安装或托管在您的网站中
如果字体托管在第三方的服务器上,则字体呈现可能无法正常工作,例如:Google 字体。尝试将字体安装到服务器Windows操作系统中或在您的网站中托管字体。
6. 图片的URL链接,外部CSS样式表引用必须包含根路径
例如,以下img标记可能无法正确呈现。图像可能会在最终渲染的PDF输出中丢失。
<img src="logo.png" />
<img src="images/logo.png" />
相反,请包含如下所示的根路径:
<img src="/logo.png" />
<img src="/images/logo.png" />“pdf_edge.cs”的类对象
在这里,我将解释一下C#类在后面是如何工作的。
如前所述,真正的工作是在“pdf_edge.cs”的C#类中完成的。
首先添加2个using语句:
using System.Diagnostics;
using System.IO;以下是运行Microsoft Edge将HTML转换为PDF文件的主要方法:
public static void GeneratePdf(string url, string filePath)
{
    using (var p = new Process())
    {
        p.StartInfo.FileName = "msedge";

        // arguments have to be in single line, no line breaks
        p.StartInfo.Arguments = $"--headless --disable-gpu
            --run-all-compositor-stages-before-draw
            --print-to-pdf=\"{filePath}\" {url}";
        p.Start();
        p.WaitForExit();
    }
}
用于定义传输方法的枚举:
public enum TransmitMethod
{
    None,
    Attachment,
    Inline
}以下是为Microsoft Edge准备URL以生成PDF的代码:
static void EdgePublish(string html, TransmitMethod transmitMethod, string filename)
{
    // Create a temporary folder for storing the PDF

    string folderTemp = HttpContext.Current.Server.MapPath("~/temp/pdf");

    if (!Directory.Exists(folderTemp))
    {
        Directory.CreateDirectory(folderTemp);
    }

    // Create 2 temporary filename

    Random rd = new Random();
    string randomstr = rd.Next(100000000, int.MaxValue).ToString();

    string fileHtml = HttpContext.Current.Server.MapPath($"~/temp/pdf/{randomstr}.html");
    string filePdf = HttpContext.Current.Server.MapPath($"~/temp/pdf/{randomstr}.pdf");

    // Create the HTML file

    File.WriteAllText(fileHtml, html);

    // Obtain the URL of the HTML file

    var r = HttpContext.Current.Request.Url;
    string url = $"{r.Scheme}://{r.Host}:{r.Port}/temp/pdf/{randomstr}.html";

    // Create the PDF file

    GeneratePdf(url, filePdf);

    // Obtain the file size

    FileInfo fi = new FileInfo(filePdf);
    string filelength = fi.Length.ToString();

    // Load the file into memory (byte array)

    byte[] ba = File.ReadAllBytes(filePdf);

    // Delete the 2 temp files from server

    try
    {
        File.Delete(filePdf);
    }
    catch { }

    try
    {
        File.Delete(fileHtml);
    }
    catch { }

    // set the transmission type

    HttpContext.Current.Response.Clear();

    if (transmitMethod == TransmitMethod.Inline)
    {
        // display in browser
        HttpContext.Current.Response.AddHeader("Content-Disposition", "inline");
    }
    else if (transmitMethod == TransmitMethod.Attachment)
    {
        // as downloadable document
        HttpContext.Current.Response.AddHeader("Content-Disposition",
            $"attachment; filename=\"{filename}\"");
    }

    // finally, transmit the pdf for download

    HttpContext.Current.Response.ContentType = "application/pdf";
    HttpContext.Current.Response.AddHeader("Content-Length", filelength);
    HttpContext.Current.Response.BinaryWrite(ba);
    HttpContext.Current.Response.End();
}在生成PDF时显示加载的GIF
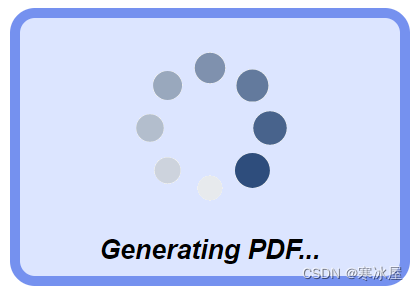
用户单击“生成PDF”按钮后,由于Web服务器可能需要一些(短)时间来处理PDF,页面可能看起来“冻结”或没有响应(但实际上是)。这可能会使用户变得紧张并多次重新单击该按钮。因此,最好显示消息或GIF动画加载图像,让用户放心服务器正在生成PDF。
下面是消息框的示例之一。
<div id="divLoading" class="divLoading" onclick="hideLoading();">
    <img src="5348585/loading.gif" /><br />
    Generating PDF...
</div>图片:loading.gif

设置消息框的样式:
.divLoading {
    width: 360px;
    font-size: 20pt;
    font-style: italic;
    font-family: Arial;
    z-index: 9;
    position: fixed;
    top: calc(50vh - 150px);
    left: calc(50vw - 130px);
    border: 10px solid #7591ef;
    border-radius: 25px;
    padding: 10px;
    text-align: center;
    background: #dce5ff;
    display: none;
    font-weight: bold;
}
下面是它的外观:
显示消息框的Javascript示例:
<script type="text/javascript">
    function showLoading() {
        let d = document.getElementById("divLoading");
        d.style.display = "block";
        setTimeout(hideLoading, 2000);
    }

    function hideLoading() {
        let d = document.getElementById("divLoading");
        d.style.display = "none";
    }
</script>
可以在现场演示站点上查看此实现的效果。
*奖金——在WinForms中生成PDF
好吧,事实证明,Microsoft Edge也可以在WinForms中使用,将HTML转换为PDF。
由于这是在WinForms中运行的,因此没有Web服务器来提供URL。因此,与其使用URL告诉MS EdgeHTML的来源,我们可以告诉Microsoft Edge加载本地文件。
因此,只需替换URL:
http://localhost:59403/temp/82348723.html到本地文件路径:
C:\web\temp\82348723.html并像这样执行命令行:
msedge --headless --disable-gpu
--run-all-compositor-stages-before-draw
--print-to-pdf="C:\file.pdf"
"C:\web\temp\82348723.html"*注意:在实际执行期间,所有参数必须在同一行上。
在C#中,
using (var p = new Process())
{
    p.StartInfo.FileName = "msedge";
    p.StartInfo.Arguments = $@"--headless --disable-gpu --run-all-compositor-stages-before-draw --print-to-pdf=""C:\file.pdf"" ""C:\web\temp\82348723.html""";
    p.Start();
    p.WaitForExit();
}
对于所有媒体和资源,请勿使用根路径。
这将呈现:
<img src="images/logo.png" />
<img src="../images/logo.png" />
这不会呈现:
<img src="/images/logo.png" />
<img src="/upfolder/images/logo.png" />还可以通过将图像编码为base64图像来渲染图像而无需另存为物理文件,例如:
<img src="data:image/png;base64,iVBORw0KGgoAAA.................." />https://www.codeproject.com/Articles/5348585/Convert-HTML-to-PDF-by-Using-Microsoft-Edge-in-ASP


 912
912


 被折叠的 条评论
为什么被折叠?
被折叠的 条评论
为什么被折叠?
 到【灌水乐园】发言


