开发SSH项目的时候搭建开发环境是一项很重要的工作,这篇博客从下载jar包开始一步一步在eclipse中进行配置。配置jdk、安装eclipse、tomact相信每一个学习ssh框架的同学都轻车熟路,不熟悉的同学请自行百度之。
个人机器及软件配置:
操作系统:Windows 7 64位
jdk:1.7
tomact:6.0
eclipse:: Luna Service Release 2 (4.4.2)
一.下载好jar包
首先下载好struts 2.3.4、spring 4.2.3、hibernate4.3.11、commons-logging、mysql驱动、c3p0
1. struts 2下载地址 http://struts.apache.org/index.html
2. spring下载地址http://repo.springsource.org/libs-release-local/org/springframework/spring/
3. hibernate下载地址http://hibernate.org/orm/downloads/
4. commons-logging下载地址http://commons.apache.org/proper/commons-logging/download_logging.cgi,下载commons-logging-1.2-bin.zip
5. mysql驱动下载地址http://dev.mysql.com/downloads/connector/j/
6. c3p0地址地址[http://mvnrepository.com/artifact/c3p0/c3p0][http://mvnrepository.com/artifact/c3p0/c3p0]
下载好后分别解压,lstruts-2.3.24-all、spring-framework-4.2.3.RELEASE-dist、hibernate-release-4.3.10.Final、commons-logging-1.2-bin这几个文件夹内放的都是需要的jar包,以后我们需要加入配置文件的时候就从这几个文件夹内取。
二、安装eclipse插件
打开eclipse,找到help->eclipse marketplace,分别搜索 hibernate、spring,安装hibernate tools插件和spring tool suite插件。
三、新建动态web工程
打开eclipse,新建dynamic web project,project name可以自定义,target runtime选择Apache tomact 6.0,dynamic web module version选择2.5.finish.
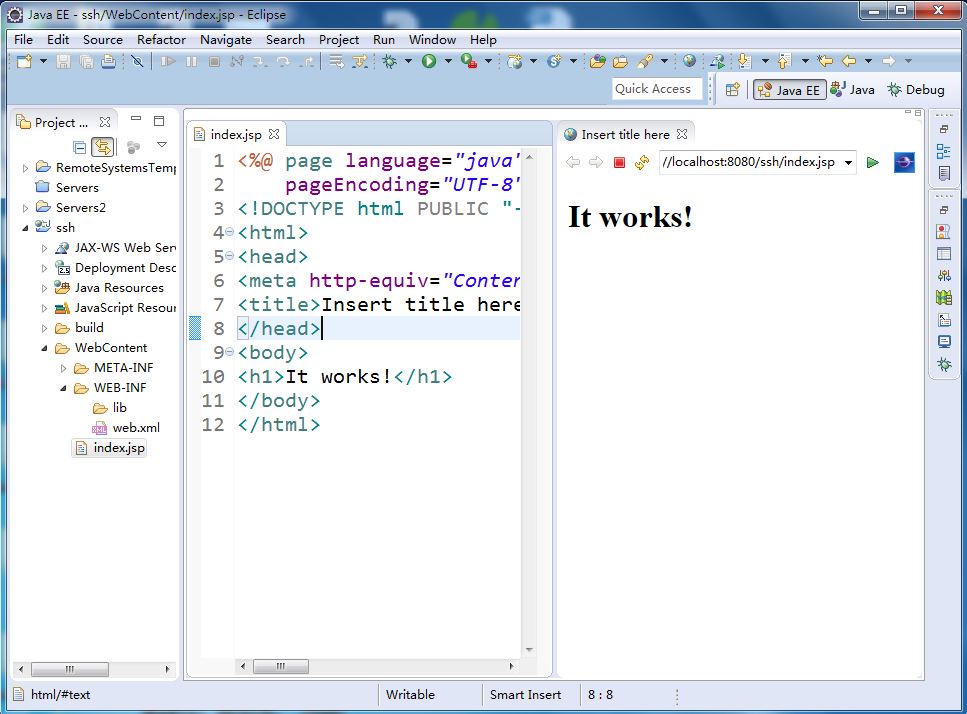
在webcontent目录下新建index.jsp,tomcat中运行,文件目录及运行效果如下:
四、加入spring
首先加入spring,需要下面这三个步骤:加入jar包、配置web.xml、加入spring配置文件
1. 加入jar包
打开spring-framework-4.2.3.RELEASE-dist\spring-framework-4.2.3.RELEASE\libs文件夹,复制以下jar包到WebContent/WEB-INF/lib:
spring-aspects-4.2.3.RELEASE.jar
spring-beans-4.2.3.RELEASE.jar
spring-context-4.2.3.RELEASE.jar
spring-core-4.2.3.RELEASE.jar
spring-expression-4.2.3.RELEASE.jar
spring-instrument-4.2.3.RELEASE.jar
spring-jdbc-4.2.3.RELEASE.jar
spring-jms-4.2.3.RELEASE.jar
spring-messaging-4.2.3.RELEASE.jar
spring-orm-4.2.3.RELEASE.jar
spring-test-4.2.3.RELEASE.jar
spring-tx-4.2.3.RELEASE.jar
spring-web-4.2.3.RELEASE.jar
spring-webmvc-4.2.3.RELEASE.jar
spring-websocket-4.2.3.RELEASE.jar
打开commons-logging-1.2,找到commons-logging-1.2.jar,复制到lib目录下.然后选中所有jar包,add to build path.
2.配置web.xml
打开web.xml,安装spring tools插件后按alt+/自动补全键会提示,向上找到ContextLoaderListener.会自动生成以下代码:
 <!-- needed for ContextLoaderListener -->
    <context-param>
        <param-name>contextConfigLocation</param-name>
        <param-value>location</param-value>
    </context-param>

    <!-- Bootstraps the root web application context before servlet initialization -->
    <listener>
        <listener-class>org.springframework.web.context.ContextLoaderListener</listener-class>
    </listener>
3.加入spring配置文件
点击工程名,新建source folder(注意:不是folder),命名为conf,用来存放配置文件.在conf目录下新建Spring Bean Definition file,名称为applicationContext.xml.将web.xml中spring配置中的location改为:classpath:applicationContext.xml.
  <!-- needed for ContextLoaderListener -->
    <context-param>
        <param-name>contextConfigLocation</param-name>
        <param-value>classpath:applicationContext.xml</param-value>
    </context-param>

    <!-- Bootstraps the root web application context before servlet initialization -->
    <listener>
        <listener-class>org.springframework.web.context.ContextLoaderListener</listener-class>
    </listener>
五、设置c3p0数据库连接池
1.加入c3p0和mysql连接驱动.把下面两个jar包加到lib目录,每次加入新的jar包都要add to build path.
c3p0-0.9.1.2.jar
mysql-connector-java-5.1.38-bin.jar
2.在conf目录下新建资源文件
添加db.properties文件
jdbc.user=root
jdbc.password=123456
jdbc.driverClass=com.mysql.jdbc.Driver
jdbc.jdbcUrl=jdbc:mysql:///sshdb

jdbc.initPoolSize=5
jdbc.maxPoolSize=10
更新applicationContext.xml
<?xml version="1.0" encoding="UTF-8"?>
<beans xmlns="http://www.springframework.org/schema/beans"
    xmlns:xsi="http://www.w3.org/2001/XMLSchema-instance" xmlns:aop="http://www.springframework.org/schema/aop"
    xmlns:context="http://www.springframework.org/schema/context" xmlns:tx="http://www.springframework.org/schema/tx"
    xsi:schemaLocation="http://www.springframework.org/schema/beans http://www.springframework.org/schema/beans/spring-beans.xsd
        http://www.springframework.org/schema/aop http://www.springframework.org/schema/aop/spring-aop-4.1.xsd
        http://www.springframework.org/schema/context http://www.springframework.org/schema/context/spring-context-4.1.xsd
        http://www.springframework.org/schema/tx http://www.springframework.org/schema/tx/spring-tx-4.1.xsd">

    <!-- 导入资源文件 -->
    <context:property-placeholder location="classpath:db.properties" />

    <!-- 配置C3P0数据源 -->

    <bean id="dataSource" class="com.mchange.v2.c3p0.ComboPooledDataSource">
        <property name="user" value="${jdbc.user}"></property>
        <property name="password" value="${jdbc.password}"></property>
        <property name="driverClass" value="${jdbc.driverClass}"></property>
        <property name="jdbcUrl" value="${jdbc.jdbcUrl}"></property>
        <property name="initialPoolSize" value="${jdbc.initPoolSize}"></property>
        <property name="maxPoolSize" value="${jdbc.maxPoolSize}"></property>
    </bean>
    <bean id="sessionFactorys" class="org.springframework.orm.hibernate4.LocalSessionFactoryBean">
       <property name="dataSource" ref="dataSource"></property>
       <property name="configLocation" value="classpath:hibernate.cfg.xml"></property>
       <property name="mappingLocations" value="classpath:cn/ac/ucas/form/*.hbm.xml"></property>
    </bean>

</beans>
六、spring整合hibernate
- 加入jar包
将hibernate-release-4.3.10.Final\lib\required目录下的jar包全部copy到工程lib目录下. - 添加hibernate配置文件
在conf目录下新建hibernate.cfg.xml,并配置hibernate基本属性.
<?xml version="1.0" encoding="UTF-8"?>
<!DOCTYPE hibernate-configuration PUBLIC
        "-//Hibernate/Hibernate Configuration DTD 3.0//EN"
        "http://hibernate.sourceforge.net/hibernate-configuration-3.0.dtd">
<hibernate-configuration>
    <session-factory>
      <!-- 配置hibernate基本属性 -->

      <!-- 方言 ctrl+shift+t 输入mysql5,找到org.hibernate.dialect.MySQL5InnoDBDialect-->
      <property name="hibernate.dialect">org.hibernate.dialect.MySQL5InnoDBDialect</property>
      <!-- 是否显示格式化sql -->
      <property name="hibernate.show_sql">true</property>
      <property name="hibernate.format_sql">true</property>
      <!-- 生成数据表的策略 -->
      <property name="hibernate.hbm2ddl.auto">update</property>

      <!--二级缓存配置相关 -->

    </session-factory>
</hibernate-configuration>
七.创建持久化类
- 新建cn.ac.ucas.form包,里面新建两个类.
员工所属部门类:
package cn.ac.ucas.form;

public class Department {
    private Integer id;
    private String departmentName;//部门名称

    public Integer getId() {
        return id;
    }

    public void setId(Integer id) {
        this.id = id;
    }

    public String getDepartmentName() {
        return departmentName;
    }

    public void setDepartmentName(String departmentName) {
        this.departmentName = departmentName;
    }

}
员工信息类:
package cn.ac.ucas.form;

import java.util.Date;

public class Employee {

    // id不能修改
    private Integer id;
    private String lastName;
    private String email;

    // 从前端传来的是string类型,需要注意转换
    private Date birth;

    // 创建时间不能被修改
    private Date createTime;

    // 单向多对一的关联关系.
    private Department department;

    public Integer getId() {
        return id;
    }

    public void setId(Integer id) {
        this.id = id;
    }

    public String getLastName() {
        return lastName;
    }

    public void setLastName(String lastName) {
        this.lastName = lastName;
    }

    public String getEmail() {
        return email;
    }

    public void setEmail(String email) {
        this.email = email;
    }

    public Date getBirth() {
        return birth;
    }

    public void setBirth(Date birth) {
        this.birth = birth;
    }

    public Date getCreateTime() {
        return createTime;
    }

    public void setCreateTime(Date createTime) {
        this.createTime = createTime;
    }

    public Department getDepartment() {
        return department;
    }

    public void setDepartment(Department department) {
        this.department = department;
    }

}
点击包名,new->other->hibernate->hibernate xml mapping file,会自动生成持久化类对应的.hbm.xml文件.
Department.hbm.xml
<?xml version="1.0"?>
<!DOCTYPE hibernate-mapping PUBLIC "-//Hibernate/Hibernate Mapping DTD 3.0//EN"
"http://hibernate.sourceforge.net/hibernate-mapping-3.0.dtd">
<!-- Generated 2015-12-15 12:07:42 by Hibernate Tools 3.4.0.CR1 -->
<hibernate-mapping>
    <class name="cn.ac.ucas.form.Department" table="SSH_DEPARTMENT">
        <id name="id" type="java.lang.Integer">
            <column name="ID" />
            <generator class="native" />
        </id>
        <property name="departmentName" type="java.lang.String">
            <column name="DEPARTMENT_NAME" />
        </property>
    </class>
</hibernate-mapping>
Employee.hbm.xml
<?xml version="1.0"?>
<!DOCTYPE hibernate-mapping PUBLIC "-//Hibernate/Hibernate Mapping DTD 3.0//EN"
"http://hibernate.sourceforge.net/hibernate-mapping-3.0.dtd">
<!-- Generated 2015-12-15 12:07:42 by Hibernate Tools 3.4.0.CR1 -->
<hibernate-mapping>
    <class name="cn.ac.ucas.form.Employee" table="SSH_EMPLOYEE">
        <id name="id" type="java.lang.Integer">
            <column name="ID" />
            <generator class="native" />
        </id>
        <property name="lastName" type="java.lang.String">
            <column name="LASTNAME" />
        </property>
        <property name="email" type="java.lang.String">
            <column name="EMAIL" />
        </property>
        <property name="birth" type="java.util.Date">
            <column name="BIRTH" />
        </property>
        <property name="createTime" type="java.util.Date">
            <column name="CREATETIME" />
        </property>
        <many-to-one name="department" class="cn.ac.ucas.form.Department" fetch="join">
            <column name="DEPARTMENT" />
        </many-to-one>
    </class>
</hibernate-mapping>
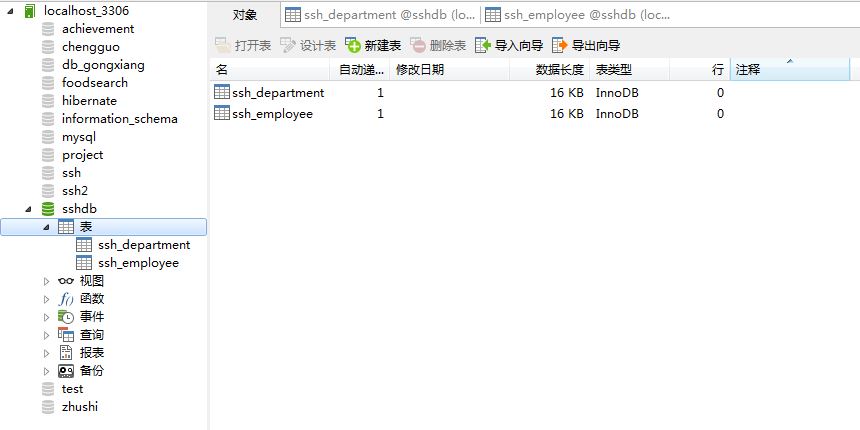
运行项目,成功的话会在数据库中生成数据库表.
八.spring整合struts
1.加入jar包
把struts-2.3.24\apps\struts2-blank\WEB-INF\lib目录下的jar拷贝到工程lib目录下.
web.xml中加入下面代码:
  <filter>
        <filter-name>struts2</filter-name>
        <filter-class>org.apache.struts2.dispatcher.ng.filter.StrutsPrepareAndExecuteFilter</filter-class>
    </filter>

    <filter-mapping>
        <filter-name>struts2</filter-name>
        <url-pattern>/*</url-pattern>
    </filter-mapping>
至此ssh项目环境配置已经完成.


 212
212


 被折叠的 条评论
为什么被折叠?


