


ASP.NET MVC - 使用Post, Redirect, Get (PRG)模式
原文地址:ASP.NET MVC - Using Post, Redirect, Get Pattern
原文作者:matthaw
本文地址:ASP.NET MVC - 使用Post, Redirect, Get (PRG)模式
译者:Q.Lee.lulu
ASP.NET MVC模式通过重新引进已经丢失的,或者至少已经没有使用很多年的模式,使其本身趋向更简单和“真实”的 HTTP体验(原文:The ASP.NET MVC pattern tends to lead itself into a more simplified and "true" HTTP experience by re-introducing patterns that have been lost, or at least, not followed in many years)。其中的一种模式是Post,Redirect,Get(PRG)模式,它可以"避免二次提交和允许web应用程序使用浏览器书签和reload按钮来更直观的表现"(Wikipedia).
一个普通的ASP.NET Web Form生命周期具有下述的模式:
1. HTTP GET of "Create.aspx"
2. HTTP POST of "Create.aspx"
3. Validation Fails, "Create.aspx" is Re-Rendered
4. HTTP POST of "Create.aspx"
5. Item is created, "Create.aspx" is Re-Rendered with confirmation message
这种Postback模式的主要问题是,在第3步或者第5步点击浏览器的刷新按钮的时候,将会重新Post你已经提交的数据。第5步还存在的一个问题是它甚至可能会重新提交已经创建了的数据(译注:即二次提交,创建了两条相同的数据)。当然,你可以在以上的步骤中处理这些问题,但默认情况下ASP.NET Web Form是这样对待它的。
将这同样的情况放到ASP.NET MVC中,可以通过呈现一个来自你的POST action的"Create"视图来实现同样的方式。例如:
1. HTTP GET of "/products/create", "Create" view is rendered
2. HTTP POST to "/products/submit"
3. Validation Fails, "Create" view is rendered
4. HTTP POST to "/products/submit"
5. Item is created, "Confirm" view is rendered
就和你注意到的一样,ASP.NET Web Form存在的问题,在ASP.NET MVC中也存在同样的问题。真正漂亮的选择是,ASP.NET MVC给予我们更多的"自由"来处理这个流程。如果我们在ASP.NET MVC中严格的按照PRG模式,它看起来应该像:
1. HTTP GET of "/products/create", "Create" view is rendered
2. HTTP POST to "/products/submit"
3. Validation Fails, redirect to "/products/create", "Create" view is rendered
4. HTTP POST to "/products/submit"
5. Item is created, redirect to "/products/confirm", "Confirm" view is rendered
如你所见,我们之前会出现问题的第3步和第5步,不会再存在问题。如果一个用户以上的任何一个步骤按下刷新按钮,他们不会看到如下图所示的可爱的“Would you like to resubmit the form data”的确认信息,而页面只是重新加载了。

要实现这个,你需要1个Controller,3个Action方法,和2个views。跟随下面的步骤实现这个模式:
using System.Web.Mvc;

public class ProductsController : Controller
{
  public ActionResult Create() { ... }
  public ActionResult Submit() { ... }
  public ActionResult Confirm() { ... }
}
当你实现你的 Create action,你要记住的是验证可能是失败的而你可能要重新显示这个表单。TempData是最适合在这种情况下使用的,它如下实现:
public ActionResult Create()
{
  if (TempData["ErrorMessage"] != null)
  {
    ViewData["ErrorMessage"] = TempData["ErrorMessage"];
    ViewData["Name"] = TempData["Name"];
    ViewData["Price"] = TempData["Price"];
    ViewData["Quantity"] = TempData["Quantity"];
  }
  return RenderView();
}
接下来你要实现你的 Submit action。这里将会处理用户输入数据的验证,如果验证通过则保存数据并重定向到 Confirm action。如果验证失败将会把表单数据保存到TempData中并重定向到 Create action。我们模拟的这个方式在验证失败的情况下也会维持视图数据。
public ActionResult Submit()
{
  string error = null;
  string name = Request.Form["Name"];
  if (string.IsNullOrEmpty(name))
  {
    error = "Name is empty. ";
  }
  decimal price;
  if (!decimal.TryParse(Request.Form["Price"], out price))
  {
    error += "Price is invalid. ";
  }
  int quantity;
  if (!int.TryParse(Request.Form["Quantity"], out quantity))
  {
    error += "Quantity is invalid.";
  }

  if (!string.IsNullOrEmpty(error))
  {
    TempData["ErrorMessage"] = error;
    TempData["Name"] = Request.Form["Name"];
    TempData["Price"] = Request.Form["Price"];
    TempData["Quantity"] = Request.Form["Quantity"];
    return RedirectToAction("Create");
  }
  else
  {
    return RedirectToAction("Confirm");
  }
}
这里注意上面的示例中一些很重要的东西是,尽管我把form中所有的数据放入到本地变量中,可能Price或者Quantity其中任何一个转换失败,而我将TempData用上面的本地变量(译注:指上面的红色部分)赋值...我将丢失用户输入的数据。所以,从Form中取得数据并直接存入到TempData中始终是一个聪明的主意。最后,需要实现 Confrim action :
public ActionResult Confirm()
{
  return RenderView(); //译注:参数为空时将呈现和action同名的view
}
现在,是时候来创建我们的视图了:
~/Views/Products/Create.aspx
<%@ Page Language="C#" AutoEventWireup="true" CodeFile="Create.aspx.cs" Inherits="Views_Products_Create" %>
<html xmlns="http://www.w3.org/1999/xhtml">
  <head runat="server">
    <title>Create Product</title>
  </head>
  <body>
    <% using (Html.Form<ProductsController>(c => c.Submit())) { %>
      <% if (!string.IsNullOrEmpty((string) ViewData["ErrorMessage"])) { %>
    <div style="color:Red;">
      <%= ViewData["ErrorMessage"] %>
    </div>
    <% } %>
    Name: <%= Html.TextBox("Name", ViewData["Name"]) %><br />
    Price: <%= Html.TextBox("Price", ViewData["Price"]) %><br />
    Quantity: <%= Html.TextBox("Quantity", ViewData["Quantity"]) %><br />
    <%= Html.SubmitButton("submitButton", "Save") %>
    <% } %>
  </body>
</html>
~/Views/Products/Confirm.aspx
<%@ Page Language="C#" AutoEventWireup="true" CodeFile="Confirm.aspx.cs" Inherits="Views_Products_Confirm" %>
<html xmlns="http://www.w3.org/1999/xhtml">
  <head id="Head1" runat="server">
    <title>Confirm Create Product</title>
  </head>
  <body>
    Thanks for creating your product.
    <%= Html.ActionLink<ProductsController>(c => c.Create(), "Click here") %> to create a new one.
  </body>
</html>
就是这样。你可以从这里获取这个模式的示例程序的代码。
一. 传统的Asp.net页面问题一个传统的Asp.net页面的请求会是这样的: HTTP GET 请求"Register.aspx" HTTP POST 请求 "Register.aspx"(点击按钮等触发服务器端事件) 数据检验失败, 重新返回到"Register.aspx" 在HTTP POST到"Register.aspx" 数据创建成功, 重新返回到"Register.aspx",提示创建成功 看看好像没有什么问题呀, 但是如果在标记为红色的这步之后,你在浏览器上点击"刷新"按钮, 就会弹出下面的对话框。
这个对话框的意思是, 为了显示你点击"刷新"按钮的页面, 浏览器需要发送你上次提交的数据到服务器端, 之所以会这样的原因是浏览器记录的是上次你的Post请求, 所以你点击"刷新"按钮, 也是重复执行一次Post请求, 而用户其实是想得到初始的页面,也就是GET请求"Register.aspx"页面. 对于大多数不清楚原理的普通用户来说,这样的对话框会让用户会非常困扰. web系统应当是以URL为标记的资源, 一个URL最好代表的一种资源. 当你收藏一个网页,分享一个网页给你朋友的时候, 你用的是网页的URL, 那是因为网页的URL就对应了你想分享的资源. 所以上面方式带来的另外一个问题就是, Get, POST, 以及POST成功后的页面实际上代表了3中不同的资源,但是这三种资源的URL是同一个URL.
二. Asp.net MVC中也存在同样的问题
假如我们在完成一个注册页面, Controller中的代码是这样的:
 // // GET: /Home/ [HttpGet] public ActionResult Register() { return View(); } [HttpPost] public ActionResult Register(Models.RegisterModel registerModel) { return View(); }
View中的代码是:
@using(Html.BeginForm()){ <fieldset> <legend>Register</legend> @Html.ValidationSummary(true) <ol> <li> @Html.LabelFor(m => m.NickName) @Html.TextBoxFor(m => m.NickName) @Html.ValidationMessageFor(m => m.NickName) </li> <li> @Html.LabelFor(m => m.Email) @Html.TextBoxFor(m => m.Email) @Html.ValidationMessageFor(m => m.Email) </li> </ol> <input type="submit" value="Sumbit" /> </fieldset> }运行以后,当你提交表单的时候,你会发现出现了同样的问题.
三. 使用PRG模式
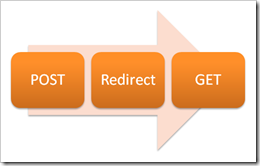
PRG模式是Post/Redirect/Get的简称.
当一个Post请求过来的时候, 服务端会处理Post请求后,再发送Redirect(HTTP 303状态码)到浏览器,浏览器之后再发送Get请求到其它页面.
这样做, 浏览器的上一个操作就总是Http Get操作, 而不是Post操作, 也就解决了刷新弹出框的问题.
四. PRG模式在MVC上的实现
针对上面的例子,我们的修改思路是:
创建3个不同的Action对应, Post请求到"RegisterProcess"之后,无论成功还是失败, 都会转换成Get请求, 成功转向"RegisterSuccess", 失败转向"Register"
修改之后的Controller代码如下:// // GET: /Home/ [HttpGet, ImportModelStateFromTempData] public ActionResult Register() { return View(); } [HttpPost, ExportModelStateToTempData] public ActionResult RegisterProcess(Models.RegisterModel registerModel) { if (ModelState.IsValid) { return RedirectToAction("RegisterSuccess"); } return RedirectToAction("Register"); } [HttpGet] public ActionResult RegisterSuccess() { return View(); }上面的ImportModelStateFromTempData和ExportModelStateToTempData是ActionFilter, 是为了解决Redirect不能保存Model的验证错误的问题.
实现的基本原理是通过ExportModelStateToTempData把Model的验证错误存放到TempData中, 通过ImportModelStateFromTempData从TempData中把验证错误导入.
View代码是:@using (Html.BeginForm("RegisterProcess", "Home")) { <fieldset> <legend>Register</legend> @Html.ValidationSummary(true) <ol> <li> @Html.LabelFor(m => m.NickName) @Html.TextBoxFor(m => m.NickName) @Html.ValidationMessageFor(m => m.NickName) </li> <li> @Html.LabelFor(m => m.Email) @Html.TextBoxFor(m => m.Email) @Html.ValidationMessageFor(m => m.Email) </li> </ol> <input type="submit" value="Sumbit" /> </fieldset> }
ImportModelStateFromTempData和ExportModelStateToTempData的实现代码如下:public abstract class ModelStateTempDataTransfer : ActionFilterAttribute { protected static readonly string Key = typeof(ModelStateTempDataTransfer).FullName; } public class ExportModelStateToTempData : ModelStateTempDataTransfer { public override void OnActionExecuted(ActionExecutedContext filterContext) { //Only export when ModelState is not valid if (!filterContext.Controller.ViewData.ModelState.IsValid) { //Export if we are redirecting if ((filterContext.Result is RedirectResult) || (filterContext.Result is RedirectToRouteResult)) { filterContext.Controller.TempData[Key] = filterContext.Controller.ViewData.ModelState; } } base.OnActionExecuted(filterContext); } } public class ImportModelStateFromTempData : ModelStateTempDataTransfer { public override void OnActionExecuted(ActionExecutedContext filterContext) { var modelState = filterContext.Controller.TempData[Key] as ModelStateDictionary; if (modelState != null) { //Only Import if we are viewing if (filterContext.Result is ViewResult) { filterContext.Controller.ViewData.ModelState.Merge(modelState); } else { //Otherwise remove it. filterContext.Controller.TempData.Remove(Key); } } base.OnActionExecuted(filterContext); } }


 2153
2153

 被折叠的 条评论
为什么被折叠?
被折叠的 条评论
为什么被折叠?
 到【灌水乐园】发言


