


In this particular blog we will discuss how to create a Spring Web Project in Maven and how to make it support eclipse IDE.
Before we start lets make sure we have all required tools available :
Maven 3.0.5
Eclipse 4.2
JDK 7
Spring 3.2.0 Release
Tomcat 7
Make sure you have a working installation of Maven in your machine, to check this supply following command to your command line:
To create dynamic web project with maven, navigate to the folder where you want to store the project and supply following command:
A good way of maintaining the integrity of groupId is to use the project structure. In case the project is consists of multiple modules than every module should append an identifier to the parent groupId. i.e. com.beingjavaguys.maven, com.beingjavaguys.spring, com.beingjavaguys.struts .. etc.
“archetype:generate” generates a new project from provided archetype or update the actual project if using a partial archetype. Maven provides a number of predefined archtypes, see more details from Maven Documentation.
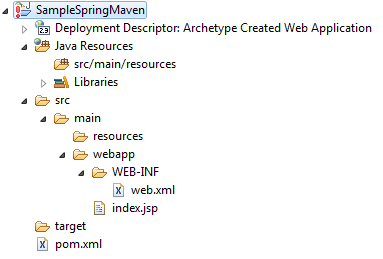
Here we are done with creating a dynamic web project in maven, now lets make this project compatible to Eclipse IDE. To make maven project support eclipse ide navigate to project folder and supply following command :
Now Import the project into eclipse, you will see a folder structure like this :
Now we are done with creating a simple dynamic web project in maven and imported it in eclipse. Lets add some required files to it to make it a Spring MVC project.
Now to make the project run on server and detect required jars in eclipse, run following command in project directory again :
this will add all required jars to eclipse's deployment assembly, as shown in the figure below:
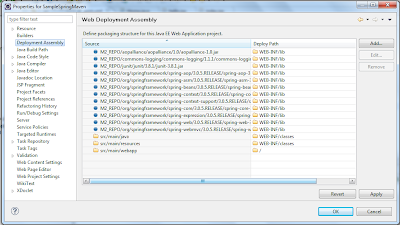
This is the most critical step in importing maven web app in eclipse process, make sure all jar files are referenced here as shown in above image. If not, run "mvn eclipse:eclipse -Dwtpversion=2.0" command again.
Here we are all done with importing a working spring mvc maven project in eclipse. Now lets add some source code to our project:
<br
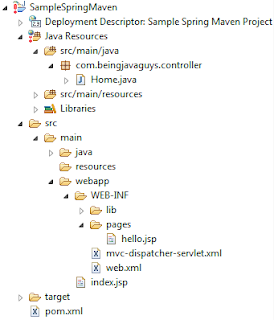
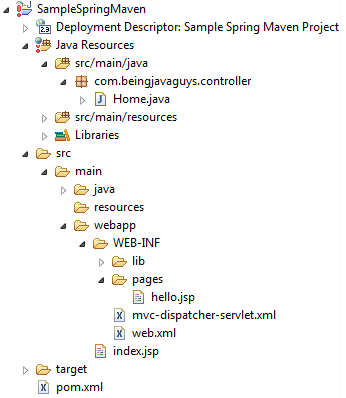
Here we are all done with adding all required files to our spring project, now the complete project structure will look something like this:
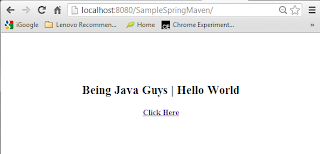
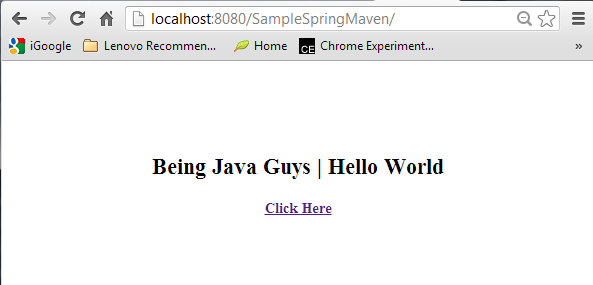
Run the project on server (Right Click > Run As > Run on Server), and you will get screens like :
Till now we have created a spring maven project and imported in eclipse. We also run the project from eclipse. Now lets see how to create a war file uisng maven and deploy it to apache tomcat server directly using tomcat7-maven plugin. Deploying maven created war file from eclipse to external server is a three step process.
We have already added the plugin in pom.xml showed above.
Thats it, now lets deploy our application 'war' file directly to external tomcat server.
1 - Start your targeted tomcat server.
2 - Navigate to your project's parent folder and supply following commands.
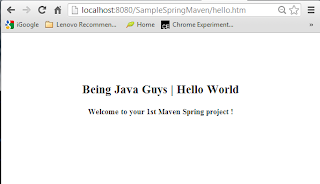
Now open browser and hit 'http://localhost:8080/SampleSpringMaven/' you will get your allpication deployed on server. Every time you make a change in your code apply last three steps 'mvn clean','mvn package' and 'mvn tomcat7:deploy'. You can use 'mvn tomcat7:redeploy' instead of 'mvn tomcat7:deploy' if case of re-deploying same app's war again on server.
In this particular blog we came across 'how to create a spring web project in maven' and 'how to deploy spring maven project war to tomcat' in upcoming blogs we will see more about 'Maven', 'Spring', 'Java' and other opensource technologies.
Thanks for reading !
Before we start lets make sure we have all required tools available :
Maven 3.0.5
Eclipse 4.2
JDK 7
Spring 3.2.0 Release
Tomcat 7
Make sure you have a working installation of Maven in your machine, to check this supply following command to your command line:
C:\Users\nagesh.chauhan>mvn -version
Create Dynamic Web Project in Maven
To create dynamic web project with maven, navigate to the folder where you want to store the project and supply following command:
C:\Users\nagesh.chauhan\maven-project>mvn archetype:generate -DgroupId=com.beingjavaguys.sample -DartifactId=SampleSpringMaven -DarchetypeArtifactId=maven-archetype-webapp -DinteractiveMode=false
What is groupId in maven ?
groupId identifies a particular project uniquely across all projects, so we should follow an naming convention. A very simple and commonly used way of doing this is to use reverse of your domain, i.e. com.beingjavaguys.maven.A good way of maintaining the integrity of groupId is to use the project structure. In case the project is consists of multiple modules than every module should append an identifier to the parent groupId. i.e. com.beingjavaguys.maven, com.beingjavaguys.spring, com.beingjavaguys.struts .. etc.
What is artifactId in maven ?
artifactId is the name of war file without version, if you are creating it by yourself you are free to took any name of your choice in lower case and without any strange symbol. But if this is a third party jar than we have to take the name of jar as suggested by it’s distribution.What is archetype in maven ?
Archetype is a Maven project templating toolkit which tells the maven the type of project we are going to create. Archetype enables the maven to create a template project of user’s choice so that the user can get the project up and running instantly.“archetype:generate” generates a new project from provided archetype or update the actual project if using a partial archetype. Maven provides a number of predefined archtypes, see more details from Maven Documentation.
What is archetypeArtifactId in maven ?
While creating a new project we provide the archetypeArtifactId that informs maven about what archetype to use to create the initial structure of the project. Maven looks it up from the archetypeCatalog and works accordingly. eg. if we want to create a simple web-app project we specify -DarchetypeArtifactId=maven-archetype-webapp.Convert Maven project to support Eclipse IDE
Here we are done with creating a dynamic web project in maven, now lets make this project compatible to Eclipse IDE. To make maven project support eclipse ide navigate to project folder and supply following command :
C:\Users\nagesh.chauhan\maven-project\SampleSpringMaven>mvn eclipse:eclipse -Dwtpversion=2.0
Now Import the project into eclipse, you will see a folder structure like this :

Create Spring MVC project in Eclipse using Maven
Now we are done with creating a simple dynamic web project in maven and imported it in eclipse. Lets add some required files to it to make it a Spring MVC project.
Update pom.xml
SampleSpringMaven\pom.xml- <project xmlns="http://maven.apache.org/POM/4.0.0" xmlns:xsi="http://www.w3.org/2001/XMLSchema-instance"
- xsi:schemaLocation="http://maven.apache.org/POM/4.0.0 http://maven.apache.org/maven-v4_0_0.xsd">
- <modelVersion>4.0.0</modelVersion>
- <groupId>com.beingjavaguys.sample</groupId>
- <artifactId>SampleSpringMaven</artifactId>
- <packaging>war</packaging>
- <version>1.0-SNAPSHOT</version>
- <name>SampleSpringMaven Maven Webapp</name>
- <url>http://maven.apache.org</url>
- <properties>
- <spring.version>3.0.5.RELEASE</spring.version>
- <jdk.version>1.6</jdk.version>
- </properties>
- <dependencies>
- <dependency>
- <groupId>org.springframework</groupId>
- <artifactId>spring-core</artifactId>
- <version>${spring.version}</version>
- </dependency>
- <dependency>
- <groupId>org.springframework</groupId>
- <artifactId>spring-web</artifactId>
- <version>${spring.version}</version>
- </dependency>
- <dependency>
- <groupId>org.springframework</groupId>
- <artifactId>spring-webmvc</artifactId>
- <version>${spring.version}</version>
- </dependency>
- <dependency>
- <groupId>junit</groupId>
- <artifactId>junit</artifactId>
- <version>3.8.1</version>
- <scope>test</scope>
- </dependency>
- </dependencies>
- <build>
- <finalName>SampleSpringMaven</finalName>
- <plugins>
- <plugin>
- <groupId>org.apache.tomcat.maven</groupId>
- <artifactId>tomcat7-maven-plugin</artifactId>
- <version>2.1</version>
- <configuration>
- <url>http://localhost:8080/manager/text</url>
- <server>my-tomcat</server>
- <path>/SampleSpringMaven</path>
- </configuration>
- </plugin>
- <plugin>
- <groupId>org.apache.maven.plugins</groupId>
- <artifactId>maven-compiler-plugin</artifactId>
- <version>3.0</version>
- <configuration>
- <source>${jdk.version}</source>
- <target>${jdk.version}</target>
- </configuration>
- </plugin>
- </plugins>
- </build>
- </project>
Run Spring Maven project in eclipse
Now to make the project run on server and detect required jars in eclipse, run following command in project directory again :
C:\Users\nagesh.chauhan\maven-project\SampleSpringMaven>mvn eclipse:eclipse -Dwtpversion=2.0
this will add all required jars to eclipse's deployment assembly, as shown in the figure below:
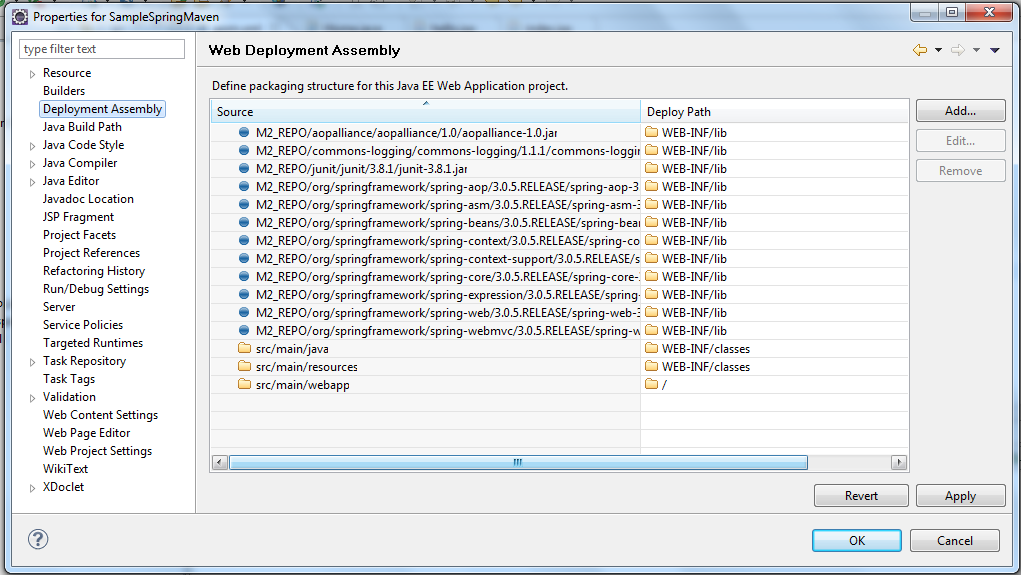
This is the most critical step in importing maven web app in eclipse process, make sure all jar files are referenced here as shown in above image. If not, run "mvn eclipse:eclipse -Dwtpversion=2.0" command again.
Here we are all done with importing a working spring mvc maven project in eclipse. Now lets add some source code to our project:
Update web.xml
src\main\webapp\WEB-INF\web.xml- <web-app xmlns="http://java.sun.com/xml/ns/javaee" xmlns:xsi="http://www.w3.org/2001/XMLSchema-instance"
- xsi:schemaLocation="http://java.sun.com/xml/ns/javaee
- http://java.sun.com/xml/ns/javaee/web-app_2_5.xsd"
- version="2.5">
- <display-name>Sample Spring Maven Project</display-name>
- <servlet>
- <servlet-name>mvc-dispatcher</servlet-name>
- <servlet-class>org.springframework.web.servlet.DispatcherServlet</servlet-class>
- <load-on-startup>1</load-on-startup>
- </servlet>
- <servlet-mapping>
- <servlet-name>mvc-dispatcher</servlet-name>
- <url-pattern>*.htm</url-pattern>
- </servlet-mapping>
- <context-param>
- <param-name>contextConfigLocation</param-name>
- <param-value>/WEB-INF/mvc-dispatcher-servlet.xml</param-value>
- </context-param>
- <listener>
- <listener-class>org.springframework.web.context.ContextLoaderListener</listener-class>
- </listener>
- </web-app>
Add mvc-dispatcher-servlet.xml
\src\main\webapp\WEB-INF\mvc-dispatcher-servlet.xml- <beans xmlns="http://www.springframework.org/schema/beans"
- xmlns:context="http://www.springframework.org/schema/context"
- xmlns:xsi="http://www.w3.org/2001/XMLSchema-instance"
- xsi:schemaLocation="
- http://www.springframework.org/schema/beans
- http://www.springframework.org/schema/beans/spring-beans-3.0.xsd
- http://www.springframework.org/schema/context
- http://www.springframework.org/schema/context/spring-context-3.0.xsd">
- <context:component-scan base-package="com.beingjavaguys.controller" />
- <bean
- class="org.springframework.web.servlet.view.InternalResourceViewResolver">
- <property name="prefix">
- <value>/WEB-INF/pages/</value>
- </property>
- <property name="suffix">
- <value>.jsp</value>
- </property>
- </bean>
- </beans>
Update index.jsp
\src\main\webapp\index.jsp- <html>
- <head>
- <script type="text/javascript" src="jquery-1.2.6.min.js"></script>
- <title>Being Java Guys | Hello World</title>
- </head>
- <body>
- <center>
- <h2>Being Java Guys | Hello World</h2>
- <h4>
- <a href="hello.htm">Click Here</a>
- </h4>
- </center>
- </body>
- </html>
Add hello.jsp
\src\main\webapp\WEB-INF\pages\hello.jsp- <html>
- <head>
- <script type="text/javascript" src="jquery-1.2.6.min.js"></script>
- <title>Being Java Guys | Hello World</title>
- </head>
- <body>
- <center>
- <h2>Being Java Guys | Hello World</h2>
- <h4>${message}</h4>
- </center>
- </body>
- </html>
<br
Adding a Simple Controller code
\src\main\java\com\beingjavaguys\controller\Home.java- package com.beingjavaguys.controller;
- import org.springframework.stereotype.Controller;
- import org.springframework.web.bind.annotation.RequestMapping;
- import org.springframework.web.servlet.ModelAndView;
- @Controller
- public class Home {
- String message = "Welcome to your 1st Maven Spring project !";
- @RequestMapping("/hello")
- public ModelAndView showMessage() {
- System.out.println("from controller");
- return new ModelAndView("hello", "message", message);
- }
- }
Here we are all done with adding all required files to our spring project, now the complete project structure will look something like this:
Run the project on server (Right Click > Run As > Run on Server), and you will get screens like :

Deploying Spring Maven application war to apache tomcat using tomcat-maven plugin.
Till now we have created a spring maven project and imported in eclipse. We also run the project from eclipse. Now lets see how to create a war file uisng maven and deploy it to apache tomcat server directly using tomcat7-maven plugin. Deploying maven created war file from eclipse to external server is a three step process.
Step 1 : Add tomcat-maven plugin entry to pom.xm
- <build>
- <finalName>SampleSpringMaven</finalName>
- <plugins>
- <plugin>
- <groupId>org.apache.tomcat.maven</groupId>
- <artifactId>tomcat7-maven-plugin</artifactId>
- <version>2.1</version>
- <configuration>
- <url>http://localhost:8080/manager/text</url>
- <server>my-tomcat</server>
- <path>/SampleSpringMaven</path>
- </configuration>
- </plugin>
- <plugin>
- ....
- ....
- </plugin>
- </plugins>
- ....
- ....
- </build>
Step 2 : Add a user entry to '..\..\apache-tomcat-7.0.41\conf\tomcat-users.xml' file in your server.
- <role rolename="manager-gui"/>
- <role rolename="manager-script"/>
- <user username="managerGui" password="manager" roles="manager-gui"/>
- <user username="manager" password="manager" roles="manager-script"/>
Step 3 : Add a 'settings.xml' to your '.m2' folder
- <settings>
- <servers>
- <server>
- <id>my-tomcat</id>
- <username>manager</username>
- <password>manager</password>
- </server>
- </servers>
- </settings>
1 - Start your targeted tomcat server.
2 - Navigate to your project's parent folder and supply following commands.
C:\Users\nagesh.chauhan\maven-project\SampleSpringMaven>mvn install -Dmaven.test.skip=true
C:\Users\nagesh.chauhan\maven-project\SampleSpringMaven>mvn clean
C:\Users\nagesh.chauhan\maven-project\SampleSpringMaven>mvn package
C:\Users\nagesh.chauhan\maven-project\SampleSpringMaven>mvn tomcat7:deploy
Now open browser and hit 'http://localhost:8080/SampleSpringMaven/' you will get your allpication deployed on server. Every time you make a change in your code apply last three steps 'mvn clean','mvn package' and 'mvn tomcat7:deploy'. You can use 'mvn tomcat7:redeploy' instead of 'mvn tomcat7:deploy' if case of re-deploying same app's war again on server.
In this particular blog we came across 'how to create a spring web project in maven' and 'how to deploy spring maven project war to tomcat' in upcoming blogs we will see more about 'Maven', 'Spring', 'Java' and other opensource technologies.
Thanks for reading !


 150
150

 被折叠的 条评论
为什么被折叠?
被折叠的 条评论
为什么被折叠?
 到【灌水乐园】发言


