


写在前面
本文记录了SpringBoot怎么整合Redis,在本文章之前你必须搭建一个SpringBoot项目,搭建教程《springboot+mybatis+mysql项目搭建,含示例Demo》,对于Redis安装和使用方面我这里也不再赘述。文章可能还有很多不足,请大家谅解,欢迎大佬提意见。
本文使用到的东西
- IntelliJ
- SpringBoot
- Redis
1.添加依赖
pom文件中添加依赖:
<!-- redis -->
<dependency>
    <groupId>org.springframework.boot</groupId>
    <artifactId>spring-boot-starter-data-redis</artifactId>
</dependency>
2.配置
application.yml文件添加配置:
spring:
  redis:
    # ip
    host: 192.168.138.39
    # 端口号
    port: 6379
    # Redis的密码
    password:
    jedis:
      pool:
        # 连接池最大连接数(使用负值表示没有限制)
        max-active: 8
        # 连接池最大阻塞等待时间(使用负值表示没有限制)
        max-wait: -1
        # 连接池中的最大空闲连接
        max-idle: 30
        # 连接池中的最小空闲连接
        min-idle: 0
3.使用缓存
@Controller
public class HelloController {
@Autowired
@Qualifier("impl1") //取得bean,指定bean名称为impl1
private HelloService helloService;
@Autowired
private RedisTemplate<String,String> redisTemplate;
@ResponseBody
@RequestMapping("/hello") //监听hello请求
public String hello(){
User user=helloService.getUser(1); //从Service取得uid为1的数据
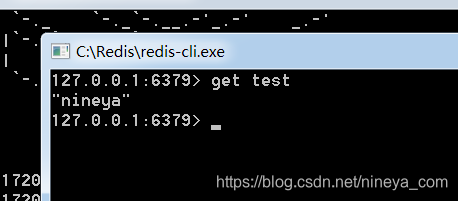
redisTemplate.opsForValue().set("test","nineya");
System.out.println(redisTemplate.opsForValue().get("test"));
return "hello "+user.getName()+", uid="+user.getUid()+".";
}
}
4.配置序列化
这里我把取得的对象存储到Redis中
//这里不再使用@Autowired了
@Resource
private RedisTemplate<String,User> redisTemplate;

User user=helloService.getUser(1);  //从Service取得uid为1的数据
redisTemplate.opsForValue().set("nineya",user);
在Redis中是无法直接存储对象的,序列化之后在Redis中存储的内容如下:
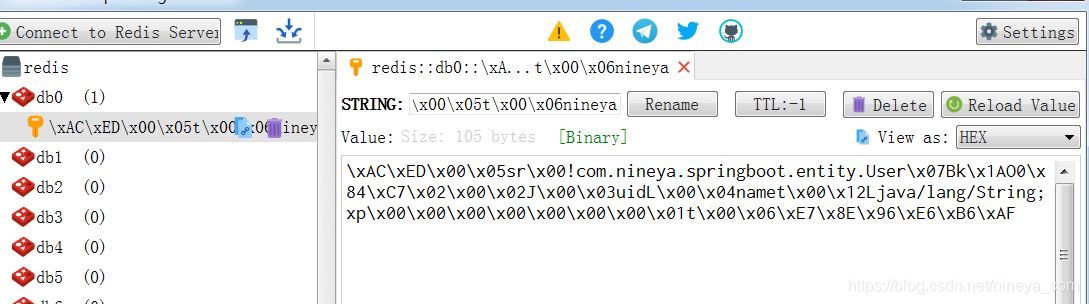
这种序列化方式不是那么方便查看,可以自定义序列化方法,使用该方法对象就无须再实现jdk提供的序列化接口“implements Serializable”。
package com.nineya.springboot.config;

import com.fasterxml.jackson.annotation.JsonAutoDetect;
import com.fasterxml.jackson.annotation.PropertyAccessor;
import com.fasterxml.jackson.databind.ObjectMapper;
import org.springframework.beans.factory.annotation.Autowired;
import org.springframework.context.annotation.Bean;
import org.springframework.context.annotation.Configuration;
import org.springframework.data.redis.connection.RedisConnectionFactory;
import org.springframework.data.redis.core.RedisTemplate;
import org.springframework.data.redis.serializer.Jackson2JsonRedisSerializer;
import org.springframework.data.redis.serializer.StringRedisSerializer;

@EnableCaching
@Configuration
public class RedisConfig {
    @Autowired
    private RedisConnectionFactory redisConnectionFactory;
    @Bean
    public RedisTemplate<String, Object> redisTemplate() {
        RedisTemplate<String, Object> redisTemplate = new RedisTemplate<>();
        // 注入数据源
        redisTemplate.setConnectionFactory(redisConnectionFactory);
        // Jackson2JsonRedisSerialize 替换默认序列化,和JacksonJsonRedisSerialize实际上一样
        Jackson2JsonRedisSerializer jackson2JsonRedisSerializer =
                new Jackson2JsonRedisSerializer(Object.class);
        // 简单的字符串序列化
        StringRedisSerializer stringRedisSerializer = new StringRedisSerializer();
        ObjectMapper objectMapper = new ObjectMapper();
        objectMapper.setVisibility(PropertyAccessor.ALL, JsonAutoDetect.Visibility.ANY);
        objectMapper.enableDefaultTyping(ObjectMapper.DefaultTyping.NON_FINAL);
        jackson2JsonRedisSerializer.setObjectMapper(objectMapper);
        // key-value结构序列化
        redisTemplate.setKeySerializer(stringRedisSerializer);
        redisTemplate.setValueSerializer(jackson2JsonRedisSerializer);
        // hash
        redisTemplate.setHashKeySerializer(stringRedisSerializer);
        redisTemplate.setHashValueSerializer(jackson2JsonRedisSerializer);
        // 启用默认序列化方式
        redisTemplate.setEnableDefaultSerializer(true);
        redisTemplate.setDefaultSerializer(jackson2JsonRedisSerializer);
        return redisTemplate;
    }
}
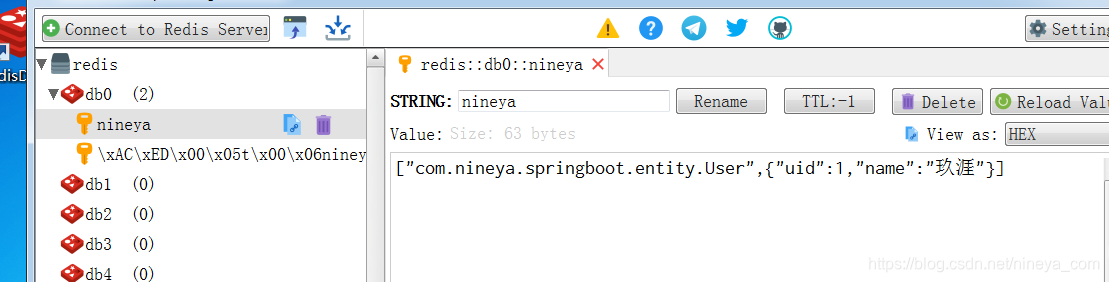
效果。
5.mybatis+redis
service层代码
package com.nineya.springboot.service.impl;

import com.nineya.springboot.mapper.UserMapper;
import com.nineya.springboot.entity.User;
import com.nineya.springboot.service.HelloService;
import org.springframework.beans.factory.annotation.Autowired;
import org.springframework.cache.annotation.CacheConfig;
import org.springframework.cache.annotation.Cacheable;
import org.springframework.stereotype.Service;

@Service("impl1")    //注释为服务,指定bean名称为impl1
@CacheConfig(cacheNames="HelloServiceImpl") // 本类内方法指定使用缓存时,默认的名称就是HelloServiceImpl
public class HelloServiceImpl implements HelloService {
    @Autowired
    private UserMapper userMapper;
    @Override
    @Cacheable  //先查缓存,缓存不存在再执行方法
    public User getUser(long uid) {
        System.out.println("执行方法");
        return userMapper.getUser(uid);
    }
}
6.总结
有不清楚的地方欢迎评论留言,看到的我都会回复的。本文到此结束,有什么不足的地方请大家不吝指正。


 1752
1752


 被折叠的 条评论
为什么被折叠?
被折叠的 条评论
为什么被折叠?
 到【灌水乐园】发言


