


论文地址:https://arxiv.org/pdf/1802.02611.pdf
论文笔记:DeepLabV3+: 在DeepLabV3基础上引入了Decoder_deeplabv3+的decoder代码是哪段_叶舟的博客-CSDN博客
参考代码:https://github.com/yassouali/pytorch_segmentation/blob/master/models/deeplabv3_plus.py
目录
0、写在前面
理解一个网络模型的最好方式,是结合其实现代码对照理解;理解一个网络的开源代码的最好方式,是结合网络结构图来一一对应着看。
DeepLabV3+的论文已经阅读完毕,阅读笔记可以参考这篇博客,现在开始从开源的代码上来详细了解网络实现的细节,主要参考了这个库中的实现。
1、网络结构
DeepLabV3+的网络结构如下图所示,主要为Encoder-Decoder结构。其中,Encoder为改进的DeepLabV3,Decoder为3+版本新提出的。
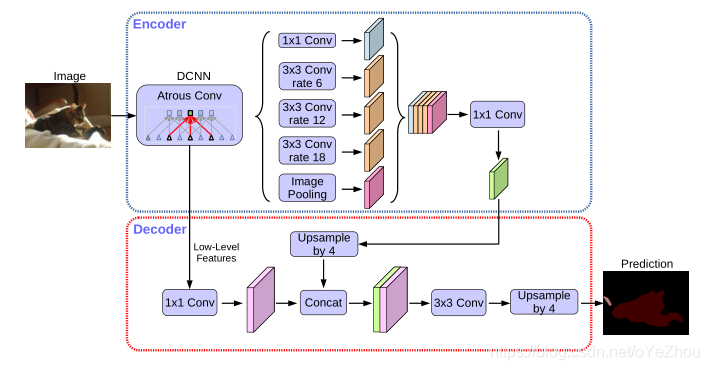
1.1、Encoder
在Encoder部分,主要包括了backbone(即:图1中的DCNN)、ASPP两大部分。
- 其中backbone有两种网络结构:将layer4改为空洞卷积的Resnet系列、改进的Xception。从backbone出来的feature map分两部分:一部分是最后一层卷积输出的feature maps,另一部分是中间的低级特征的feature maps;backbone输出的第一部分送入ASPP模块,第二部分则送入Decoder模块。
- ASPP模块接受backbone的第一部分输出作为输入,使用了四种不同膨胀率的空洞卷积块(包括卷积、BN、激活层)和一个全局平均池化块(包括池化、卷积、BN、激活层)得到一共五组feature maps,将其concat起来之后,经过一个1*1卷积块(包括卷积、BN、激活、dropout层),最后送入Decoder模块。
1.2、Decoder
在Decoder部分,接收来自backbone中间层的低级feature maps和来自ASPP模块的输出作为输入。
- 首先,对低级feature maps使用1*1卷积进行通道降维,从256降到48(之所以需要降采样到48,是因为太多的通道会掩盖ASPP输出的feature maps的重要性,且实验验证48最佳);
- 然后,对来自ASPP的feature maps进行插值上采样,得到与低级featuremaps尺寸相同的feature maps;
- 接着,将通道降维的低级feature maps和线性插值上采样得到的feature maps使用concat拼接起来,并送入一组3*3卷积块进行处理;
- 最后,再次进行线性插值上采样,得到与原图分辨率大小一样的预测图。
整个的网络结构即为上述几个部分,下面结合Pytorch实现的代码进行理解。
2、代码解析
2.1、class DeepLab
该class为总的网络结构,我们从forward函数可以看出其整体的流程:输入x经过backbone得到16倍下采样的feature map1和低级feature map2;feature map1送入ASPP模块,得到结果,然后和feature map2一起送入Decoder模块;最后经过插值得到与原图大小相等的预测图。代码如下:
'''
-> Deeplab V3 +
'''

class DeepLab(BaseModel):
    def __init__(self, num_classes, in_channels=3, backbone='xception', pretrained=True,
                output_stride=16, freeze_bn=False, **_):

        super(DeepLab, self).__init__()
        assert ('xception' or 'resnet' in backbone)
        if 'resnet' in backbone:
            self.backbone = ResNet(in_channels=in_channels, output_stride=output_stride, pretrained=pretrained)
            low_level_channels = 256
        else:
            self.backbone = Xception(output_stride=output_stride, pretrained=pretrained)
            low_level_channels = 128

        self.ASSP = ASSP(in_channels=2048, output_stride=output_stride)
        self.decoder = Decoder(low_level_channels, num_classes)

        if freeze_bn: self.freeze_bn()

    def forward(self, x):
        H, W = x.size(2), x.size(3)
        x, low_level_features = self.backbone(x)
        x = self.ASSP(x)
        x = self.decoder(x, low_level_features)
        x = F.interpolate(x, size=(H, W), mode='bilinear', align_corners=True)
        return x

    # Two functions to yield the parameters of the backbone
    # & Decoder / ASSP to use differentiable learning rates
    # FIXME: in xception, we use the parameters from xception and not aligned xception
    # better to have higher lr for this backbone

    def get_backbone_params(self):
        return self.backbone.parameters()

    def get_decoder_params(self):
        return chain(self.ASSP.parameters(), self.decoder.parameters())

    def freeze_bn(self):
        for module in self.modules():
            if isinstance(module, nn.BatchNorm2d): module.eval()
需要注意的是:如果使用ResNet系列作为backbone,中间的低级feature map输出维度为256,如果使用Xception作为backbone,中间的低级feature map维度为128。不过,不管是256还是128,最终都要在送入Decoder后降采样到48通道。
2.2、backbone部分
上文提到,backbone分ResNet系列和Xception两种。
2.2.1、ResNet作为backbone
对于ResNet系列,一共有layer0~4,共五个layer。其中,前三个layers,也即layer0~layer2不变,仅针对layer3、layer4进行了改进,将普通卷积改为了空洞卷积。如果输出步幅(输入尺寸与输出feature map尺寸之比)为8,需要改动layer3和layer4;如果输出步幅为16,则仅改动layer4:
        if output_stride == 16: s3, s4, d3, d4 = (2, 1, 1, 2)
        elif output_stride == 8: s3, s4, d3, d4 = (1, 1, 2, 4)

        if output_stride == 8:
            for n, m in self.layer3.named_modules():
                if 'conv1' in n and (backbone == 'resnet34' or backbone == 'resnet18'):
                    m.dilation, m.padding, m.stride = (d3,d3), (d3,d3), (s3,s3)
                elif 'conv2' in n:
                    m.dilation, m.padding, m.stride = (d3,d3), (d3,d3), (s3,s3)
                elif 'downsample.0' in n:
                    m.stride = (s3, s3)

        for n, m in self.layer4.named_modules():
            if 'conv1' in n and (backbone == 'resnet34' or backbone == 'resnet18'):
                m.dilation, m.padding, m.stride = (d4,d4), (d4,d4), (s4,s4)
            elif 'conv2' in n:
                m.dilation, m.padding, m.stride = (d4,d4), (d4,d4), (s4,s4)
            elif 'downsample.0' in n:
                m.stride = (s4, s4)
此外,中间的低级feature maps在ResNet系列中,是layer1的输出。
2.2.2、Xception作为backbone
如果以Xception作为backbone,则需要对Xception的中间流(Middle Flow)和出口流(Exit flow)进行改动:去掉原有的池化层,并将原有的卷积层替换为带有步长的可分离卷积,但是入口流(Entry Flow)不变:
        # Stride for block 3 (entry flow), and the dilation rates for middle flow and exit flow
        if output_stride == 16: b3_s, mf_d, ef_d = 2, 1, (1, 2)
        if output_stride == 8: b3_s, mf_d, ef_d = 1, 2, (2, 4)

        # Entry Flow
        self.conv1 = nn.Conv2d(in_channels, 32, 3, 2, padding=1, bias=False)
        self.bn1 = nn.BatchNorm2d(32)
        self.relu = nn.ReLU(inplace=True)
        self.conv2 = nn.Conv2d(32, 64, 3, 1, padding=1, bias=False)
        self.bn2 = nn.BatchNorm2d(64)

        self.block1 = Block(64, 128, stride=2, dilation=1, use_1st_relu=False)
        self.block2 = Block(128, 256, stride=2, dilation=1)
        self.block3 = Block(256, 728, stride=b3_s, dilation=1)

        # Middle Flow
        for i in range(16):
            exec(f'self.block{i+4} = Block(728, 728, stride=1, dilation=mf_d)')

        # Exit flow
        self.block20 = Block(728, 1024, stride=1, dilation=ef_d[0], exit_flow=True)

        self.conv3 = SeparableConv2d(1024, 1536, 3, stride=1, dilation=ef_d[1])
        self.bn3 = nn.BatchNorm2d(1536)
        self.conv4 = SeparableConv2d(1536, 1536, 3, stride=1, dilation=ef_d[1])
        self.bn4 = nn.BatchNorm2d(1536)
        self.conv5 = SeparableConv2d(1536, 2048, 3, stride=1, dilation=ef_d[1])
        self.bn5 = nn.BatchNorm2d(2048)
而中间的低级feature maps在Xception系列中,是Entry Flow中block1的输出。
2.3、class ASPP
从backbone出来的输出步幅为16的feature maps被送入了ASPP模块,在该模块中经过不同膨胀率的卷积块和一个全局信息提取块后,concat起来,最后经过一个1*1卷积块之后,即为ASPP模块的输出。
注意,这里之所以说是“块”,是因为其不单单包含一个操作,也包含了多个其他的操作,如BN、RELU、Dropout等,上文的1.1节等地方均有类似描述。
如ASPP的不同膨胀率的分支定义如下:
def assp_branch(in_channels, out_channles, kernel_size, dilation):
    padding = 0 if kernel_size == 1 else dilation
    return nn.Sequential(
            nn.Conv2d(in_channels, out_channles, kernel_size, padding=padding, dilation=dilation, bias=False),
            nn.BatchNorm2d(out_channles),
            nn.ReLU(inplace=True))
全局信息提取块定义如下:
        self.avg_pool = nn.Sequential(
            nn.AdaptiveAvgPool2d((1, 1)),
            nn.Conv2d(in_channels, 256, 1, bias=False),
            nn.BatchNorm2d(256),
            nn.ReLU(inplace=True))
ASPP类定义的完整代码如下:
class ASSP(nn.Module):
    def __init__(self, in_channels, output_stride):
        super(ASSP, self).__init__()

        assert output_stride in [8, 16], 'Only output strides of 8 or 16 are suported'
        if output_stride == 16: dilations = [1, 6, 12, 18]
        elif output_stride == 8: dilations = [1, 12, 24, 36]

        self.aspp1 = assp_branch(in_channels, 256, 1, dilation=dilations[0])
        self.aspp2 = assp_branch(in_channels, 256, 3, dilation=dilations[1])
        self.aspp3 = assp_branch(in_channels, 256, 3, dilation=dilations[2])
        self.aspp4 = assp_branch(in_channels, 256, 3, dilation=dilations[3])

        self.avg_pool = nn.Sequential(
            nn.AdaptiveAvgPool2d((1, 1)),
            nn.Conv2d(in_channels, 256, 1, bias=False),
            nn.BatchNorm2d(256),
            nn.ReLU(inplace=True))

        self.conv1 = nn.Conv2d(256*5, 256, 1, bias=False)
        self.bn1 = nn.BatchNorm2d(256)
        self.relu = nn.ReLU(inplace=True)
        self.dropout = nn.Dropout(0.5)

        initialize_weights(self)

    def forward(self, x):
        x1 = self.aspp1(x)
        x2 = self.aspp2(x)
        x3 = self.aspp3(x)
        x4 = self.aspp4(x)
        x5 = F.interpolate(self.avg_pool(x), size=(x.size(2), x.size(3)), mode='bilinear', align_corners=True)

        x = self.conv1(torch.cat((x1, x2, x3, x4, x5), dim=1))
        x = self.bn1(x)
        x = self.dropout(self.relu(x))

        return x
2.4、class Decoder
Decoder部分属于最后一部分了,其接受backbone的低级feature maps和ASPP输出的feature maps,并对其分别进行了降维、上采样,然后concat,最后经过一组3*3卷积块后输出。其类定义代码如下:
class Decoder(nn.Module):
    def __init__(self, low_level_channels, num_classes):
        super(Decoder, self).__init__()
        self.conv1 = nn.Conv2d(low_level_channels, 48, 1, bias=False)
        self.bn1 = nn.BatchNorm2d(48)
        self.relu = nn.ReLU(inplace=True)

        # Table 2, best performance with two 3x3 convs
        self.output = nn.Sequential(
            nn.Conv2d(48+256, 256, 3, stride=1, padding=1, bias=False),
            nn.BatchNorm2d(256),
            nn.ReLU(inplace=True),
            nn.Conv2d(256, 256, 3, stride=1, padding=1, bias=False),
            nn.BatchNorm2d(256),
            nn.ReLU(inplace=True),
            nn.Dropout(0.1),
            nn.Conv2d(256, num_classes, 1, stride=1),
        )
        initialize_weights(self)

    def forward(self, x, low_level_features):
        low_level_features = self.conv1(low_level_features)
        low_level_features = self.relu(self.bn1(low_level_features))
        H, W = low_level_features.size(2), low_level_features.size(3)

        x = F.interpolate(x, size=(H, W), mode='bilinear', align_corners=True)
        x = self.output(torch.cat((low_level_features, x), dim=1))
        return x
需要注意的是,该代码将最后的4倍上采样插值的操作放到Decoder外面了,这一点与论文稍有差别,但只是归属不同,效果是一样的,不影响使用。
3、总结
本文主要结合DeepLabv3+的网络结构和开源代码进行了对照解析。通过对网络结构中的每一块的作用及其代码实现中的细节进行了解,就能够对该网络模型有一个宏观和微观上的把握,理解层次也更加深入了。
对网络结构理解清晰透彻之后,就可以尝试魔改了,比如把线性插值上采样改为反卷积,是不是就可以避免转TensorRT时对上采样操作的不支持呢?这个想法后续有时间会尝试一下。


 590
590

 被折叠的 条评论
为什么被折叠?
被折叠的 条评论
为什么被折叠?
 到【灌水乐园】发言


