


官方说明
Tinker是微信官方的Android热补丁解决方案,它支持动态下发代码、So库以及资源,让应用能够在不需要重新安装的情况下实现更新。当然,你也可以使用Tinker来更新你的插件。
github地址:https://github.com/Tencent/tinker
我的Demo地址:https://github.com/7449/AndroidDevelop/tree/master/TinkerDemo
介绍
Tinker is a hot-fix solution library for Android, it supports dex, library and resources update without reinstall apk.
wiki地址
github首页介绍的不是很详细,但是Tinker的wiki写的挺详细的
https://github.com/Tencent/tinker/wiki
Tinker开源不久,截至目前已获得5K+ star ,其火热程度可见一斑,关键是Tinker的稳定性已经通过了几亿微信用户的测试。
其实官方的simple已经写的很清楚了,不过为了理顺一些思路还是需要自己再重新走一遍过程
重要提示: Tinker不支持AndroidStudio的Instant Run,运行前请关闭
步骤:
clone tinker
clone地址:https://github.com/Tencent/tinker.git
新建Demo
新建项目,申请权限,因为本地获取补丁包需要读取sd卡的权限
    <uses-permission android:name="android.permission.READ_EXTERNAL_STORAGE"/>
    <uses-permission android:name="android.permission.WRITE_EXTERNAL_STORAGE"/>
依赖Tinker的一些必须操作
在Demo的build.gradle 的dependencied填写
classpath 'com.tencent.tinker:tinker-patch-gradle-plugin:1.7.3'示例: https://github.com/7449/AndroidDevelop/blob/master/TinkerDemo/build.gradle
在Demo的app目录下的build.gradle填写
apply plugin: 'com.tencent.tinker.patch'

compile 'com.tencent.tinker:tinker-android-anno:1.7.3'
compile 'com.tencent.tinker:tinker-android-lib:1.7.3'
compile 'com.android.support:multidex:1.0.1'
在defaultConfig下 把 multiDexEnabled 设置为ture
然后在官方示例 tinker-sample-android 的app目录下的build.gradle里找到
def bakPath = file("${buildDir}/bakApk/")
大概在134行左右 往下的内容全部copy到自己的build.gradle目录下,但是应该会报错,具体需要copy内容请看我的示例代码
示例:https://github.com/7449/AndroidDevelop/blob/master/TinkerDemo/app/build.gradle
新建application
在清单文件的application填写 ,规定写法,暂时不要管,这里名字可以随便写但是要和之后的MyApplication 里面的application名字一样
android:name="tinker.Application"
然后新建MyApplication 继承DefaultApplicationLike,重写onBaseContextAttached,在里面初始化一些东西,具体内容如下
@DefaultLifeCycle(
        application = "tinker.Application", flags = ShareConstants.TINKER_ENABLE_ALL)
public class App extends DefaultApplicationLike {


    public App(Application application, int tinkerFlags, boolean tinkerLoadVerifyFlag, long applicationStartElapsedTime, long applicationStartMillisTime, Intent tinkerResultIntent, Resources[] resources, ClassLoader[] classLoader, AssetManager[] assetManager) {
        super(application, tinkerFlags, tinkerLoadVerifyFlag, applicationStartElapsedTime, applicationStartMillisTime, tinkerResultIntent, resources, classLoader, assetManager);
    }

    @Override
    public void onBaseContextAttached(Context base) {
        super.onBaseContextAttached(base);
        MultiDex.install(base);
        TinkerInstaller.install(this);
    }
}
这个时候重新rebuild 一下项目就可以找到那个application了
这个时候基本的依赖已经完成了,接下来看如何在代码中实现热修复
测试
根据官方示例我也简单的用一个button来测试效果,先是简单的Toast一个tinker error。
  findViewById(R.id.btn_).setOnClickListener(new View.OnClickListener() {
        @Override
        public void onClick(View v) {
            TinkerInstaller.onReceiveUpgradePatch(getApplicationContext(), Environment.getExternalStorageDirectory().getAbsolutePath() + "/tinkerDemo");
            Toast.makeText(getApplicationContext(), "tinker error", Toast.LENGTH_SHORT).show();
        }
    });
这个时候运行一下项目,点击一下button,Toast tinker error ,嗯 没问题,接下来你可以拔下数据线操作了
这个时候看app目录下的buil的目录,应该会有一个tinkerFile文件夹和我们的app目录下的build.gradle 里面的bakPath对应,tinkerFile目录下有两个生成的文件,一个是apk,一个是text,
Tinker不建议设置为apk结尾,因为某些运营商会劫持apk结尾的文件,这里就是简单的测试下,就没改
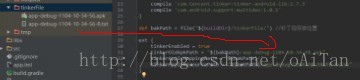
这个时候打开app/build.gradle 根据我的图片修改,命名必须要对上
,图片看不清,就是生成的那两个文件的名字要手动写到app/build.gradle 里面的 ext 里面
ext {
    tinkerEnabled = true
    tinkerOldApkPath = "${bakPath}/app-debug-1103-18-13-12.apk" //这里
    tinkerApplyMappingPath = "${bakPath}/"
    tinkerApplyResourcePath = "${bakPath}/app-debug-1103-18-13-12-R.txt" //还有这里
}
确认修改好了之后开始修改代码,只是简单的把Toast tinker error 改成tinker success
改好之后开始制作补丁,进入项目的app目录下的Dos窗口,执行 gradle tinkerPatchDebug
这里注意的是必须要配置gradle环境变量。
等到Dos窗口提示 BUILD SUCCESSFUL 就说明补丁已经打好了
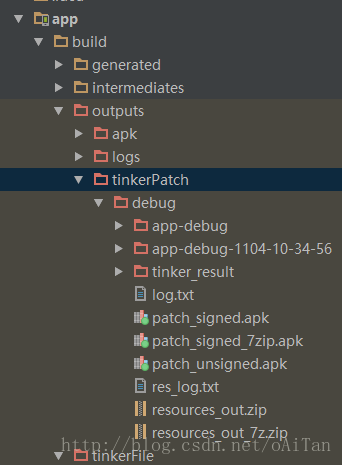
这个时候看build文件夹下的outputs新生成了tinkerPatch目录,里面的patch_singned_7zip.apk就是新打好的补丁
拖出来命名为我之前MainActivity里面的tinkerDemo
放到手机的根目录下,彻底关掉app(因为Tinker不支持直接应用,必须要重启一次)
然后重新打开,点击button就会发现会Tost tinker success,那就证明简单的运行测试没有出现什么问题
这里要确定的是,app必须获取读取sd卡的权限


 496
496


 被折叠的 条评论
为什么被折叠?
被折叠的 条评论
为什么被折叠?
 到【灌水乐园】发言


