


pytorch: 1.9.0
torchvision: 0.10
mmdetection: 2.15.0
mmcv: 1.3.10
测试图片(图片大小:720x1280):
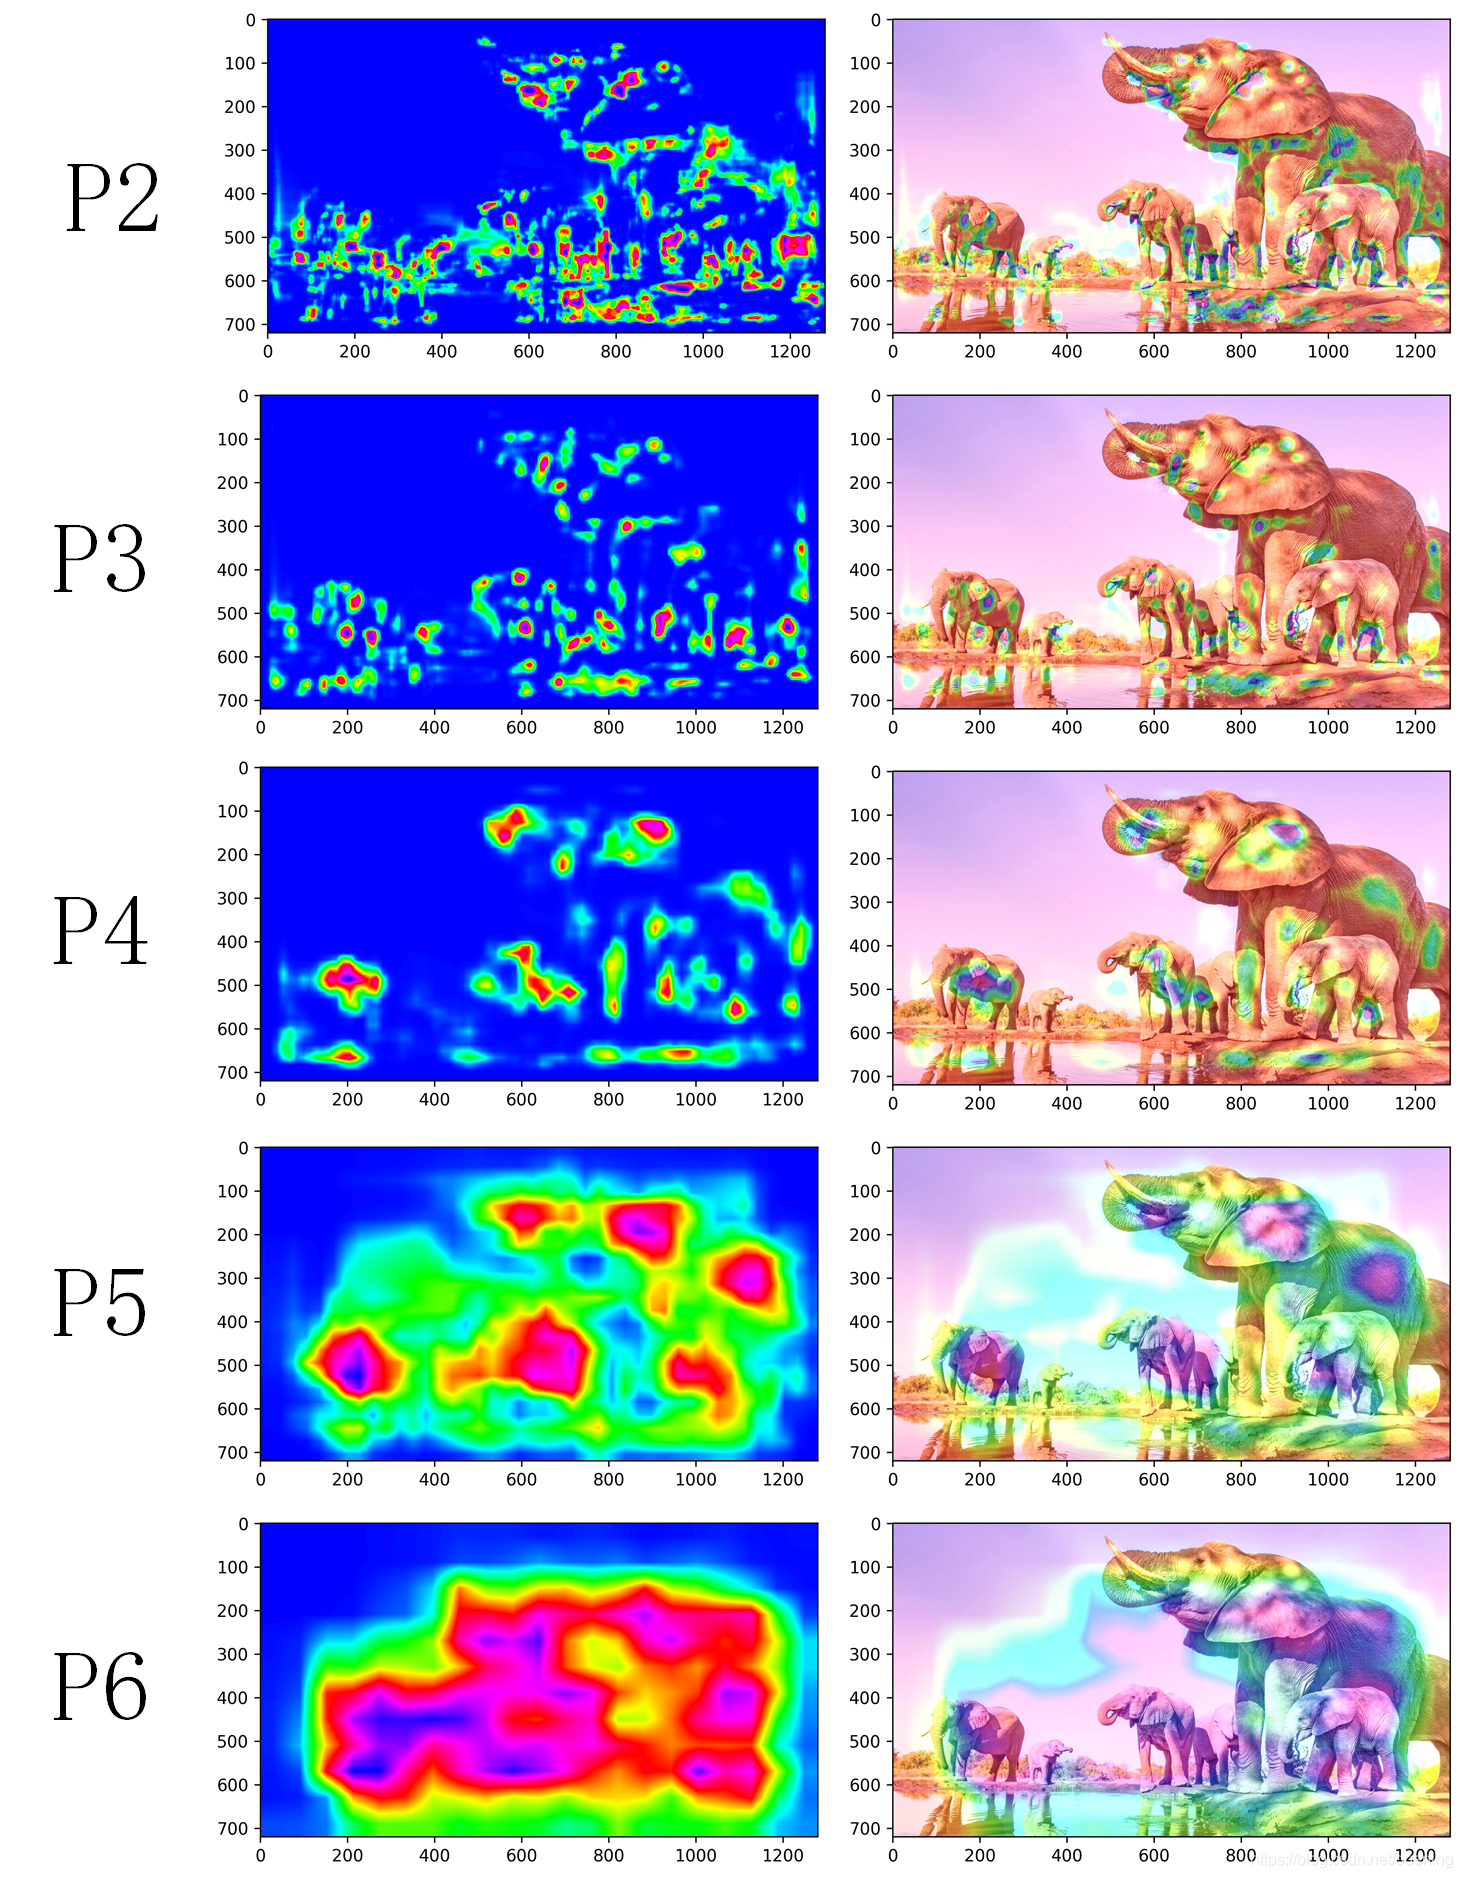
之前博主写过一篇pytorch模型特征可视化的博文:pytorch卷积网络特征图可视化 ,本篇博文想记录一下目标检测模型的特征图可视化,这个在很多OD的论文上都可以看到CAM图,其实操作起来和前面博文介绍的基本一致,主要是看选取哪层conv的输出作为特征,然后经过颜色转换后叠加到原图去,获取特征图的方法主要用到钩子函数,顾名思义,将特征量从forward前向运算过程中“勾出”来。
1.torchvision.models.detection检测模型
话不多说,直接上代码:
# -*- coding: utf-8 -*-
"""
Created on Fri Aug  6 11:10:41 2021

@author: Wenqing Zhou (zhou.wenqing@qq.com)
@github: https://github.com/ouening

参考链接:
1.https://blog.csdn.net/cl2227619761/article/details/106577306/
2.https://zhuanlan.zhihu.com/p/87853615
"""

import torch
import numpy as np
from PIL import Image
from torchvision import transforms, models
import matplotlib.cm
from torchinfo import summary
import copy
import cv2
import matplotlib.pyplot as plt

device = 'cuda' if torch.cuda.is_available() else 'cpu'

module_name = []
p_in = []
p_out = []

# 定义hook_fn,顾名思义就是把数值从forward计算过程中“勾出”来
def hook_fn(module, inputs, outputs):
    module_name.append(module.__class__)
    print(module)
    p_in.append(inputs)
    p_out.append(outputs)


#%% 加载模型,注册钩子函数

# model = models.detection.fasterrcnn_resnet50_fpn(pretrained=True)
# model.rpn.head.cls_logits.register_forward_hook(hook_fn) # faster_rcnn

## Retinanet
# model = models.detection.retinanet_resnet50_fpn(pretrained=True)
# model.head.classification_head.cls_logits.register_forward_hook(hook_fn)

## SSD300 VGG16
model = models.detection.ssd300_vgg16(pretrained=True)
model.head.classification_head.register_forward_hook(hook_fn)

# print(summary(model, (1,3,300,300), verbose=1))
#%%
# 导入一张图像
img_file = r"C:\Users\gaoya\Pictures\elephant_1280p.jpg"
img = Image.open(img_file)
ori_img = img.copy()

# 必要的前处理
transform = transforms.Compose([
                # transforms.Resize((416,416)),
				transforms.ToTensor(),
				transforms.Normalize(
					[0.485, 0.456, 0.406],
					[0.229, 0.224, 0.225])])
img = transform(img).unsqueeze(0)  # 增加batch维度

model.to(device)
img = img.to(device) # torch.Size([1, 3, 720, 1280])
# EVAL模式
model.eval()
with torch.no_grad():
    model(img)

#%% 特征可视化
def show_feature_map(img_src, conv_features):
    '''可视化卷积层特征图输出
    img_src:源图像文件路径
    conv_feature:得到的卷积输出,[b, c, h, w]
    '''
    img = Image.open(img_file).convert('RGB')
    height, width = img.size
    conv_features = conv_features.cpu()

    heat = conv_features.squeeze(0)#降维操作,尺寸变为(C,H,W)
    heatmap = torch.mean(heat,dim=0)#对各卷积层(C)求平均值,尺寸变为(H,W)
    # heatmap = torch.max(heat,dim=1).values.squeeze()

    heatmap = heatmap.numpy()#转换为numpy数组
    heatmap = np.maximum(heatmap, 0)
    heatmap /= np.max(heatmap)#minmax归一化处理
    heatmap = cv2.resize(heatmap,(img.size[0],img.size[1]))#变换heatmap图像尺寸,使之与原图匹配,方便后续可视化
    heatmap = np.uint8(255*heatmap)#像素值缩放至(0,255)之间,uint8类型,这也是前面需要做归一化的原因,否则像素值会溢出255(也就是8位颜色通道)
    heatmap = cv2.applyColorMap(heatmap,cv2.COLORMAP_HSV)#颜色变换
    plt.imshow(heatmap)
    plt.show()
    # heatmap = np.array(Image.fromarray(heatmap).convert('L'))
    superimg = heatmap*0.4+np.array(img)[:,:,::-1] #图像叠加,注意翻转通道,cv用的是bgr
    cv2.imwrite('./superimg.jpg',superimg)#保存结果
    # 可视化叠加至源图像的结果
    img_ = np.array(Image.open('./superimg.jpg').convert('RGB'))
    plt.imshow(img_)
    plt.show()

model_str = model.__str__()

if model_str.startswith('SSD'):
    for k in range(len(module_name)):
        for j in range(len(p_in[0][0])):
            print(p_in[k][0][j].shape)
            print(p_out[k].shape)
            show_feature_map(img_file, p_in[k][0][j])
            # show_feature_map(img_file, torch.sigmoid(p_out[k]))
            print()

if model_str.startswith('RetinaNet'): # retinanet
    for k in range(len(module_name)):# 不同尺寸的特征图
        print(p_in[k][0].shape)
        print(p_out[k].shape)
        # show_feature_map(img_file, p_in[k][j])
        show_feature_map(img_file, torch.sigmoid(p_out[k]))
        print()

if model_str.startswith('FasterRCNN'): # FasterRCNN
    for k in range(len(module_name)):
        print(p_in[k][0].shape)
        print(p_out[k].shape)
        # show_feature_map(img_file, p_in[k][0])
        show_feature_map(img_file, torch.sigmoid(p_out[k]))
        print()

print(summary(model, (1,3,300,300), verbose=1))
1.1 Faster RCNN的结果:
P2 -P6的输入输出特征维度:
torch.Size([1, 256, 192, 336])
torch.Size([1, 3, 192, 336])

torch.Size([1, 256, 96, 168])
torch.Size([1, 3, 96, 168])

torch.Size([1, 256, 48, 84])
torch.Size([1, 3, 48, 84])

torch.Size([1, 256, 24, 42])
torch.Size([1, 3, 24, 42])

torch.Size([1, 256, 12, 21])
torch.Size([1, 3, 12, 21])
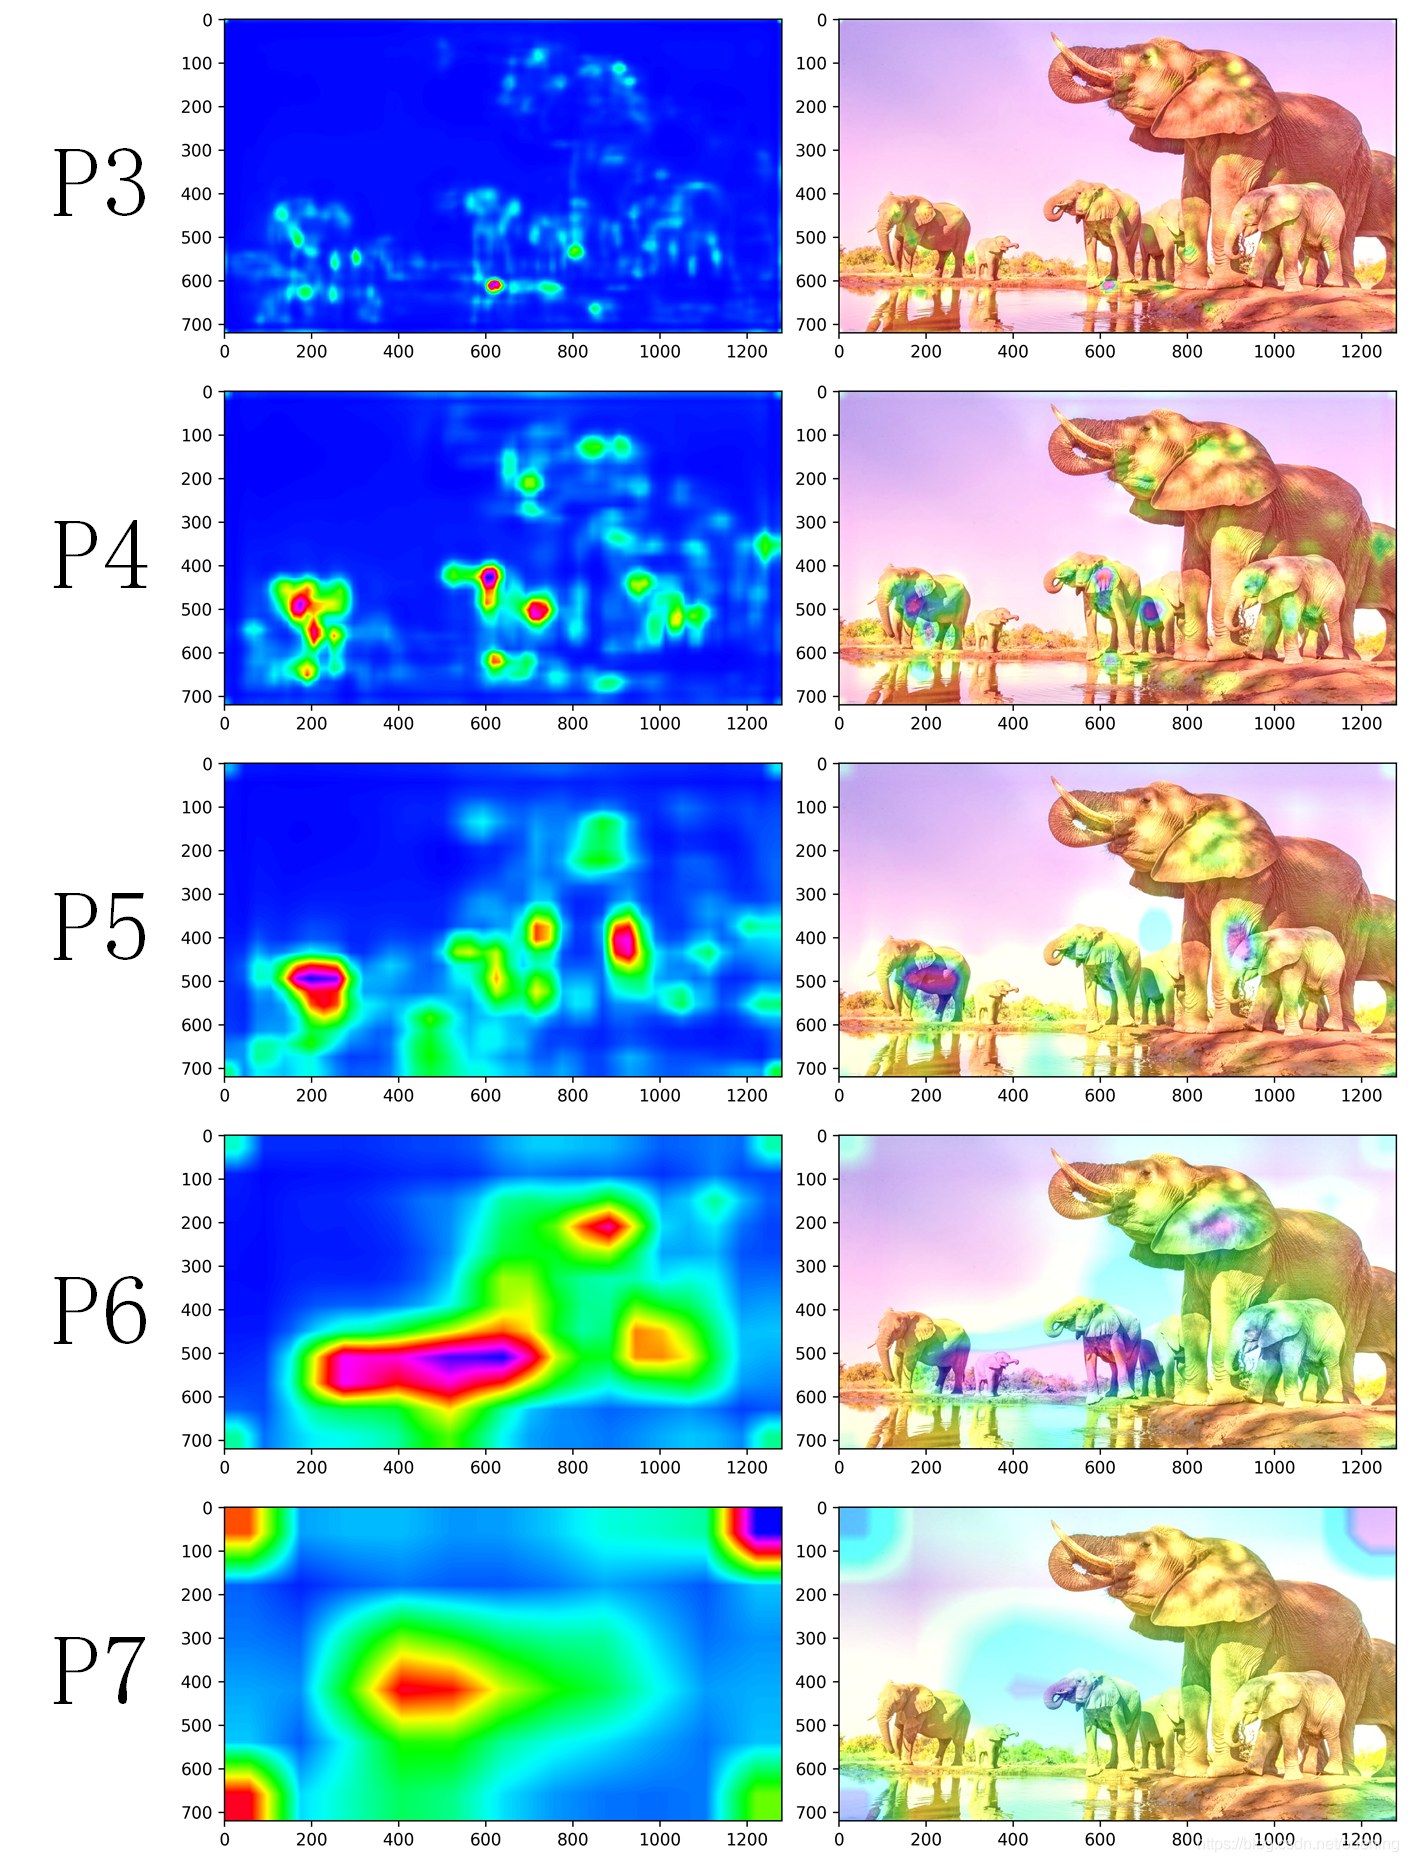
1.2 RetinaNet结果
torch.Size([1, 256, 96, 168])
torch.Size([1, 819, 96, 168])

torch.Size([1, 256, 48, 84])
torch.Size([1, 819, 48, 84])

torch.Size([1, 256, 24, 42])
torch.Size([1, 819, 24, 42])

torch.Size([1, 256, 12, 21])
torch.Size([1, 819, 12, 21])

torch.Size([1, 256, 6, 11])
torch.Size([1, 819, 6, 11])
主要输出通道数为819,因为9个anchor乘以91类=819.
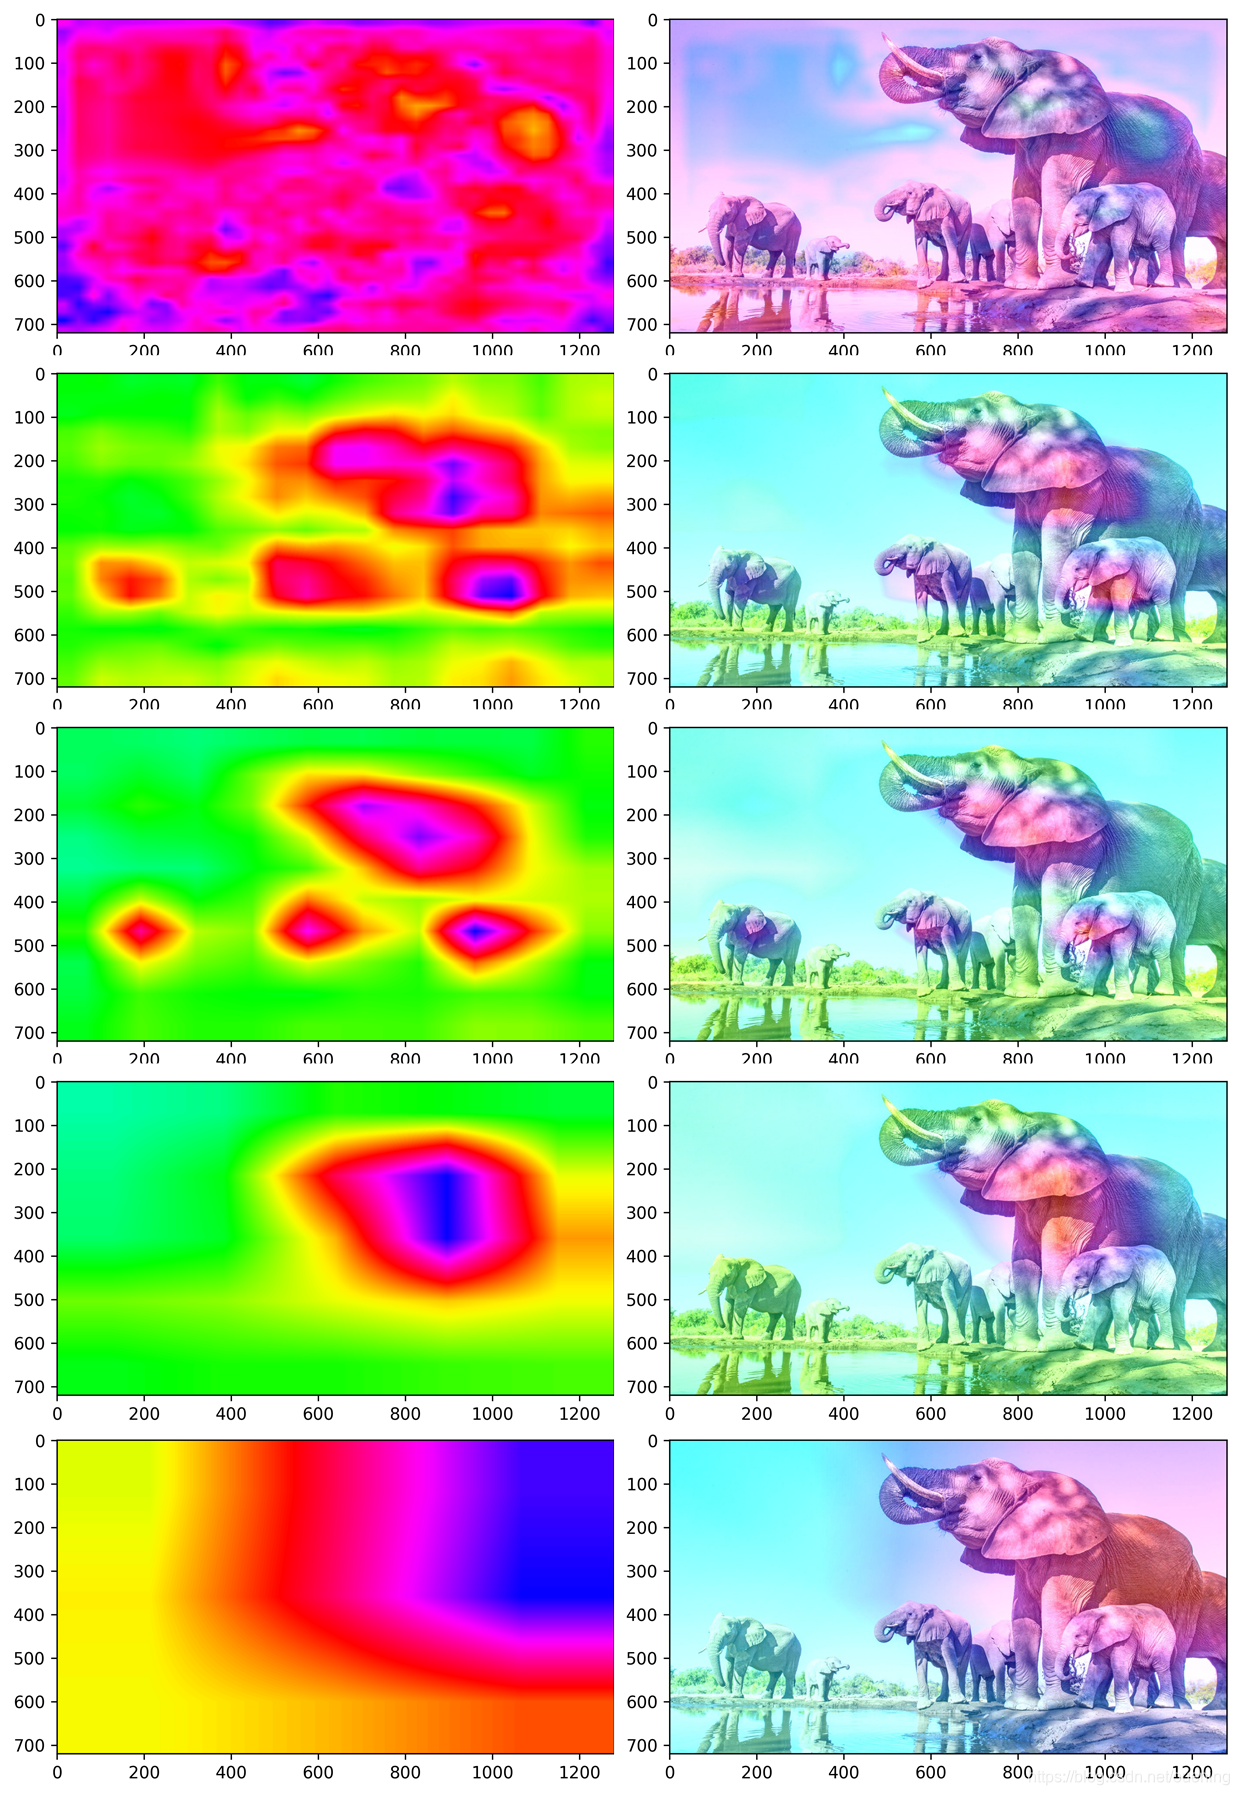
1.3 SSD300
torch.Size([1, 512, 38, 38])
torch.Size([1, 8732, 91])

torch.Size([1, 1024, 19, 19])
torch.Size([1, 8732, 91])

torch.Size([1, 512, 10, 10])
torch.Size([1, 8732, 91])

torch.Size([1, 256, 5, 5])
torch.Size([1, 8732, 91])

torch.Size([1, 256, 3, 3])
torch.Size([1, 8732, 91])

torch.Size([1, 256, 1, 1])
torch.Size([1, 8732, 91])
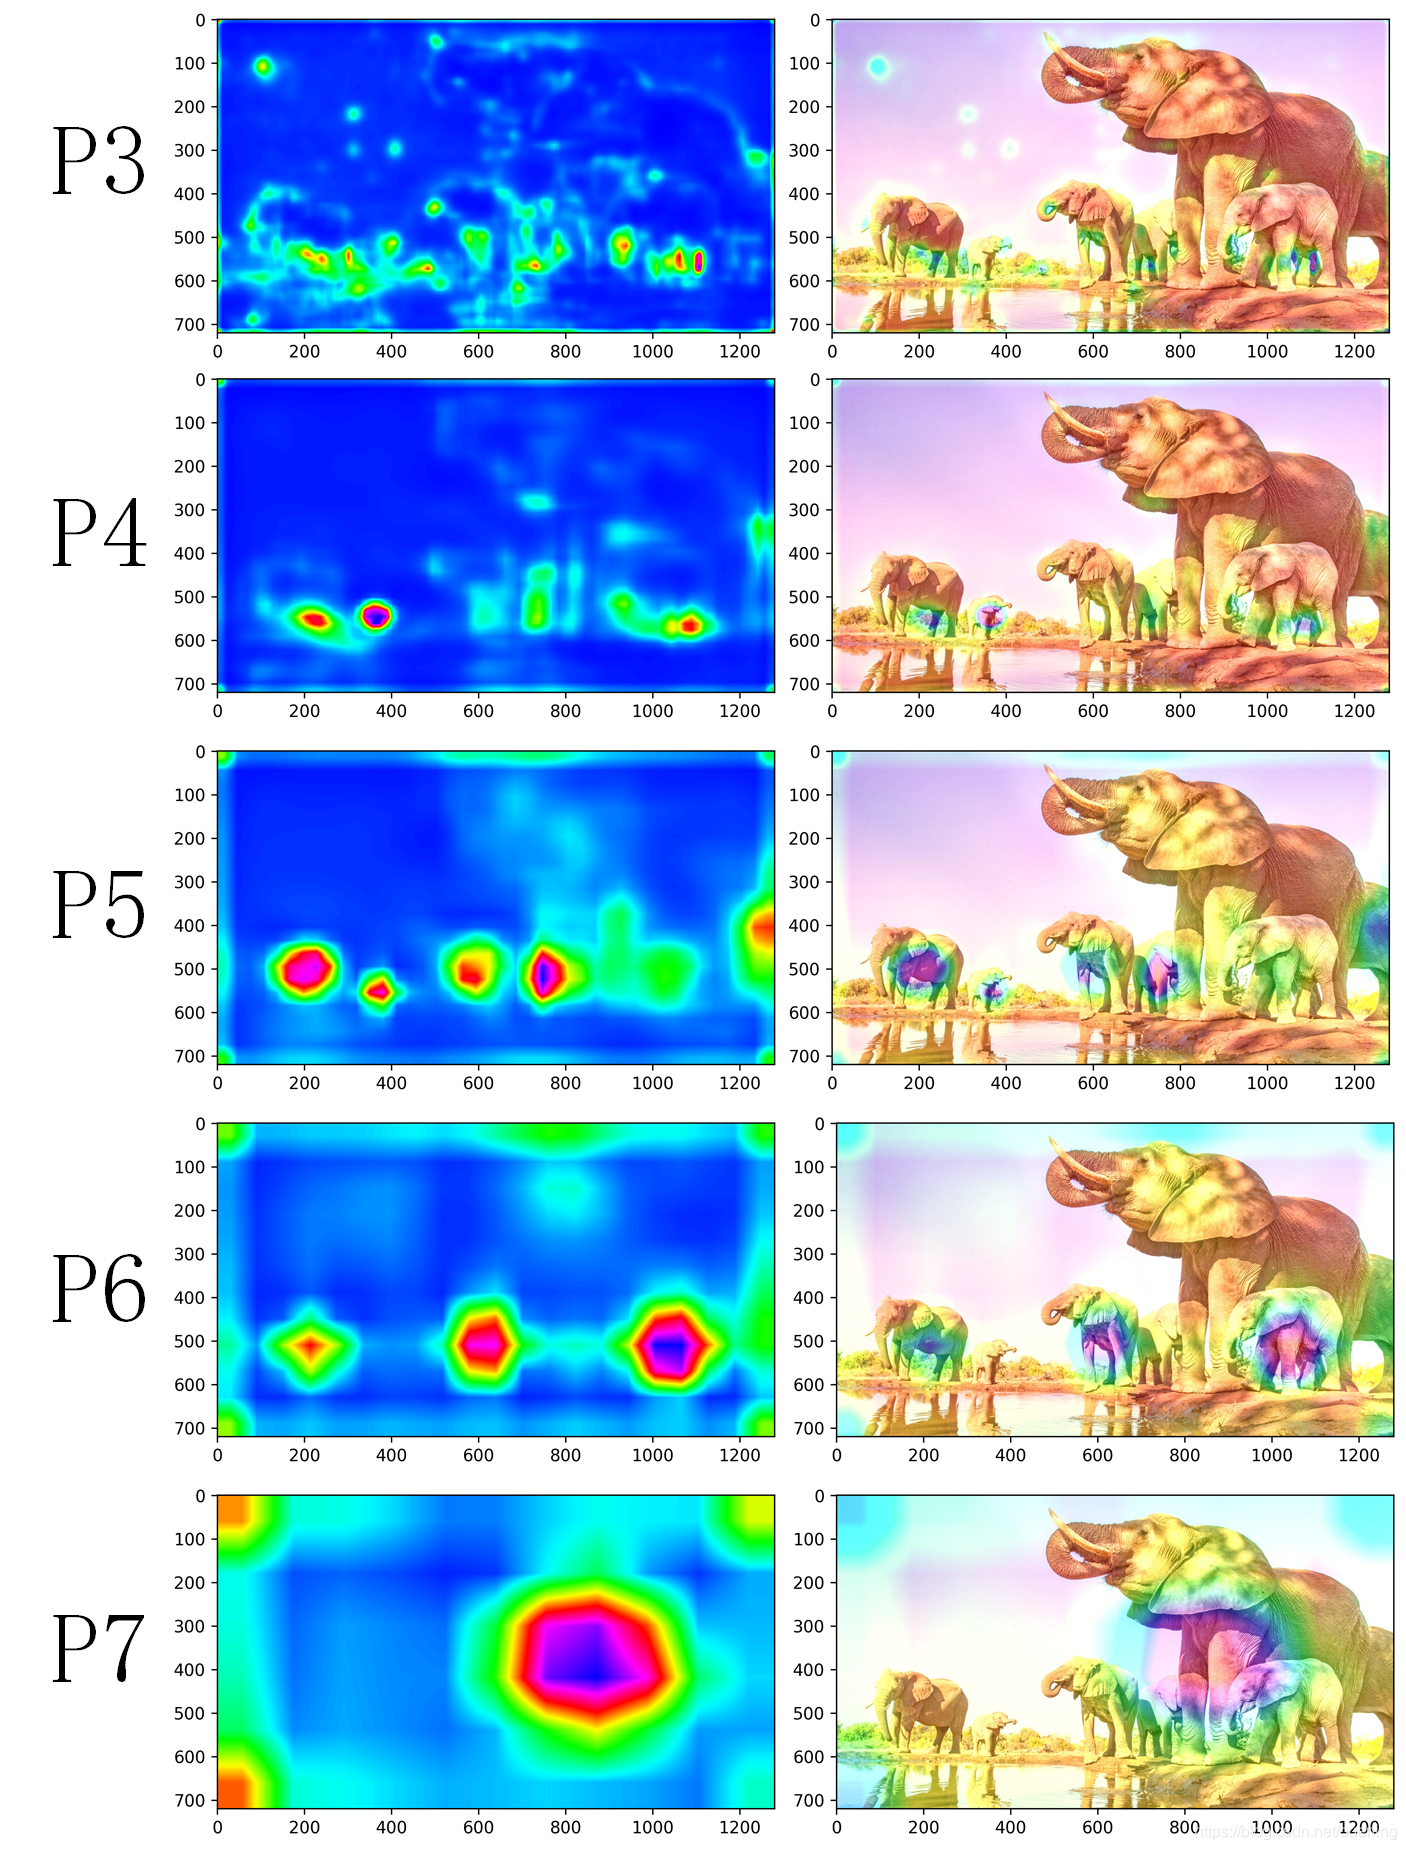
2.mmdetection retinanet
mmdetection实现的retinanet模型配置文件和权重可以从以下地址下载:
https://github.com/open-mmlab/mmdetection/tree/master/configs/retinanet
详细介绍可以参考:
https://mingming97.github.io/2019/03/29/mmdetection%20retinanet/
特征可视化代码如下:
# -*- coding: utf-8 -*-
"""
Created on Fri Aug  6 15:31:30 2021

@author: Wenqing Zhou (zhou.wenqing@qq.com)
@github: https://github.com/ouening
"""

import torch
import numpy as np
from PIL import Image
from torchvision import transforms, models
import matplotlib.cm
from torchinfo import summary
import copy
import cv2
import matplotlib.pyplot as plt
from argparse import ArgumentParser

from mmdet.apis import (inference_detector,
                        init_detector, show_result_pyplot)

device = 'cpu'
config = r"D:\Github\mmdetection\configs\retinanet\retinanet_r50_fpn_1x_coco.py"
ckpt = r"E:\Downloads\retinanet_r50_fpn_1x_coco_20200130-c2398f9e.pth"
img = r"elephant_1280p.jpg"
score_thr = 0.8

# build the model from a config file and a checkpoint file
model = init_detector(config, ckpt, device=device)

#%%
# 定义列表用于存储中间层的输入或者输出
module_name = []
p_in = []
p_out = []

# 定义hook_fn,顾名思义就是把数值从
def hook_fn(module, inputs, outputs):
    print(module_name)
    module_name.append(module.__class__)
    p_in.append(inputs)
    p_out.append(outputs)

model.bbox_head.retina_cls.register_forward_hook(hook_fn)

# test a single image
result = inference_detector(model, img)
# show the results
show_result_pyplot(model, img, result, score_thr=score_thr)

#%%
def show_feature_map(img_src, conv_features):
    '''可视化卷积层特征图输出
    img_src:源图像文件路径
    conv_feature:得到的卷积输出,[b, c, h, w]
    '''
    img = Image.open(img_src).convert('RGB')
    height, width = img.size
    conv_features = conv_features.cpu()

    heat = conv_features.squeeze(0)#降维操作,尺寸变为(2048,7,7)
    heatmap = torch.mean(heat,dim=0)#对各卷积层(2048)求平均值,尺寸变为(7,7)
    # heatmap = torch.max(heat,dim=1).values.squeeze()

    heatmap = heatmap.numpy()#转换为numpy数组
    heatmap = np.maximum(heatmap, 0)
    heatmap /= np.max(heatmap)#minmax归一化处理
    heatmap = cv2.resize(heatmap,(img.size[0],img.size[1]))#变换heatmap图像尺寸,使之与原图匹配,方便后续可视化
    heatmap = np.uint8(255*heatmap)#像素值缩放至(0,255)之间,uint8类型,这也是前面需要做归一化的原因,否则像素值会溢出255(也就是8位颜色通道)
    heatmap = cv2.applyColorMap(heatmap,cv2.COLORMAP_HSV)#颜色变换
    plt.imshow(heatmap)
    plt.show()
    # heatmap = np.array(Image.fromarray(heatmap).convert('L'))
    superimg = heatmap*0.4+np.array(img)[:,:,::-1] #图像叠加,注意翻转通道,cv用的是bgr
    cv2.imwrite('./superimg.jpg',superimg)#保存结果
    # 可视化叠加至源图像的结果
    img_ = np.array(Image.open('./superimg.jpg').convert('RGB'))
    plt.imshow(img_)
    plt.show()

model_str = model.__str__()

if model_str.startswith('SSD'):
    for k in range(len(module_name)):
        for j in range(len(p_in[0][0])):
            print(p_in[k][0][j].shape)
            # print(p_out[k].shape)
            show_feature_map(img, p_in[k][0][j])
            # show_feature_map(img_file, torch.sigmoid(p_out[k]))
            print()

else:
    for k in range(len(module_name)):
        print(p_in[k][0].shape)
        print(p_out[k].shape)
        # show_feature_map(img_file, p_in[k][0])
        show_feature_map(img, torch.sigmoid(p_out[k]))
        print()
 torch.Size([1, 256, 96, 168])
torch.Size([1, 720, 96, 168])

torch.Size([1, 256, 48, 84])
torch.Size([1, 720, 48, 84])

torch.Size([1, 256, 24, 42])
torch.Size([1, 720, 24, 42])

torch.Size([1, 256, 12, 21])
torch.Size([1, 720, 12, 21])

torch.Size([1, 256, 6, 11])
torch.Size([1, 720, 6, 11])
mmdetection训练用的coco数据集是80类,也去除了背景,anchor为9个,所以输出通道是720.
关键是:model.bbox_head.retina_cls.register_forward_hook(hook_fn),这个需要先将模型打印出来,看看需要在哪个卷积模块注册钩子函数。
参考链接:
1.https://blog.csdn.net/cl2227619761/article/details/106577306/
2.https://zhuanlan.zhihu.com/p/87853615
3.https://mingming97.github.io/2019/03/29/mmdetection%20retinanet/


 7048
7048


 被折叠的 条评论
为什么被折叠?
被折叠的 条评论
为什么被折叠?
 到【灌水乐园】发言


