


1.需求说明
首先,读者先来说明验证码的作用。对于安全性要求比较高的系统来说,添加下验证码的功能是必不可少的。有主要是为是防止黑客的入侵。有些黑客为了故意攻击一个系统,可能会使用攻击工具,连续不断地重试用户名或密码登录系统。如果我们不加入验证码,那么就有可能会被破解用户名和密码的。所以加入验证码是非常有必要的。
2.开发思路
对于这样的需求是小功能,我想实现的话是不难的,主要看你要怎样来实现生成验证这个功能了。我们可以使用js来生成验证码,也可以使用java来实现。笔者将会分为两篇的博客来说明,这一篇主要是说明使用js来实现。
3.代码实现
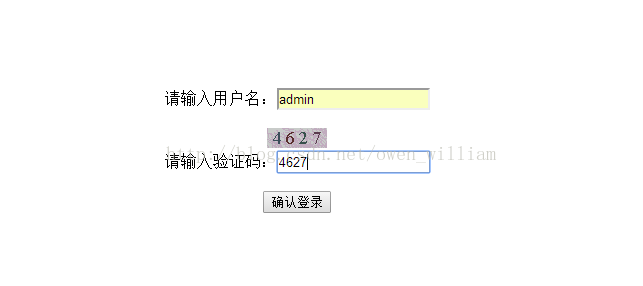
1) 创建登录页面,页面我们需要输入用户和验证码。所以需要两个文件框,同时还需要生成验证码图片的。大概登录的页面login.jsp的代码如下:
<%@ page language="java" import="java.util.*" pageEncoding="UTF-8"%>
<%@ taglib prefix="c" uri="http://java.sun.com/jsp/jstl/core"%>

<!DOCTYPE HTML PUBLIC "-//W3C//DTD HTML 4.01 Transitional//EN">
<html>
	<head>
		<meta http-equiv="Content-Type" content="text/html; charset=UTF-8" />
		<title>验证码测试</title>

		<script type="text/javascript">

		/*	刷新验证码	*/
		function change_yanzhengma()
		{
			document.getElementById("checkcode_img").src = "checkcode.jsp?" + new Date().getTime();
		}

		function checkLoginInfo()
		{
			if (form1.userName.value == "" || form1.userName.value == null)
			{
				alert("用户名不能为空");
				form1.userName.focus();
				return false;
			}
			else if (form1.userCode.value == "" || form1.userCode.value == null)
			{
				alert("验证码不能为空");
				form1.yanzhengma.focus();
				return false;
			}

			return true;
		}
</script>


	</head>

	<body>
		<center>
			<form action="loginCheck" method="post" name="form1">
				<br/><br/><br/><br/><br/><br/>


				请输入用户名:<input type="text" name="userName" id="userName"/>

				<br/><br/>

				<img alt="点击刷新" src="checkcode.jsp" border="0" id="checkcode_img" onClick="change_yanzhengma();" />
				<br/>
				请输入验证码:<input type="text" name="userCode" id="userCode"/>

				<br/><br/>

				<input type="submit" value="确认登录">

				<br/><br/>

				<!-- 保存登录失败时显示给用户的提示信息 -->
				<font color="red">
					${sessionScope.loginError } <%session.removeAttribute("loginError"); %>
				</font>

			</form>
		</center>
	</body>
</html>
2) 细心的读者已经发现了,上面的代码已经的checkcode.jsp的字段,这个页面就是生成验证码的文件,代码的逻辑就不多说了,在代码已经的注释了,读者可以自己看。
<%@ page import="java.awt.*,java.awt.image.*,java.util.*,javax.imageio.*" pageEncoding="gbk"%>
<%@ page import="java.io.OutputStream"%>

<%--	采用JPG格式的图片验证码	--%>

<%!Color getRandColor(int fc, int bc)	//随机生成图片中rgb的值
	{
		Random random = new Random();
		if (fc > 255)
			fc = 255;

		if (bc > 255)
			bc = 255;

		int r = fc + random.nextInt(bc - fc);

		int g = fc + random.nextInt(bc - fc);

		int b = fc + random.nextInt(bc - fc);

		return new Color(r, g, b);
	}
%>

<%
	try
	{
		response.setHeader("Pragma", "No-cache");

		response.setHeader("Cache-Control", "no-cache");

		response.setDateHeader("Expires", 0);

		int width = 60, height = 20;

		BufferedImage image = new BufferedImage(width, height, BufferedImage.TYPE_INT_RGB);

		OutputStream os = response.getOutputStream();

		Graphics g = image.getGraphics();

		Random random = new Random();

		// 设置画笔的颜色
		g.setColor(getRandColor(200, 250));

		// 画图,生成干扰图片
		g.fillRect(0, 0, width, height);

		//字体等样式
		g.setFont(new Font("Times New Roman", Font.PLAIN, 18));

		g.setColor(getRandColor(160, 200));

		//生成图像内部的干扰线条
		for (int i = 0; i < 155; i++)
		{
			int x = random.nextInt(width);
			int y = random.nextInt(height);
			int xl = random.nextInt(12);
			int yl = random.nextInt(12);

			//绘制干扰线条
			g.drawLine(x, y, x + xl, y + yl);
		}

		String sRand = "";

		//生成4为随机的、有彩色值得验证码
		for (int i = 0; i < 4; i++)
		{
			//生成一位验证码的值
			String rand = String.valueOf(random.nextInt(10));

			sRand += rand;

			g.setColor(new Color(20 + random.nextInt(110), 20 + random.nextInt(110), 20 + random.nextInt(110)));

			//对生成的验证码值进行颜色设置,已进行干扰
			g.drawString(rand, 13 * i + 6, 16);
		}

		session.setAttribute("checkcode_inSession", sRand);

		g.dispose();

		//生成JPEG格式的图片验证码
		ImageIO.write(image, "gif", os);

		os.flush();
		os.close();

		os = null;

		// 用来将缓冲区的数据立即输出到浏览器当中
		response.flushBuffer();

		/*	两句关键代码	*/
		out.clear();

		out = pageContext.pushBody();
	}
	catch (IllegalStateException e)
	{
		System.out.println(e.getMessage());
		e.printStackTrace();
	}
%>
3) 加入了验证码之后,我们会把生产的验证码放入到session中,以便后端可以拿到并且验证用户输入的验证码是还有问题。所以CheckCodeServlet.java的后端逻辑处理的类的代码如下。主要实现的是,验证用户输入的用户名是否正确还有就是验证码是否正确。
@SuppressWarnings("serial")
public class CheckCodeServlet extends HttpServlet
{

	public void doGet(HttpServletRequest request, HttpServletResponse response) throws ServletException, IOException
	{
		doPost(request, response);
	}

	public void doPost(HttpServletRequest request, HttpServletResponse response) throws ServletException, IOException
	{
		response.setContentType("text/html;charset=UTF-8");

		HttpSession session = request.getSession();

		String userName = request.getParameter("userName"); // 账号
		String userCode = request.getParameter("userCode"); // 输入的验证码


		/*	获取系统生成的验证码,同时移除掉	*/
		String verificationCode = (String) session.getAttribute("checkcode_inSession");
		session.removeAttribute("checkcode_inSession");


		/*	验证码正确才进行账户信息检查	*/

		// 验证码错误
		if (!userCode.equals(verificationCode))
		{
			session.setAttribute("loginError", "验证码错误");
			response.sendRedirect("login.jsp");
		}
		else
		{
			// 账号存在,此处也可以通过js进行合法性检查
			if (userName!=null && userName!="")
			{
				// 登录成功
				if (userName.equals("admin"))
				{
					//把登录成功的用户信息存放在session中
					session.setAttribute("UserInfoSession", userName);
					response.sendRedirect("main.jsp");
				}
				// 登录失败,账号信息有误
				else
				{
					session.setAttribute("loginError", "账号信息有误");
					response.sendRedirect("login.jsp");
				}
			}
		}
	}
}
4) 当然要想前端与后端可以关联起来,我们还还需要在Web.xml中配置上我们定义的CheckCodeServlet.java.
 <?xml version="1.0" encoding="UTF-8"?>
<web-app version="2.5"
	xmlns="http://java.sun.com/xml/ns/javaee"
	xmlns:xsi="http://www.w3.org/2001/XMLSchema-instance"
	xsi:schemaLocation="http://java.sun.com/xml/ns/javaee
	http://java.sun.com/xml/ns/javaee/web-app_2_5.xsd">
  <servlet>
    <description>This is the description of my J2EE component</description>
    <display-name>This is the display name of my J2EE component</display-name>
    <servlet-name>CheckCodeServlet</servlet-name>
    <servlet-class>com.owen.checkcode.servlet.CheckCodeServlet</servlet-class>
  </servlet>

  <servlet-mapping>
    <servlet-name>CheckCodeServlet</servlet-name>
    <url-pattern>/checkCodeServlet</url-pattern>
  </servlet-mapping>
  <welcome-file-list>
    <welcome-file>index.jsp</welcome-file>
  </welcome-file-list>
</web-app>
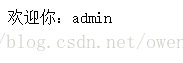
5) 最后,当用户登录成功后,我们给个简单的页面main.jsp。
<%@ page language="java" import="java.util.*" pageEncoding="UTF-8"%>

<!DOCTYPE HTML PUBLIC "-//W3C//DTD HTML 4.01 Transitional//EN">
<html>
	<head>

		<title>登录成功</title>


	</head>

	<body>
		欢迎你:<%=session.getAttribute("UserInfoSession") %>

	</body>
</html>
6) 说明:项目可能用到的jar有:javax.servlet-5.1.12.jar、jstl-1.2.jar
4.实现功能
1) 登录页面。
2) 登录成功。
5.项目结构


 901
901


 被折叠的 条评论
为什么被折叠?
被折叠的 条评论
为什么被折叠?
 到【灌水乐园】发言


