


WebMvcConfigurer 配置接口其实是 Spring 内部的一种配置方式,采用 JavaBean 的形式来代替传统的 XML 配置文件形式进行针对框架个性化定制,可以自定义一些 Handler,Interceptor,ViewResolver,MessageConverter。基于 java-based 方式的 Spring MVC 配置,需要创建一个配置类并实现 WebMvcConfigurer 接口。
了解WebMvcConfigurer配置接口的详解:
请浏览本博客的文章:《SpringBoot中的WebMvcConfigurer配置接口的详解》
以前写 Spring MVC 的时候,如果需要访问一个页面,必须要写 Controller 类,然后再写一个方法跳转到页面,感觉好麻烦,其实重写 WebMvcConfigurer 中的 addViewControllers 方法即可达到效果了。
【示例】SpringBoot 中通过重写 WebMvcConfigurer 配置接口中的 addViewControllers 方法实现页面跳转。
(1)添加依赖
创建 Spring Boot 项目,使用 Maven 添加依赖文件,在 pom.xml 文件中,添加需要的依赖:
<dependency>
	<groupId>org.springframework.boot</groupId>
	<artifactId>spring-boot-starter-web</artifactId>
</dependency>

<dependency>
	<groupId>org.springframework.boot</groupId>
	<artifactId>spring-boot-starter-thymeleaf</artifactId>
</dependency>
(2)创建页面
在项目中的 resources/templates 目录下,创建 user 目录,并在该目录下创建 user-info.html 页面,页面代码如下:
<!DOCTYPE html>
<html lang="en">
<head>
    <meta charset="UTF-8">
    <title>用户信息</title>
    <meta name="author" content="pan_junbiao的博客">
</head>
<body>
    <p>您好,欢迎访问 pan_junbiao的博客</p>
    <p>博客地址:https://blog.csdn.net/pan_junbiao</p>
</body>
</html>
(2)创建配置类
创建 com.pjb.config 包,并创建 WebMvcConfig 类,实现 WebMvcConfigurer 接口;重写 addViewControllers 方法;使用 @Configuration 注解,标注该类为配置类。
package com.pjb.config;

import org.springframework.context.annotation.Configuration;
import org.springframework.web.servlet.config.annotation.ViewControllerRegistry;
import org.springframework.web.servlet.config.annotation.WebMvcConfigurer;

/**
 * Web MVC 配置类
 * @author pan_junbiao
 **/
@Configuration
public class WebMvcConfig implements WebMvcConfigurer
{
    @Override
    public void addViewControllers(ViewControllerRegistry registry)
    {
        //设置页面注册
        registry.addViewController("/toUserInfo").setViewName("user/user-info");
        registry.addViewController("/toUserDetail").setViewName("user/user-detail");
        registry.addViewController("/").setViewName("/index");
    }
}
页面的跳转等同于使用 @Controller 注解的控制器类,代码如下:
/**
 * 用户控制器
 * @author pan_junbiao
 **/
@Controller
public class UserController
{
    @RequestMapping("/toUserInfo")
    public String toUserInfo()
    {
        return "/user/user-info";
    }
}
(3)执行测试
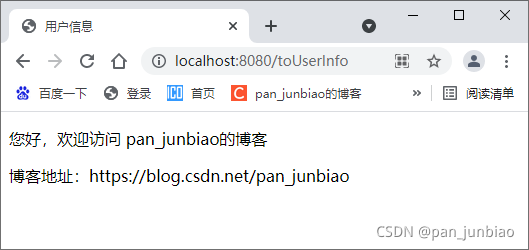
启动项目,在浏览器中输入地址:http://localhost:8080/toUserInfo,执行结果如下:


 99
99


 被折叠的 条评论
为什么被折叠?
被折叠的 条评论
为什么被折叠?
 到【灌水乐园】发言


