


一:系统环境
[root@centosTest mysitesec]# python --version
Python 2.7.3
[root@centosTest mysitesec]# lsb_release -a
LSB Version:    :base-4.0-amd64:base-4.0-noarch:core-4.0-amd64:core-4.0-noarch:graphics-4.0-amd64:graphics-4.0-noarch:printing-4.0-amd64:printing-4.0-noarch
Distributor ID: CentOS
Description:    CentOS release 6.4 (Final)
Release:        6.4
Codename:       Final
[root@centosTest mysitesec]#
django1.6.2
二:项目创建
django-admin.py startproject mysitesec
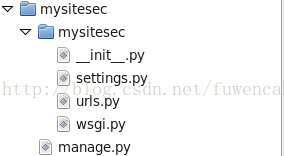
项目结构:
三:进入目录,运行服务
[root@centosTest django]# cd mysitesec/
[root@centosTest mysitesec]# ll
总用量 8
-rw-r--r--. 1 root root 252 11月 5 04:23 manage.py
drwxr-xr-x. 2 root root 4096 11月 5 04:26 mysitesec
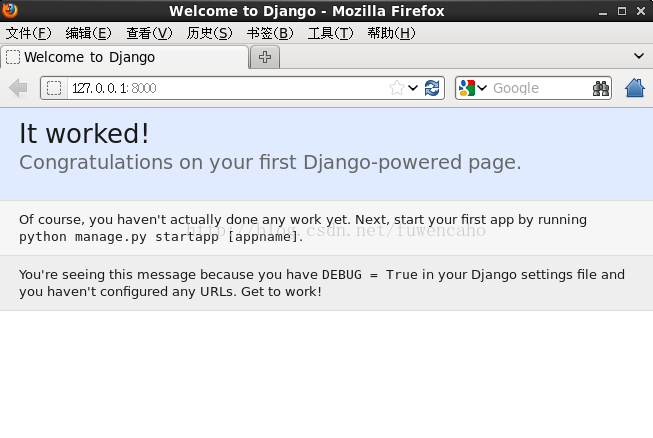
[root@centosTest mysitesec]# python manage.py runserver
Validating models...
0 errors found
November 04, 2014 - 20:51:46
Django version 1.6.2, using settings 'mysitesec.settings'
Starting development server at http://127.0.0.1:8000/
Quit the server with CONTROL-C.
四:创建blog应用
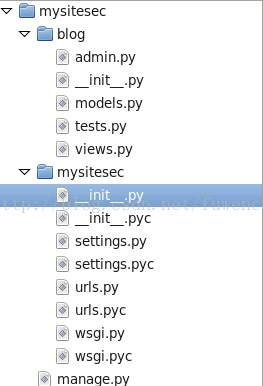
[root@centosTest mysitesec]# python manage.py startapp blog
[root@centosTest mysitesec]# ll
总用量 12
drwxr-xr-x. 2 root root 4096 11月  5 04:59 blog
-rw-r--r--. 1 root root  252 11月  5 04:23 manage.py
drwxr-xr-x. 2 root root 4096 11月  5 04:54 mysitesec
[root@centosTest mysitesec]# pwd
/data/download/django/mysitesec
[root@centosTest mysitesec]#
--待续
2014-11-06续:
五:创建model并同步数据库
现在我们打开blog目录下的models.py文件,这是我们定义blog数据结构的地方。
from django.db import models

# Create your models here.
class BlogsPost(models.Model):
    title = models.CharField(max_length = 150)
    body = models.TextField()
    timestamp = models.DateTimeField()
同步数据库却报错如下:
.......
.......
django.db.utils.OperationalError: near "��N": syntax error
解决不了之后在另一台机器上重复上述步骤成功
同步数据库
[root@localhost mysite16_2]# python manage.py syncdb
Creating tables ...
Creating table django_admin_log
Creating table auth_permission
Creating table auth_group_permissions
Creating table auth_group
Creating table auth_user_groups
Creating table auth_user_user_permissions
Creating table auth_user
Creating table django_content_type
Creating table django_session

You just installed Django's auth system, which means you don't have any superusers defined.
Would you like to create one now? (yes/no): yes
Username (leave blank to use 'root'): root
Email address: pianzif@126.com
Password:
Password (again):
Superuser created successfully.
Installing custom SQL ...
Installing indexes ...
Installed 0 object(s) from 0 fixture(s)
[root@localhost mysite16_2]#
六 :设置admin应用
vi settings.py
INSTALLED_APPS = (
    'django.contrib.admin',
    'django.contrib.auth',
    'django.contrib.contenttypes',
    'django.contrib.sessions',
    'django.contrib.messages',
    'django.contrib.staticfiles',
    'blog',
)
vi urls.py
[root@localhost mysite16_2]# more mysite16_2/urls.py
from django.conf.urls import patterns, include, url

from django.contrib import admin
admin.autodiscover()

urlpatterns = patterns('',
    # Examples:
    # url(r'^$', 'mysite16_2.views.home', name='home'),
    # url(r'^blog/', include('blog.urls')),

    url(r'^admin/', include(admin.site.urls)),
)
创建数据到后台
[root@localhost mysite16_2]# vi blog/models.py

from django.db import models
from django.contrib import admin

# Create your models here.
class BlogsPost(models.Model):
    title = models.CharField(max_length = 150)
    body = models.TextField()
    timestamp = models.DateTimeField()

admin.site.register(BlogsPost)[root@localhost mysite16_2]# python manage.py syncdb
Creating tables ...
Creating table blog_blogspost
Installing custom SQL ...
Installing indexes ...
Installed 0 object(s) from 0 fixture(s)
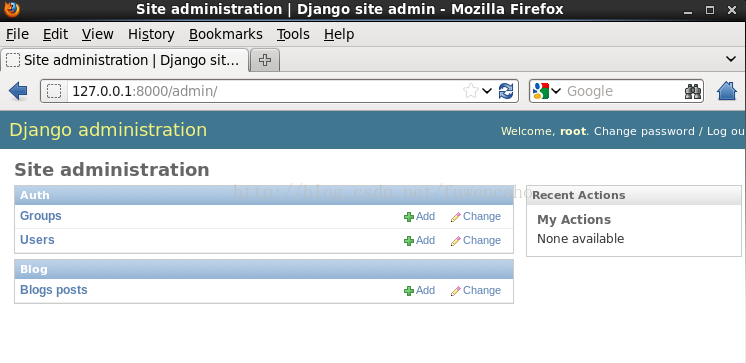
[root@localhost mysite16_2]# 启动服务登录admin
root 123456
python mange.py runserver
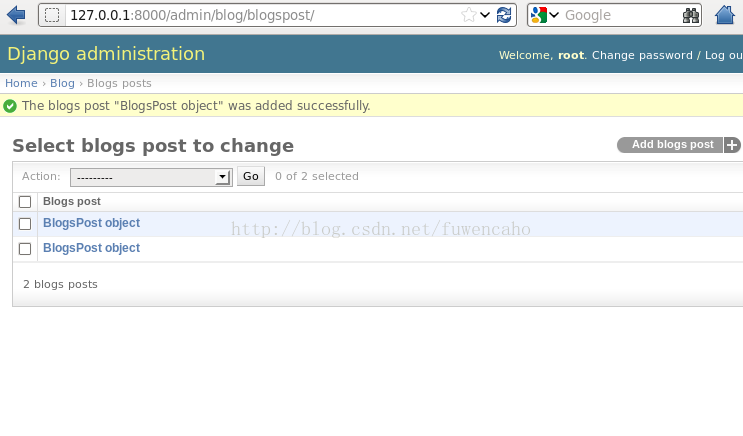
add一个博客
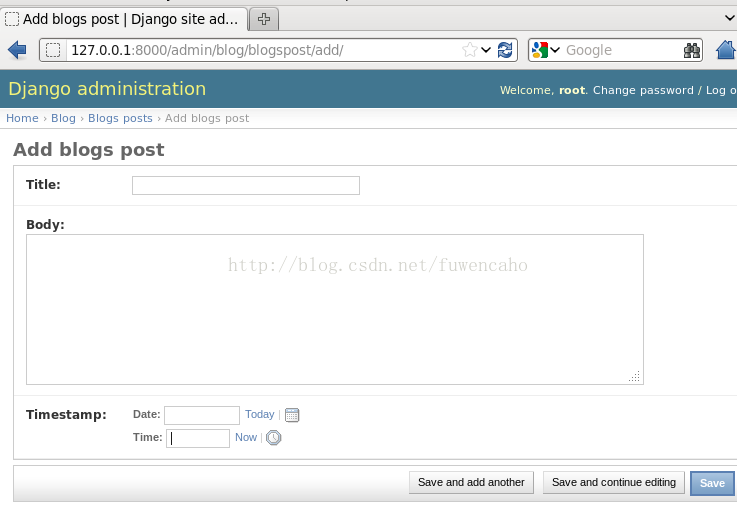
编辑让他显示正确的标题
[root@localhost mysite16_2]# vi blog/models.py

from django.db import models
from django.contrib import admin

# Create your models here.
class BlogsPost(models.Model):
    title = models.CharField(max_length = 150)
    body = models.TextField()
    timestamp = models.DateTimeField()

class BlogPostAdmin(admin.ModelAdmin):
    list_display = ('title','timestamp')

admin.site.register(BlogsPost,BlogPostAdmin)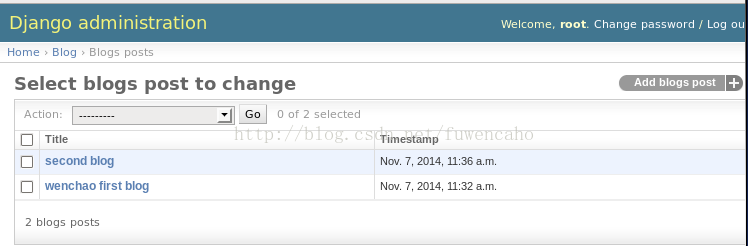
七:创建blog的公共部分
从Django的角度看,一个页面具有三个典型的组件:一个模板(template):模板负责把传递进来的信息显示出来。
一个视图(viw):视图负责从数据库获取需要显示的信息。
一个URL模式:它负责把收到的请求和你的试图函数匹配,有时候也会向视
图传递一些参数。
7.1:创建模版页面让他在前台显示
查看表
[root@localhost mysite16_2]# sqlite3 db.sqlite3
SQLite version 3.6.20
Enter ".help" for instructions
Enter SQL statements terminated with a ";"
sqlite> .tables
auth_group auth_user_user_permissions
auth_group_permissions blog_blogspost
auth_permission django_admin_log
auth_user django_content_type
auth_user_groups django_session
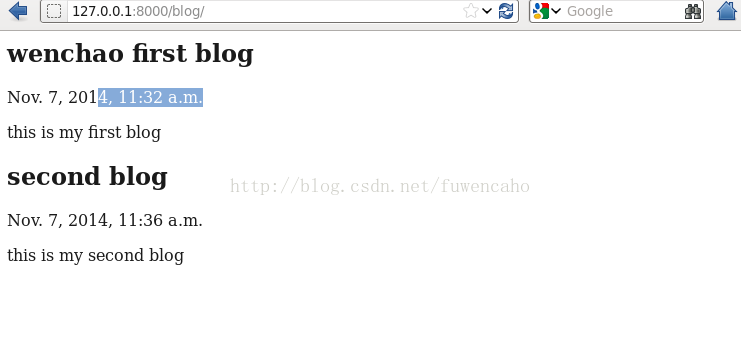
sqlite> select * from blog_blogspost;
1|wenchao first blog|this is my first blog|2014-11-07 11:32:34
2|second blog|this is my second blog|2014-11-07 11:36:01
sqlite> 常见模版目录及模版文件
[root@localhost blog]# cd templates/
[root@localhost templates]# ll
total 4
-rw-r--r--. 1 root root 114 Nov  7 11:50 archive.html
[root@localhost templates]# more archive.html
{% for post in posts %}
<h2>{{ post.title }}</h2>
<p>{{ post.timestamp }}</p>
<p>{{ post.body }}</p>
{% endfor %}
[root@localhost templates]# pwd
/root/Desktop/data/download/django/mysite16_2/blog/templates
[root@localhost templates]#
注册模版文件
在settings.py中增加
TEMPLATE_DIRS = (
'/root/Desktop/data/download/django/mysite16_2/blog/templates'
,
)
7.2:创建视图函数
[root@localhost mysite16_2]# cd ../blog/
[root@localhost blog]# more views.py
from django.shortcuts import render
from django.template import loader,Context
from django.http import HttpResponse
from blog.models import BlogsPost


# Create your views here.
def archive(request):
    posts = BlogsPost.objects.all()
    t = loader.get_template("archive.html")
    c = Context({'posts':posts})
    return HttpResponse(t.render(c))
[root@localhost blog]#   pwd
/root/Desktop/data/download/django/mysite16_2/blog
[root@localhost blog]#
posts = BlogPost.objects.all() :获取数据库里面所拥有BlogPost对象
t = loader.get_template("archive.html"):加载模板
c = Context({'posts':posts}):模板的渲染的数据是有一个字典类的对象Conte
xt提供,这里的是一对键值对。
7.3:创建url模式
增加blog的url
[root@localhost mysite16_2]# more urls.py
from django.conf.urls import patterns, include, url

from django.contrib import admin
admin.autodiscover()

urlpatterns = patterns('',
    # Examples:
    # url(r'^$', 'mysite16_2.views.home', name='home'),
    url(r'^blog/', include('blog.urls')),

    url(r'^admin/', include(admin.site.urls)),

)
[root@localhost mysite16_2]# pwd
/root/Desktop/data/download/django/mysite16_2/mysite16_2
[root@localhost mysite16_2]#
在blog应用中创建blog文件
[root@localhost blog]# more urls.py
from django.conf.urls import *
from blog.views import archive
urlpatterns = patterns('',
                       url(r'^$',archive),
                      )
[root@localhost blog]# pwd
/root/Desktop/data/download/django/mysite16_2/blog
[root@localhost blog]#
之所以在blog应用下面又创建urls.py文件,是为了降低耦合度。这样mysite/
urls.py文件针对的是每个项目的url。
八:启动服务看前台显示的效果
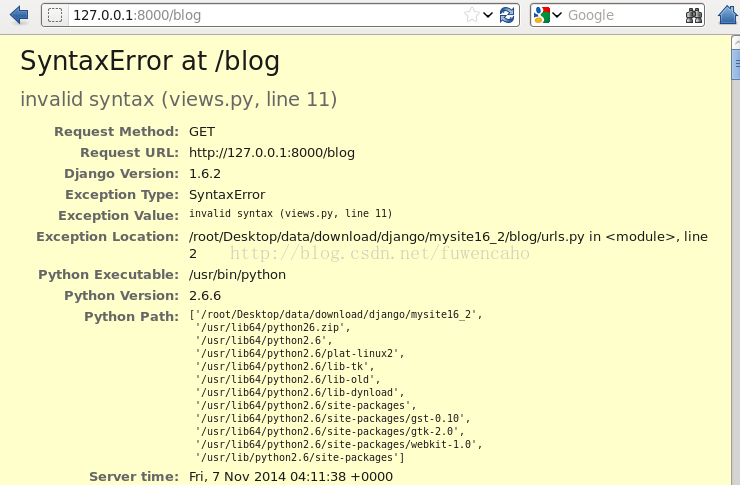
应该是python路径找不到的问题
我的解决方法如下
[root@localhost blog]# cd /usr/lib/python2.6/site-packages/
[root@localhost site-packages]# ll *pth
-rw-r--r--. 1 root root 30 Feb 23  2013 abrt.pth
-rw-r--r--. 1 root root 47 Nov  7 12:45 path.pth
[root@localhost site-packages]# more path.pth
/root/Desktop/data/download/django/mysite16_2/
[root@localhost site-packages]# echo $PYTHONPATH

[root@localhost site-packages]# python
Python 2.6.6 (r266:84292, Feb 22 2013, 00:00:18)
[GCC 4.4.7 20120313 (Red Hat 4.4.7-3)] on linux2
Type "help", "copyright", "credits" or "license" for more information.
>>> import sys
>>> sys.path
['', '/usr/lib64/python26.zip', '/usr/lib64/python2.6', '/usr/lib64/python2.6/plat-linux2', '/usr/lib64/python2.6/lib-tk', '/usr/lib64/python2.6/lib-old', '/usr/lib64/python2.6/lib-dynload', '/usr/lib64/python2.6/site-packages', '/usr/lib64/python2.6/site-packages/gst-0.10', '/usr/lib64/python2.6/site-packages/gtk-2.0', '/usr/lib64/python2.6/site-packages/webkit-1.0', '/usr/lib/python2.6/site-packages', '/root/Desktop/data/download/django/mysite16_2']
>>>
KeyboardInterrupt
>>>
[root@localhost site-packages]# pwd
/usr/lib/python2.6/site-packages
[root@localhost site-packages]#
九:样式修改
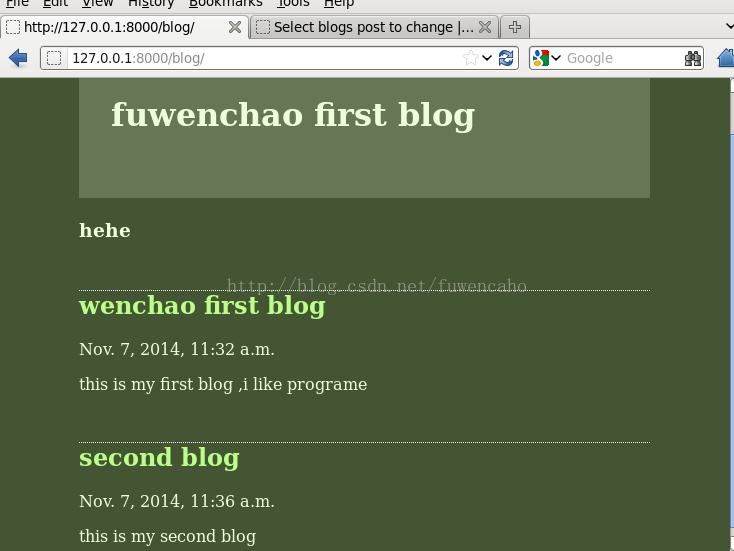
创建基础模版
[root@localhost templates]# more base.html
<html>
<style type="text/css">
body{color:#efd;background:#453;padding:0 5em;margin:0}
h1{padding:2em 1em;background:#675}
h2{color:#bf8;border-top:1px dotted #fff;margin-top:2em}
p{margin:1em 0}
</style>
<body>
<h1>fuwenchao first blog</h1>
<h3>hehe</h3>
{% block content %}
{% endblock %}
</body>
</html>
[root@localhost templates]#
修改模版引用基础模版
[root@localhost templates]# more archive.html
{% extends "base.html" %}
{% block content %}
{% for post in posts %}
<h2>{{ post.title }}</h2>
<p>{{ post.timestamp }}</p>
<p>{{ post.body }}</p>
{% endfor %}
{% endblock %}
[root@localhost templates]#
测试:


 213
213

 被折叠的 条评论
为什么被折叠?
被折叠的 条评论
为什么被折叠?
 到【灌水乐园】发言


