


HBase部署与使用
概述
HBase的角色
HMaster
功能:
- 监控RegionServer
- 处理RegionServer故障转移
- 处理元数据的变更
- 处理region的分配或移除
- 在空闲时间进行数据的负载均衡
- 通过Zookeeper发布自己的位置给客户端
RegionServer
功能:
- 负责存储HBase的实际数据
- 处理分配个他的Region
- 刷新缓存到HDFS
- 维护HLog
- 执行压缩
- 负责处理Region分片
组件:
- Write-Ahead logs
HBase 的修改记录,当对 HBase 读写数据的时候,数据不是直接写进磁盘,它会在内存中
保留一段时间(时间以及数据量阈值可以设定)。但把数据保存在内存中可能有更高的概率
引起数据丢失,为了解决这个问题,数据会先写在一个叫做 Write-Ahead logfile 的文件中,
然后再写入内存中。所以在系统出现故障的时候,数据可以通过这个日志文件重建。
- HFile
这是在磁盘上保存原始数据的实际的物理文件,是实际的存储文件。
- Store
HFile 存储在 Store 中,一个 Store 对应 HBase 表中的一个列族。
- MemStore
顾名思义,就是内存存储,位于内存中,用来保存当前的数据操作,所以当数据保存在 WAL
中之后,RegsionServer 会在内存中存储键值对
- Region
Hbase 表的分片,HBase 表会根据 RowKey 值被切分成不同的 region 存储在 RegionServer 中,
在一个 RegionServer 中可以有多个不同的 region。
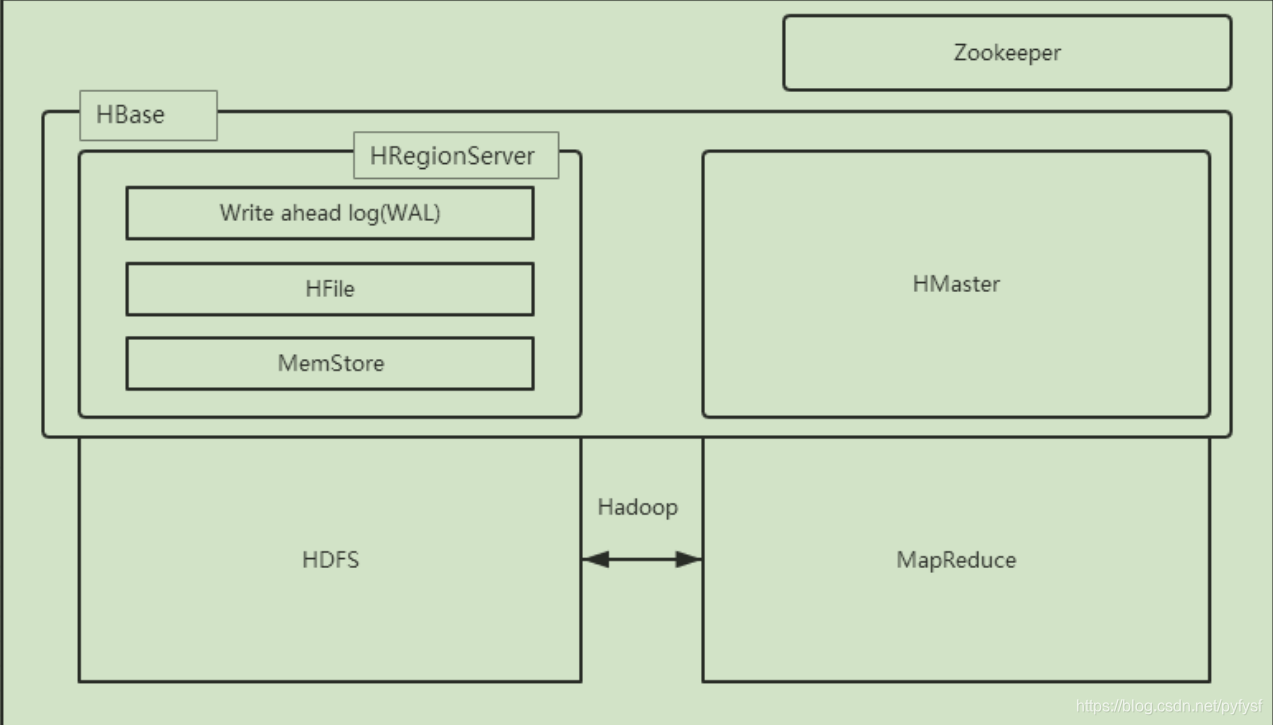
HBase的架构
HBase 一种是作为存储的分布式文件系统,另一种是作为数据处理模型的 MR 框架。因为日
常开发人员比较熟练的是结构化的数据进行处理,但是在 HDFS 直接存储的文件往往不具
有结构化,所以催生出了 HBase 在 HDFS 上的操作。如果需要查询数据,只需要通过键值
便可以成功访问。
架构图如下图所示:
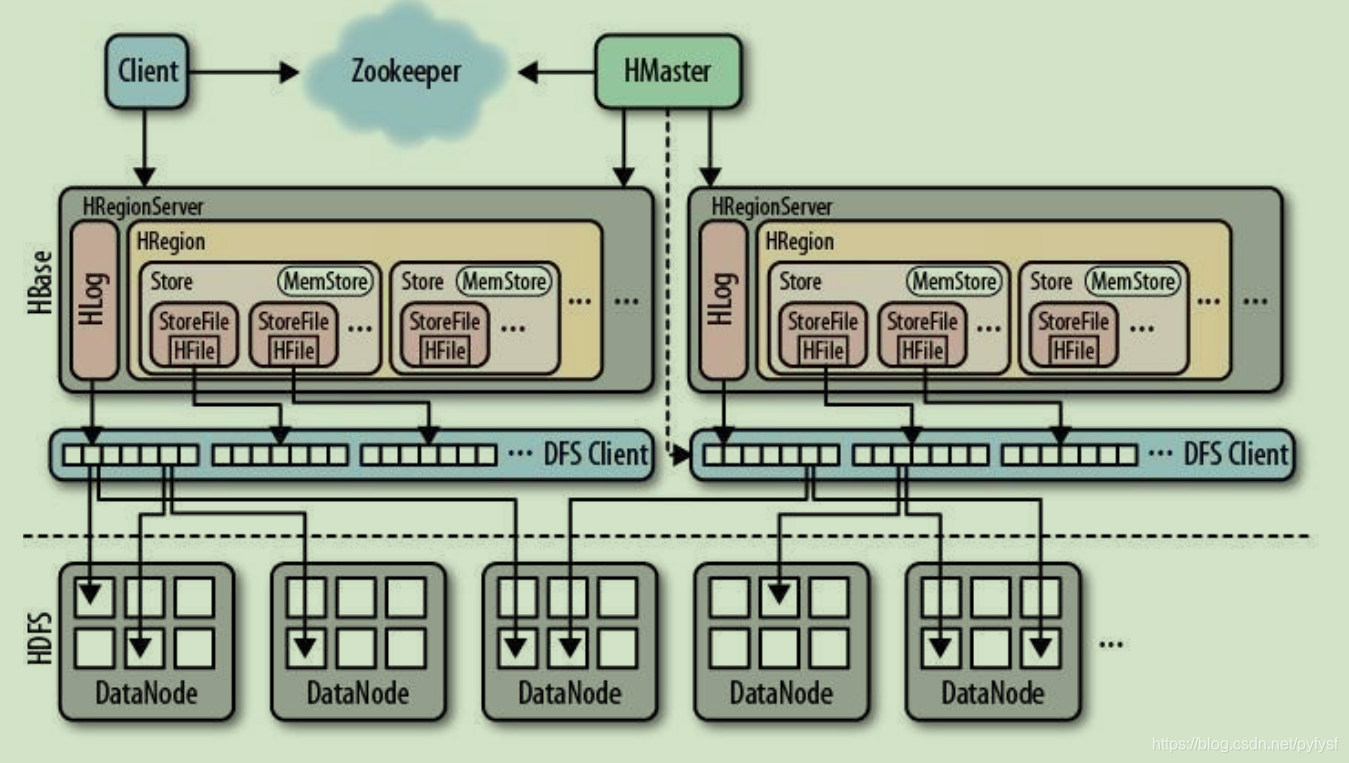
HBase 内置有 Zookeeper,但一般我们会有其他的 Zookeeper 集群来监管 master 和
regionserver,Zookeeper 通过选举,保证任何时候,集群中只有一个活跃的 HMaster,HMaster
与 HRegionServer 启动时会向 ZooKeeper 注册,存储所有 HRegion 的寻址入口,实时监控
HRegionserver 的上线和下线信息。并实时通知给 HMaster,存储 HBase 的 schema 和 table
元数据,默认情况下,HBase 管理 ZooKeeper 实例,Zookeeper 的引入使得 HMaster 不再是
单点故障。一般情况下会启动两个 HMaster,非 Active 的 HMaster 会定期的和 Active HMaster
通信以获取其最新状态,从而保证它是实时更新的,因而如果启动了多个 HMaster 反而增加
了 Active HMaster 的负担。
一个 RegionServer 可以包含多个 HRegion,每个 RegionServer 维护一个 HLog,和多个 HFiles
以及其对应的 MemStore。RegionServer 运行于 DataNode 上,数量可以与 DatNode 数量一致,
架构图:
HBase部署与使用
部署
前提:
zookeeper正常部署
hadoop正常部署
1.解压HBase程序包
2.修改配置文件
hbase-env.sh
export JAVA_HOME=/home/admin/modules/jdk1.8.0_121
export HBASE_MANAGES_ZK=false
hbase-site.xml
<configuration>
	<property>
		<name>hbase.rootdir</name>
		<value>hdfs://linux01:8020/hbase</value>
	</property>
	<property>
		<name>hbase.cluster.distributed</name>
		<value>true</value>
	</property>
	<!-- 0.98 后的新变动,之前版本没有.port,默认端口为 60000 -->
	<property>
		<name>hbase.master.port</name>
		<value>16000</value>
	</property>
	<property>
		<name>hbase.zookeeper.quorum</name>
		<value>linux01:2181,linux02:2181,linux03:2181</value>
	</property>
	<property>
		<name>hbase.zookeeper.property.dataDir</name>
		<value>/home/admin/modules/zookeeper-3.4.5/zkData</value>
	</property>
</configuration>
regionservers:
hadoop102
hadoop103
hadoop104
3.jar包问题
由于 HBase 需要依赖 Hadoop,所以替换 HBase 的 lib 目录下的 jar 包,以解决兼容问题:
3.1 删除原有的 jar
$ rm -rf /home/admin/modules/hbase-1.3.1/lib/hadoop-*
$ rm -rf /home/admin/modules/hbase-1.3.1/lib/zookeeper-3.4.6.jar
3.2 拷贝新 jar,涉及的 jar 有:
hadoop-annotations-2.7.2.jar
hadoop-auth-2.7.2.jar
hadoop-client-2.7.2.jar
hadoop-common-2.7.2.jar
hadoop-hdfs-2.7.2.jar
hadoop-mapreduce-client-app-2.7.2.jar
hadoop-mapreduce-client-common-2.7.2.jar
hadoop-mapreduce-client-core-2.7.2.jar
hadoop-mapreduce-client-hs-2.7.2.jar
hadoop-mapreduce-client-hs-plugins-2.7.2.jar
hadoop-mapreduce-client-jobclient-2.7.2.jar
hadoop-mapreduce-client-jobclient-2.7.2-tests.jar
hadoop-mapreduce-client-shuffle-2.7.2.jar
hadoop-yarn-api-2.7.2.jar
hadoop-yarn-applications-distributedshell-2.7.2.jar
hadoop-yarn-applications-unmanaged-am-launcher-2.7.2.jar
hadoop-yarn-client-2.7.2.jar
hadoop-yarn-common-2.7.2.jar
hadoop-yarn-server-applicationhistoryservice-2.7.2.jar
hadoop-yarn-server-common-2.7.2.jar
hadoop-yarn-server-nodemanager-2.7.2.jar
hadoop-yarn-server-resourcemanager-2.7.2.jar
hadoop-yarn-server-tests-2.7.2.jar
hadoop-yarn-server-web-proxy-2.7.2.jar
zookeeper-3.4.5.jar
这些 jar 包的对应版本应替换成你目前使用的 hadoop 版本,具体情况具体分析。
查找 jar 包举例:
$ find /home/admin/modules/hadoop-2.7.2/ -name hadoop-annotations*
4.HBase 软连接 Hadoop 配置
$ ln -s ~/modules/hadoop-2.7.2/etc/hadoop/core-site.xml
~/modules/hbase-1.3.1/conf/core-site.xml
$ ln -s ~/modules/hadoop-2.7.2/etc/hadoop/hdfs-site.xml
~/modules/hbase-1.3.1/conf/hdfs-site.xml
5.HBase 服务的启动
5.1 启动方式 1
$ bin/hbase-daemon.sh start master
$ bin/hbase-daemon.sh start regionserver
如果集群之间的节点时间不同步,会导致 regionserver 无法启动,抛出ClockOutOfSyncException 异常
5.1 启动方式 2
$ bin/start-hbase.sh
对应的停止服务:
$ bin/stop-hbase.sh
如 果 使 用 的 是 JDK8 以 上 版 本 , 则 应 在 hbase-evn.sh 中 移 除
“HBASE_MASTER_OPTS”和“HBASE_REGIONSERVER_OPTS”配置
6.查看HBASE页面
http://hadoop102:16010
简单使用
1.基本操作
(1)进入HBase客户端命令行
$ bin/hbase shell
(2)查看帮助命令
hbase(main)> help
(3)查看当前数据库中有哪些表
hbase(main)> list
2.表的操作
(1)创建表
create 'student','info'
(2)插入数据到表
hbase(main) > put 'student','1001','info:name','Thomas'
hbase(main) > put 'student','1001','info:sex','male'
hbase(main) > put 'student','1001','info:age','18'
hbase(main) > put 'student','1002','info:name','Janna'
hbase(main) > put 'student','1002','info:sex','female'
hbase(main) > put 'student','1002','info:age','20'
(3)扫描查看数据
hbase(main) > scan 'student'
hbase(main) > scan 'student',{STARTROW => '1001', STOPROW => '1001'}
hbase(main) > scan 'student',{STARTROW => '1001'}
(4)查看表结构
hbase(main):012:0> describe ‘student’
(5)更新指定字段数据
hbase(main) > put 'student','1001','info:name','Nick'
hbase(main) > put 'student','1001','info:age','100'
(6)查看“指定行”或“指定列族:列”的数据
hbase(main) > get 'student','1001'
hbase(main) > get 'student','1001','info:name'
(7)删除数据
删除某 某 rowkey 的 的 全部 数据
hbase(main) > deleteall 'student','1001'

删除某 rowkey  的某一列 数据
hbase(main) > delete 'student','1002','info:sex'
(8)清空表数据
hbase(main) > truncate 'student'
清空表的操作顺序为先 disable,然后再 truncating。
(9)删除表
hbase(main) > disable 'student'
hbase(main) > drop 'student'
(10)统计数据行数
hbase(main) > count 'student'
(11)变更表信息
将 info 列族中的数据存放 3 个版本
hbase(main) > alter 'student',{NAME=>'info',VERSIONS=>3}
读写流程
HBase读数据流程
1) HRegionServer 保存着 meta 表以及表数据,要访问表数据,首先 Client 先去访问
zookeeper,从 zookeeper 里面获取 meta 表所在的位置信息,即找到这个 meta 表在哪个
HRegionServer 上保存着。
2) 接着 Client 通过刚才获取到的 HRegionServer 的 IP 来访问 Meta 表所在的HRegionServer,从而读取到 Meta,进而获取到 Meta 表中存放的元数据。
3) Client 通过元数据中存储的信息,访问对应的 HRegionServer,然后扫描所在
HRegionServer 的 Memstore 和 Storefile 来查询数据。
4) 最后 HRegionServer 把查询到的数据响应给 Client。
HBase写数据流程
1) Client 也是先访问 zookeeper,找到 Meta 表,并获取 Meta 表信息。
2) 确定当前将要写入的数据所对应的 RegionServer 服务器和 Region。
3) Client 向该 RegionServer 服务器发起写入数据请求,然后 RegionServer 收到请求并响应。
4) Client 先把数据写入到 HLog,以防止数据丢失。
5) 然后将数据写入到 Memstore。
6) 如果 Hlog 和 Memstore 均写入成功,则这条数据写入成功。在此过程中,如果 Memstore达到阈值,
会把 Memstore 中的数据 flush 到 StoreFile 中。
7) 当 Storefile 越来越多,会触发 Compact 合并操作,把过多的 Storefile 合并成一个大的Storefile。
当 Storefile 越来越大,Region 也会越来越大,达到阈值后,会触发 Split 操作,将 Region 一分为二。

尖叫提示:因为内存空间是有限的,所以说溢写过程必定伴随着大量的小文件产生。
JAVAAPI
- 新建Maven工程
pom.xml
    <dependencies>
        <!-- https://mvnrepository.com/artifact/org.apache.hbase/hbase-client -->
        <dependency>
            <groupId>org.apache.hbase</groupId>
            <artifactId>hbase-client</artifactId>
            <version>1.3.1</version>
        </dependency>

        <!-- https://mvnrepository.com/artifact/org.apache.hbase/hbase-server -->
        <dependency>
            <groupId>org.apache.hbase</groupId>
            <artifactId>hbase-server</artifactId>
            <version>1.3.1</version>
        </dependency>
- 编写HBaseAPI
package top.wintp.hbasetest;

import org.apache.hadoop.conf.Configuration;
import org.apache.hadoop.hbase.Cell;
import org.apache.hadoop.hbase.CellUtil;
import org.apache.hadoop.hbase.HBaseConfiguration;
import org.apache.hadoop.hbase.HColumnDescriptor;
import org.apache.hadoop.hbase.HTableDescriptor;
import org.apache.hadoop.hbase.TableName;
import org.apache.hadoop.hbase.client.Admin;
import org.apache.hadoop.hbase.client.Connection;
import org.apache.hadoop.hbase.client.ConnectionFactory;
import org.apache.hadoop.hbase.client.Delete;
import org.apache.hadoop.hbase.client.Get;
import org.apache.hadoop.hbase.client.Put;
import org.apache.hadoop.hbase.client.Result;
import org.apache.hadoop.hbase.client.ResultScanner;
import org.apache.hadoop.hbase.client.Scan;
import org.apache.hadoop.hbase.client.Table;
import org.apache.hadoop.hbase.util.Bytes;
import org.junit.Test;
import org.slf4j.Logger;
import org.slf4j.LoggerFactory;

import java.io.IOException;

import javafx.scene.control.Tab;

/**
 * @description: description:
 * <p>
 * @author: upuptop
 * <p>
 * @qq: 337081267
 * <p>
 * @CSDN: http://blog.csdn.net/pyfysf
 * <p>
 * @cnblogs: http://www.cnblogs.com/upuptop
 * <p>
 * @blog: http://wintp.top
 * <p>
 * @email: pyfysf@163.com
 * <p>
 * @time: 2019/04/2019/4/23
 * <p>
 */
public class HBaseDemo {
    private static Logger logger = LoggerFactory.getLogger(HBaseDemo.class);

    private static Configuration sConf;

    static {
        //    加载配置
        sConf = HBaseConfiguration.create();
    }


    @Test
    public void testAllFun() throws Exception {
        //    判断表是否存在
        //System.out.println(tableExists("ns_ct:calllog"));
        //创建表
        //createTable("upuptop2", "info");
        //删除表
        dropTable("ns_ct:calllog");

        dropNamespace("ns_ct");

        //    插入数据
        //insertData("upuptop", "1004", "info", "name", "upuptop");
        //insertData("upuptop", "1003", "info", "name", "pyfysf");
        //insertData("upuptop", "1002", "info", "name", "wintp.top");
        //insertData("upuptop", "1001", "info", "name", "sfok.top");

        //    删除数据
        //deleteData("upuptop","1004");

        //    查询所有数据
        //getAllRow("ns_ct:calllog");

        //    查询单条数据
        //getRow("upuptop", "1001");
    }

    /**
     * 获取一行数据
     *
     * @param tableName 表名
     * @param rowKey
     * @throws IOException
     */
    private void getRow(String tableName, String rowKey) throws IOException {
        Connection connection = ConnectionFactory.createConnection(sConf);
        Table table = connection.getTable(TableName.valueOf(tableName));
        Get get = new Get(Bytes.toBytes(rowKey));
        Result result = table.get(get);
        Cell[] cells = result.rawCells();

        for (Cell cell : cells) {
            byte[] rowArray = CellUtil.cloneRow(cell);
            logger.info("HBaseDemo  getAllRow()   rowArray   " + Bytes.toString(rowArray));

            byte[] familyArray = CellUtil.cloneFamily(cell);
            logger.info("HBaseDemo  getAllRow()   familyStr   " + Bytes.toString(familyArray));

            byte[] valueArray = CellUtil.cloneValue(cell);
            logger.info("HBaseDemo  getAllRow()   valueArray   " + Bytes.toString(valueArray));

        }
        table.close();
        connection.close();
    }

    /**
     * 获取所有的数据
     *
     * @param tableName 表名
     */
    private void getAllRow(String tableName) throws IOException {
        //    获取连接
        Connection connection = ConnectionFactory.createConnection(sConf);
        Table table = connection.getTable(TableName.valueOf(tableName));
        Scan scan = new Scan();
        //可以在这里给scan加过滤条件 类似于addQuery() addWhere()
        ResultScanner scanner = table.getScanner(scan);

        for (Result result : scanner) {
            Cell[] cells = result.rawCells();

            for (Cell cell : cells) {
                byte[] rowArray = CellUtil.cloneRow(cell);
                logger.info("HBaseDemo  getAllRow()   rowArray   " + Bytes.toString(rowArray));

                byte[] familyArray = CellUtil.cloneFamily(cell);
                logger.info("HBaseDemo  getAllRow()   familyStr   " + Bytes.toString(familyArray));

                byte[] valueArray = CellUtil.cloneValue(cell);
                logger.info("HBaseDemo  getAllRow()   valueArray   " + Bytes.toString(valueArray));

            }
        }

        table.close();
        connection.close();

    }

    /**
     * 删除数据
     *
     * @param tableName 表名
     * @param rowKey    rowkey
     * @throws IOException
     */
    private void deleteData(String tableName, String rowKey) throws IOException {
        Connection connection = ConnectionFactory.createConnection(sConf);
        Table table = connection.getTable(TableName.valueOf(tableName));
        Delete delete = new Delete(Bytes.toBytes(rowKey));
        table.delete(delete);
        table.close();
        connection.close();
    }

    /**
     * 插入数据
     *
     * @param tableName 表名
     * @param rowKey    行
     * @param family    列族
     * @param qualifier 具体的列名称
     * @param value     值
     * @throws IOException
     */
    private void insertData(String tableName, String rowKey, String family, String qualifier, String value) throws IOException {
        //    所有表的操作均为table对象
        Connection connection = ConnectionFactory.createConnection(sConf);
        //获取table对象
        Table table = connection.getTable(TableName.valueOf(tableName));
        //创建put对象 只要是添加一行的操作都是用put进行的
        Put put = new Put(Bytes.toBytes(rowKey));

        //列族 列名 值
        put.addColumn(Bytes.toBytes(family), Bytes.toBytes(qualifier), Bytes.toBytes(value));

        table.put(put);


        table.close();
        connection.close();
    }

    /**
     * 删除表
     *
     * @param tableName 表名称
     */
    private void dropTable(String tableName) throws IOException {
        //    获取连接
        Connection connection = ConnectionFactory.createConnection(sConf);
        Admin admin = connection.getAdmin();

        if (!tableExists(tableName)) {
            //    表不存在
            logger.info("HBaseDemo  dropTable()   数据表【{}】不存在   ", tableName);
            return;
        }

        //判断表是否禁用了
        if (!admin.isTableDisabled(TableName.valueOf(tableName))) {
            //   未禁用
            admin.disableTable(TableName.valueOf(tableName));
        }

        //删除表 必须要将表进行禁用 TableNotDisabledException
        admin.deleteTable(TableName.valueOf(tableName));

        admin.close();
        connection.close();
    }

    /**
     * 删除命名空间
     *
     * @param spaceName
     * @throws IOException
     */
    private void dropNamespace(String spaceName) throws IOException {
        //    获取连接
        Connection connection = ConnectionFactory.createConnection(sConf);
        Admin admin = connection.getAdmin();

        admin.deleteNamespace(spaceName);

        admin.close();
        connection.close();
    }


    /**
     * 创建表
     *
     * @param tableName  表名
     * @param familyName 列族名  可以有多个
     * @throws IOException
     */
    public void createTable(String tableName, String... familyName) throws IOException {
        //通过工厂类获取到连接对象
        Connection connection = ConnectionFactory.createConnection(sConf);
        //通过连接对象获取到操作表的admin对象
        Admin admin = connection.getAdmin();
        //创建表的描述对象
        HTableDescriptor hTableDescriptor = new HTableDescriptor(TableName.valueOf(tableName));

        for (String cf : familyName) {
            //创建列族对象
            HColumnDescriptor family = new HColumnDescriptor(cf);
            //为表的描述对象添加列族对象
            hTableDescriptor.addFamily(family);
        }

        //判断表是否存在
        if (tableExists(tableName)) {
            //    存在即不创建
            logger.info("HBaseDemo  createTable()   数据表已存在   ");
            return;
        }
        //创建表
        admin.createTable(hTableDescriptor);
        logger.info("HBaseDemo  createTable()   创建表【{}】成功   ", tableName);

        admin.close();
        connection.close();
    }


    /**
     * 判断表是否存在
     *
     * @param tableName
     */
    public boolean tableExists(String tableName) throws IOException {
        //获得连接
        Connection connection = ConnectionFactory.createConnection(sConf);
        //获取操作表的admin对象
        Admin admin = connection.getAdmin();
        //判断表是否存在
        boolean result = admin.tableExists(TableName.valueOf(tableName));


        admin.close();
        connection.close();

        return result;
    }


}

MapReduce
通过 HBase 的相关 JavaAPI,我们可以实现伴随 HBase 操作的 MapReduce 过程,比如使用
MapReduce 将数据从本地文件系统导入到 HBase 的表中,比如我们从 HBase 中读取一些原
始数据后使用 MapReduce 做数据分析。
官方的HBASE-MapReduce执行
$ bin/hbase mapredcp
- 执行环境变量的导入
$ export HBASE_HOME=/home/admin/modules/hbase-1.3.1
$ export HADOOP_HOME=/home/admin/modules/hadoop-2.7.2
$ export HADOOP_CLASSPATH=`${HBASE_HOME}/bin/hbase mapredcp`
- 运行官方的 MapReduce 任务
– 案例一:统计 Student
$ ~/modules/hadoop-2.7.2/bin/yarn jar lib/hbase-server-1.3.1.jar rowcounter student
– 案例二:用 使用 MapReduce 将本地数据导入到 HBase
(1) 在本地创建一个 tsv 格式的文件:fruit.tsv
1001  Apple  Red
1002  Pear Yellow
1003  Pineapple Yellow
(2) 创建 HBase 表
hbase(main):001:0> create 'fruit','info'
(3) 在 在 HDFS 中创建 input_fruit 文件夹并上传 fruit.tsv 文件
$ ~/modules/hadoop-2.7.2/bin/hdfs dfs -mkdir /input_fruit/
$ ~/modules/hadoop-2.7.2/bin/hdfs dfs -put fruit.tsv /input_fruit/
(4) 执行 MapReduce 到 到 HBase 的 的 fruit
$ ~/modules/hadoop-2.7.2/bin/yarn jar lib/hbase-server-1.3.1.jar importtsv \
-Dimporttsv.columns=HBASE_ROW_KEY,info:name,info:color fruit \
hdfs://linux01:8020/input_fruit
(5)使用 scan 命令查看导入后的结果
hbase(main):001:0> scan ‘fruit’
自定义 HBase-MapReduce1
目标:将 fruit 表中的一部分数据,通过 MR 迁入到 fruit_mr 表中
- 构建 ReadFruitMapper 类,用于读取 fruit 表中的数据
public class ReadFruitMapper extends TableMapper<ImmutableBytesWritable, Put> {
    @Override
    protected void map(ImmutableBytesWritable key, Result value, Context context)
            throws IOException, InterruptedException {
//将 fruit 的 name 和 color 提取出来,相当于将每一行数据读取出来放入到 Put 对象中。
        Put put = new Put(key.get());
//遍历添加 column 行
        for (Cell cell : value.rawCells()) {
//添加/克隆列族:info
            if ("info".equals(Bytes.toString(CellUtil.cloneFamily(cell)))) {
//添加/克隆列:name
                if ("name".equals(Bytes.toString(CellUtil.cloneQualifier(cell)))) {
//将该列 cell 加入到 put 对象中
                    put.add(cell);
//添加/克隆列:color
                } else if ("color".equals(Bytes.toString(CellUtil.cloneQualifier(cell)))) {
//向该列 cell 加入到 put 对象中
                    put.add(cell);
                }
            }
        }//将从 fruit 读取到的每行数据写入到 context 中作为 map 的输出
        context.write(key, put);
    }
}
- 构建 WriteFruitMRReducer 类,用于将读取到的 fruit 表中的数据写入到 fruit_mr 表中
public class WriteFruitMRReducer extends TableReducer<ImmutableBytesWritable, Put, NullWritable> {
    @Override
    protected void reduce(ImmutableBytesWritable key, Iterable<Put> values, Context context)
            throws IOException, InterruptedException {
//读出来的每一行数据写入到 fruit_mr 表中
        for (Put put : values) {
            context.write(NullWritable.get(), put);
        }
    }
}
- 构建 Fruit2FruitMRRunner extends Configured implements Tool 用于组装运行 Job 任务
//组装 Job
    public int run(String[] args) throws Exception {
        //得到 Configuration
        Configuration conf = this.getConf();
        //创建 Job 任务
        Job job = Job.getInstance(conf, this.getClass().getSimpleName());
        job.setJarByClass(Fruit2FruitMRRunner.class);
        //配置 Job
        Scan scan = new Scan();
        scan.setCacheBlocks(false);
        scan.setCaching(500);
        //设置 Mapper,注意导入的是 mapreduce 包下的,不是 mapred 包下的,后者是老 版本
        TableMapReduceUtil.initTableMapperJob(
                "fruit", //数据源的表名
                scan, //scan 扫描控制器
                ReadFruitMapper.class,//设置 Mapper 类
                ImmutableBytesWritable.class,//设置 Mapper 输出 key 类型
                Put.class,//设置 Mapper 输出 value 值类型
                job//设置给哪个 JOB
        );
        //设置 Reducer
        TableMapReduceUtil.initTableReducerJob("fruit_mr", WriteFruitMRReducer.class,
                job);
        //设置 Reduce 数量,最少 1 个
        job.setNumReduceTasks(1);
        boolean isSuccess = job.waitForCompletion(true);
        if (!isSuccess) {
            throw new IOException("Job running with error");
        }
        return isSuccess ? 0 : 1;
    }

	public static void main( String[] args ) throws Exception{
		Configuration conf = HBaseConfiguration.create();
		int status = ToolRunner.run(conf, new Fruit2FruitMRRunner(), args);
		System.exit(status);
	}
- 打包运行
$ ~/modules/hadoop-2.7.2/bin/yarn jar ~/softwares/jars/hbase-0.0.1-SNAPSHOT.jar
com.z.hbase.mr1.Fruit2FruitMRRunner
自定义 HBase-MapReduce2
目标:实现将 HDFS 中的数据写入到 HBase 表中
- 构建 ReadFruitFromHDFSMapper 于读取 HDFS 中的文件数据
public class ReadFruitFromHDFSMapper extends Mapper<LongWritable, Text,
        ImmutableBytesWritable, Put> {
    @Override
    protected void map(LongWritable key, Text value, Context context) throws IOException,
            InterruptedException {
//从 HDFS 中读取的数据
        String lineValue = value.toString();
//读取出来的每行数据使用\t 进行分割,存于 String 数组
        String[] values = lineValue.split("\t");
//根据数据中值的含义取值
        String rowKey = values[0];
        String name = values[1];
        String color = values[2];
//初始化 rowKey
        ImmutableBytesWritable rowKeyWritable = new
                ImmutableBytesWritable(Bytes.toBytes(rowKey));
//初始化 put 对象
        Put put = new Put(Bytes.toBytes(rowKey));
//参数分别:列族、列、值
        put.add(Bytes.toBytes("info"), Bytes.toBytes("name"), Bytes.toBytes(name));
        put.add(Bytes.toBytes("info"), Bytes.toBytes("color"), Bytes.toBytes(color));
        context.write(rowKeyWritable, put);
    }
}
- 构建 WriteFruitMRFromTxtReducer
public class WriteFruitMRFromTxtReducer extends TableReducer<ImmutableBytesWritable, Put,
        NullWritable> {
    @Override
    protected void reduce(ImmutableBytesWritable key, Iterable<Put> values, Context context)
            throws IOException, InterruptedException {
//读出来的每一行数据写入到 fruit_hdfs 表中
        for(Put put: values){
            context.write(NullWritable.get(), put);
        }
    }
}
- 创建 Txt2FruitRunner 组装 Job
 public int run(String[] args) throws Exception {
//得到 Configuration
        Configuration conf = this.getConf();
//创建 Job 任务
        Job job = Job.getInstance(conf, this.getClass().getSimpleName());
        job.setJarByClass(Txt2FruitRunner.class);
        Path inPath = new Path("hdfs://linux01:8020/input_fruit/fruit.tsv");
        FileInputFormat.addInputPath(job, inPath);
//设置 Mapper
        job.setMapperClass(ReadFruitFromHDFSMapper.class);
        job.setMapOutputKeyClass(ImmutableBytesWritable.class);
        job.setMapOutputValueClass(Put.class);
//设置 Reducer
        TableMapReduceUtil.initTableReducerJob("fruit_mr", WriteFruitMRFromTxtReducer.class, job);
//设置 Reduce 数量,最少 1 个
        job.setNumReduceTasks(1);
        boolean isSuccess = job.waitForCompletion(true);
        if(!isSuccess){
            throw new IOException("Job running with error");
        }
        return isSuccess ? 0 : 1;
    }
与hive的集成
环境准备
因为我们后续可能会在操作 Hive 的同时对 HBase 也会产生影响,所以 Hive 需要持有操作
HBase 的 Jar,那么接下来拷贝 Hive 所依赖的 Jar 包(或者使用软连接的形式)
$ export HBASE_HOME=/home/admin/modules/hbase-1.3.1
$ export HIVE_HOME=/home/admin/modules/apache-hive-1.2.2-bin
$ ln -s $HBASE_HOME/lib/hbase-common-1.3.1.jar
$HIVE_HOME/lib/hbase-common-1.3.1.jar
$ ln -s $HBASE_HOME/lib/hbase-server-1.3.1.jar $HIVE_HOME/lib/hbase-server-1.3.1.jar
$ ln -s $HBASE_HOME/lib/hbase-client-1.3.1.jar $HIVE_HOME/lib/hbase-client-1.3.1.jar
$ ln -s $HBASE_HOME/lib/hbase-protocol-1.3.1.jar $HIVE_HOME/lib/hbase-protocol-1.3.1.jar
$ ln -s $HBASE_HOME/lib/hbase-it-1.3.1.jar $HIVE_HOME/lib/hbase-it-1.3.1.jar
$ ln -s $HBASE_HOME/lib/htrace-core-3.1.0-incubating.jar
$HIVE_HOME/lib/htrace-core-3.1.0-incubating.jar
$ ln -s $HBASE_HOME/lib/hbase-hadoop2-compat-1.3.1.jar
$HIVE_HOME/lib/hbase-hadoop2-compat-1.3.1.jar
$ ln -s $HBASE_HOME/lib/hbase-hadoop-compat-1.3.1.jar
$HIVE_HOME/lib/hbase-hadoop-compat-1.3.1.jar
同时在 hive-site.xml 中修改 zookeeper 的属性,如下:
<property>
	<name>hive.zookeeper.quorum</name>
	<value>linux01,linux02,linux03</value>
	<description>The list of ZooKeeper servers to talk to. This is only needed for read/write
	locks.</description>
</property>
<property>
	<name>hive.zookeeper.client.port</name>
	<value>2181</value>
	<description>The port of ZooKeeper servers to talk to. This is only needed for read/write
	locks.</description>
</property>
- 案例一 一
目标:建立 Hive 表,关联 HBase 表,插入数据到 Hive 表的同时能够影响 HBase 表。
分步实现:
(1) 在 在 Hive 中创建表同时关联 HBase
CREATE TABLE hive_hbase_emp_table(
empno int,
ename string,
job string,
mgr int,
hiredate string,
sal double,
comm double,
deptno int)STORED BY 'org.apache.hadoop.hive.hbase.HBaseStorageHandler'
WITH SERDEPROPERTIES ("hbase.columns.mapping" =
":key,info:ename,info:job,info:mgr,info:hiredate,info:sal,info:comm,info:deptno")
TBLPROPERTIES ("hbase.table.name" = "hbase_emp_table");

完成之后,可以分别进入 Hive 和 HBase 查看,都生成了对应的表
(2) 在 在 Hive 中创建临时中间表,用于 load 文件中的数据
不能将数据直接 load 进 Hive 所关联 HBase 的那张表中
CREATE TABLE emp(
empno int,
ename string,
job string,
mgr int,
hiredate string,
sal double,
comm double,
deptno int)
row format delimited fields terminated by '\t';
(3) 向 向 Hive 中间表中 load 数据
hive> load data local inpath '/home/admin/softwares/data/emp.txt' into table emp;
(4) 通过 insert 命令将中间表中的数据导入到 Hive 关联 HBase
hive> insert into table hive_hbase_emp_table select * from emp;
(5) 查看 Hive 以及关联的 HBase
Hive
hive> select * from hive_hbase_emp_table;
HBase :
hbase> scan ‘hbase_emp_table’
- 案例二
目标:在 HBase 中已经存储了某一张表 hbase_emp_table,然后在 Hive 中创建一个外部表来
关联 HBase 中的 hbase_emp_table 这张表,使之可以借助 Hive 来分析 HBase 这张表中的数
据。
注:该案例 2 紧跟案例 1 的脚步,所以完成此案例前,请先完成案例 1。
(1) 在 在 Hive 中创建外部表
CREATE EXTERNAL TABLE relevance_hbase_emp(
empno int,
ename string,
job string,
mgr int,
hiredate string,
sal double,
comm double,
deptno int)
STORED BY
'org.apache.hadoop.hive.hbase.HBaseStorageHandler'
WITH SERDEPROPERTIES ("hbase.columns.mapping" =
":key,info:ename,info:job,info:mgr,info:hiredate,info:sal,info:comm,info:deptno")
TBLPROPERTIES ("hbase.table.name" = "hbase_emp_table");
关联后就可以使用 Hive 函数进行一些分析操作了
hive (default)> select * from relevance_hbase_emp;
与sqoop的集成
相关参数
| 参数 | 描述 |
|---|---|
| –column-family <family> | Sets the target column family for the import设置导入的目标列族。 |
| –hbase-create-table | If specified, create missing HBase tables是否自动创建不存在的 HBase 表(这就意味着,不需要手动提前在 HBase 中先建立表) |
| –hbase-row-key <col> | Specifies which input column to use as the rowkey.In case, if input table contains compositekey, then <col> must be in the form of a comma-separated list of composite key attributes. mysql 中哪一列的值作为 HBase 的 rowkey, 如果rowkey是个组合键,则以逗号分隔。 (注:避免 rowkey 的重复) |
| –hbase-table <table-name> | Specifies an HBase table to use as the targetinstead of HDFS.指定数据将要导入到 HBase 中的哪张表中。 |
| –hbase-bulkload | Enables bulk loading.是否允许 bulk 形式的导入。 |
将 RDBMS 中的数据抽取到 HBase 中
(1) 配置 sqoop-env.sh
export HBASE_HOME=/home/admin/modules/hbase-1.3.1
(2) 在 在 Mysql 中新建一个数据库 db_library ,一张表 book
CREATE DATABASE db_library;
CREATE TABLE db_library.book(
id int(4) PRIMARY KEY NOT NULL AUTO_INCREMENT,
name VARCHAR(255) NOT NULL,
price VARCHAR(255) NOT NULL);
(3) 插入数据
INSERT INTO db_library.book (name, price) VALUES('Lie Sporting', '30');
INSERT INTO db_library.book (name, price) VALUES('Pride & Prejudice', '70');
INSERT INTO db_library.book (name, price) VALUES('Fall of Giants', '50');
(4) 执行 Sqoop
$ bin/sqoop import \
--connect jdbc:mysql://linux01:3306/db_library \
--username root \
--password 123456 \
--table book \
--columns "id,name,price" \
--column-family "info" \
--hbase-create-table \
--hbase-row-key "id" \
--hbase-table "hbase_book" \
--num-mappers 1 \
--split-by id
sqoop1.4.6 只支持 HBase1.0.1 之前的版本的自动创建 HBase 表的功能
(5)创建HBASE表
hbase> create 'hbase_book','info'
(5) 在 在 HBase 中 中 scan
hbase> scan ‘hbase_book’
常用的shell操作
- satus 显示服务器状态
hbase> status ‘linux01’
- whoami 显示 HBase 当前用户
hbase> whoami
- list 显示当前所有的表
hbase> list
- count统计指定表的记录数
hbase> count 'hbase_book'
- describe 展示表结构信息
hbase> describe 'hbase_book'
- exist 检查表是否存在,适用于表量特别多的情况
hbase> exist 'hbase_book'
- is_enabled/is_disabled 检查表是否启用或禁用
    hbase> is_enabled 'hbase_book'
    hbase> is_disabled 'hbase_book'
- alter 该命令可以改变表和列族的模式
    为当前表增加列族:
    hbase> alter 'hbase_book', NAME => 'CF2', VERSIONS => 2
    为当前表删除列族:
    hbase> alter 'hbase_book', 'delete' => ’CF2’
- disable 禁用一张表
hbase> disable 'hbase_book'
- drop 删除一张表,记得在删除表之前必须先禁用
hbase> drop 'hbase_book'
- delete 删除一行中一个单元格的值
hbase> delete ‘hbase_book’, ‘rowKey’, ‘CF:C’
- truncate 清空表数据,即禁用表-删除表-创建表
hbase> truncate 'hbase_book'
- create 创建表
hbase> create ‘table’, ‘cf’
创建多个列族:
hbase> create 't1', {NAME => 'f1'}, {NAME => 'f2'}, {NAME => 'f3'}
数据的备份与操作
备份
停止 HBase 服务后,使用 distcp 命令运行 MapReduce 任务进行备份,将数据备份到另一个
地方,可以是同一个集群,也可以是专用的备份集群。
即,把数据转移到当前集群的其他目录下(也可以不在同一个集群中):
$ bin/hadoop distcp \
hdfs://linux01:8020/hbase \
hdfs://linux01:8020/HbaseBackup/backup20171009
执行该操作,一定要开启 Yarn 服务
恢复
$ bin/hadoop distcp \
hdfs://linux01:8020/HbaseBackup/backup20170930 \
hdfs://linux01:8020/hbase
节点的管理
服役( (commissioning )
当启动 regionserver 时,regionserver 会向 HMaster 注册并开始接收本地数据,开始的时候,
新加入的节点不会有任何数据,平衡器开启的情况下,将会有新的 region 移动到开启的
RegionServer 上。如果启动和停止进程是使用 ssh 和 HBase 脚本,那么会将新添加的节点的
主机名加入到 conf/regionservers 文件中。
退役( (decommissioning )
顾名思义,就是从当前 HBase 集群中删除某个 RegionServer,这个过程分为如下几个过程:
- 停止负载平衡器
hbase> balance_switch false
- 在退役止 节点上停止 RegionServer
hbase> hbase-daemon.sh stop regionserver
- RegionServer 一旦停止,会关闭维护的所有 region
- Zookeeper 上的该 RegionServer 节点消失
- Master 节点检测到该 RegionServer 下线
- RegionServer 的 的 region 服务得到重新分配
该关闭方法比较传统,需要花费一定的时间,而且会造成部分 region 短暂的不可用。
另一种方案:
- RegionServer 先卸载所管理的 region
$ bin/graceful_stop.sh <RegionServer-hostname>
- 自动平衡数据
- 和之前的 2~6
版本的确界
- 版本的下界
默认的版本下界是 0,即禁用。row 版本使用的最小数目是与生存时间(TTL Time To Live)
相结合的,并且我们根据实际需求可以有 0 或更多的版本,使用 0,即只有 1 个版本的值写
入 cell。 - 版本的上界
之前默认的版本上界是 3,也就是一个 row 保留 3 个副本(基于时间戳的插入)。该值不要
设计的过大,一般的业务不会超过 100。如果 cell 中存储的数据版本号超过了 3 个,再次插
入数据时,最新的值会将最老的值覆盖。(现版本已默认为 1)
本博客仅为博主学习总结,感谢各大网络平台的资料。蟹蟹!!


 559
559


 被折叠的 条评论
为什么被折叠?
被折叠的 条评论
为什么被折叠?
 到【灌水乐园】发言


