因为工作需要。需要写api接口给h5的客户端人员调用。所以,今天花了一天的时间研究了spring+hibernate
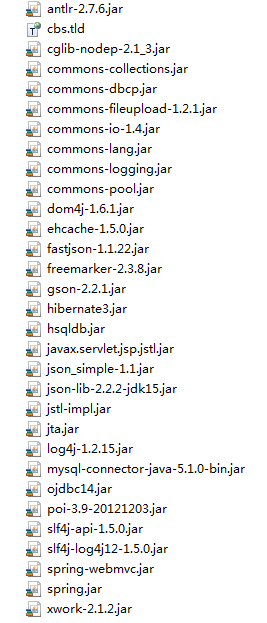
第一步:将对应的jar文件放入到lib目录下
第二步:配置web.xml文件,其中的< display-name> 标签和description标签暂时不明白是用来干嘛的
<?xml version= "1.0" encoding ="UTF-8"?>
<web-app version= "3.0"
        xmlns= "http://java.sun.com/xml/ns/javaee"
        xmlns:xsi="http://www.w3.org/2001/XMLSchema-instance"
        xsi:schemaLocation="http://java.sun.com/xml/ns/javaee
       http://java.sun.com/xml/ns/javaee/web-app_3_0.xsd" >


        <display-name> baimi.routertool</display-name > <!--这里一定要写上并且和下面你的context-param里面你的param-value对应上 ,至于原因暂停还没搞明白 -->
        <description> 路由拓展助手商户采集系统 </description>


        <!-- 应用程序根目录键值 -->
        <context-param>
               <param-name> webAppRootKey</param-name >
               <param-value> baimi.routertool</param-value >
        </context-param>


        <!-- 设置转码过滤器-->
        <filter>
               <filter-name> encodingFilter</filter-name >
               <filter-class> org.springframework.web.filter.CharacterEncodingFilter</filter-class >
               <init-param>
                      <param-name> encoding</ param-name>
                      <param-value> UTF-8</ param-value>
               </init-param>
               <init-param>
                      <param-name> forceEncoding</param-name >
                      <param-value> true</ param-value>
               </init-param>
        </filter>

        <filter-mapping>
               <filter-name> encodingFilter</filter-name >
               <url-pattern> /*</ url-pattern>
        </filter-mapping>


        <!-- 配置log4j 文件路径 -->
        <context-param>
               <param-name> log4jConfigLocation</param-name >
               <param-value> classpath:log4j.properties</param-value >
        </context-param>

        <!-- 配置spring 配置文件 -->
        <context-param>
               <param-name> contextConfigLocation</param-name >
               <param-value> classpath:applicationContext.xml</param-value >
        </context-param>


        <!-- 配置log4j监听 -->
        <listener>
               <listener-class> org.springframework.web.util.Log4jConfigListener</listener-class >
        </listener>

        <!-- 配置spring监听 -->
        <listener>
               <listener-class> org.springframework.web.context.ContextLoaderListener</listener-class >
        </listener>


        <!-- 配置 Spring DispatcherServlet -->
        <servlet>
               <servlet-name> spring</ servlet-name>
               <servlet-class> org.springframework.web.servlet.DispatcherServlet</servlet-class >
               <!-- 配置该Servlet随应用启动时候启动 -->
               <load-on-startup> 2</ load-on-startup>
        </servlet>

              <!-- 配置servlet与spring映射 -->
        <servlet-mapping>
               <servlet-name> spring</ servlet-name>
               <url-pattern> *.do</ url-pattern>
        </servlet-mapping>

  <welcome-file-list >
    <welcome-file >index.jsp </welcome-file>
  </welcome-file-list >
</web-app>
第三步:配置spring-servlet.xml文件。这个文件里面的内容只需要更改action所在包的路径就可以了(就是改context:component-scan标签)
<?xml version= "1.0" encoding ="UTF-8"?>
<beans xmlns= "http://www.springframework.org/schema/beans"
        xmlns:xsi="http://www.w3.org/2001/XMLSchema-instance" xmlns:p="http://www.springframework.org/schema/p"
        xmlns:context="http://www.springframework.org/schema/context"
        xmlns:jee="http://www.springframework.org/schema/jee" xmlns:tx="http://www.springframework.org/schema/tx"
        xsi:schemaLocation="
                     http://www.springframework.org/schema/beans http://www.springframework.org/schema/beans/spring-beans-2.5.xsd
                     http://www.springframework.org/schema/context http://www.springframework.org/schema/context/spring-context-2.5.xsd
                     http://www.springframework.org/schema/jee http://www.springframework.org/schema/jee/spring-jee-2.5.xsd
                     http://www.springframework.org/schema/tx http://www.springframework.org/schema/tx/spring-tx-2.5.xsd">


        <!-- 启用spring mvc 注解 -->
        <context:annotation-config />

        <!-- 设置action 所在包 -->
        <context:component-scan base-package="com.bmsh.mytest.*" />

        <!-- ========================= 事物注解 ========================= -->
        <tx:annotation-driven transaction-manager="transactionManager" />
        <context:mbean-export />

        <!-- spring 默认是会加上4 个适配器,如果配置了期中一个另外的将不会加载 -->
        <!-- 完成请求和注解POJO的映射 -->
        <bean
               class= "org.springframework.web.servlet.mvc.annotation.AnnotationMethodHandlerAdapter" />

        <!-- 对转向页面的路径解析。prefix:前缀, suffix:后缀 -->
        <bean
               class= "org.springframework.web.servlet.view.InternalResourceViewResolver"
               p:prefix= "/WEB-INF/" />

        <!-- MVC 注解 URL配置管理器 -->
        <bean
               class= "org.springframework.web.servlet.mvc.annotation.DefaultAnnotationHandlerMapping" >
        </bean>

</beans>
第四步:配置config文件下hibernate的配置
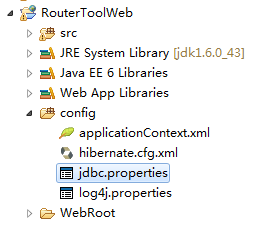
config文件下有四个文件,applicationContext.xml,这个文件用来管理hibernate的所有数据库的链接以及表和字段的映射关系
hibernate.cfg.xml ,这个用来配置sessionfactory,里面用来映射hbm.xml文件
jdbc.properties. 这个用来保存数据库链接的相关信息
log4j.properties. 这个是Log4j的配置文件,和hibernate没有关系
config文件下有四个文件,applicationContext.xml,这个文件用来管理hibernate的所有数据库的链接以及表和字段的映射关系
hibernate.cfg.xml ,这个用来配置sessionfactory,里面用来映射hbm.xml文件
jdbc.properties. 这个用来保存数据库链接的相关信息
log4j.properties. 这个是Log4j的配置文件,和hibernate没有关系

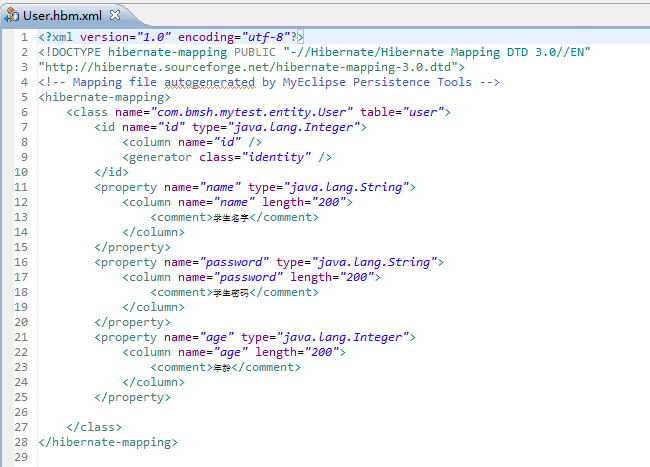
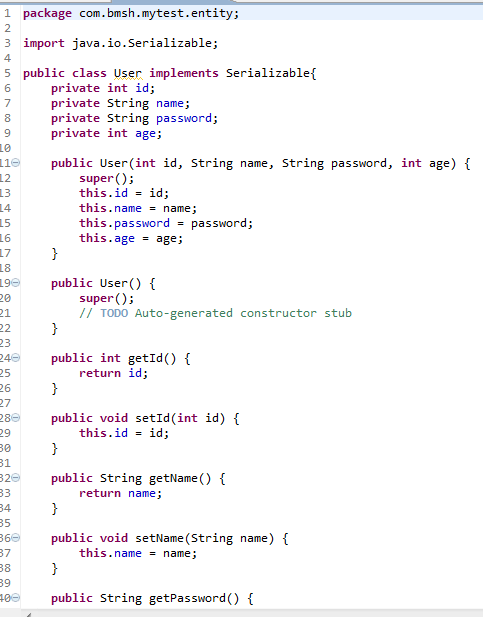
这中间有说道一个hbm.xml文件,这个文件是用来干嘛的呢.. 我们来看看, 其实,这个xml文件就是根据一个实体类来映射一张表
其中class标签的name就是类的名字, 后面的table="user" ,表示映射的就是这张table的表
id的name是这个类的属性名。column为table表的字段名
所以每次编写一个entity实体类的时候,要编写好对应的.hbm.xml文件
其中class标签的name就是类的名字, 后面的table="user" ,表示映射的就是这张table的表
id的name是这个类的属性名。column为table表的字段名
所以每次编写一个entity实体类的时候,要编写好对应的.hbm.xml文件


第五步: 定义一个ObjectMapper类实现ParameterizedRowMapper接口,这是一个通用的包装类(用来操作数据,以及数据类型转换的)
import java.lang.reflect.Field;
import java.sql.ResultSet;
import java.sql.ResultSetMetaData;
import java.sql.SQLException;
import java.util.ArrayList;
import java.util.HashMap;
import java.util.List;
import java.util.Map;

import org.apache.log4j.Logger;
import org.springframework.jdbc.core.simple.ParameterizedRowMapper;

/** */
/**
 * 通用的Object包装类(类型问题,依然是个瓶颈,如果有好的解决方案请 pm我)
 *
 * 功能:查询对象类型或对象集合时的通用包装类
 *
 * @author zdw
 *
 */
@SuppressWarnings({"rawtypes" })
public class ObjectMapper implements ParameterizedRowMapper {
        private Class clazz ;
        private List<String> xmlColumnList = null;
       Logger log = Logger. getLogger(ObjectMapper.class);

        public ObjectMapper(Class clazz) {
               this.clazz = clazz;
       }

        public ObjectMapper(Class clazz, String[] xmlString) {
               this.clazz = clazz;
               if (xmlString != null && xmlString.length > 0) {
                      xmlColumnList = new ArrayList<String>();
                      for (String str : xmlString) {
                            xmlColumnList.add(str);
                     }
              }
       }

        /** */
        /**
        * 重写mapRow方法
        */
        public Object mapRow(ResultSet rs, int rowNum) throws SQLException {
               try {
                     Map<String, String> map = new HashMap<String, String>();
                     ResultSetMetaData md = rs.getMetaData();

                      for (int i = 0; i < md.getColumnCount(); i++) {
                           String columnName = md.getColumnName(i + 1);
                           String columnKey = null;
                            if (columnName == null){
                                  columnKey = "";
                           } else{
                                  columnKey = columnName.replaceAll( "_", "" );
                           }

                           map.put(columnKey.toLowerCase(), columnName.toLowerCase());
                     }

                     Object obj = clazz.newInstance();
                     Field fields[] = obj.getClass().getDeclaredFields();

                      for (int i = 0; i < fields.length; i++) {
                           Field field = fields[i];
                            if (field.getName().equals("serialVersionUID" )
                                         || map.get(field.getName().toLowerCase()) == null)
                                   continue;
                            // 暴力访问
                           field.setAccessible( true);
                            this.typeMapper(field, obj, rs , map);
                            // 恢复默认
                           field.setAccessible( false);
                     }
                      return obj;
              } catch (Exception e) {
                     e.printStackTrace();
              }
               return null ;
       }

        /** */
        /**
        * 数据类型包装器
        *
        * @param field
        *            目标属性
        * @param obj
        *            目标对象
        * @param rs
        *            结果集
        * @throws Exception
        */
        private void typeMapper(Field field, Object obj, ResultSet rs,Map<String,String> map)
                      throws Exception {
              String type = field.getType().getName();
              String result;
               if (type.equals("java.lang.String" )) {
                     field.set(obj, rs.getString(map.get(field.getName().toLowerCase())));
              } else if (type.equals("int")) {
                     field.set(obj, rs.getInt(map.get(map.get(field.getName().toLowerCase()))));
              } else if (type.equals("java.lang.Integer")) {
                     result = rs.getString(map.get(map.get(field.getName().toLowerCase())));
                      if (result == null || "".equals(result)) {
                           field.set(obj, null);
                     } else {
                           field.set(obj, Integer. parseInt(result));
                     }
              } else if (type.equals("long")) {
                     field.set(obj, rs.getLong(map.get(field.getName().toLowerCase())));
              } else if (type.equals("java.lang.Long")) {

                     result = rs.getString(map.get(field.getName().toLowerCase()));
                      if (result == null || "".equals(result)) {
                           field.set(obj, null);
                     } else {
                           field.set(obj, Long. parseLong(result));
                     }
              } else if (type.equals("boolean") || type.equals("java.lang.Boolean" )) {
                     field.set(obj, rs.getBoolean(map.get(field.getName().toLowerCase())));
              } else if (type.equals("java.util.Date")) {
                     field.set(obj, rs.getTimestamp(map.get(field.getName().toLowerCase())));
              } else if (type.equals("double") || type.equals( "java.lang.Double")) { // Double型包装
                     field.set(obj, rs.getDouble(map.get(field.getName().toLowerCase())));
              } else if (type.equals("float") || type.equals( "java.lang.Float")) {
                     field.set(obj, rs.getFloat(map.get(field.getName().toLowerCase())));
              } else if (type.equals("java.math.BigDecimal")) {
                     field.set(obj, rs.getBigDecimal(map.get(field.getName().toLowerCase())));
              } else if (type.equals("java.sql.Timestamp")){
                     field.set(obj, rs.getTimestamp(map.get(field.getName().toLowerCase())));
              } else if (type.equals("short") || type.equals( "java.lang.Short") ){
                     field.set(obj, rs.getShort(map.get(field.getName().toLowerCase())));
              } else if (type.equals("byte") || type.equals( "java.lang.Byte") ){
                     field.set(obj, rs.getByte(map.get(field.getName().toLowerCase())));
              }

       }
}
第六步: 定义好一个接口,并且写一个类来实现该接口
我这里定义了一个UserService接口,并通过
UserServiceImpl来实现此接口,不要忘记了继承
JdbcDaoSupport
最重要的一点:必须再这个UserServiceImpl的类上面加上
@Service和@Transactional 反射
public interface UserService {
        public int saveUser(List<User> list);
        public List<User> queryUser();
        public int UpdateUser(User user);
        public int deleteUser(int userId);
}
import java.sql.PreparedStatement;
import java.sql.SQLException;
import java.util.List;
import org.apache.log4j.Logger;
import org.springframework.jdbc.core.PreparedStatementSetter;
import org.springframework.jdbc.core.support.JdbcDaoSupport;
import org.springframework.stereotype.Service;
import org.springframework.transaction.annotation.Transactional;

import com.bmsh.mytest.entity.User;
import com.bmsh.mytest.service.ObjectMapper;
import com.bmsh.mytest.service.UserService;

@Service
@Transactional
public class UserServiceImpl extends JdbcDaoSupport implements UserService{
       Logger log=Logger. getLogger(UserServiceImpl.class);
        @Override
        public int saveUser(List<User> list) {
              String exesit= "select * from user where name=?" ;
              String insert= "insert into user(id,name,password,age) values(?,?,?,?)";
               int line=0;
               for(final User user:list){
                      if(getJdbcTemplate().queryForInt(exesit, new Object[]{user.getId()})==0){ //如果执行了 sql语句,sql返回空的时候,此处返回的 int值就为0
                            //下一步,存储到数据库,位了避免 sql注入,采用PreparedStatement
                           line+=getJdbcTemplate().update(insert, new PreparedStatementSetter(){

                                   @Override
                                   public void setValues(PreparedStatement arg0)
                                                 throws SQLException {
                                         arg0.setInt(1,user.getId());
                                         arg0.setString(2, user.getName());
                                         arg0.setString(3, user.getPassword());
                                         arg0.setInt(4, user.getAge());
                                  }

                           });
                     }
              }
               return line;

       }

        @SuppressWarnings("unchecked" )
        @Override
        public List<User> queryUser() {
              String query= "select * from user";
               return getJdbcTemplate().query(query, new ObjectMapper(User.class));
       }

        @Override
        public int UpdateUser(final User user) {
              String update= "update user set name=?,password=?,age=? where id=?" ;
               int line=getJdbcTemplate().update(update, new PreparedStatementSetter() {

                      @Override
                      public void setValues(PreparedStatement arg0) throws SQLException {
                           arg0.setString(1, user.getName());
                           arg0.setString(2, user.getPassword());
                           arg0.setInt(3, user.getAge());
                           arg0.setInt(4,user.getId());
                     }
              });
               return line;
       }

        @Override
        public int deleteUser(final int userId) {
              String delete= "delete from user where id=?";
               int line=getJdbcTemplate().update(delete, new PreparedStatementSetter() {

                      @Override
                      public void setValues(PreparedStatement arg0) throws SQLException {
                           arg0.setInt(1,userId);
                     }
              });
               return line;
       }

}
OK,到此就算结束了,下面来看一下如何定义api接口给客户端调用呢。 我上面的
UserService
接口定义了四个方法,这里我就只操作其中一个方法做掩饰了,其他的都是一样的
重点:必须再这个类前面加上@Controller
必须在要使用到的接口前面加上@Autowired
在你的方法前面加上 @RequestMapping ("这里写你的接口的路径" )
如果是手机客户端调用,在这里可以直接在方法最后一句return,这样就可以直接返回给客户端了
import java.util.List;

import javax.servlet.http.HttpServletRequest;
import javax.servlet.http.HttpServletResponse;

import org.springframework.beans.factory.annotation.Autowired;
import org.springframework.stereotype.Controller;
import org.springframework.web.bind.annotation.RequestMapping;

import com.bmsh.mytest.entity.User;
import com.bmsh.mytest.service.UserService;

@Controller
public class UserAction {
        @Autowired
       UserService userService;

        @RequestMapping("/queryUser.do" )
        public List<User> query(HttpServletRequest request,HttpServletResponse response) {
              List<User> list = userService.queryUser();
               return list;
       }
}
其中http://192.168.11.150:8080 这个是我的tomcat路径
RouterToolWeb 是我的项目名称
queryUser.do 这个是项目中action的具体实现方法的路径
demo下载地址:http://download.csdn.net/detail/q908555281/9334155


 4273
4273


 被折叠的 条评论
为什么被折叠?


