


作者:糖墨夕
原文:https://juejin.cn/post/7279346413914718263
初衷是基于WangEditor[1]进行了一次特殊处理,使其更加易于使用和灵活。这个编辑器可以让你像写文字一样轻松地编辑富文本内容。不论你是要写一篇精彩的博客文章,还是设计一个华丽的网页,这个编辑器都能满足我们的需求。我使用了“Hook”的机制,可以自由地定制和控制编辑器的各种功能。
其实,主要是方便易用,在不同页面中,如果需要到富文本编辑器,如果这个时候我们把它封装成hook,那么我们就很轻易的复用某些功能点,可以省去很多重新编写逻辑的代码。
接下来我们先从WangEditor的使用文档做一下初步的了解
介绍
简洁易用,功能强大快速接入,配置简单,集成了几乎所有常见功能。在 Vue React 也可以快速接入,只需再做个hook就能更加灵活
如下几步以Vue3使用为例:
第一步:安装
yarn add @wangeditor/editor
# 或者 npm install @wangeditor/editor --save

yarn add @wangeditor/editor-for-vue@next
# 或者 npm install @wangeditor/editor-for-vue@next --save
第二步:使用模版
<template>
    <div style="border: 1px solid #ccc">
      <Toolbar
        style="border-bottom: 1px solid #ccc"
        :editor="editorRef"
        :defaultConfig="toolbarConfig"
        :mode="mode"
      />
      <Editor
        style="height: 500px; overflow-y: hidden;"
        v-model="valueHtml"
        :defaultConfig="editorConfig"
        :mode="mode"
        @onCreated="handleCreated"
      />
    </div>
</template>
第三步:Script
<script>
import '@wangeditor/editor/dist/css/style.css' // 引入 css

import { onBeforeUnmount, ref, shallowRef, onMounted } from 'vue'
import { Editor, Toolbar } from '@wangeditor/editor-for-vue'

export default {
  components: { Editor, Toolbar },
  setup() {
    // 编辑器实例,必须用 shallowRef
    const editorRef = shallowRef()

    // 内容 HTML
    const valueHtml = ref('<p>hello</p>')

    // 模拟 ajax 异步获取内容
    onMounted(() => {
        setTimeout(() => {
            valueHtml.value = '<p>模拟 Ajax 异步设置内容</p>'
        }, 1500)
    })

    const toolbarConfig = {}
    const editorConfig = { placeholder: '请输入内容...' }

    // 组件销毁时,也及时销毁编辑器
    onBeforeUnmount(() => {
        const editor = editorRef.value
        if (editor == null) return
        editor.destroy()
    })

    const handleCreated = (editor) => {
      editorRef.value = editor // 记录 editor 实例,重要!
    }

    return {
      editorRef,
      valueHtml,
      mode: 'default', // 或 'simple'
      toolbarConfig,
      editorConfig,
      handleCreated
    };
  }
}
</script>
配置
可通过 toolbarConfig 和 editorConfig 来修改菜单栏和编辑器的配置,详细文档参考
工具栏配置[2] - 插入新菜单,屏蔽某个菜单等
编辑器配置[3] - 兼听各个生命周期,自定义粘贴
菜单配置[4] - 配置颜色、字体、字号、链接校验、上传图片、视频等
封装
依据介绍中的内容,进行二次封装成hook
步骤
封装wangEditor成hook,我是按照以下步骤进行:
1. 创建一个新的Hook组件
创建一个新的组件来封装wangEditor成为一个可复用的hook。你可以使用React的useState和useEffect等hook来管理编辑器的状态和生命周期。
2. 初始化编辑器:
在组件的useEffect钩子中,使用wangEditor的初始化方法来创建编辑器实例,并将其存储在状态中。
3. 添加事件监听:
使用wangEditor提供的方法,为编辑器添加事件监听器。这样可以捕获用户的输入、选择和其他操作。
4. 定义公共方法
在hook组件中定义一些公共方法,例如获取编辑器内容、插入内容等,以便在其他组件中使用。
5. 销毁编辑器:
使用wangEditor提供的销毁方法,在组件的清理函数中销毁编辑器实例,避免内存泄漏。
以上步骤只是一个大致的方案,具体实现可能会根据项目的需求和编辑器的配置有所差异。所以在封装过程中要注意参考wangEditor的官方文档和示例,以确保正确使用和配置编辑器。封装wangEditor成为一个hook后,你可以在其他组件中方便地使用它,简化并提高你的开发效率。
实践
那么我们就开始进行封装了
首先,创建一个editor.ts hook文件
暴露出这几个方法如下:
1.1. 编辑器容器

用于包裹编辑器工具栏和编辑器的容器
1.2. 编辑器实例
// 编辑器实例,必须用 shallowRef
  const editorRef = shallowRef();
当编辑器渲染完成之后,通过 editorRef.value 获取 editor 实例,即可调用它的 API
1.3. 工具栏配置
这个配置必不可少
可通过 toolbarConfig 和 editorConfig 来修改菜单栏和编辑器的配置,详细文档参考
工具栏配置[5] - 插入新菜单,屏蔽某个菜单等
编辑器配置[6] - 兼听各个生命周期,自定义粘贴
菜单配置[7] - 配置颜色、字体、字号、链接校验、上传图片、视频等
那么,我们可以将其作为参数传入hook,便于灵活定制化,如下代码的编写:
创建一个函数,提供额外的参数配置
export default function useEditor(
  options: EditorOptions = {
    config: {},
    toolbarConfig: {},
  },
)
编写toolbarConfig 和 editorConfig 合并传进参数的方法
const editorToolbarConfig = merge(
		{
			excludeKeys: ['codeBlock', '|'],
		},
		options.toolbarConfig || {},
	);
将传入的toolbarConfig,与hook编写的公共默认参数部分合并。
1.4. 编辑器配置
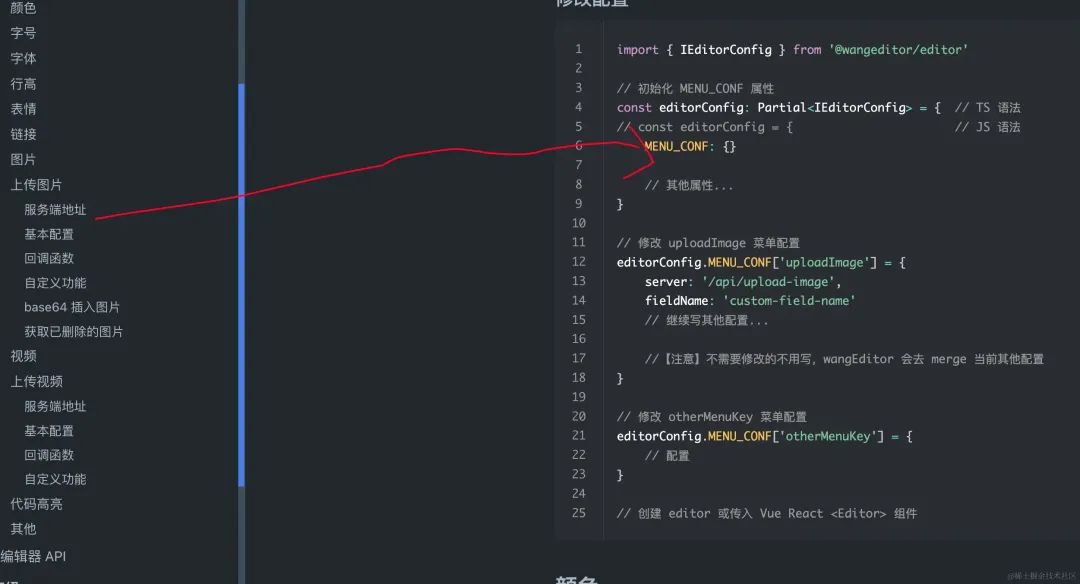
editorConfig的配置
const editorConfig = merge(
    {
        placeholder: '请输入正文,可插入图片、附件',
        MENU_CONF: {
            uploadImage: {
                // 自定义上传
                async customUpload(file: File, insertFn) {
                    // 限制大小
                    const maxFileSize = 10 * 1024 * 1024; // 10M
                    if (file.size > maxFileSize) {
                        await MessagePlugin.warning({ content: '请选择小于10M的图片' });
                        return;
                    }

                    const loading = LoadingPlugin({
                        attach: () => editorContainerRef.value,
                        showOverlay: true,
                        size: '20px',
                    });

                    try {
                        const result = (await upload(file)) as PutObjectResult;
                        insertFn(result.url, result.name, result.url);
                        loading.hide();
                    } catch (e) {
                        console.log(e);
                        loading.hide();
                    }
                },
            },
    },
    EXTEND_CONF: {
            mentionConfig: {
                // eslint-disable-next-line @typescript-eslint/no-empty-function
                showModal: () => {},
                // eslint-disable-next-line @typescript-eslint/no-empty-function
                hideModal: () => {},
            },
        },
    },
    options.config || {},
);通过合并多个配置对象生成的editorConfig,代码中的图片上传方法,也是在此处进行配置好,
uploadImage自定义上传的配置。在这个自定义上传配置中,首先对文件大小进行了限制,限制为10M以下的图片。如果超过了限制大小,会显示一个警告提示给用户。然后,它创建了一个loading对象,并在上传文件时显示loading动画。接着,通过upload函数上传文件,并将返回的结果(包括URL、名称等)传递给insertFn函数,这样就能将图片插入到编辑器中。最后,无论上传成功或失败,都会隐藏loading动画。
当然这里只是对图片上传做了配置,还可以根据wangEditor的相关文档,做深入的配置方法覆盖,以适配我们自己的后端服务接口以及业务逻辑。
当然官方文档也给有一个例子:
还有其他的自定义功能,这里就不作多的叙述
1.5. 销毁编辑器
在hook文件editor.ts的useEditor方法体里面写该销毁方法了
// 组件销毁时,也及时销毁编辑器
 onBeforeUnmount(() => {
  const editor = editorRef.value;
  if (editor == null) return;
  editor.destroy();
 });
其次,使用useEditor
如图:
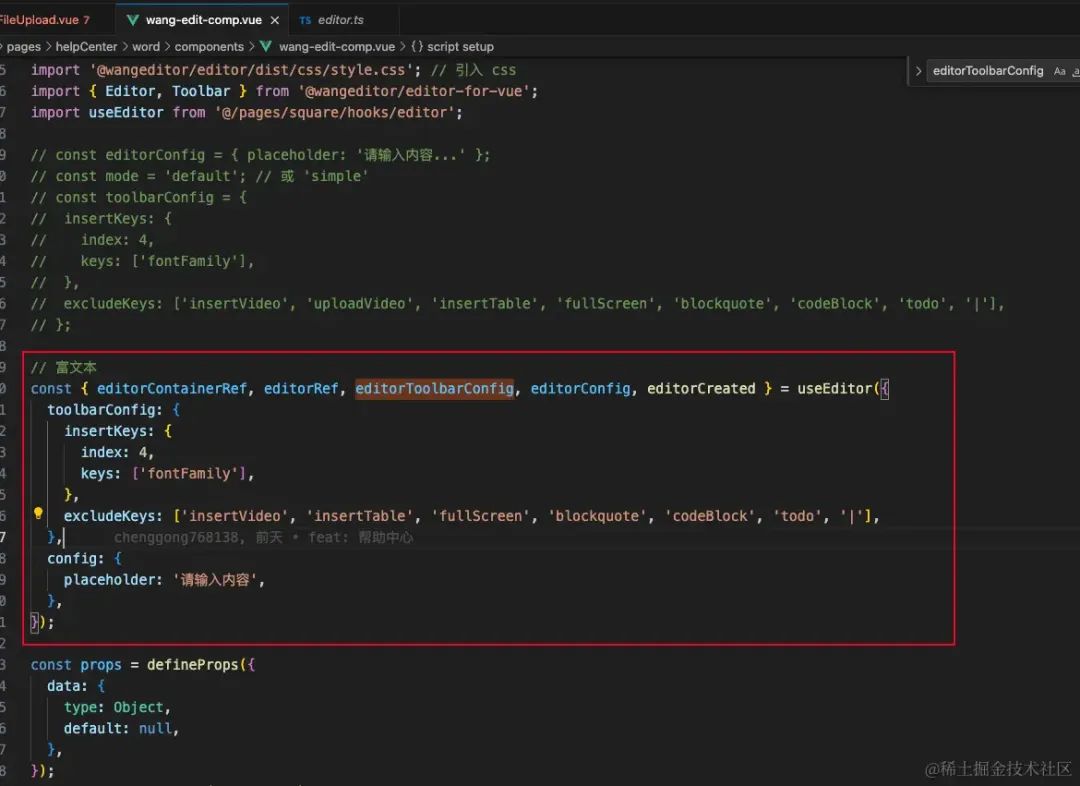
调用useEditor hook,并将配置参数传递给它。其中,toolbarConfig用于配置编辑器工具栏的显示和顺序,insertKeys指定了fontFamily工具的位置,excludeKeys指定了需要排除的工具项。config用于设置编辑器的占位符文本。
最后,将useEditor hook返回的结果解构赋值给之前定义的变量,以获取相关引用和配置信息, 代码:
// 富文本
const { editorContainerRef, editorRef, editorToolbarConfig, editorConfig, editorCreated } = useEditor({
 toolbarConfig: {
  insertKeys: {
   index: 4,
   keys: ['fontFamily'],
  },
  excludeKeys: ['insertVideo', 'insertTable', 'fullScreen', 'blockquote', 'codeBlock', 'todo', '|'],
 },
 config: {
  placeholder: '请输入内容',
 },
});
参考资料
[1]
https://www.wangeditor.com/: https://link.juejin.cn?target=https%3A%2F%2Fwww.wangeditor.com%2F
[2]https://www.wangeditor.com/v5/toolbar-config.html: https://link.juejin.cn?target=https%3A%2F%2Fwww.wangeditor.com%2Fv5%2Ftoolbar-config.html
[3]https://www.wangeditor.com/v5/editor-config.html: https://link.juejin.cn?target=https%3A%2F%2Fwww.wangeditor.com%2Fv5%2Feditor-config.html
[4]https://www.wangeditor.com/v5/menu-config.html: https://link.juejin.cn?target=https%3A%2F%2Fwww.wangeditor.com%2Fv5%2Fmenu-config.html
[5]https://www.wangeditor.com/v5/toolbar-config.html: https://link.juejin.cn?target=https%3A%2F%2Fwww.wangeditor.com%2Fv5%2Ftoolbar-config.html
[6]https://www.wangeditor.com/v5/editor-config.html: https://link.juejin.cn?target=https%3A%2F%2Fwww.wangeditor.com%2Fv5%2Feditor-config.html
[7]https://www.wangeditor.com/v5/menu-config.html: https://link.juejin.cn?target=https%3A%2F%2Fwww.wangeditor.com%2Fv5%2Fmenu-config.html
最后
如果你觉得这篇内容对你挺有启发,我想邀请你帮我个小忙:
点个「喜欢」或「在看」,让更多的人也能看到这篇内容
我组建了个氛围非常好的前端群,里面有很多前端小伙伴,欢迎加我微信「sherlocked_93」拉你加群,一起交流和学习
关注公众号「前端下午茶」,持续为你推送精选好文,也可以加我为好友,随时聊骚。


点个喜欢支持我吧,在看就更好了


 被折叠的 条评论
为什么被折叠?
被折叠的 条评论
为什么被折叠?
 到【灌水乐园】发言


